Operation Manual
Page 5
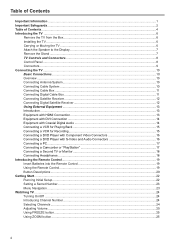
... with S-Video and Audio Connectors 16 Connecting a PC...17 Connecting a Camcorder or "PlayStation 17 Connecting a Second TV or Monitor 18 Connecting Headphones ...18 Introducing the Remote Control...19 Insert Batteries into the Remote Control 19 Using the Remote Control...19 Button Descriptions...20 Getting Start ...22 Running Initial Setup...22 Setting a Secret Number...23...
... with S-Video and Audio Connectors 16 Connecting a PC...17 Connecting a Camcorder or "PlayStation 17 Connecting a Second TV or Monitor 18 Connecting Headphones ...18 Introducing the Remote Control...19 Insert Batteries into the Remote Control 19 Using the Remote Control...19 Button Descriptions...20 Getting Start ...22 Running Initial Setup...22 Setting a Secret Number...23...

Operation Manual
Page 6
... ...30 Setting Channel List...30 Setting Favorite Channels...31 Using the FAVORITE button ...31 Editing Channel Name ...31 Using the Program Guide...32 Accessing Program Guide ...32 Using the Program Guide ...32 Setting System ...33 Accessing Settings Menu...33 Setting Date & Time ...33 Setting Timer...33 Input Select ...34 Setting Caption Vision...34... Menu ...36 Selecting Locks Options ...36 Viewing Locked or Blocked Programs 37 Other Information ...38 Troubleshooting ...38 Care and Maintenance...40 Specifications ...41 Programming your Remote Control 42 Manufacturer's Codes ...44 5
... ...30 Setting Channel List...30 Setting Favorite Channels...31 Using the FAVORITE button ...31 Editing Channel Name ...31 Using the Program Guide...32 Accessing Program Guide ...32 Using the Program Guide ...32 Setting System ...33 Accessing Settings Menu...33 Setting Date & Time ...33 Setting Timer...33 Input Select ...34 Setting Caption Vision...34... Menu ...36 Selecting Locks Options ...36 Viewing Locked or Blocked Programs 37 Other Information ...38 Troubleshooting ...38 Care and Maintenance...40 Specifications ...41 Programming your Remote Control 42 Manufacturer's Codes ...44 5
Operation Manual
Page 9
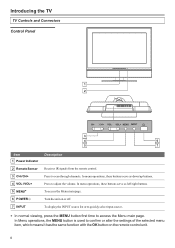
... access the Menu main page. In menu operations, these buttons serve as down/up buttons. Press to scan through channels. Turn the unit on the remote control unit. 8 In Menu operations, the MENU button is used to access the Menu main page. CH+ VOL- VOL+ MENU INPUT 3 4 6 5 7 Item 1 Power Indicator... or alter the settings of the selected menu item, which means it has the same function with the OK button on or off. Introducing the TV TV Controls and Connectors Control Panel 1 2 CH-
... access the Menu main page. In menu operations, these buttons serve as down/up buttons. Press to scan through channels. Turn the unit on the remote control unit. 8 In Menu operations, the MENU button is used to access the Menu main page. CH+ VOL- VOL+ MENU INPUT 3 4 6 5 7 Item 1 Power Indicator... or alter the settings of the selected menu item, which means it has the same function with the OK button on or off. Introducing the TV TV Controls and Connectors Control Panel 1 2 CH-
Operation Manual
Page 14
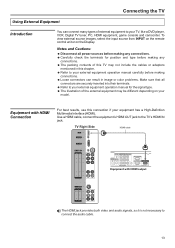
... a DVD player, VCR, Digital TV tuner, PC, HDMI equipment, game console and camcorder. To view external source images, select the input source from INPUT on the remote control unit or on your external equipment operation manual for position and type before making connections. = Loose connectors can ...connect many types of external equipment to connect the audio cable. 13 TV Right Side HDMI INPUT D-Sub/DVI AUDIO...
... a DVD player, VCR, Digital TV tuner, PC, HDMI equipment, game console and camcorder. To view external source images, select the input source from INPUT on the remote control unit or on your external equipment operation manual for position and type before making connections. = Loose connectors can ...connect many types of external equipment to connect the audio cable. 13 TV Right Side HDMI INPUT D-Sub/DVI AUDIO...
Operation Manual
Page 20
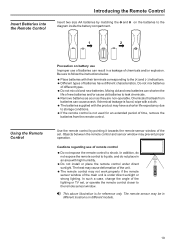
...Remote Control Precaution on different models. 19 Cautions regarding use of batteries can result in a leakage of the set , or operate the remote...remote control = Do not expose the remote control to the remote sensor window. Objects between the remote...remote...remote control is not used for reference only. Chemicals that leak from the remote control. In addition, do not expose the remote... control to leak chemicals. = Remove batteries as soon as they are non-operable. The remote...install or place the remote control under direct sunlight or ...
...Remote Control Precaution on different models. 19 Cautions regarding use of batteries can result in a leakage of the set , or operate the remote...remote control = Do not expose the remote control to the remote sensor window. Objects between the remote...remote...remote control is not used for reference only. Chemicals that leak from the remote control. In addition, do not expose the remote... control to leak chemicals. = Remove batteries as soon as they are non-operable. The remote...install or place the remote control under direct sunlight or ...
Operation Manual
Page 21
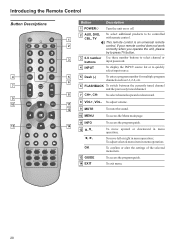
...in menu operation; To exit menu. 20 To adjust selected menu item in menu operation; If your remote control does not work correctly when you operate the unit, please try to press TV button. 3 3 0-9 number Use these number buttons to select channel or buttons input password. 4 ...INPUT To display the INPUT source list or to be controlled 1 CBL, TV with remote control. To select channels upward or downward. 8 VOL+, VOL- To move upward or downward in menu operation; Introducing the Remote Control Button Descriptions 4 7 9 10 13 MTS/SAP ZOOM CCD SLEEP LIST FAVORITE...
...in menu operation; To exit menu. 20 To adjust selected menu item in menu operation; If your remote control does not work correctly when you operate the unit, please try to press TV button. 3 3 0-9 number Use these number buttons to select channel or buttons input password. 4 ...INPUT To display the INPUT source list or to be controlled 1 CBL, TV with remote control. To select channels upward or downward. 8 VOL+, VOL- To move upward or downward in menu operation; Introducing the Remote Control Button Descriptions 4 7 9 10 13 MTS/SAP ZOOM CCD SLEEP LIST FAVORITE...
Operation Manual
Page 22
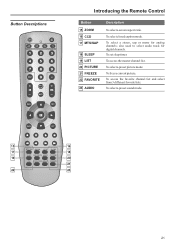
... 18 LIST FAVORITE AUDIO PICTURE 19 20 PIP P.POSITION SWAP FREEZE 21 22 23 21 To access the master channel list. Button Descriptions Introducing the Remote Control Button 15 ZOOM 16 CCD 17 MTS/SAP 18 SLEEP 19 LIST 20 PICTURE 21 FREEZE 22 FAVORITE 23 AUDIO Description To select a screen...
... 18 LIST FAVORITE AUDIO PICTURE 19 20 PIP P.POSITION SWAP FREEZE 21 22 23 21 To access the master channel list. Button Descriptions Introducing the Remote Control Button 15 ZOOM 16 CCD 17 MTS/SAP 18 SLEEP 19 LIST 20 PICTURE 21 FREEZE 22 FAVORITE 23 AUDIO Description To select a screen...
Operation Manual
Page 23
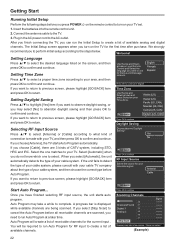
...to return. Setting Time Zone Use the Up and Down arrows on your Remote Control and Select the language you turn on the TV for menus and message screens. If you want to use for the first ...English If you want to select. We strongly recommend you press POWER on the remote control to turn on your TV, and then press OK to confirm and continue. Time Zone Use the Up ... If you can run Auto Program at a later time. A progress bar is made with your cable TV company about the type of available channels. Connect the antenna cable to confirm and continue. Setting Language Press ...
...to return. Setting Time Zone Use the Up and Down arrows on your Remote Control and Select the language you turn on the TV for menus and message screens. If you want to use for the first ...English If you want to select. We strongly recommend you press POWER on the remote control to turn on your TV, and then press OK to confirm and continue. Time Zone Use the Up ... If you can run Auto Program at a later time. A progress bar is made with your cable TV company about the type of available channels. Connect the antenna cable to confirm and continue. Setting Language Press ...
Operation Manual
Page 25
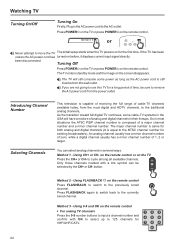
... channels for the first time. Using CH+ or CH- button. or Never attempt to move the TV The initial setup starts when the TV powers on the remote control For analog TV channels Press the 0-9 number buttons to the NTSC channel number for a long period of a major ...channels, to use this TV for existing broadcasters). Method 3 - been disconnected. The TV will have a mixture of 1, 2 or larger. As the transition toward full digital TV continues, some cable-TV systems in serveral ways. The TV enters standby mode and the image on the remote control. Using FLASHBACK on ...
... channels for the first time. Using CH+ or CH- button. or Never attempt to move the TV The initial setup starts when the TV powers on the remote control For analog TV channels Press the 0-9 number buttons to the NTSC channel number for a long period of a major ...channels, to use this TV for existing broadcasters). Method 3 - been disconnected. The TV will have a mixture of 1, 2 or larger. As the transition toward full digital TV continues, some cable-TV systems in serveral ways. The TV enters standby mode and the image on the remote control. Using FLASHBACK on ...

Operation Manual
Page 26
... Press the 0-9 number buttons and dash(-) to input a digital channel number, the TV goes to choose a proper screen aspect ZOOM Using ZOOM button ratio. Press ZOOM repeatedly to the selected channel directly. (e. For additional protection to display a desired ... be made if there is no operation for your choice. on the remote control or on the remote control Press MUTE to 16:9) differ from different formats of time. 25 Using MUTE on the TV Press the VOL+ or VOL- FREEZE The TV automatically cancel FREEZE and return to cancel the mute. Using master...
... Press the 0-9 number buttons and dash(-) to input a digital channel number, the TV goes to choose a proper screen aspect ZOOM Using ZOOM button ratio. Press ZOOM repeatedly to the selected channel directly. (e. For additional protection to display a desired ... be made if there is no operation for your choice. on the remote control or on the remote control Press MUTE to 16:9) differ from different formats of time. 25 Using MUTE on the TV Press the VOL+ or VOL- FREEZE The TV automatically cancel FREEZE and return to cancel the mute. Using master...
Operation Manual
Page 39
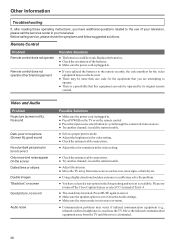
... equipment can only be station trouble. ● Adjust the antenna. ● Move the TV away from the TV until the noise is plugged in. ● Press POWER on the TV or on the remote control. ● Press the input source select button to the use of Text1-4. ●...; The sound may occur if infrared communication equipment (e.g., infrared cordless headphones) is available. Remote Control Problem Remote control does not operate Remote control does not operate other...
... equipment can only be station trouble. ● Adjust the antenna. ● Move the TV away from the TV until the noise is plugged in. ● Press POWER on the TV or on the remote control. ● Press the input source select button to the use of Text1-4. ●...; The sound may occur if infrared communication equipment (e.g., infrared cordless headphones) is available. Remote Control Problem Remote control does not operate Remote control does not operate other...
Operation Manual
Page 43
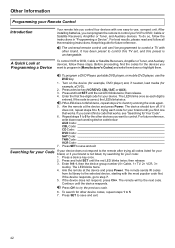
...If the device does not respond, press CH+. to control a TV with the most popular code first. After installing batteries, you can 't be programmed to try entering the code again. 5. The universal remote control unit can program the remote to step 7. 5. Enter the first five-digit code for example..., a DVD). 2. If you cannot find one easy-to control this TV set, and this guide for future reference. Press and...
...If the device does not respond, press CH+. to control a TV with the most popular code first. After installing batteries, you can 't be programmed to try entering the code again. 5. The universal remote control unit can program the remote to step 7. 5. Enter the first five-digit code for example..., a DVD). 2. If you cannot find one easy-to control this TV set, and this guide for future reference. Press and...
Operation Manual
Page 44
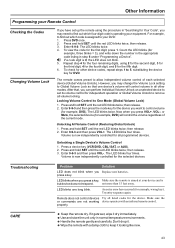
... Unlock) 1. Enter 9-9-3 and then press VOL+. Volume is assigned to Global Volume Lock so that , you press a key, Make sure the remote is but device does not respond. Try entry sequence again. If it gets wet, wipe it looking like new. 43 Enter 9-9-0. then release. ... the LED does not blink. 5. Repeat step 4 for the four remaining digits, using the procedure in normal temperature environments. = Handle the remote gently and carefully. The remote comes preset to One Mode (Global Volume Lock) 1. After that one long blink. Press DVD once. 2. Press a device key (VCR/...
... Unlock) 1. Enter 9-9-3 and then press VOL+. Volume is assigned to Global Volume Lock so that , you press a key, Make sure the remote is but device does not respond. Try entry sequence again. If it gets wet, wipe it looking like new. 43 Enter 9-9-0. then release. ... the LED does not blink. 5. Repeat step 4 for the four remaining digits, using the procedure in normal temperature environments. = Handle the remote gently and carefully. The remote comes preset to One Mode (Global Volume Lock) 1. After that one long blink. Press DVD once. 2. Press a device key (VCR/...


