
Operation Manual
Page 4
... or circuits. Any noticeable abnormality in a wet basement, or near a swimming pool, and the like. This is a very high technology product, giving you finely detailed pictures. Panel protection The panel used in this apparatus near water For example, near a bathtub, washbowl, kitchen sink, or laundry tub, in the product indicates that...
... or circuits. Any noticeable abnormality in a wet basement, or near a swimming pool, and the like. This is a very high technology product, giving you finely detailed pictures. Panel protection The panel used in this apparatus near water For example, near a bathtub, washbowl, kitchen sink, or laundry tub, in the product indicates that...

Operation Manual
Page 6
...Picture Settings ...28 Adjusting Screen Settings...28 Audio Control ...29 Accessing Audio Menu...29 Selecting Audio Options...29 Setting Channels...30 Accessing Channels Menu ...30 Selecting Channel Options ...30 Setting Channel List...30 Setting Favorite Channels...31 Using the FAVORITE button ...31 Editing Channel Name ...31 Using the Program Guide...32... Accessing Program Guide ...32 Using the Program Guide ...32 Setting System ...33 Accessing Settings Menu...33 Setting Date & Time ...33 Setting Timer...
...Picture Settings ...28 Adjusting Screen Settings...28 Audio Control ...29 Accessing Audio Menu...29 Selecting Audio Options...29 Setting Channels...30 Accessing Channels Menu ...30 Selecting Channel Options ...30 Setting Channel List...30 Setting Favorite Channels...31 Using the FAVORITE button ...31 Editing Channel Name ...31 Using the Program Guide...32... Accessing Program Guide ...32 Using the Program Guide ...32 Setting System ...33 Accessing Settings Menu...33 Setting Date & Time ...33 Setting Timer...
Operation Manual
Page 7
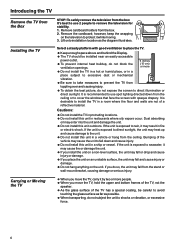
... humid place, or in a place subject to excessive dust or mechanical vibration. = Be sure to take measures to prevent the TV from toppling over and causing injury. = To obtain the best picture, do not block the ventilation openings. 6 inches (15 cm) or more people. = When you place the unit on an ...unstable surface, the unit may fall down from the ceiling or to cover the windows that face the screen with good ventilation to place the TV. = Keep enough...
... humid place, or in a place subject to excessive dust or mechanical vibration. = Be sure to take measures to prevent the TV from toppling over and causing injury. = To obtain the best picture, do not block the ventilation openings. 6 inches (15 cm) or more people. = When you place the unit on an ...unstable surface, the unit may fall down from the ceiling or to cover the windows that face the screen with good ventilation to place the TV. = Keep enough...
Operation Manual
Page 10
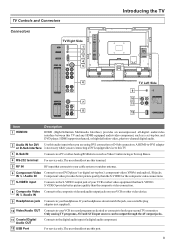
... audio. 2 Audio IN for DVI Use this audio input when you are using DVI connection or D-Sub connection. S VIDEO provides better picture quality than the S-VIDEO or the composite video connections. 7 S-VIDEO input Connects to the digital audio input of your VCR or other ... R 2 1 HDM I INP UT D-Su b/D VI AUD IO IN PUT D-S ub IN PUT (PC/ DTV I NPU T) RS -2 32 RF CO MP ON EN T Y Y Pb Pb Pr Pr R R L L 2 1 S- TV Controls and Connectors Connectors TV Right Side HDMI INPUT D-Sub/DVI AUDIO INPUT 1 2 D-Sub INPUT (PC/DTV INPUT) 3 4 RS-232 RF 5 COMPONENT Y Y Pb ...
... audio. 2 Audio IN for DVI Use this audio input when you are using DVI connection or D-Sub connection. S VIDEO provides better picture quality than the S-VIDEO or the composite video connections. 7 S-VIDEO input Connects to the digital audio input of your VCR or other ... R 2 1 HDM I INP UT D-Su b/D VI AUD IO IN PUT D-S ub IN PUT (PC/ DTV I NPU T) RS -2 32 RF CO MP ON EN T Y Y Pb Pb Pr Pr R R L L 2 1 S- TV Controls and Connectors Connectors TV Right Side HDMI INPUT D-Sub/DVI AUDIO INPUT 1 2 D-Sub INPUT (PC/DTV INPUT) 3 4 RS-232 RF 5 COMPONENT Y Y Pb ...
Operation Manual
Page 11
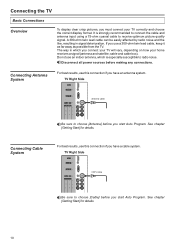
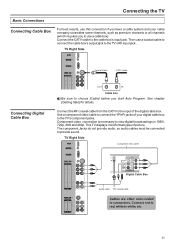
... vary, depending on how your TV correctly and choose the correct display format. See chapter [Getting Start] for details. See chapter [Getting Start] for details. 10 Connecting the TV Basic Connections Overview To display clear crisp pictures, you use a 300-ohm twin lead cable, keep it... as far away as possible from the TV. Connecting Cable System For best results, use an indoor antenna, which ...
... vary, depending on how your TV correctly and choose the correct display format. See chapter [Getting Start] for details. See chapter [Getting Start] for details. 10 Connecting the TV Basic Connections Overview To display clear crisp pictures, you use a 300-ohm twin lead cable, keep it... as far away as possible from the TV. Connecting Cable System For best results, use an indoor antenna, which ...
Operation Manual
Page 12
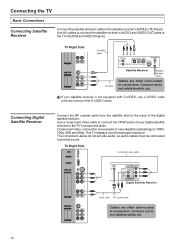
...broadcastings in 1080i, 720p, 480i and 480p. See chapter [Getting Start] for details. Component video connection is necessary to the cable box's input jack. TV Right Side HDMI INPUT D-Sub/DVI AUDIO INPUT Component video cable D-Sub INPUT (PC/DTV INPUT) RS-232 RF COMPONENT Y Y Pb Pb Pr ... this connection if you have a cable system and your digital cable box to the TV's component jacks. Connect the RF coaxial cable from the CATV to provide sound. This TV displays most format types of picture. The component Jacks do not provide audio, so audio cables must be connected to ...
...broadcastings in 1080i, 720p, 480i and 480p. See chapter [Getting Start] for details. Component video connection is necessary to the cable box's input jack. TV Right Side HDMI INPUT D-Sub/DVI AUDIO INPUT Component video cable D-Sub INPUT (PC/DTV INPUT) RS-232 RF COMPONENT Y Y Pb Pb Pr ... this connection if you have a cable system and your digital cable box to the TV's component jacks. Connect the RF coaxial cable from the CATV to provide sound. This TV displays most format types of picture. The component Jacks do not provide audio, so audio cables must be connected to ...
Operation Manual
Page 13
... jacks. Use AV cables to connect the satellite receiver's AUDIO and VIDEO OUT jacks to the satellite receiver's SATELLITE IN jack. This TV displays most format types of your satellite receiver is necessary to white, etc. 12 Use a component video cable to connectors. VIDEO AV... VIDEO VIDEO L L R R 2 1 Cables are often color-coded to connect the YPbPr jacks of picture. If your digital satellite receiver to the TV's component jacks. Component video connection is not equipped with S-VIDEO, use a VIDEO cable (yellow) instead of the digital...
... jacks. Use AV cables to connect the satellite receiver's AUDIO and VIDEO OUT jacks to the satellite receiver's SATELLITE IN jack. This TV displays most format types of your satellite receiver is necessary to white, etc. 12 Use a component video cable to connectors. VIDEO AV... VIDEO VIDEO L L R R 2 1 Cables are often color-coded to connect the YPbPr jacks of picture. If your digital satellite receiver to the TV's component jacks. Component video connection is not equipped with S-VIDEO, use a VIDEO cable (yellow) instead of the digital...
Operation Manual
Page 16
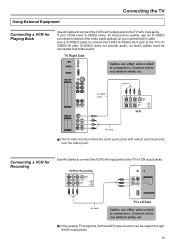
...S-video terminal share the same audio jacks with video2 and has priority over the video2 jack. Connect red to red, white to connectors. TV Right Side HDMI INPUT D-Sub/DVI AUDIO INPUT D-Sub INPUT (PC/DTV INPUT) Cables are often color-coded to provide sound. RS-232... RF COMPONENT Y Y Pb Pb Pr Pr R R L L 2 1 S- VCR for best picture quality, use an S-VIDEO connection instead of the video cable (yellow) on your combined A/V cable. Only analog TV programs, AV1and AV2 input sources can be connected to connectors.
...S-video terminal share the same audio jacks with video2 and has priority over the video2 jack. Connect red to red, white to connectors. TV Right Side HDMI INPUT D-Sub/DVI AUDIO INPUT D-Sub INPUT (PC/DTV INPUT) Cables are often color-coded to provide sound. RS-232... RF COMPONENT Y Y Pb Pb Pr Pr R R L L 2 1 S- VCR for best picture quality, use an S-VIDEO connection instead of the video cable (yellow) on your combined A/V cable. Only analog TV programs, AV1and AV2 input sources can be connected to connectors.
Operation Manual
Page 21
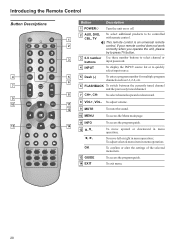
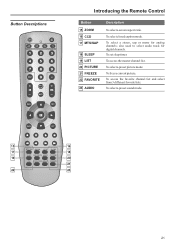
... channels upward or downward. 8 VOL+, VOL- If your remote control does not work correctly when you operate the unit, please try to press TV button. 3 3 0-9 number Use these number buttons to select channel or buttons input password. 4 INPUT To display the INPUT source list or ... 14 EXIT To access the program guide. Introducing the Remote Control Button Descriptions 4 7 9 10 13 MTS/SAP ZOOM CCD SLEEP LIST FAVORITE AUDIO PICTURE PIP P.POSITION SWAP FREEZE Button Description 1 POWER Turn the unit on or off. 2 AUX, DVD, To select additional products to quickly select input...
... channels upward or downward. 8 VOL+, VOL- If your remote control does not work correctly when you operate the unit, please try to press TV button. 3 3 0-9 number Use these number buttons to select channel or buttons input password. 4 INPUT To display the INPUT source list or ... 14 EXIT To access the program guide. Introducing the Remote Control Button Descriptions 4 7 9 10 13 MTS/SAP ZOOM CCD SLEEP LIST FAVORITE AUDIO PICTURE PIP P.POSITION SWAP FREEZE Button Description 1 POWER Turn the unit on or off. 2 AUX, DVD, To select additional products to quickly select input...
Operation Manual
Page 22
... and select from 3 different favorite lists. To select a preset sound mode. 15 16 MTS/SAP ZOOM CCD SLEEP 17 18 LIST FAVORITE AUDIO PICTURE 19 20 PIP P.POSITION SWAP FREEZE 21 22 23 21 also used to select audio track for analog channels; To select a preset... picture mode. To freeze current picture. To select a stereo, sap or mono for digital channels. Button Descriptions Introducing the Remote Control Button 15 ZOOM 16 CCD 17 MTS/SAP...
... and select from 3 different favorite lists. To select a preset sound mode. 15 16 MTS/SAP ZOOM CCD SLEEP 17 18 LIST FAVORITE AUDIO PICTURE 19 20 PIP P.POSITION SWAP FREEZE 21 22 23 21 also used to select audio track for analog channels; To select a preset... picture mode. To freeze current picture. To select a stereo, sap or mono for digital channels. Button Descriptions Introducing the Remote Control Button 15 ZOOM 16 CCD 17 MTS/SAP...

Operation Manual
Page 24
...secret number is very important, please keep it in a familiar place. Press to highlight the menu items. Picture Picture Settings Screen Settings Audio Aspect Ratio Press to normal picture. 23 Highlight [Locks]........... As a precautionary measure, make a note of your operation or alter the settings...set a secret number firstly as [Cinemotion]. 5. Press MENU 2. Press OK Picture New PIN Enter New PIN: Audio Settings Confirm New PIN: Channels Locks Guide Press a Number to enter digit The TV allows you to adjust the selected items or move the on-screen cursor in...
...secret number is very important, please keep it in a familiar place. Press to highlight the menu items. Picture Picture Settings Screen Settings Audio Aspect Ratio Press to normal picture. 23 Highlight [Locks]........... As a precautionary measure, make a note of your operation or alter the settings...set a secret number firstly as [Cinemotion]. 5. Press MENU 2. Press OK Picture New PIN Enter New PIN: Audio Settings Confirm New PIN: Channels Locks Guide Press a Number to enter digit The TV allows you to adjust the selected items or move the on-screen cursor in...

Operation Manual
Page 26
...to normal viewing in about a minute. on the remote control or on the TV Press the VOL+ or VOL- FREEZE The TV automatically cancel FREEZE and return to temporarily capture a program's picture. The following mode may available for a long period of time. 25 Normal Example...: Source Final When you enter channel number with the ▲▼and OK buttons. Selecting Channels Watching TV For digital TV channel Press the 0-9 number buttons and...
...to normal viewing in about a minute. on the remote control or on the TV Press the VOL+ or VOL- FREEZE The TV automatically cancel FREEZE and return to temporarily capture a program's picture. The following mode may available for a long period of time. 25 Normal Example...: Source Final When you enter channel number with the ▲▼and OK buttons. Selecting Channels Watching TV For digital TV channel Press the 0-9 number buttons and...
Operation Manual
Page 27
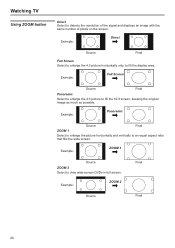
... to fill the 16:9 screen, keeping the original image as much as possible. Example: Panoramic Source Final ZOOM 1 Select to enlarge the picture horizontally and vertically to detects the resolution of the signal and displays an image with the same number of pixels on the screen. Watching... TV Using ZOOM button Direct Select to an equal aspect ratio that fills the wide screen. Example: Direct Source Final Full Screen Select to enlarge the 4:3 picture horizontally only, to fill the display area.
... to fill the 16:9 screen, keeping the original image as much as possible. Example: Panoramic Source Final ZOOM 1 Select to enlarge the picture horizontally and vertically to detects the resolution of the signal and displays an image with the same number of pixels on the screen. Watching... TV Using ZOOM button Direct Select to an equal aspect ratio that fills the wide screen. Example: Direct Source Final Full Screen Select to enlarge the 4:3 picture horizontally only, to fill the display area.
Operation Manual
Page 28
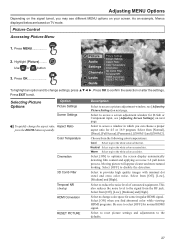
... and [ZOOM 2]. This also reduces the noise level to give the white colors a neutral tint. Picture Control Accessing Picture Menu 1. Highlight [Picture]......... Press OK Picture Audio Picture Settings Screen Settings Aspect Ratio Color Temperature Settings Cinemotion ON Channels 3D Comb Filter Temporal NR Locks HDMI ...Options Depending on the signal tuned, you may see different MENU options on TV mode. Moving picture will appear clearer and more natural looking. Select to reset picture settings and adjustments to provides high quality images with minimal dot crawl and ...
... and [ZOOM 2]. This also reduces the noise level to give the white colors a neutral tint. Picture Control Accessing Picture Menu 1. Highlight [Picture]......... Press OK Picture Audio Picture Settings Screen Settings Aspect Ratio Color Temperature Settings Cinemotion ON Channels 3D Comb Filter Temporal NR Locks HDMI ...Options Depending on the signal tuned, you may see different MENU options on TV mode. Moving picture will appear clearer and more natural looking. Select to reset picture settings and adjustments to provides high quality images with minimal dot crawl and ...
Operation Manual
Page 29
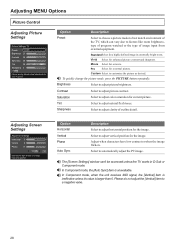
... 25 Contrast 25 Saturation 25 Tint 25 Sharpness 4 DONE Choose among different preset adjustments for your TV picture Option Description Preset Select to choose a picture mode to best match environment of the TV, which can 't be accessed unless the TV works in a normally bright room. Pro Select for the image. Adjusting Screen Settings Adjustment Settings...
... 25 Contrast 25 Saturation 25 Tint 25 Sharpness 4 DONE Choose among different preset adjustments for your TV picture Option Description Preset Select to choose a picture mode to best match environment of the TV, which can 't be accessed unless the TV works in a normally bright room. Pro Select for the image. Adjusting Screen Settings Adjustment Settings...

Operation Manual
Page 30
...sounds. Hall Select for a movie program. Use this item to select a stereo mode as a default mode when you switch your TV to a digital program. Stereo Select for a spoken dialog program. Digital Preference Use this window have an effect on the headphone only....music program. Highlight [Audio]......... Use or button. 3. Press OK Picture Audio Settings Channels Locks Guide Bass, Treble & Balance Phone Settings Effects Auto Volume Control OFF COAX Out (SPDIF) Analog Preference Digital Preference TV Speaker ON RESET AUDIO To highlight an option and to change the...
...sounds. Hall Select for a movie program. Use this item to select a stereo mode as a default mode when you switch your TV to a digital program. Stereo Select for a spoken dialog program. Digital Preference Use this window have an effect on the headphone only....music program. Highlight [Audio]......... Use or button. 3. Press OK Picture Audio Settings Channels Locks Guide Bass, Treble & Balance Phone Settings Effects Auto Volume Control OFF COAX Out (SPDIF) Analog Preference Digital Preference TV Speaker ON RESET AUDIO To highlight an option and to change the...
Operation Manual
Page 31
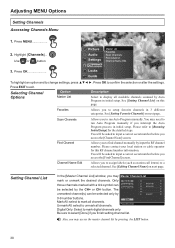
... [Editing Channel Name] on next page. Mark All: select to [Running Initial Setup] for this page. Also, you access the [Channel Scan] screen. Press OK Picture Audio Settings Master List Favorites Scan Channels Find Channel Channel Name Edit Channels Locks Guide To highlight an option and to change settings, press Press...
... [Editing Channel Name] on next page. Mark All: select to [Running Initial Setup] for this page. Also, you access the [Channel Scan] screen. Press OK Picture Audio Settings Master List Favorites Scan Channels Find Channel Channel Name Edit Channels Locks Guide To highlight an option and to change settings, press Press...
Operation Manual
Page 33
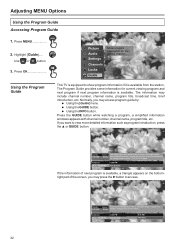
... = Using the GUIDE button. = Using the INFO button. Press OK Using the Program Guide Picture Audio Settings Channels Locks Guide Show program information for current viewing program and next program if next ...Stereo deadly consequences for the prize of a full scholarship to the college of their choice. (TV-PG, CC, Digital) Antenna 24.1 KVUE-HD 8:00 PM The Scholar If the information of... GUIDE button. Antenna 24.1 KVUE-HD 8:00 PM The Scholar 9:00 PM The Ring 32 Adjusting MENU Options Using the Program Guide Accessing Program Guide 1. Press the GUIDE button while watching...
... = Using the GUIDE button. = Using the INFO button. Press OK Using the Program Guide Picture Audio Settings Channels Locks Guide Show program information for current viewing program and next program if next ...Stereo deadly consequences for the prize of a full scholarship to the college of their choice. (TV-PG, CC, Digital) Antenna 24.1 KVUE-HD 8:00 PM The Scholar If the information of... GUIDE button. Antenna 24.1 KVUE-HD 8:00 PM The Scholar 9:00 PM The Ring 32 Adjusting MENU Options Using the Program Guide Accessing Program Guide 1. Press the GUIDE button while watching...
Operation Manual
Page 34
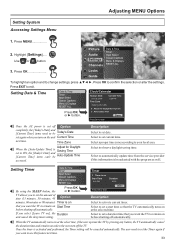
... OK or ► button. Select to remain on the unit Current Time next time. Select to set a duration time that you want the TV to automatically update time from the service provider if this feature next time. 33 Press MENU 2. Use or button. 3. Time Zone Adjust for ...is on Start Time 8:00 PM Duration 01:30 Press OK to finish Done Description Select to set current time. Highlight [Settings]..... Press OK Picture Audio Settings Channels Date & Time Timer Input Select Closed Captions Menu & Displays RESET ALL Locks Guide To highlight an option and to change settings...
... OK or ► button. Select to remain on the unit Current Time next time. Select to set a duration time that you want the TV to automatically update time from the service provider if this feature next time. 33 Press MENU 2. Use or button. 3. Time Zone Adjust for ...is on Start Time 8:00 PM Duration 01:30 Press OK to finish Done Description Select to set current time. Highlight [Settings]..... Press OK Picture Audio Settings Channels Date & Time Timer Input Select Closed Captions Menu & Displays RESET ALL Locks Guide To highlight an option and to change settings...

Operation Manual
Page 37
... All] to [Setting a Secret Number] in which you want to confirm the selection. Also, you finish setting. Be sure to exit. Picture Audio Settings PIN Entry You must enter your TV. Enter a correct PIN. To highlight an option and to continue 3. Press EXIT to select [Done] when you may select [Lock All...
... All] to [Setting a Secret Number] in which you want to confirm the selection. Also, you finish setting. Be sure to exit. Picture Audio Settings PIN Entry You must enter your TV. Enter a correct PIN. To highlight an option and to continue 3. Press EXIT to select [Done] when you may select [Lock All...


