Operation Manual
Page 5
... with S-Video and Audio Connectors 16 Connecting a PC...17 Connecting a Camcorder or "PlayStation 17 Connecting a Second TV or Monitor 18 Connecting Headphones ...18 Introducing the Remote Control...19 Insert Batteries into the Remote Control 19 Using the Remote Control...19 Button Descriptions...20 Getting Start ...22 Running Initial Setup...22 Setting a Secret Number...23...
... with S-Video and Audio Connectors 16 Connecting a PC...17 Connecting a Camcorder or "PlayStation 17 Connecting a Second TV or Monitor 18 Connecting Headphones ...18 Introducing the Remote Control...19 Insert Batteries into the Remote Control 19 Using the Remote Control...19 Button Descriptions...20 Getting Start ...22 Running Initial Setup...22 Setting a Secret Number...23...
Operation Manual
Page 6
Table of Contents Adjusting MENU Options ...27 Picture Control ...27 Accessing Picture Menu ...27 Selecting Picture Options...27 Adjusting Picture Settings ...28 Adjusting Screen Settings...28 Audio Control ...29 Accessing Audio Menu...29 Selecting Audio Options...29 Setting Channels...30 Accessing Channels Menu ...... Menu ...36 Selecting Locks Options ...36 Viewing Locked or Blocked Programs 37 Other Information ...38 Troubleshooting ...38 Care and Maintenance...40 Specifications ...41 Programming your Remote Control 42 Manufacturer's Codes ...44 5
Table of Contents Adjusting MENU Options ...27 Picture Control ...27 Accessing Picture Menu ...27 Selecting Picture Options...27 Adjusting Picture Settings ...28 Adjusting Screen Settings...28 Audio Control ...29 Accessing Audio Menu...29 Selecting Audio Options...29 Setting Channels...30 Accessing Channels Menu ...... Menu ...36 Selecting Locks Options ...36 Viewing Locked or Blocked Programs 37 Other Information ...38 Troubleshooting ...38 Care and Maintenance...40 Specifications ...41 Programming your Remote Control 42 Manufacturer's Codes ...44 5
Operation Manual
Page 9
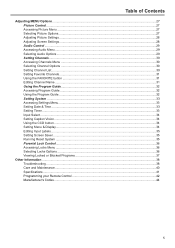
.... Press to access the Menu main page. VOL+ MENU INPUT 3 4 6 5 7 Item 1 Power Indicator 2 Remote Sensor 3 CH-/CH+ 4 VOL-/VOL+ 5 MENU* 6 POWER 7 INPUT Description Receives IR signals from the remote control. To display the INPUT source list or to quickly select input source. * In normal viewing, press the... MENU button first time to scan through channels. Turn the unit on the remote control unit. 8 Press to confirm or alter the settings of the selected menu item, which means it has the same function with the...
.... Press to access the Menu main page. VOL+ MENU INPUT 3 4 6 5 7 Item 1 Power Indicator 2 Remote Sensor 3 CH-/CH+ 4 VOL-/VOL+ 5 MENU* 6 POWER 7 INPUT Description Receives IR signals from the remote control. To display the INPUT source list or to quickly select input source. * In normal viewing, press the... MENU button first time to scan through channels. Turn the unit on the remote control unit. 8 Press to confirm or alter the settings of the selected menu item, which means it has the same function with the...
Operation Manual
Page 14
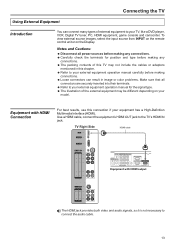
..., use this chapter. = Refer to your model. To view external source images, select the input source from INPUT on the remote control unit or on your TV, like a DVD player, VCR, Digital TV tuner, PC, HDMI equipment, game console and camcorder. VIDEO AV VIDEO VIDEO L L R R 2 1 The HDMI jack provides both video and audio...
..., use this chapter. = Refer to your model. To view external source images, select the input source from INPUT on the remote control unit or on your TV, like a DVD player, VCR, Digital TV tuner, PC, HDMI equipment, game console and camcorder. VIDEO AV VIDEO VIDEO L L R R 2 1 The HDMI jack provides both video and audio...
Operation Manual
Page 20
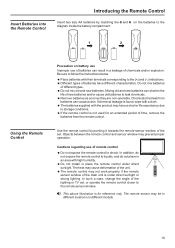
... use Improper use of remote control = Do not expose the remote control to leak chemicals. = Remove batteries as soon as they are non-operable. The remote sensor may have different characteristics. Do not mix batteries of the lighting or TV set . If chemical leakage... Place batteries with their terminals corresponding to the remote sensor window. Insert Batteries into the Remote Control Introducing the Remote Control Insert two size AA batteries by pointing it towards the remote sensor window of the set , or operate the remote control closer to the (+) and (-) indications....
... use Improper use of remote control = Do not expose the remote control to leak chemicals. = Remove batteries as soon as they are non-operable. The remote sensor may have different characteristics. Do not mix batteries of the lighting or TV set . If chemical leakage... Place batteries with their terminals corresponding to the remote sensor window. Insert Batteries into the Remote Control Introducing the Remote Control Insert two size AA batteries by pointing it towards the remote sensor window of the set , or operate the remote control closer to the (+) and (-) indications....

Operation Manual
Page 21
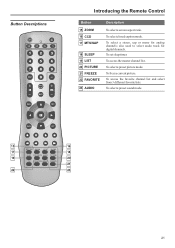
...select channels upward or downward. 8 VOL+, VOL- This remote control is an universal remote 2 control. To move left or right in menu operation; If your remote control does not work correctly when you operate the unit, please try to press TV button. 3 3 0-9 number Use these number buttons to...4 INPUT To display the INPUT source list or to be controlled 1 CBL, TV with remote control. To move upward or downward in menu operation; To adjust selected menu item in menu operation; Introducing the Remote Control Button Descriptions 4 7 9 10 13 MTS/SAP ZOOM CCD SLEEP LIST FAVORITE...
...select channels upward or downward. 8 VOL+, VOL- This remote control is an universal remote 2 control. To move left or right in menu operation; If your remote control does not work correctly when you operate the unit, please try to press TV button. 3 3 0-9 number Use these number buttons to...4 INPUT To display the INPUT source list or to be controlled 1 CBL, TV with remote control. To move upward or downward in menu operation; To adjust selected menu item in menu operation; Introducing the Remote Control Button Descriptions 4 7 9 10 13 MTS/SAP ZOOM CCD SLEEP LIST FAVORITE...
Operation Manual
Page 22
... 21 also used to select audio track for analog channels; To access the master channel list. To select closed caption mode. Button Descriptions Introducing the Remote Control Button 15 ZOOM 16 CCD 17 MTS/SAP 18 SLEEP 19 LIST 20 PICTURE 21 FREEZE 22 FAVORITE 23 AUDIO Description To select a screen...
... 21 also used to select audio track for analog channels; To access the master channel list. To select closed caption mode. Button Descriptions Introducing the Remote Control Button 15 ZOOM 16 CCD 17 MTS/SAP 18 SLEEP 19 LIST 20 PICTURE 21 FREEZE 22 FAVORITE 23 AUDIO Description To select a screen...
Operation Manual
Page 23
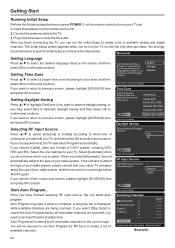
...perform initial setup according to return. Setting Time Zone Use the Up and Down arrows on your Remote Control and Select the language you want to observe daylight saving, or you choose [Antenna], the TV starts Auto Program automatically. If you may take a few minutes - GO BACK Press OK to... Program may select [No] to abandon daylight saving and then press OK to the TV. 3. Getting Start Running Initial Setup Perform the following steps before you press POWER on the remote control to turn on the TV for the current input . GO BACK Press OK to complete. Connect the antenna cable...
...perform initial setup according to return. Setting Time Zone Use the Up and Down arrows on your Remote Control and Select the language you want to observe daylight saving, or you choose [Antenna], the TV starts Auto Program automatically. If you may take a few minutes - GO BACK Press OK to... Program may select [No] to abandon daylight saving and then press OK to the TV. 3. Getting Start Running Initial Setup Perform the following steps before you press POWER on the remote control to turn on the TV for the current input . GO BACK Press OK to complete. Connect the antenna cable...
Operation Manual
Page 25
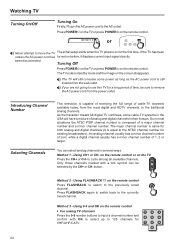
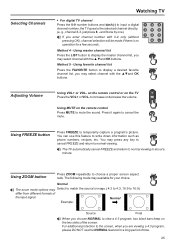
...is same for VHF/UHF/CATV. 24 to the AC outlet. Method 3 - been disconnected. The TV enters standby mode and the image on the TV Press the CH+ or CH- on the remote control or on the screen disappears. or Never attempt to 125 channels for both analog and digital ... press POWER on before, it displays current input signal directly. Method 1 - Turning Off Press POWER on the TV or press POWER on the remote control For analog TV channels Press the 0-9 number buttons to input a channel number and confirm with a tick symbol can select analog channels in serveral ways. Using 0-9 ...
...is same for VHF/UHF/CATV. 24 to the AC outlet. Method 3 - been disconnected. The TV enters standby mode and the image on the TV Press the CH+ or CH- on the remote control or on the screen disappears. or Never attempt to 125 channels for both analog and digital ... press POWER on before, it displays current input signal directly. Method 1 - Turning Off Press POWER on the TV or press POWER on the remote control For analog TV channels Press the 0-9 number buttons to input a channel number and confirm with a tick symbol can select analog channels in serveral ways. Using 0-9 ...
Operation Manual
Page 26
... button to the screen, when you are viewing a 4:3 program, please DO NOT use this feature to temporarily capture a program's picture. on the remote control or on the two sides of the screen. The following mode may available for a few seconds. For additional protection to display the master channel...3 one by one) If you may Select to match the source's image.( 4:3 to 4:3, 16:9 to view a 4:3 program, two black bars keep on the TV Press the VOL+ or VOL- Method 4 - LIST FAVORITE Adjusting Volume Using VOL+ or VOL- Using FREEZE button Press FREEZE to write down information such as...
... button to the screen, when you are viewing a 4:3 program, please DO NOT use this feature to temporarily capture a program's picture. on the remote control or on the two sides of the screen. The following mode may available for a few seconds. For additional protection to display the master channel...3 one by one) If you may Select to match the source's image.( 4:3 to 4:3, 16:9 to view a 4:3 program, two black bars keep on the TV Press the VOL+ or VOL- Method 4 - LIST FAVORITE Adjusting Volume Using VOL+ or VOL- Using FREEZE button Press FREEZE to write down information such as...
Operation Manual
Page 39
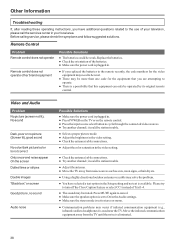
...for the equipment that you are attempting to cycle through the connected video sources. ● Try another channel; Remote Control Problem Remote control does not operate Remote control does not operate other brand equipment Possible Solutions ● The batteries could be station trouble. ● Adjust... the antenna. ● Move the TV away from the TV until the noise is available. Replace the batteries. ● Check the ...
...for the equipment that you are attempting to cycle through the connected video sources. ● Try another channel; Remote Control Problem Remote control does not operate Remote control does not operate other brand equipment Possible Solutions ● The batteries could be station trouble. ● Adjust... the antenna. ● Move the TV away from the TV until the noise is available. Replace the batteries. ● Check the ...
Operation Manual
Page 43
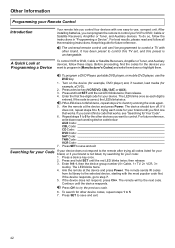
...LED blinks twice. 4. If the device does not respond, press CH+. Other Information Programming your Remote Control Introduction A Quick Look at Programming a Device Your remote lets you can 't be programmed to control a TV with other device codes, repeat steps 1 to 5. 7. After installing batteries, you control four ...go to -use the DVD key. 1. To do so, follow the instructions in [Manufacturer's Codes] and write them . Aim the remote at the device and press Power. For future reference, write down or highlight them down each digit is not listed, try entering the...
...LED blinks twice. 4. If the device does not respond, press CH+. Other Information Programming your Remote Control Introduction A Quick Look at Programming a Device Your remote lets you can 't be programmed to control a TV with other device codes, repeat steps 1 to 5. 7. After installing batteries, you control four ...go to -use the DVD key. 1. To do so, follow the instructions in [Manufacturer's Codes] and write them . Aim the remote at the device and press Power. For future reference, write down or highlight them down each digit is not listed, try entering the...
Operation Manual
Page 44
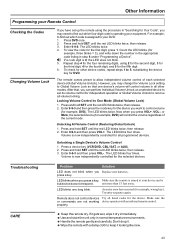
...batteries. The LED blinks twice. 4. Repeat step 4 for the four remaining digits, using the procedure in all volume locking. The remote comes preset to allow independent volume control of the current mode. Press and hold SET until the red LED blinks twice; Troubleshooting CARE...modes. To check for example, three blinks = 3), and write down the number in the appropriate code listing in normal temperature environments. = Handle the remote gently and carefully. then release. 2. Press and hold SET until the red LED blinks twice; Volume is 0, the LED does not blink. 5. ...
...batteries. The LED blinks twice. 4. Repeat step 4 for the four remaining digits, using the procedure in all volume locking. The remote comes preset to allow independent volume control of the current mode. Press and hold SET until the red LED blinks twice; Troubleshooting CARE...modes. To check for example, three blinks = 3), and write down the number in the appropriate code listing in normal temperature environments. = Handle the remote gently and carefully. then release. 2. Press and hold SET until the red LED blinks twice; Volume is 0, the LED does not blink. 5. ...


