Operation Manual
Page 2
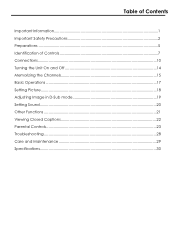
Table of Contents Important Information 1 Important Safety Precautions 2 Preparations ...5 Identification of Controls 7 Connections...10 Turning the Unit On and Off 14 Memorizing the Channels 15 Basic Operations ...17 Setting Picture ...18 Adjusting Image in D-Sub mode 19 Setting Sound ...20 Other Functions ...21 Viewing Closed Captions 22 Parental Controls ...23 Troubleshooting ...28 Care and Maintenance 29 Specifications...30
Table of Contents Important Information 1 Important Safety Precautions 2 Preparations ...5 Identification of Controls 7 Connections...10 Turning the Unit On and Off 14 Memorizing the Channels 15 Basic Operations ...17 Setting Picture ...18 Adjusting Image in D-Sub mode 19 Setting Sound ...20 Other Functions ...21 Viewing Closed Captions 22 Parental Controls ...23 Troubleshooting ...28 Care and Maintenance 29 Specifications...30
Operation Manual
Page 6
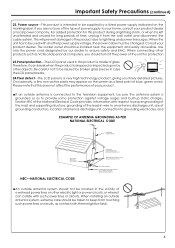
...lightning storm, or when it is made of blue, green or red. When the unit has to be used in case the LCD panel breaks. 24.Pixel defect---The LCD panel is intended to ensure safety and EMC. Consult your product. When connecting other products such as a fixed point of glass...., it from the wall outlet and disconnect the cable system. Please note that this product is left unattended and unused for protection 23.Panel protection---The LCD panel used with another power supply voltage, the power cable must be installed near the equipment and easily accessible. If you finely detailed...
...lightning storm, or when it is made of blue, green or red. When the unit has to be used in case the LCD panel breaks. 24.Pixel defect---The LCD panel is intended to ensure safety and EMC. Consult your product. When connecting other products such as a fixed point of glass...., it from the wall outlet and disconnect the cable system. Please note that this product is left unattended and unused for protection 23.Panel protection---The LCD panel used with another power supply voltage, the power cable must be installed near the equipment and easily accessible. If you finely detailed...
Operation Manual
Page 9
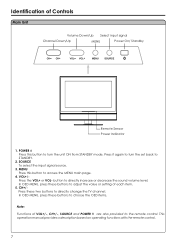
... select the input signal source. 3. button to the remote control. In OSD MENU, press these buttons to directly change the TV channel; POWER Press this button to turn the set back to STANDBY. 2. VOL+/Press the VOL+ or VOL- This operation manual provides a description based on operating ...functions with the remote control. 7 MENU Press this button to access the MENU main page. 4. Press it again to turn the unit ON from STANDBY mode. Identification of VOL+/-, CH+/-, SOURCE and POWER are also provided to directly increase or decrease the sound volume...
... select the input signal source. 3. button to the remote control. In OSD MENU, press these buttons to directly change the TV channel; POWER Press this button to turn the set back to STANDBY. 2. VOL+/Press the VOL+ or VOL- This operation manual provides a description based on operating ...functions with the remote control. 7 MENU Press this button to access the MENU main page. 4. Press it again to turn the unit ON from STANDBY mode. Identification of VOL+/-, CH+/-, SOURCE and POWER are also provided to directly increase or decrease the sound volume...

Operation Manual
Page 11
Identification of Controls (continued) Remote Control To display channel status or signal information Turn the unit on or off To select Stereo mode Sound mute [0-9] number buttons: Direct channel To access the MENU main page or exit menu operation To switch channels; In MENU operation, use ENTER or VOL+/- In MENU operation, use CH+/- to adjust selected item To confirm your operation To set sleep timer Audio mode select 9 to select menu item To select input signal source Picture mode select To quickly jump between current channel and last selected channel. To adjust volume;
Identification of Controls (continued) Remote Control To display channel status or signal information Turn the unit on or off To select Stereo mode Sound mute [0-9] number buttons: Direct channel To access the MENU main page or exit menu operation To switch channels; In MENU operation, use ENTER or VOL+/- In MENU operation, use CH+/- to adjust selected item To confirm your operation To set sleep timer Audio mode select 9 to select menu item To select input signal source Picture mode select To quickly jump between current channel and last selected channel. To adjust volume;
Operation Manual
Page 12
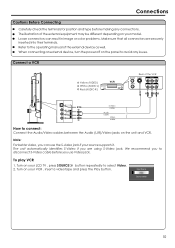
...(AUDIO R ) VCR Rear of the external device as well. Turn on your model. Loose connectors can use Video jack. The unit automatically identifies S-Video if you are securely inserted into their terminals. Turn on your LCD TV , press SOURCE button repeatedly to disconnect S-Video cable before making any... issues. When connecting an external device, turn the power off on the panel to connect: Connect the Audio...
...(AUDIO R ) VCR Rear of the external device as well. Turn on your model. Loose connectors can use Video jack. The unit automatically identifies S-Video if you are securely inserted into their terminals. Turn on your LCD TV , press SOURCE button repeatedly to disconnect S-Video cable before making any... issues. When connecting an external device, turn the power off on the panel to connect: Connect the Audio...
Operation Manual
Page 13
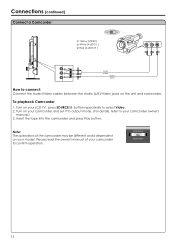
... the Audio/Video cables between the Audio (L/R)/Video jacks on your model. To playback Camcorder 1. Note: The operations of your camcorder owner's manual.) 3. Turn on your LCD TV , press SOURCE button repeatedly to confirm operation. Turn on your camcorder and set it to output mode. (For details, refer to your camcorder to select Video. 2.
... the Audio/Video cables between the Audio (L/R)/Video jacks on your model. To playback Camcorder 1. Note: The operations of your camcorder owner's manual.) 3. Turn on your LCD TV , press SOURCE button repeatedly to confirm operation. Turn on your camcorder and set it to output mode. (For details, refer to your camcorder to select Video. 2.
Operation Manual
Page 14
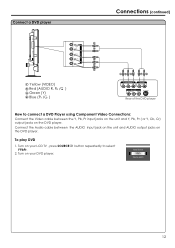
Turn on your LCD TV , press SOURCE YPbPr. 2. Turn on your DVD player. Connect a DVD player Connections (continued) RW GB R Y Yellow (VIDEO) R Red (AUDIO R, PR /CR ) G Green (Y) B Blue (PB /CB ) GB R WR COMPONENT Y Pb ...
Turn on your LCD TV , press SOURCE YPbPr. 2. Turn on your DVD player. Connect a DVD player Connections (continued) RW GB R Y Yellow (VIDEO) R Red (AUDIO R, PR /CR ) G Green (Y) B Blue (PB /CB ) GB R WR COMPONENT Y Pb ...
Operation Manual
Page 15
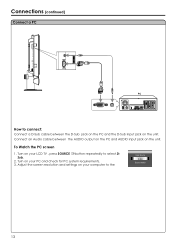
Adjust the screen resolution and settings on your LCD TV , press SOURCE button repeatedly to select DSub. 2. Turn on your PC and check for PC system requirements. 3. Connect an Audio cable between the D-Sub jack on the PC and the D-Sub input jack on the unit. To Watch the PC screen 1. Connections (continued) Connect a PC How to connect: Connect a D-Sub cable between the AUDIO output on the PC and AUDIO input jack on the unit. Turn on your computer to the Input Source D-Sub Source-switch 13
Adjust the screen resolution and settings on your LCD TV , press SOURCE button repeatedly to select DSub. 2. Turn on your PC and check for PC system requirements. 3. Connect an Audio cable between the D-Sub jack on the PC and the D-Sub input jack on the unit. To Watch the PC screen 1. Connections (continued) Connect a PC How to connect: Connect a D-Sub cable between the AUDIO output on the PC and AUDIO input jack on the unit. Turn on your computer to the Input Source D-Sub Source-switch 13
Operation Manual
Page 16
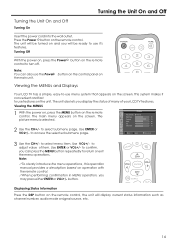
... on the main unit. Turning the Unit On and Off Turning the Unit On and Off Turning On Insert the power cord into the wall outlet. Note: You can press the MENU button repeatedly to -use features on the screen. Viewing the MENUs and Displays Your LCD TV has a simple, easy...-to return or exit the menu operations. This system makes it 's features. Note: !To clearly introduce the menu operations , this operation manual provides a description based on the remote control, the unit will be turned on the remote control to ...
... on the main unit. Turning the Unit On and Off Turning the Unit On and Off Turning On Insert the power cord into the wall outlet. Note: You can press the MENU button repeatedly to -use features on the screen. Viewing the MENUs and Displays Your LCD TV has a simple, easy...-to return or exit the menu operations. This system makes it 's features. Note: !To clearly introduce the menu operations , this operation manual provides a description based on the remote control, the unit will be turned on the remote control to ...

Operation Manual
Page 18
... tune a program manually, the AFC will be added. When the item is set to input channel number directly. 16 The erased channels can not be turned off automatically. Channel Auto Searching Source Cable Channel Skip On Off Fine Tune AFC On Off Frequency 55.25 MHz Move Select Menu to exit...
... tune a program manually, the AFC will be added. When the item is set to input channel number directly. 16 The erased channels can not be turned off automatically. Channel Auto Searching Source Cable Channel Skip On Off Fine Tune AFC On Off Frequency 55.25 MHz Move Select Menu to exit...
Operation Manual
Page 19
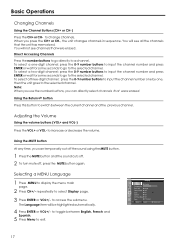
... use the number buttons, you can temporarily cut off the sound using the MUTE button. 1 Press the MUTE button and the sound cuts off. 2 To turn mute off, press the MUTE button again. Adjusting the Volume Using the volume buttons (VOL+ and VOL-) Press the VOL + or VOL- Display Language Transparency...
... use the number buttons, you can temporarily cut off the sound using the MUTE button. 1 Press the MUTE button and the sound cuts off. 2 To turn mute off, press the MUTE button again. Adjusting the Volume Using the volume buttons (VOL+ and VOL-) Press the VOL + or VOL- Display Language Transparency...

Operation Manual
Page 27
... Controls menu, press CH+/- repeatedly to access the password checking page. 4 Input the correct password with 0-9 number buttons. to exit 25 Turn On or Off Parental Lock Control Function 1 From the Parental Controls menu, press CH+/- Parental Controls Enter Password Move Select Menu to exit... Parental Controls Parental Lock On Off Clear All Yes TV Rating None Movie Rating NA CA-FR-Rating E CA-EN-Rating E Change Password Move Select Menu to exit Change Password New ...
... Controls menu, press CH+/- repeatedly to access the password checking page. 4 Input the correct password with 0-9 number buttons. to exit 25 Turn On or Off Parental Lock Control Function 1 From the Parental Controls menu, press CH+/- Parental Controls Enter Password Move Select Menu to exit... Parental Controls Parental Lock On Off Clear All Yes TV Rating None Movie Rating NA CA-FR-Rating E CA-EN-Rating E Change Password Move Select Menu to exit Change Password New ...
Operation Manual
Page 30
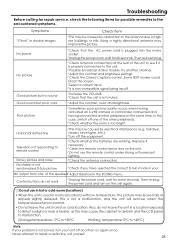
...Using a highly directional antenna may improve the picture. This is used in a hot or cold location. Then re-plug the power cord and turn your problem is too bright. Then re-insert plug !Check antenna connections at the rear of the speakers!Adjust Balance in a location exposed to... direct sunlight or near a heater, as this may cause the cabinet to deform and the LCD panel to malfunction. (Storage temperature: 0°C to +50°C Working temperature: 5°C to +40°C ) Note: If your unit off the ...
...Using a highly directional antenna may improve the picture. This is used in a hot or cold location. Then re-plug the power cord and turn your problem is too bright. Then re-insert plug !Check antenna connections at the rear of the speakers!Adjust Balance in a location exposed to... direct sunlight or near a heater, as this may cause the cabinet to deform and the LCD panel to malfunction. (Storage temperature: 0°C to +50°C Working temperature: 5°C to +40°C ) Note: If your unit off the ...
Operation Manual
Page 31
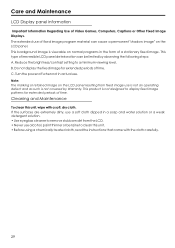
...normal programs in the form of Video Games, Computers, Captions or Other Fixed Image Displays. C. Note: The marking or retained image on the LCD panel resulting from the LCD. • Never use . Cleaning and Maintenance To clean this unit. • Before using a chemically treated cloth, read the instructions that.... This background image is not designed to a minimum viewing level. Do not display the fixed image for extended periods of time. Turn the power off when not in a soap and water solution or a weak detergent solution. • Use eyeglass cleaner to remove ...
...normal programs in the form of Video Games, Computers, Captions or Other Fixed Image Displays. C. Note: The marking or retained image on the LCD panel resulting from the LCD. • Never use . Cleaning and Maintenance To clean this unit. • Before using a chemically treated cloth, read the instructions that.... This background image is not designed to a minimum viewing level. Do not display the fixed image for extended periods of time. Turn the power off when not in a soap and water solution or a weak detergent solution. • Use eyeglass cleaner to remove ...
