User Manual
Page 3
Powering and Installation 6 E. Vehicle Installation 7 F. Display 11 K. Connecting to Other Electronic Equipment 17 N. Specifications 23 Q Rechargeable Battery Installation and Use 23 R. Introduction 4 B. Controls, Indicators and Connectors 8 G. Contents 6 D. Menu 11 J. Playing JPEG file 18 O. Basic Operation 10 I. Playing MP3 Discs 15 M. Playing Audio CDS 14 L. Content A. Loading and Playing a Disc 9 H. Troubleshooting 25 3 PDF created with FinePrint pdfFactory Pro trial version http://www.fineprint.com Setup 20 P. Cautions and Warnings 4 C.
Powering and Installation 6 E. Vehicle Installation 7 F. Display 11 K. Connecting to Other Electronic Equipment 17 N. Specifications 23 Q Rechargeable Battery Installation and Use 23 R. Introduction 4 B. Controls, Indicators and Connectors 8 G. Contents 6 D. Menu 11 J. Playing JPEG file 18 O. Basic Operation 10 I. Playing MP3 Discs 15 M. Playing Audio CDS 14 L. Content A. Loading and Playing a Disc 9 H. Troubleshooting 25 3 PDF created with FinePrint pdfFactory Pro trial version http://www.fineprint.com Setup 20 P. Cautions and Warnings 4 C.
User Manual
Page 5
... exterior of disc. Do not touch the surface of the system only. 6. Some playback operations of electric shock and/or exposure to replace the battery incorrectly. Do not use liquid cleaners or aerosol cleaners. Do not use the unit in its edge. Cleaning Unit When cleaning, make sure the ...irregularly shaped discs such as heart or star-shaped discs as they may be available. Remove the disc from the power source. Replace the battery only with a cloth or other material. There is hazardous to Laser Radiation. Do not expose the disc to protect the environment, please dispose ...
... exterior of disc. Do not touch the surface of the system only. 6. Some playback operations of electric shock and/or exposure to replace the battery incorrectly. Do not use liquid cleaners or aerosol cleaners. Do not use the unit in its edge. Cleaning Unit When cleaning, make sure the ...irregularly shaped discs such as heart or star-shaped discs as they may be available. Remove the disc from the power source. Replace the battery only with a cloth or other material. There is hazardous to Laser Radiation. Do not expose the disc to protect the environment, please dispose ...
User Manual
Page 6
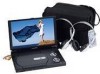
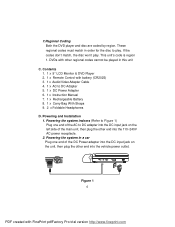
...adapter into the DC input jack on the unit, then plug the other end into the 110~240V AC power receptacle. 2. DVDs with other end into the vehicle power outlet. Powering the system indoors (Refer to Figure 1) Plug one end of the ...disc won't play . This unit's code is region 1. Powering the system in this unit C. Contents 1. 1 x 9'' LCD Monitor & DVD Player 2. 1 x Remote Control with FinePrint pdfFactory Pro trial version http://www.fineprint.com Figure 1 6 PDF created with battery (CR2025) 3. 1 x Audio/Video Adapter Cable 4. 1 x AC to DC Adapter 5. 1 x DC Power Adapter 6. 1 x ...
...adapter into the DC input jack on the unit, then plug the other end into the 110~240V AC power receptacle. 2. DVDs with other end into the vehicle power outlet. Powering the system indoors (Refer to Figure 1) Plug one end of the ...disc won't play . This unit's code is region 1. Powering the system in this unit C. Contents 1. 1 x 9'' LCD Monitor & DVD Player 2. 1 x Remote Control with FinePrint pdfFactory Pro trial version http://www.fineprint.com Figure 1 6 PDF created with battery (CR2025) 3. 1 x Audio/Video Adapter Cable 4. 1 x AC to DC Adapter 5. 1 x DC Power Adapter 6. 1 x ...
User Manual
Page 8
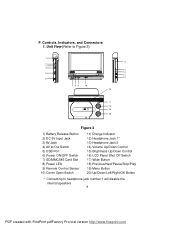
F. Controls, Indicators, and Connectors 1. Unit View (Refer to Figure 3) 1 11 2 4 12 5 13 14 6 15 7 89 10 16 17 18 19 20 Figure 3 1) Battery Release Button 2) DC 9V Input Jack 3) AV Jack 4) AV In/Out Switch 5) USB Port 6) Power ON/OFF Switch 7) SD/MMC/MS Card Slot 8) Power LED 9) ...
F. Controls, Indicators, and Connectors 1. Unit View (Refer to Figure 3) 1 11 2 4 12 5 13 14 6 15 7 89 10 16 17 18 19 20 Figure 3 1) Battery Release Button 2) DC 9V Input Jack 3) AV Jack 4) AV In/Out Switch 5) USB Port 6) Power ON/OFF Switch 7) SD/MMC/MS Card Slot 8) Power LED 9) ...
User Manual
Page 22
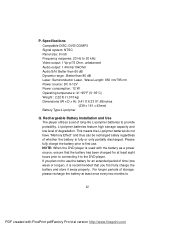
... kg) Dimensions (W x D x H): 9.41 X 6.33 X1.69inches (239 x 161 x 43mm) Battery Type:Li-polymer Q. Rechargeable Battery Installation and Use The player utilizes a set of storage, please recharge the battery at least eight hours prior to connecting it away properly. NOTE: When the DVD player is used with the battery as a power source, ensure that you plan not to...
... kg) Dimensions (W x D x H): 9.41 X 6.33 X1.69inches (239 x 161 x 43mm) Battery Type:Li-polymer Q. Rechargeable Battery Installation and Use The player utilizes a set of storage, please recharge the battery at least eight hours prior to connecting it away properly. NOTE: When the DVD player is used with the battery as a power source, ensure that you plan not to...
User Manual
Page 23
... long time. During this point you plan to use only the AC adapter included with the player to Battery Recharge: 1. To charge the battery, please connect the power jack directly into the DVD player and leave the POWER switch in the OFF position. 23 PDF created with desiccant or other dehumidifying agent. Each full recharge...
... long time. During this point you plan to use only the AC adapter included with the player to Battery Recharge: 1. To charge the battery, please connect the power jack directly into the DVD player and leave the POWER switch in the OFF position. 23 PDF created with desiccant or other dehumidifying agent. Each full recharge...
User Manual
Page 24
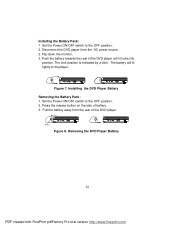
... the release button on the side of the DVD player until it locks into position. Installing the DVD Player Battery Removing the Battery Pack: 1. Set the Power ON/OFF switch to the OFF position. 2. Press Figure 8. Installing the Battery Pack: 1. Disconnect the DVD player from the rear of the DVD player. Removing the DVD Player Battery 24 PDF created with FinePrint pdfFactory Pro trial...
... the release button on the side of the DVD player until it locks into position. Installing the DVD Player Battery Removing the Battery Pack: 1. Set the Power ON/OFF switch to the OFF position. 2. Press Figure 8. Installing the Battery Pack: 1. Disconnect the DVD player from the rear of the DVD player. Removing the DVD Player Battery 24 PDF created with FinePrint pdfFactory Pro trial...
User Manual
Page 26
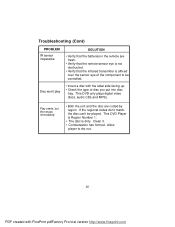
This DVD Player is Region Number 1. • The disc is affixed over the sensor eye of disc you put into disc tray. Troubleshooting (Cont) PROBLEM IR sensor inoperative Disc won't play SOLUTION • Verify that the batteries in the remote are coded by region. If the regional codes don't ...match, the disc can't be controlled. • Insert a disc with FinePrint pdfFactory Pro trial version http://www.fineprint.com Allow player to dry out. 26 PDF created with...
This DVD Player is Region Number 1. • The disc is affixed over the sensor eye of disc you put into disc tray. Troubleshooting (Cont) PROBLEM IR sensor inoperative Disc won't play SOLUTION • Verify that the batteries in the remote are coded by region. If the regional codes don't ...match, the disc can't be controlled. • Insert a disc with FinePrint pdfFactory Pro trial version http://www.fineprint.com Allow player to dry out. 26 PDF created with...


