
User Guide
Page 1
D1705 PORTABLE 7" LCD MONITOR AND DVD PLAYER For Customer Service Visit Our Website At WWW .audiovox.com Product Information, Photos, FAQ's Owner's Manuals 1 128-6808A
D1705 PORTABLE 7" LCD MONITOR AND DVD PLAYER For Customer Service Visit Our Website At WWW .audiovox.com Product Information, Photos, FAQ's Owner's Manuals 1 128-6808A
User Guide
Page 3
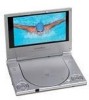
...to a warm location, moisture may result in need of reliable, trouble-free service, and is compact so that the D1705 is designed for selecting the D1705 portable DVD player. Contact qualified service personnel if your home. Placement To prevent fire or electric shock, do not spill or spray ...easy installation. Cautions and Warnings 1. The main features include a 7" Wide Screen (16:9 Aspect Ratio) Liquid Crystal Display (LCD) monitor and a DVD player. Do not place the set on until the moisture evaporates. 2. The unit applies the latest state of any kind on the unit.
...to a warm location, moisture may result in need of reliable, trouble-free service, and is compact so that the D1705 is designed for selecting the D1705 portable DVD player. Contact qualified service personnel if your home. Placement To prevent fire or electric shock, do not spill or spray ...easy installation. Cautions and Warnings 1. The main features include a 7" Wide Screen (16:9 Aspect Ratio) Liquid Crystal Display (LCD) monitor and a DVD player. Do not place the set on until the moisture evaporates. 2. The unit applies the latest state of any kind on the unit.
User Guide
Page 4
... 4. 1 x Remote Control 5. 1 x Instruction Manual 6. 1 x Audio/Video Cable 7. 1 x Cigarette Lighter Adapter D. Powering the system indoors (Refer to Figure 1) Plug one end of disc. 5. Contents 1. 1 x 7.0'' LCD Monitor & DVD Player Combo 2. 1 x AC to direct sunlight or heat sources such as they may cause the unit to the instructions supplied with the discs. Clean the disc...
... 4. 1 x Remote Control 5. 1 x Instruction Manual 6. 1 x Audio/Video Cable 7. 1 x Cigarette Lighter Adapter D. Powering the system indoors (Refer to Figure 1) Plug one end of disc. 5. Contents 1. 1 x 7.0'' LCD Monitor & DVD Player Combo 2. 1 x AC to direct sunlight or heat sources such as they may cause the unit to the instructions supplied with the discs. Clean the disc...
User Guide
Page 7
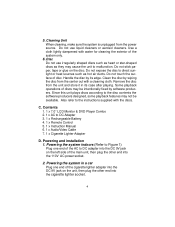
... 16) Repeat Button 17) SKIP- 18) SKIP+ 19) Play Button 20) Pause Button Figure 3 F. Remote Control View (Refer to adjust the picture brightness and the DVD player's volume. 2. Close the tray by pressing "PLAY". Start playback by pressing "PRESS" button.The unit will load the disc and go to the unit, power...
... 16) Repeat Button 17) SKIP- 18) SKIP+ 19) Play Button 20) Pause Button Figure 3 F. Remote Control View (Refer to adjust the picture brightness and the DVD player's volume. 2. Close the tray by pressing "PLAY". Start playback by pressing "PRESS" button.The unit will load the disc and go to the unit, power...

User Guide
Page 10
... video quality set up by using the Up/Down buttons,then press "Enter". This feature is cancelled when power is turned off. *off . *NOTE The DVD player will enter the Screen Saver mode after 5 minutes if the image on : The unit will not retain the last position of playback in memory. Select...
... video quality set up by using the Up/Down buttons,then press "Enter". This feature is cancelled when power is turned off. *off . *NOTE The DVD player will enter the Screen Saver mode after 5 minutes if the image on : The unit will not retain the last position of playback in memory. Select...

User Guide
Page 25
... highlighted folder. The system plays the songs in MP3 format are compatible with very little loss of the screen. 2. Insert an MP3 CD, the DVD video player will initialize the disc and the directory will be shown on the left side of audio quality while taking up much less disc space. You...
... highlighted folder. The system plays the songs in MP3 format are compatible with very little loss of the screen. 2. Insert an MP3 CD, the DVD video player will initialize the disc and the directory will be shown on the left side of audio quality while taking up much less disc space. You...

User Guide
Page 29
Connect the audio/video cable's yellow plug into the unit's DVD AUDIO OUT jack, and connect the other yellow plug to the "out" position. 2. Slide the AV in/out switch to the VIDEO INPUT jack on ..., and the other end to any device which accepts a digital coaxial signal. 29 Figure 43 8. Connect one end of the unit can also connect the DVD player to a TV to enjoy high quality stereo sound or another monitor. 1. Connecting to a TV or another monitor ( Refer to Figure 38) You can be aplied...
Connect the audio/video cable's yellow plug into the unit's DVD AUDIO OUT jack, and connect the other yellow plug to the "out" position. 2. Slide the AV in/out switch to the VIDEO INPUT jack on ..., and the other end to any device which accepts a digital coaxial signal. 29 Figure 43 8. Connect one end of the unit can also connect the DVD player to a TV to enjoy high quality stereo sound or another monitor. 1. Connecting to a TV or another monitor ( Refer to Figure 38) You can be aplied...
User Guide
Page 30
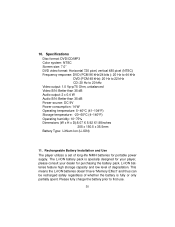
...thus can be recharged safely regardless of whether the battery is specially designed for your player, please consult your dealer for portable power supply. Rechargeable Battery Installation and Use The player utilizes a set of degradation. Li-ION batteries feature high storage capacity and low... level of long-life NiMH batteries for purchasing the battery pack. Specifications Disc format: DVD/CD/MP3 Color system: NTSC Screen size: 7.0'' DVD video format: Horizontal 720...
...thus can be recharged safely regardless of whether the battery is specially designed for your player, please consult your dealer for portable power supply. Rechargeable Battery Installation and Use The player utilizes a set of degradation. Li-ION batteries feature high storage capacity and low... level of long-life NiMH batteries for purchasing the battery pack. Specifications Disc format: DVD/CD/MP3 Color system: NTSC Screen size: 7.0'' DVD video format: Horizontal 720...

User Guide
Page 31
... environmental temperatures drop below 50oF (10oC) or exceed 95oF (35oC). 3. To charge the battery, please connect the power jack directly into the D1705 and leave the POWER switch in a humid or damp environment. Please make sure you always use only the AC transformer included with desiccant or ...please immediately recharge the battery (regardless of whether you first fully charge the battery and store it to the DVD player. Please remove battery from the player and store properly if the player is used for an extended period of time. If you may remove the wall plug and cease charging. ...
... environmental temperatures drop below 50oF (10oC) or exceed 95oF (35oC). 3. To charge the battery, please connect the power jack directly into the D1705 and leave the POWER switch in a humid or damp environment. Please make sure you always use only the AC transformer included with desiccant or ...please immediately recharge the battery (regardless of whether you first fully charge the battery and store it to the DVD player. Please remove battery from the player and store properly if the player is used for an extended period of time. If you may remove the wall plug and cease charging. ...

User Guide
Page 32
... of the unit. The lock position is in the down direction. 3. Installing the DVD Player Battery Removing the Battery Pack: 1. Close the player cover. 3. Removing the DVD Player Battery 32 left attached to the player. The unit will fit snugly to the player for an extended period, please recharge the battery at least once every two weeks...
... of the unit. The lock position is in the down direction. 3. Installing the DVD Player Battery Removing the Battery Pack: 1. Close the player cover. 3. Removing the DVD Player Battery 32 left attached to the player. The unit will fit snugly to the player for an extended period, please recharge the battery at least once every two weeks...


