
Product Manual
Page 1
... este producto. Veuillez lire toutes les instructions avant d'utiliser ce produit. 140 mm 216 mm 24"Series Widescreen LCD Monitor User Manual Manual del usuario del monitor LCD de pantalla ancha de serie 24" Manuel de l'utilisateur écran géant LCD série 24" Model AT24OHP Modelo AT24OHP Modèle no AT24OHP Call for technical support 1-877-777-4357 Llame para...
... este producto. Veuillez lire toutes les instructions avant d'utiliser ce produit. 140 mm 216 mm 24"Series Widescreen LCD Monitor User Manual Manual del usuario del monitor LCD de pantalla ancha de serie 24" Manuel de l'utilisateur écran géant LCD série 24" Model AT24OHP Modelo AT24OHP Modèle no AT24OHP Call for technical support 1-877-777-4357 Llame para...

Product Manual
Page 2
... power supply cord and the provided shielded video interface cable with the limits for purchasing this guide thoroughly before installation. This monitor generates, uses, and can radiate radio frequency energy. English Operation Instructions Thank you for a Class B digital device, pursuant to a residential installation. If this device. Harmful interference to radio or television reception, resetting the monitor may be used . FCC RADIO FREQUENCY INTERFERENCE STATEMENT WARNING: (FOR FCC CERTIFIED MODELS...
... power supply cord and the provided shielded video interface cable with the limits for purchasing this guide thoroughly before installation. This monitor generates, uses, and can radiate radio frequency energy. English Operation Instructions Thank you for a Class B digital device, pursuant to a residential installation. If this device. Harmful interference to radio or television reception, resetting the monitor may be used . FCC RADIO FREQUENCY INTERFERENCE STATEMENT WARNING: (FOR FCC CERTIFIED MODELS...

Product Manual
Page 3
English Contents Safety Precautions 1 First Setup 2 Quick Installation 2 Front View of the Product 3 Rear View of the Product 3 Using On Screen Display (OSD) Functions 4 Supporting Timing Modes 8 Technical Information 9 Care and Maintenance 10 Troubleshooting 10 Warranty Information 11
English Contents Safety Precautions 1 First Setup 2 Quick Installation 2 Front View of the Product 3 Rear View of the Product 3 Using On Screen Display (OSD) Functions 4 Supporting Timing Modes 8 Technical Information 9 Care and Maintenance 10 Troubleshooting 10 Warranty Information 11
Product Manual
Page 4
... dealer or power company. The power cord plug must be repaired by a qualified technician. Do not remove the monitor cabinet. There are high-voltage parts inside that a user's safety comes first. Have it checked by service personnel. 1 Apply non-ammonia based cleaner onto the cloth, not directly onto the glass screen. Keep the monitor away from magnetic objects, motors, TV sets, and transformer...
... dealer or power company. The power cord plug must be repaired by a qualified technician. Do not remove the monitor cabinet. There are high-voltage parts inside that a user's safety comes first. Have it checked by service personnel. 1 Apply non-ammonia based cleaner onto the cloth, not directly onto the glass screen. Keep the monitor away from magnetic objects, motors, TV sets, and transformer...
Product Manual
Page 5
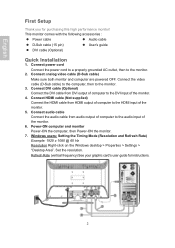
...Refresh Rate) Example: 1920 x 1080 @ 60 Hz Resolution Right-click on the Windows desktop > Properties > Settings > "Desktop Area". Connect analog video cable (D-Sub cable) Make sure both monitor and computer are powered OFF. Connect power cord Connect the power cord to a properly grounded AC outlet, then to the monitor. 3. English First Setup Thank you for instructions. 2 This monitor comes with the following accessories : Power cable Audio cable D-Sub cable (15 pin) User's guide DVI cable (Optional) Quick Installation 1. Power...
...Refresh Rate) Example: 1920 x 1080 @ 60 Hz Resolution Right-click on the Windows desktop > Properties > Settings > "Desktop Area". Connect analog video cable (D-Sub cable) Make sure both monitor and computer are powered OFF. Connect power cord Connect the power cord to a properly grounded AC outlet, then to the monitor. 3. English First Setup Thank you for instructions. 2 This monitor comes with the following accessories : Power cable Audio cable D-Sub cable (15 pin) User's guide DVI cable (Optional) Quick Installation 1. Power...
Product Manual
Page 6
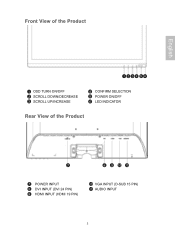
Front View of the Product English 1 2 34 56 1 OSD TURN ON/OFF 2 SCROLL DOWN/DECREASE 3 SCROLL UP/INCREASE 4 CONFIRM SELECTION 5 POWER ON/OFF 6 LED INDICATOR Rear View of the Product 7 8 9 10 11 7 POWER INPUT 8 DVI INPUT (DVI 24 PIN) 9 HDMI INPUT (HDMI 19 PIN) 10 VGA INPUT (D-SUB 15 PIN) 11 AUDIO INPUT 3
Front View of the Product English 1 2 34 56 1 OSD TURN ON/OFF 2 SCROLL DOWN/DECREASE 3 SCROLL UP/INCREASE 4 CONFIRM SELECTION 5 POWER ON/OFF 6 LED INDICATOR Rear View of the Product 7 8 9 10 11 7 POWER INPUT 8 DVI INPUT (DVI 24 PIN) 9 HDMI INPUT (HDMI 19 PIN) 10 VGA INPUT (D-SUB 15 PIN) 11 AUDIO INPUT 3

Product Manual
Page 7
... OSD menu. Select the desired item when in OSD menu, it is shortcut to display Opticolor Mode adjustment control screen. Power Lock (when not in OSD menu) OSD Lock (when not in OSD menu. Shortcut to display the Contrast/ Brightness/DCR/ECO Mode adjustment control screen. Select the desired item when in OSD menu, it is shortcut to display input select source adjustment when not in OSD menu) Main Menu 4 English Using On Screen Display (OSD) Functions 1 2 ▼ 1+▼ 1+▲ Display main menu. When not in OSD menu. Recall both of Contrast and Brightness...
... OSD menu. Select the desired item when in OSD menu, it is shortcut to display Opticolor Mode adjustment control screen. Power Lock (when not in OSD menu) OSD Lock (when not in OSD menu. Shortcut to display the Contrast/ Brightness/DCR/ECO Mode adjustment control screen. Select the desired item when in OSD menu, it is shortcut to display input select source adjustment when not in OSD menu) Main Menu 4 English Using On Screen Display (OSD) Functions 1 2 ▼ 1+▼ 1+▲ Display main menu. When not in OSD menu. Recall both of Contrast and Brightness...

Product Manual
Page 8
... When press Input Select change Input signal to adjust selected color. User Color : Individual adjustments for a darker color. Information : To display the information, regarding the current input signal coming from the graphic card in your graphic card user guide for more information about changing the resolution and refresh rate. ECO Mode : Allows the user to select the desired color. 2. Press ▼ or ▲ button to Analog, HDMI or DVI. Manual Image Adjust : To manually adjust the Horizontal Size, H./V. Volume : To adjust the volume of the screen. Press button 2 to turn the...
... When press Input Select change Input signal to adjust selected color. User Color : Individual adjustments for a darker color. Information : To display the information, regarding the current input signal coming from the graphic card in your graphic card user guide for more information about changing the resolution and refresh rate. ECO Mode : Allows the user to select the desired color. 2. Press ▼ or ▲ button to Analog, HDMI or DVI. Manual Image Adjust : To manually adjust the Horizontal Size, H./V. Volume : To adjust the volume of the screen. Press button 2 to turn the...
Product Manual
Page 9
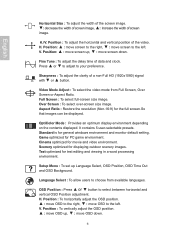
... H. Scenery optimized for general windows environment and monitor default setting. OSD Position : Press ▲ or ▼ button to your preference. Over Screen : To select over-screen size image. Position: ▲ : move OSD down . Sharpness : To adjust the clarity of the video. Standard is for displaying outdoor scenery images. It contains 5 user-selectable presets. Position : To vertically adjust the OSD position. ▲ : move OSD up, ▼ : move screen up Language Select, OSD Position, OSD Time Out and OSD Background. English Horizontal Size : To adjust the...
... H. Scenery optimized for general windows environment and monitor default setting. OSD Position : Press ▲ or ▼ button to your preference. Over Screen : To select over-screen size image. Position: ▲ : move OSD down . Sharpness : To adjust the clarity of the video. Standard is for displaying outdoor scenery images. It contains 5 user-selectable presets. Position : To vertically adjust the OSD position. ▲ : move OSD up, ▼ : move screen up Language Select, OSD Position, OSD Time Out and OSD Background. English Horizontal Size : To adjust the...

Product Manual
Page 10
Press button 2 to turn off On Screen Display(OSD)after a preset period of time. Memory Recall : To recall factory settings for video & audio controls. English OSD Time Out : To automatically turn the OSD background On or Off. OSD Background : Allows the user to select the Memory Recall menu option. 7
Press button 2 to turn off On Screen Display(OSD)after a preset period of time. Memory Recall : To recall factory settings for video & audio controls. English OSD Time Out : To automatically turn the OSD background On or Off. OSD Background : Allows the user to select the Memory Recall menu option. 7
Product Manual
Page 11
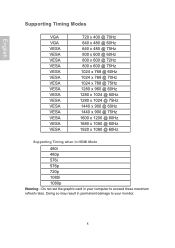
Doing so may result in your computer to your monitor. 8 English Supporting Timing Modes VGA VGA VESA VESA VESA VESA VESA VESA VESA VESA VESA VESA VESA VESA VESA VESA VESA 720 x 400 @ 70Hz 640 x 480 @ 60Hz 640 x 480 @ 75Hz 800 x 600 @ 60Hz 800 x 600 @ 72Hz 800 x 600 @ 75Hz 1024 x 768 @ ...1280 x 1024 @ 60Hz 1280 x 1024 @ 75Hz 1440 x 900 @ 60Hz 1440 x 900 @ 75Hz 1600 x 1200 @ 60Hz 1680 x 1050 @ 60Hz 1920 x 1080 @ 60Hz Supporting Timing when in HDMI Mode 480i 480p 576i 576p 720p 1080i 1080p Warning : Do not set the graphic card in permanent damage to exceed these maximum refresh rates.
Doing so may result in your computer to your monitor. 8 English Supporting Timing Modes VGA VGA VESA VESA VESA VESA VESA VESA VESA VESA VESA VESA VESA VESA VESA VESA VESA 720 x 400 @ 70Hz 640 x 480 @ 60Hz 640 x 480 @ 75Hz 800 x 600 @ 60Hz 800 x 600 @ 72Hz 800 x 600 @ 75Hz 1024 x 768 @ ...1280 x 1024 @ 60Hz 1280 x 1024 @ 75Hz 1440 x 900 @ 60Hz 1440 x 900 @ 75Hz 1600 x 1200 @ 60Hz 1680 x 1050 @ 60Hz 1920 x 1080 @ 60Hz Supporting Timing when in HDMI Mode 480i 480p 576i 576p 720p 1080i 1080p Warning : Do not set the graphic card in permanent damage to exceed these maximum refresh rates.
Product Manual
Page 13
... all signal cables are missing, check the video cable to reduce glare. Put your monitor in a well ventilated area. Do not place any colors (red, green, blue) are installed. English Care and Maintenance Care Avoid exposing your monitor directly to another electrical device into the power outlet to repair your monitor yourself. Always call your service center. Never remove the rear cover of your monitor. Make...
... all signal cables are missing, check the video cable to reduce glare. Put your monitor in a well ventilated area. Do not place any colors (red, green, blue) are installed. English Care and Maintenance Care Avoid exposing your monitor directly to another electrical device into the power outlet to repair your monitor yourself. Always call your service center. Never remove the rear cover of your monitor. Make...

Product Manual
Page 14
... YOU SPECIFIC LEGAL RIGHTS, AND YOU MAY ALSO HAVE OTHER RIGHTS WHICH MAY VARY BY STATE OR PROVINCE. If you do not have a copy of your store receipt and paid using a check or a major credit card, a copy can be obtained from the date of an Office Depot Merchandise card. For service, please call 1-877-777-HELP (1-877...
... YOU SPECIFIC LEGAL RIGHTS, AND YOU MAY ALSO HAVE OTHER RIGHTS WHICH MAY VARY BY STATE OR PROVINCE. If you do not have a copy of your store receipt and paid using a check or a major credit card, a copy can be obtained from the date of an Office Depot Merchandise card. For service, please call 1-877-777-HELP (1-877...


