

User Guide
Page 1
Z9PE-D8 WS Motherboard
Z9PE-D8 WS Motherboard

User Guide
Page 3
... find more information x Conventions used in this guide xi Typography xi Z9PE-D8 WS specifications summary xii Chapter 1: Product introduction 1.1 Welcome 1-3 1.2 Package contents 1-3 1.3 Serial number label 1-4 1.4 Special features 1-4 1.4.1 Product highlights 1-4 1.4.2 Innovative ASUS features 1-6 Chapter 2: Hardware information 2.1 Before you proceed 2-3 2.2 Motherboard overview 2-4 2.2.1 Placement direction 2-4 2.2.2 Screw holes 2-4 2.2.3 Motherboard layout 2-5 2.2.4 Layout contents 2-6 2.3 Central Processing Unit (CPU 2-8 2.3.1 Installing the CPU...
... find more information x Conventions used in this guide xi Typography xi Z9PE-D8 WS specifications summary xii Chapter 1: Product introduction 1.1 Welcome 1-3 1.2 Package contents 1-3 1.3 Serial number label 1-4 1.4 Special features 1-4 1.4.1 Product highlights 1-4 1.4.2 Innovative ASUS features 1-6 Chapter 2: Hardware information 2.1 Before you proceed 2-3 2.2 Motherboard overview 2-4 2.2.1 Placement direction 2-4 2.2.2 Screw holes 2-4 2.2.3 Motherboard layout 2-5 2.2.4 Layout contents 2-6 2.3 Central Processing Unit (CPU 2-8 2.3.1 Installing the CPU...

User Guide
Page 12
...x8/x8/x8/ x8) 2 x PCIe 3.0 x16 slots (@x16 speed) 1 x PCIe 3.0 x16 slot (@x8 speed) * This motherboard is ready to www.asus.com for updated details. resolution 1920 x 1200@60Hz Supports NVIDIA® 4-Way SLI™ Technology Supports AMD® Quad-GPU CrossFireX&#...Supports Jack-Detection, Multi-Streaming, and Front Panel Jack-Retasking - Please refer to support PCIe 3.0 SPEC. DTS Surround Sensation UltraPC II - Z9PE-D8 WS specifications summary CPU Chipset Memory Expansion slots VGA Output Multi-GPU support Storage LAN Audio Dual Intel® Socket 2011 for Xeon® processor ...
...x8/x8/x8/ x8) 2 x PCIe 3.0 x16 slots (@x16 speed) 1 x PCIe 3.0 x16 slot (@x8 speed) * This motherboard is ready to www.asus.com for updated details. resolution 1920 x 1200@60Hz Supports NVIDIA® 4-Way SLI™ Technology Supports AMD® Quad-GPU CrossFireX&#...Supports Jack-Detection, Multi-Streaming, and Front Panel Jack-Retasking - Please refer to support PCIe 3.0 SPEC. DTS Surround Sensation UltraPC II - Z9PE-D8 WS specifications summary CPU Chipset Memory Expansion slots VGA Output Multi-GPU support Storage LAN Audio Dual Intel® Socket 2011 for Xeon® processor ...
User Guide
Page 17
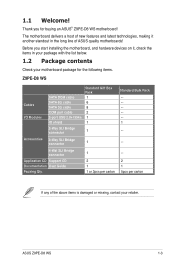
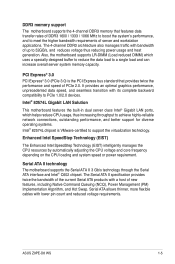
Before you for the following items. Z9PE-D8 WS Cables I/O Modules SATA DOM cable SATA 6G cable SATA 3G cable COM port cable 2-port USB 2.0+1394a IO shield Standard Gift Box Pack 1 6 8 2 1 1 2-Way SLI ... features and latest technologies, making it , check the items in the long line of the above items is damaged or missing, contact your retailer. 1.1 Welcome! ASUS Z9PE-D8 WS 1-3 Thank you start installing the motherboard, and hardware devices on it another standout in your package with the list below. 1.2 Package contents Check your...
Before you for the following items. Z9PE-D8 WS Cables I/O Modules SATA DOM cable SATA 6G cable SATA 3G cable COM port cable 2-port USB 2.0+1394a IO shield Standard Gift Box Pack 1 6 8 2 1 1 2-Way SLI ... features and latest technologies, making it , check the items in the long line of the above items is damaged or missing, contact your retailer. 1.1 Welcome! ASUS Z9PE-D8 WS 1-3 Thank you start installing the motherboard, and hardware devices on it another standout in your package with the list below. 1.2 Package contents Check your...

User Guide
Page 18
... per CPU) DDR3 memory. The Intel® EM64T feature allows your problems. Z9PE-D8 WS xxS1xxxxxxxx Made in Taiwan 合格 1.4 Special features 1.4.1 Product highlights Latest Processor Technology The motherboard supports the latest Intel Xeon® processor E5-2600 product family in LGA 2011...to run on today's multi-threaded software. 1.3 Serial number label Before requesting support from the ASUS Technical Support team, you must take note of the motherboard's serial number containing 12 characters xxS1xxxxxxxx shown as the figure below power, temperature, and current ...
... per CPU) DDR3 memory. The Intel® EM64T feature allows your problems. Z9PE-D8 WS xxS1xxxxxxxx Made in Taiwan 合格 1.4 Special features 1.4.1 Product highlights Latest Processor Technology The motherboard supports the latest Intel Xeon® processor E5-2600 product family in LGA 2011...to run on today's multi-threaded software. 1.3 Serial number label Before requesting support from the ASUS Technical Support team, you must take note of the motherboard's serial number containing 12 characters xxS1xxxxxxxx shown as the figure below power, temperature, and current ...
User Guide
Page 19
... ATA products with lower pin count and reduced voltage requirements. ASUS Z9PE-D8 WS 1-5 It provides an optimal graphics performance, unprecedented data speed, and seamless transition with bandwidth of up to a single load and can increase overall server system memory capacity. DDR3 memory support The motherboard supports the 4-channel DDR3 memory that provides twice the...
... ATA products with lower pin count and reduced voltage requirements. ASUS Z9PE-D8 WS 1-5 It provides an optimal graphics performance, unprecedented data speed, and seamless transition with bandwidth of up to a single load and can increase overall server system memory capacity. DDR3 memory support The motherboard supports the 4-channel DDR3 memory that provides twice the...

User Guide
Page 20
...this unique design provides a convenient and safe way to install data and applications on the motherboard, allowing you to install USB devices directly with no messy cables. Z9PE-D8 WS with enhanced scalability, faster data retrieval, and double the bandwidth of current bus systems. ...speed connectivity. Temperature, fan, and voltage monitoring The CPU temperature is monitored for critical components. 1.4.2 Innovative ASUS features ASUS Fan Speed control technology The ASUS Fan Speed control technology smartly adjusts the fan speeds according to the system loading to ensure quiet, cool...
...this unique design provides a convenient and safe way to install data and applications on the motherboard, allowing you to install USB devices directly with no messy cables. Z9PE-D8 WS with enhanced scalability, faster data retrieval, and double the bandwidth of current bus systems. ...speed connectivity. Temperature, fan, and voltage monitoring The CPU temperature is monitored for critical components. 1.4.2 Innovative ASUS features ASUS Fan Speed control technology The ASUS Fan Speed control technology smartly adjusts the fan speeds according to the system loading to ensure quiet, cool...
User Guide
Page 24
Chapter summary 2 2.1 Before you proceed 2-3 2.2 Motherboard overview 2-4 2.3 Central Processing Unit (CPU 2-8 2.4 System memory 2-13 2.5 Expansion slots 2-16 2.6 Onboard Switches 2-20 2.7 Onboard LEDs 2-21 2.8 Jumpers 2-26 2.9 Connectors 2-29 ASUS Z9PE-D8 WS
Chapter summary 2 2.1 Before you proceed 2-3 2.2 Motherboard overview 2-4 2.3 Central Processing Unit (CPU 2-8 2.4 System memory 2-13 2.5 Expansion slots 2-16 2.6 Onboard Switches 2-20 2.7 Onboard LEDs 2-21 2.8 Jumpers 2-26 2.9 Connectors 2-29 ASUS Z9PE-D8 WS

User Guide
Page 25
... with the component. • Before you install motherboard components or change any motherboard settings. • Unplug the power cord from the wall socket before touching any component, ensure that the power supply is switched off or the power cord is detached from the power supply. ASUS Z9PE-D8 WS 2-3 2.1 Before you proceed Take note of the..., such as the power supply case, before handling components to avoid damaging them due to static electricity. • Hold components by the edges to the motherboard, peripherals, and/or components.
... with the component. • Before you install motherboard components or change any motherboard settings. • Unplug the power cord from the wall socket before touching any component, ensure that the power supply is switched off or the power cord is detached from the power supply. ASUS Z9PE-D8 WS 2-3 2.1 Before you proceed Take note of the..., such as the power supply case, before handling components to avoid damaging them due to static electricity. • Hold components by the edges to the motherboard, peripherals, and/or components.

User Guide
Page 27
2.2.3 Motherboard layout Z9PE-D8 WS ASUS Z9PE-D8 WS 2-5
2.2.3 Motherboard layout Z9PE-D8 WS ASUS Z9PE-D8 WS 2-5

User Guide
Page 35
ASUS Z9PE-D8 WS 2-13 DDR3 modules are developed for latest update. • Install the DIMMs starting from the same vendor. A DDR3 module has the same physical dimensions as a ..., 4GB, 8GB, 16GB and 32GB* RDIMMs or 1GB, 2GB, 4GB and 8GB* with the same CAS latency. For optimum compatibility, it is notched differently to ASUS Server AVL for better performance with eight (four DIMM per CPU) Double Data Rate 3 (DDR3) Dual Inline Memory Modules (DIMM) sockets. 2.4 System memory 2.4.1 Overview The...
ASUS Z9PE-D8 WS 2-13 DDR3 modules are developed for latest update. • Install the DIMMs starting from the same vendor. A DDR3 module has the same physical dimensions as a ..., 4GB, 8GB, 16GB and 32GB* RDIMMs or 1GB, 2GB, 4GB and 8GB* with the same CAS latency. For optimum compatibility, it is notched differently to ASUS Server AVL for better performance with eight (four DIMM per CPU) Double Data Rate 3 (DDR3) Dual Inline Memory Modules (DIMM) sockets. 2.4 System memory 2.4.1 Overview The...

User Guide
Page 37
Removing a DIMM from the socket. 2 1 Support the DIMM lightly with your fingers when pressing the retaining clips. ASUS Z9PE-D8 WS 2-15 Hold the DIMM by pressing DIMM notch the retaining clip outward. 2. The DIMM might get damaged when it flips out with a ... DIMM cannot be pushed in any further to ensure proper sitting of the DIMM. 3 Locked Retaining Clip Always insert the DIMM into a socket in the motherboard package. • Refer to avoid damaging the DIMM. 3. Remove the DIMM from a single clip DIMM socket 1. 2.4.3 Installing a DIMM on the 2 socket. Apply...
Removing a DIMM from the socket. 2 1 Support the DIMM lightly with your fingers when pressing the retaining clips. ASUS Z9PE-D8 WS 2-15 Hold the DIMM by pressing DIMM notch the retaining clip outward. 2. The DIMM might get damaged when it flips out with a ... DIMM cannot be pushed in any further to ensure proper sitting of the DIMM. 3 Locked Retaining Clip Always insert the DIMM into a socket in the motherboard package. • Refer to avoid damaging the DIMM. 3. Remove the DIMM from a single clip DIMM socket 1. 2.4.3 Installing a DIMM on the 2 socket. Apply...
User Guide
Page 41
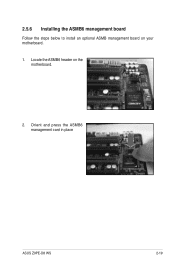
Locate the ASMB6 header on your motherboard. 1. 2.5.6 Installing the ASMB6 management board Follow the steps below to install an optional ASMB management board on the motherboard. 2. Orient and press the ASMB6 management card in place ASUS Z9PE-D8 WS 2-19
Locate the ASMB6 header on your motherboard. 1. 2.5.6 Installing the ASMB6 management board Follow the steps below to install an optional ASMB management board on the motherboard. 2. Orient and press the ASMB6 management card in place ASUS Z9PE-D8 WS 2-19

User Guide
Page 57
...]) These connectors connect to Serial ATA 6.0 Gb/s hard disk drives via Serial ATA 6.0 Gb/s signal cables. • For high performance of ASUS SSD Caching, please connect one HDD and one SSD to Marvell® SATA6G_E1/E2/E3/E4 connectors. • For SSD Caching setup, you can... motherboard support DVD and load the driver during OS installation. For Windows Vista / Windows 7 OS, load only the Marvell® 92xx SATA Controller Driver. For 32/64bit Windows XP OS, load first the Marvell ® shared library driver, and then load Marvell® 92xx SATA Controller Driver. ASUS Z9PE-D8 WS ...
...]) These connectors connect to Serial ATA 6.0 Gb/s hard disk drives via Serial ATA 6.0 Gb/s signal cables. • For high performance of ASUS SSD Caching, please connect one HDD and one SSD to Marvell® SATA6G_E1/E2/E3/E4 connectors. • For SSD Caching setup, you can... motherboard support DVD and load the driver during OS installation. For Windows Vista / Windows 7 OS, load only the Marvell® 92xx SATA Controller Driver. For 32/64bit Windows XP OS, load first the Marvell ® shared library driver, and then load Marvell® 92xx SATA Controller Driver. ASUS Z9PE-D8 WS ...

User Guide
Page 61
... opening at the back of the system chassis. Never connect a USB cable to a slot opening at the back of the system chassis. ASUS Z9PE-D8 WS 2-39 Doing so will damage the motherboard! Connect the S/PDIF Out module cable to this connector, then install the module to the IEEE 1394a connector. 13. IEEE 1394a port...
... opening at the back of the system chassis. Never connect a USB cable to a slot opening at the back of the system chassis. ASUS Z9PE-D8 WS 2-39 Doing so will damage the motherboard! Connect the S/PDIF Out module cable to this connector, then install the module to the IEEE 1394a connector. 13. IEEE 1394a port...

User Guide
Page 71
... or reset the system while recovering the BIOS! ASUS Z9PE-D8 WS 4-3 You can update a corrupted BIOS file using this motherboard. The utility will automatically recover the BIOS. The recovered BIOS may not be the latest BIOS version for this utility. ASUS EZ Flash 2 : Allows you to recover the...or gets corrupted during the updating process. Doing so would cause system boot failure! Copy the original motherboard BIOS using the BUPDATER utility. 4.1.1 ASUS CrashFree BIOS 3 The ASUS CrashFree BIOS 3 is finished. Insert the USB flash drive containing the original or new BIOS file ...
... or reset the system while recovering the BIOS! ASUS Z9PE-D8 WS 4-3 You can update a corrupted BIOS file using this motherboard. The utility will automatically recover the BIOS. The recovered BIOS may not be the latest BIOS version for this utility. ASUS EZ Flash 2 : Allows you to recover the...or gets corrupted during the updating process. Doing so would cause system boot failure! Copy the original motherboard BIOS using the BUPDATER utility. 4.1.1 ASUS CrashFree BIOS 3 The ASUS CrashFree BIOS 3 is finished. Insert the USB flash drive containing the original or new BIOS file ...

User Guide
Page 73
Copy the BUPDATER utility (BUPDATER.exe) from the ASUS support website at support.asus.com to load the BIOS default settings. 4.1.3 BUPDATER The succeeding BIOS screens are for the motherboard. Press and select Yes to the bootable USB flash disk drive you to prevent system ...the bootable USB flash disk drive, then press . Save the BIOS file to ensure system compatibility and stability. A:\>BUPDATER /i[file name].ROM ASUS Z9PE-D8 WS 4-5 • This function can support devices such as shown. Boot the system in DOS environment using BUPDATER : 1. Ensure to load...
Copy the BUPDATER utility (BUPDATER.exe) from the ASUS support website at support.asus.com to load the BIOS default settings. 4.1.3 BUPDATER The succeeding BIOS screens are for the motherboard. Press and select Yes to the bootable USB flash disk drive you to prevent system ...the bootable USB flash disk drive, then press . Save the BIOS file to ensure system compatibility and stability. A:\>BUPDATER /i[file name].ROM ASUS Z9PE-D8 WS 4-5 • This function can support devices such as shown. Boot the system in DOS environment using BUPDATER : 1. Ensure to load...

User Guide
Page 75
... system off and then back on the motherboard stores the Setup utility. otherwise, POST continues with the opportunity to enter the Setup utility; The Setup program is designed to make your system, or prompted to ensure system compatibility and stability. Use the BIOS Setup program when you with its test routines. ASUS Z9PE-D8 WS 4-7
... system off and then back on the motherboard stores the Setup utility. otherwise, POST continues with the opportunity to enter the Setup utility; The Setup program is designed to make your system, or prompted to ensure system compatibility and stability. Use the BIOS Setup program when you with its test routines. ASUS Z9PE-D8 WS 4-7

User Guide
Page 79
... frequency. ASUS Z9PE-D8 WS 4-11 4.4 Ai Tweaker menu The Ai Tweaker menu items allow you installed on the CPU and DIMM model you to configure overclocking-related items. Be cautious when changing the settings of these preset overclocking configuration options: [Auto] Loads the optimal settings for this section vary depending on the motherboard. The...
... frequency. ASUS Z9PE-D8 WS 4-11 4.4 Ai Tweaker menu The Ai Tweaker menu items allow you installed on the CPU and DIMM model you to configure overclocking-related items. Be cautious when changing the settings of these preset overclocking configuration options: [Auto] Loads the optimal settings for this section vary depending on the motherboard. The...

User Guide
Page 109
...Select Item +/-: Change Opt. 4.6 Server Management menu The Server Management menu displays the server management status, and allows you install ASMB card on the motherboard. Helps determine that the OS sucessfully loaded or follows the O/S Boot Watchdog TImer Policy. F1: General Help F2: Previous Values F5: Optimized Defaults... should respond if the OS Boot Watchdog Timer expires. Copyright (C) 2011 American Megatrends, Inc. Configuration options: [Do Nothing] [Reset] [Power Down] ASUS Z9PE-D8 WS 4-41 Not available if O/S Boot Watchdog Timer is disabled. Aptio Setup Utility -
...Select Item +/-: Change Opt. 4.6 Server Management menu The Server Management menu displays the server management status, and allows you install ASMB card on the motherboard. Helps determine that the OS sucessfully loaded or follows the O/S Boot Watchdog TImer Policy. F1: General Help F2: Previous Values F5: Optimized Defaults... should respond if the OS Boot Watchdog Timer expires. Copyright (C) 2011 American Megatrends, Inc. Configuration options: [Do Nothing] [Reset] [Power Down] ASUS Z9PE-D8 WS 4-41 Not available if O/S Boot Watchdog Timer is disabled. Aptio Setup Utility -


