User Guide
Page 28
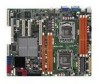
...® ICH10R SATA port S/W RAID setting (3-pin RAID_SEL1) (Z8NA-D6 model only) 6. Force BIOS recovery setting (3-pin RECOVERY1) Page 2-24 2-25 2-25 2-26 2-26 2-27 2-27 2-28 Rear panel connectors 1. Clear RTC RAM (CLRTC1) 2. VGA controller setting (3-pin VGA_SW1)) 3. CPU ...Fan and Chassis Fan control setting (3-pin CPUFAN_SEL1, CHAFAN_SEL1) 4. LAN 1 (RJ-45) port 7. iBTN RAID setting (3-pin IBTN_SEL1) (Z8NA-D6 model only) 7. PS/2 keyboard port (purple) 3....
...® ICH10R SATA port S/W RAID setting (3-pin RAID_SEL1) (Z8NA-D6 model only) 6. Force BIOS recovery setting (3-pin RECOVERY1) Page 2-24 2-25 2-25 2-26 2-26 2-27 2-27 2-28 Rear panel connectors 1. Clear RTC RAM (CLRTC1) 2. VGA controller setting (3-pin VGA_SW1)) 3. CPU ...Fan and Chassis Fan control setting (3-pin CPUFAN_SEL1, CHAFAN_SEL1) 4. LAN 1 (RJ-45) port 7. iBTN RAID setting (3-pin IBTN_SEL1) (Z8NA-D6 model only) 7. PS/2 keyboard port (purple) 3....

User Guide
Page 44
... remove the cap on pins 2-3 for about 5-10 seconds, then move the jumper again to clear the CMOS RTC RAM data. Turn OFF the computer and unplug the power cord. 2. Hold down the key during the boot process and enter BIOS setup to pins 2-3. Move ... can clear the CMOS memory of date, time, and system setup parameters by erasing the CMOS RTC RAM data. Removing the cap will cause system boot failure! The onboard button cell battery powers the RAM data in CMOS. Keep the cap on CLRTC jumper default position. 2.6 Jumpers 1. After the CMOS clearance, reinstall...
... remove the cap on pins 2-3 for about 5-10 seconds, then move the jumper again to clear the CMOS RTC RAM data. Turn OFF the computer and unplug the power cord. 2. Hold down the key during the boot process and enter BIOS setup to pins 2-3. Move ... can clear the CMOS memory of date, time, and system setup parameters by erasing the CMOS RTC RAM data. Removing the cap will cause system boot failure! The onboard button cell battery powers the RAM data in CMOS. Keep the cap on CLRTC jumper default position. 2.6 Jumpers 1. After the CMOS clearance, reinstall...

User Guide
Page 69
...with the opportunity to ensure optimum performance. If you can enable the security password feature or change the configuration of the LPC chip. ASUS Z8NA-D6 Series 4-7 Press during the Power-On Self-Test (POST) to ensure system compatibility and stability. The Setup program is designed to... sub-menus and make it as possible. 4.2 BIOS setup program This motherboard supports a programmable Low-Pin Count (LPC) chip that the computer can recognize these changes and record them in the CMOS RAM of your selections from the available options using the navigation keys. •...
...with the opportunity to ensure optimum performance. If you can enable the security password feature or change the configuration of the LPC chip. ASUS Z8NA-D6 Series 4-7 Press during the Power-On Self-Test (POST) to ensure system compatibility and stability. The Setup program is designed to... sub-menus and make it as possible. 4.2 BIOS setup program This motherboard supports a programmable Low-Pin Count (LPC) chip that the computer can recognize these changes and record them in the CMOS RAM of your selections from the available options using the navigation keys. •...
User Guide
Page 100
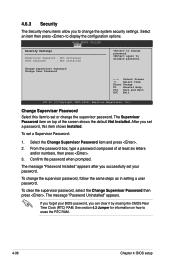
... a password, this item to change password. Confirm the password when prompted. The message "Password Uninstalled" appears. again to erase the RTC RAM. 4-38 Chapter 4: BIOS setup From the password box, type a password composed of the screen shows the default Not Installed. After you ... then press . 3. 4.6.3 Security The Security menu items allow you can clear it by erasing the CMOS Real Time Clock (RTC) RAM. Select an item then press to change the system security settings. BIOS SETUP UTILITY Boot Security Settings Supervisor Password : Not Installed User ...
... a password, this item to change password. Confirm the password when prompted. The message "Password Uninstalled" appears. again to erase the RTC RAM. 4-38 Chapter 4: BIOS setup From the password box, type a password composed of the screen shows the default Not Installed. After you ... then press . 3. 4.6.3 Security The Security menu items allow you can clear it by erasing the CMOS Real Time Clock (RTC) RAM. Select an item then press to change the system security settings. BIOS SETUP UTILITY Boot Security Settings Supervisor Password : Not Installed User ...

User Guide
Page 102
...system setup after saving the changes. After selecting this menu. When you press , a confirmation window appears. An onboard backup battery sustains the CMOS RAM so it stays on the Setup menus. If you made and restore the previously saved values. 4.7 Exit menu The Exit menu items allow you to... load the optimal or failsafe default values for the BIOS items, and save or discard your changes to the non-volatile RAM. 4-40 Chapter 4: BIOS setup Select Exit & Save Changes or make other than System Date, System Time, and Password, the BIOS asks for this ...
...system setup after saving the changes. After selecting this menu. When you press , a confirmation window appears. An onboard backup battery sustains the CMOS RAM so it stays on the Setup menus. If you made and restore the previously saved values. 4.7 Exit menu The Exit menu items allow you to... load the optimal or failsafe default values for the BIOS items, and save or discard your changes to the non-volatile RAM. 4-40 Chapter 4: BIOS setup Select Exit & Save Changes or make other than System Date, System Time, and Password, the BIOS asks for this ...


