User Guide
Page 3
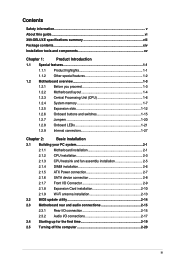
Contents Safety information...v About this guide...vi X99-DELUXE specifications summary viii Package contents...xiv Installation tools and components xv Chapter 1: Product Introduction 1.1 Special features 1-1... 2-6 2.1.5 ATX Power connection 2-7 2.1.6 SATA device connection 2-8 2.1.7 Front I/O Connector 2-9 2.1.8 Expansion Card installation 2-10 2.1.9 Wi-Fi antenna installation 2-13 2.2 BIOS update utility 2-14 2.3 Motherboard rear and audio connections 2-15 2.3.1 Rear I/O connection 2-15 2.3.2 Audio I/O connections 2-17 2.4 Starting up for the first time ...
Contents Safety information...v About this guide...vi X99-DELUXE specifications summary viii Package contents...xiv Installation tools and components xv Chapter 1: Product Introduction 1.1 Special features 1-1... 2-6 2.1.5 ATX Power connection 2-7 2.1.6 SATA device connection 2-8 2.1.7 Front I/O Connector 2-9 2.1.8 Expansion Card installation 2-10 2.1.9 Wi-Fi antenna installation 2-13 2.2 BIOS update utility 2-14 2.3 Motherboard rear and audio connections 2-15 2.3.1 Rear I/O connection 2-15 2.3.2 Audio I/O connections 2-17 2.4 Starting up for the first time ...
User Guide
Page 4
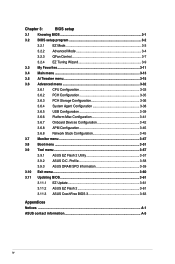
... SPD Information 3-59 3.10 Exit menu 3-60 3.11 Updating BIOS 3-61 3.11.1 EZ Update 3-61 3.11.2 ASUS EZ Flash 2 3-61 3.11.3 ASUS CrashFree BIOS 3 3-63 Appendices Notices ...A-1 ASUS contact information A-5 iv Chapter 3: BIOS setup 3.1 Knowing BIOS 3-1 3.2 BIOS setup program 3-2 3.2.1 EZ Mode 3-3 3.2.2 Advanced Mode 3-4 3.2.3 QFan Control 3-7 3.2.4 EZ Tuning Wizard 3-9 3.3 My Favorites ... 3-42 3.6.8 APM Configuration 3-45 3.6.8 Network Stack Configuration 3-45 3.7 Monitor menu 3-47 3.8 Boot menu 3-51 3.9 Tool menu 3-57 3.9.1 ASUS EZ Flash 2 Utility 3-57...
... SPD Information 3-59 3.10 Exit menu 3-60 3.11 Updating BIOS 3-61 3.11.1 EZ Update 3-61 3.11.2 ASUS EZ Flash 2 3-61 3.11.3 ASUS CrashFree BIOS 3 3-63 Appendices Notices ...A-1 ASUS contact information A-5 iv Chapter 3: BIOS setup 3.1 Knowing BIOS 3-1 3.2 BIOS setup program 3-2 3.2.1 EZ Mode 3-3 3.2.2 Advanced Mode 3-4 3.2.3 QFan Control 3-7 3.2.4 EZ Tuning Wizard 3-9 3.3 My Favorites ... 3-42 3.6.8 APM Configuration 3-45 3.6.8 Network Stack Configuration 3-45 3.7 Monitor menu 3-47 3.8 Boot menu 3-51 3.9 Tool menu 3-57 3.9.1 ASUS EZ Flash 2 Utility 3-57...
User Guide
Page 6
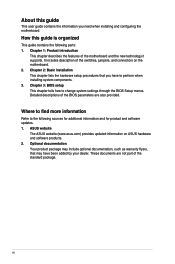
... also provided. vi How this guide This user guide contains the information you have been added by your dealer. ASUS website The ASUS website (www.asus.com) provides updated information on the motherboard. 2. Chapter 3: BIOS setup This chapter tells how to the following parts: 1. Chapter 2: Basic installation This chapter lists the hardware setup procedures...
... also provided. vi How this guide This user guide contains the information you have been added by your dealer. ASUS website The ASUS website (www.asus.com) provides updated information on the motherboard. 2. Chapter 3: BIOS setup This chapter tells how to the following parts: 1. Chapter 2: Basic installation This chapter lists the hardware setup procedures...

User Guide
Page 8
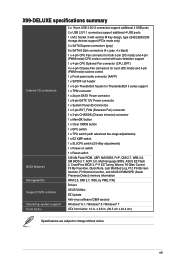
X99-DELUXE specifications summary LGA2011-v3 socket for details. 40-LANE CPU 5 x PCI...devices support (PCIE mode only) - 8 x SATA 6.0 Gb/s ports* (4 x gray from controller 1, 4 x black from controller 2) - Intel® X99 Express Chipset 8 x DIMM, max. 64 GB, DDR4 2800 (O.C.)* / 2666 (O.C.)* / 2400 (O.C.)* / 2133 MHz, non-ECC, un-buffered memory Quad channel...Turbo Boost Technology 2.0* Chipset Memory * The support of individual CPUs. Remember to adjust the bandwidth option in BIOS if you install any PCIe device on the next page) viii Please refer to Memory QVL (Qualified Vendors ...
X99-DELUXE specifications summary LGA2011-v3 socket for details. 40-LANE CPU 5 x PCI...devices support (PCIE mode only) - 8 x SATA 6.0 Gb/s ports* (4 x gray from controller 1, 4 x black from controller 2) - Intel® X99 Express Chipset 8 x DIMM, max. 64 GB, DDR4 2800 (O.C.)* / 2666 (O.C.)* / 2400 (O.C.)* / 2133 MHz, non-ECC, un-buffered memory Quad channel...Turbo Boost Technology 2.0* Chipset Memory * The support of individual CPUs. Remember to adjust the bandwidth option in BIOS if you install any PCIe device on the next page) viii Please refer to Memory QVL (Qualified Vendors ...

User Guide
Page 10
...technology with ThunderboltEX II series (continued on the next page) x DIGI+ Power Control CPU Power - ASUS DRAM power utility TPU - Turbo App - UEFI BIOS - Most advanced options with a single click! 5-Way Optimization tuning key perfectly consolidates TPU, EPU, ... Ready (Optional) - ASUS CPU power utility DRAM Power - Superb memory O.C. EPU, EPU switch ASUS Fan Xpert3 - Design - Industry leading digital 4-phase DRAM power design - X99-DELUXE specifications summary USB ASUS Exclusive Features ASUS Exclusive Features ASMedia® USB 3.0 controller - support ASUS USB 3.0 Boost - ...
...technology with ThunderboltEX II series (continued on the next page) x DIGI+ Power Control CPU Power - ASUS DRAM power utility TPU - Turbo App - UEFI BIOS - Most advanced options with a single click! 5-Way Optimization tuning key perfectly consolidates TPU, EPU, ... Ready (Optional) - ASUS CPU power utility DRAM Power - Superb memory O.C. EPU, EPU switch ASUS Fan Xpert3 - Design - Industry leading digital 4-phase DRAM power design - X99-DELUXE specifications summary USB ASUS Exclusive Features ASUS Exclusive Features ASMedia® USB 3.0 controller - support ASUS USB 3.0 Boost - ...

User Guide
Page 11
... 3.0 hub - Experience smooth online gaming with tailored performance, network priority, and audio configuration for EZ BIOS download scheduling UEFI BIOS - Tuner - ASUS Q-Slot (continued on the next page) xi function: Cloud GO!, Remote Desktop, Remote Keyboard &...BIOS Flashback - ASUS CrashFreeBIOS 3 - ASUS EZ Flash 2 Q-Design - ASUS Q-Code - Monitor your PC to -go, Photo Express, Remote Desktop, Quick Launch, Windows® 8 Login and Bluetooth pairing Gamers and Professionals Turbo APP - X99-DELUXE specifications summary ASUS Exclusive Features Powerful Home Server ASUS...
... 3.0 hub - Experience smooth online gaming with tailored performance, network priority, and audio configuration for EZ BIOS download scheduling UEFI BIOS - Tuner - ASUS Q-Slot (continued on the next page) xi function: Cloud GO!, Remote Desktop, Remote Keyboard &...BIOS Flashback - ASUS CrashFreeBIOS 3 - ASUS EZ Flash 2 Q-Design - ASUS Q-Code - Monitor your PC to -go, Photo Express, Remote Desktop, Quick Launch, Windows® 8 Login and Bluetooth pairing Gamers and Professionals Turbo APP - X99-DELUXE specifications summary ASUS Exclusive Features Powerful Home Server ASUS...

User Guide
Page 12
... with excellent durability - ASUS C.P.R. (CPU Parameter Recall) 1 x BIOS Flashback button 1 x ASUS Wi-Fi GO! ASUS Stainless Steel Back I /O ports (continued on the next page) xii vCCIN: Adjustable CPU Input voltage at 0.001 V increment - iGPU: Adjustable CPU Graphics voltage at 0.01 V increment - X99-DELUXE specifications summary ASUS Exclusive Features ASUS Special Features ASUS Quiet Thermal Solution ASUS Exclusive Overclocking Features Rear...
... with excellent durability - ASUS C.P.R. (CPU Parameter Recall) 1 x BIOS Flashback button 1 x ASUS Wi-Fi GO! ASUS Stainless Steel Back I /O ports (continued on the next page) xii vCCIN: Adjustable CPU Input voltage at 0.001 V increment - iGPU: Adjustable CPU Graphics voltage at 0.01 V increment - X99-DELUXE specifications summary ASUS Exclusive Features ASUS Special Features ASUS Quiet Thermal Solution ASUS Exclusive Overclocking Features Rear...
User Guide
Page 13
...System Panel (Q-Connector) 1 x 5-pin EXT_FAN (Extension Fan) connector 1 x 3-pin CHASSIS (Chassis intrusion) connector 1 x MemOK! X99-DELUXE specifications summary Internal I/O connectors BIOS features Manageability Support DVD contents Operating system support Form factor 2 x 19-pin USB 3.0/2.0 connectors support additional 4 USB ports 2 x...) 1 x Power-on switch 1 x Reset switch 128 Mb Flash ROM, UEFI AMI BIOS, PnP, DMI 2.7, WfM 2.0, SM BIOS 2.7, ACPI 5.0, Multi-language BIOS, ASUS EZ Flash 2, CrashFree BIOS 3, F11 EZ Tuning Wizard, F6 Qfan Control, F3 My Favorites, Quick Note, Last ...
...System Panel (Q-Connector) 1 x 5-pin EXT_FAN (Extension Fan) connector 1 x 3-pin CHASSIS (Chassis intrusion) connector 1 x MemOK! X99-DELUXE specifications summary Internal I/O connectors BIOS features Manageability Support DVD contents Operating system support Form factor 2 x 19-pin USB 3.0/2.0 connectors support additional 4 USB ports 2 x...) 1 x Power-on switch 1 x Reset switch 128 Mb Flash ROM, UEFI AMI BIOS, PnP, DMI 2.7, WfM 2.0, SM BIOS 2.7, ACPI 5.0, Multi-language BIOS, ASUS EZ Flash 2, CrashFree BIOS 3, F11 EZ Tuning Wizard, F6 Qfan Control, F3 My Favorites, Quick Note, Last ...
User Guide
Page 27
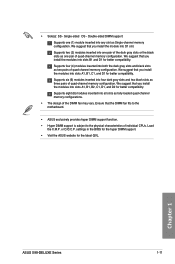
...as two pairs of quad-channel memory configuration. or D.O.C.P. We suggest that the DIMM fan fits to the motherboard. • ASUS exclusively provides hyper DIMM support function. • Hyper DIMM support is subject to the physical characteristics of the DIMM fan may ...pairs of quad-channel memory configuration. settings in the BIOS for the hyper DIMM support. • Visit the ASUS website for better compatibility. Double-sided DIMM support: Supports one pair of quad-channel memory configuration. Chapter 1 ASUS X99-DELUXE Series 1-11 • Side(s): SS - Single-sided...
...as two pairs of quad-channel memory configuration. or D.O.C.P. We suggest that the DIMM fan fits to the motherboard. • ASUS exclusively provides hyper DIMM support function. • Hyper DIMM support is subject to the physical characteristics of the DIMM fan may ...pairs of quad-channel memory configuration. settings in the BIOS for the hyper DIMM support. • Visit the ASUS website for better compatibility. Double-sided DIMM support: Supports one pair of quad-channel memory configuration. Chapter 1 ASUS X99-DELUXE Series 1-11 • Side(s): SS - Single-sided...
User Guide
Page 28
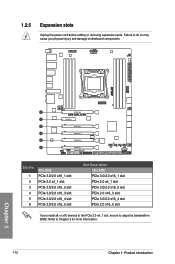
... 1: Product introduction Refer to do so may cause you install x8 or x16 devices to the PCIe 2.0 x4_1 slot, ensure to adjust its bandwidth in BIOS. Chapter 1 Slot No. 1 2 3 4 5 6 40-LANE PCIe 3.0/2.0 x16_1 slot PCIe 2.0 x4_1 slot PCIe 3.0/2.0 x16_2 slot PCIe 3.0/2.0 x16_3 slot PCIe 3.0/2.0 x16_4 slot PCIe 3.0/2.0 x16_5 slot Slot Description...
... 1: Product introduction Refer to do so may cause you install x8 or x16 devices to the PCIe 2.0 x4_1 slot, ensure to adjust its bandwidth in BIOS. Chapter 1 Slot No. 1 2 3 4 5 6 40-LANE PCIe 3.0/2.0 x16_1 slot PCIe 2.0 x4_1 slot PCIe 3.0/2.0 x16_2 slot PCIe 3.0/2.0 x16_3 slot PCIe 3.0/2.0 x16_4 slot PCIe 3.0/2.0 x16_5 slot Slot Description...
User Guide
Page 29
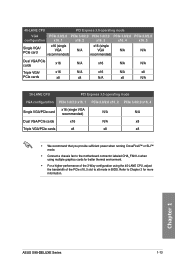
Chapter 1 ASUS X99-DELUXE Series 1-13 Refer to x8 mode in BIOS. 40-LANE CPU PCI Express 3.0 operating mode VGA PCIe 3.0/2.0 PCIe 3.0/2.0 PCIe 3.0/2.0 PCIe 3.0/2.0 PCIe 3.0/2.0 configuration x16_1 x16_2 x16_3 x16_4 x16_5 Single VGA/ PCIe card x16 (single ...
Chapter 1 ASUS X99-DELUXE Series 1-13 Refer to x8 mode in BIOS. 40-LANE CPU PCI Express 3.0 operating mode VGA PCIe 3.0/2.0 PCIe 3.0/2.0 PCIe 3.0/2.0 PCIe 3.0/2.0 PCIe 3.0/2.0 configuration x16_1 x16_2 x16_3 x16_4 x16_5 Single VGA/ PCIe card x16 (single ...
User Guide
Page 32
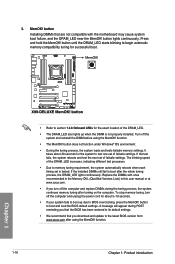
.... • If you download and update to its default settings. • We recommend that the BIOS has been restored to the latest BIOS version from www.asus.com after the whole tuning process, the DRAM_LED lights continuously. button does not function under Windows® OS environment. • During the tuning ...8226; If your system fails to test one set of failsafe settings. MemOK! function. • The MemOK! If the installed DIMMs still fail to BIOS overclocking, press the MemOK! button to section 1.2.8 Onboard LEDs for successful boot. • Refer to boot and load the...
.... • If you download and update to its default settings. • We recommend that the BIOS has been restored to the latest BIOS version from www.asus.com after the whole tuning process, the DRAM_LED lights continuously. button does not function under Windows® OS environment. • During the tuning ...8226; If your system fails to test one set of failsafe settings. MemOK! function. • The MemOK! If the installed DIMMs still fail to BIOS overclocking, press the MemOK! button to section 1.2.8 Onboard LEDs for successful boot. • Refer to boot and load the...
User Guide
Page 33
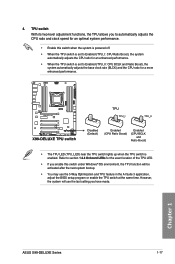
... 3 application, adjust the BIOS setup program or enable the TPU switch at the same time. Refer to Enabled (TPU_II: CPU BCLK and Ratio Boost), the system automatically adjusts the base clock rate (BLCK) and the CPU ratio for an enhanced performance. • When the TPU switch is enabled. ASUS X99-DELUXE Series 1-17 Chapter...
... 3 application, adjust the BIOS setup program or enable the TPU switch at the same time. Refer to Enabled (TPU_II: CPU BCLK and Ratio Boost), the system automatically adjusts the base clock rate (BLCK) and the CPU ratio for an enhanced performance. • When the TPU switch is enabled. ASUS X99-DELUXE Series 1-17 Chapter...

User Guide
Page 34
...; OS environment, the EPU function will be activated after the next system bootup. • You may change the EPU settings in the software application or BIOS setup program and enable the EPU function at the same time. Chapter 1 1-18 Chapter 1: Product introduction EPU switch Enable this switch when the system is...
...; OS environment, the EPU function will be activated after the next system bootup. • You may change the EPU settings in the software application or BIOS setup program and enable the EPU function at the same time. Chapter 1 1-18 Chapter 1: Product introduction EPU switch Enable this switch when the system is...
User Guide
Page 35
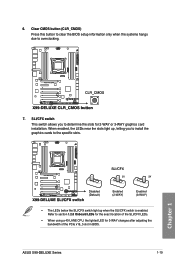
...to determine the slots for 3-WAY changes after adjusting the bandwidth of the PCIe x16_5 slot in BIOS. SLI/CFX switch This switch allows you to install the graphics cards to overclocking. 7. ASUS X99-DELUXE Series 1-19 Chapter 1 When enabled, the LEDs near the slots light up when the SLI/...CFX switch is enabled. Clear CMOS button (CLR_CMOS) Press this button to clear the BIOS setup information only when the systems hangs due to...
...to determine the slots for 3-WAY changes after adjusting the bandwidth of the PCIe x16_5 slot in BIOS. SLI/CFX switch This switch allows you to install the graphics cards to overclocking. 7. ASUS X99-DELUXE Series 1-19 Chapter 1 When enabled, the LEDs near the slots light up when the SLI/...CFX switch is enabled. Clear CMOS button (CLR_CMOS) Press this button to clear the BIOS setup information only when the systems hangs due to...
User Guide
Page 44
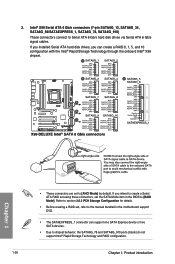
...Chapter 1: Product introduction Refer to section 3.6.3 PCH Storage Configuration for details. • Before creating a RAID set, refer to the manual bundled in the BIOS to Serial ATA 6 Gb/s hard disk drives via Serial ATA 6 Gb/s signal cables. Chapter 1 • These connectors are set the SATA Mode item... The SATAEXPRESS_1 connector can create a RAID 0, 1, 5, and 10 configuration with the Intel® Rapid Storage Technology through the onboard Intel® X99 chipset. If you can support one SATA Express device or two SATA devices. • Due to [AHCI Mode] by default. Intel®...
...Chapter 1: Product introduction Refer to section 3.6.3 PCH Storage Configuration for details. • Before creating a RAID set, refer to the manual bundled in the BIOS to Serial ATA 6 Gb/s hard disk drives via Serial ATA 6 Gb/s signal cables. Chapter 1 • These connectors are set the SATA Mode item... The SATAEXPRESS_1 connector can create a RAID 0, 1, 5, and 10 configuration with the Intel® Rapid Storage Technology through the onboard Intel® X99 chipset. If you can support one SATA Express device or two SATA devices. • Due to [AHCI Mode] by default. Intel®...

User Guide
Page 45
...of the front panel audio I /O module that you connect a high-definition front panel audio module to this connector to avail of the system chassis. ASUS X99-DELUXE Series 1-29 Connect the S/PDIF Out module cable to a slot opening at the back of the motherboard's high-definition audio capability. • If you... want to connect a high-definition or an AC'97 front panel audio module to this connector, set the Front Panel Type item in the BIOS setup to [HD] or [AC97]. The S/PDIF module is for an additional Sony/Philips Digital Interface (S/PDIF) port. Digital audio connector (4-1 pin ...
...of the front panel audio I /O module that you connect a high-definition front panel audio module to this connector to avail of the system chassis. ASUS X99-DELUXE Series 1-29 Connect the S/PDIF Out module cable to a slot opening at the back of the motherboard's high-definition audio capability. • If you... want to connect a high-definition or an AC'97 front panel audio module to this connector, set the Front Panel Type item in the BIOS setup to [HD] or [AC97]. The S/PDIF module is for an additional Sony/Philips Digital Interface (S/PDIF) port. Digital audio connector (4-1 pin ...

User Guide
Page 48
...'s control mode, go to section 2.1.8 Expansion card installation for details. Do not place jumper caps on X99 platform. • The EXT_FAN connector supports 2 of 5 thermal sensor sources. • The CPU fan...maximum 1A (12 W) fan power. • The CPU_FAN, CHA_FAN, and EXT_FAN connectors support the ASUS FAN Xpert 3 feature on the fan connectors! • Ensure that the black wire of each ... Monitor > CPU Q-Fan Control item in BIOS. • To install more fans, refer to Advanced Mode > Monitor > Chassis Fan 1/4 Q-Fan Control items in BIOS. • The chassis fan connectors support DC...
...'s control mode, go to section 2.1.8 Expansion card installation for details. Do not place jumper caps on X99 platform. • The EXT_FAN connector supports 2 of 5 thermal sensor sources. • The CPU fan...maximum 1A (12 W) fan power. • The CPU_FAN, CHA_FAN, and EXT_FAN connectors support the ASUS FAN Xpert 3 feature on the fan connectors! • Ensure that the black wire of each ... Monitor > CPU Q-Fan Control item in BIOS. • To install more fans, refer to Advanced Mode > Monitor > Chassis Fan 1/4 Q-Fan Control items in BIOS. • The chassis fan connectors support DC...

User Guide
Page 53
... you connect the sensor or switch at the first time or when you intend to exit the message. Chapter 1 ASUS X99-DELUXE Series 1-37 Remove the jumper caps and enable the related options in BIOS if you reconnect the sensor or switch to this connector when a chassis component is removed or replaced. 14. The...
... you connect the sensor or switch at the first time or when you intend to exit the message. Chapter 1 ASUS X99-DELUXE Series 1-37 Remove the jumper caps and enable the related options in BIOS if you reconnect the sensor or switch to this connector when a chassis component is removed or replaced. 14. The...
User Guide
Page 67
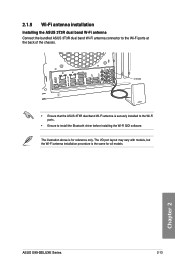
... installation procedure is the same for reference only. Chapter 2 ASUS X99-DELUXE Series 2-13 The illustration above is securely installed to the Wi-Fi ports. • Ensure to the Wi-Fi ports at the back of the chassis. IO Shield BIOS • Ensure that the ASUS 3T3R dual band Wi-Fi antenna is for all...
... installation procedure is the same for reference only. Chapter 2 ASUS X99-DELUXE Series 2-13 The illustration above is securely installed to the Wi-Fi ports. • Ensure to the Wi-Fi ports at the back of the chassis. IO Shield BIOS • Ensure that the ASUS 3T3R dual band Wi-Fi antenna is for all...


