User Guide
Page 2
... your request please provide the name, model number and version, as the corresponding binary/object code. All Rights Reserved. ASUS ASSUMES NO RESPONSIBILITY OR LIABILITY FOR ANY ERRORS OR INACCURACIES THAT MAY APPEAR IN THIS MANUAL, INCLUDING THE PRODUCTS AND SOFTWARE DESCRIBED IN IT. This offer is distributed without the express written permission of this email address). IN...
... your request please provide the name, model number and version, as the corresponding binary/object code. All Rights Reserved. ASUS ASSUMES NO RESPONSIBILITY OR LIABILITY FOR ANY ERRORS OR INACCURACIES THAT MAY APPEAR IN THIS MANUAL, INCLUDING THE PRODUCTS AND SOFTWARE DESCRIBED IN IT. This offer is distributed without the express written permission of this email address). IN...
User Guide
Page 6
... product and software updates. 1. Chapter 3: BIOS setup This chapter tells how to change system settings through the BIOS Setup menus. How this guide This user guide contains the information you have been added by your dealer. Optional documentation Your product package may include optional documentation, such as warranty flyers, that you need when installing and configuring the motherboard. These documents are not part of the BIOS parameters are...
... product and software updates. 1. Chapter 3: BIOS setup This chapter tells how to change system settings through the BIOS Setup menus. How this guide This user guide contains the information you have been added by your dealer. Optional documentation Your product package may include optional documentation, such as warranty flyers, that you need when installing and configuring the motherboard. These documents are not part of the BIOS parameters are...

User Guide
Page 8
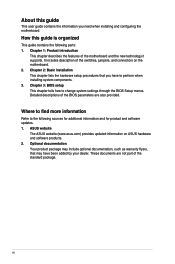
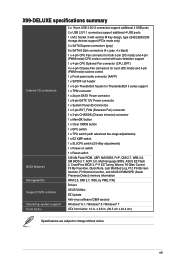
... RAID 0, 1, 5, 10 and Intel® Rapid Storage Technology 13 support - 1 x SATA Express port (gray at x1 mode, compatible with PCIe x1 devices) 1 x PCI Express 2.0 x4 slot** (compatible with PCIe x1 and x4 devices) Multi-GPU support Storage * The PCIe x16_5 shares bandwidth with vertical M Key design, type 2242/2260/2280 storage devices support (PCIE mode only) - 8 x SATA 6.0 Gb/s ports* (4 x gray from controller 1, 4 x black from controller 2) - Intel® X99 Express Chipset 8 x DIMM, max. 64 GB, DDR4 2800 (O.C.)* / 2666 (O.C.)* / 2400 (O.C.)* / 2133 MHz, non-ECC, un-buffered memory...
... RAID 0, 1, 5, 10 and Intel® Rapid Storage Technology 13 support - 1 x SATA Express port (gray at x1 mode, compatible with PCIe x1 devices) 1 x PCI Express 2.0 x4 slot** (compatible with PCIe x1 and x4 devices) Multi-GPU support Storage * The PCIe x16_5 shares bandwidth with vertical M Key design, type 2242/2260/2280 storage devices support (PCIE mode only) - 8 x SATA 6.0 Gb/s ports* (4 x gray from controller 1, 4 x black from controller 2) - Intel® X99 Express Chipset 8 x DIMM, max. 64 GB, DDR4 2800 (O.C.)* / 2666 (O.C.)* / 2400 (O.C.)* / 2133 MHz, non-ECC, un-buffered memory...
User Guide
Page 9
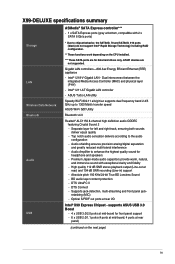
...-in) support - ATAPI devices are for headphone and speakers - DTS Connect - X99-DELUXE specifications summary ASMedia® SATA Express controller*** - 1 x SATA Express ports (gray at bottom, compatible with exceptional clarity and fidelity - Separate layer for front panel support - 6 x USB 2.0/1.1 ports (4 ports at mid-board, 4 ports at rear panel) (continued on the CPU installed. *** These SATA ports are not supported. Absolute pitch 192 KHz/24-bit True BD Lossless Sound - Gigabit LAN controllers-802.3az Energy Efficient Ethernet (EEE) appliance - ASUS Turbo LAN utility Speedy...
...-in) support - ATAPI devices are for headphone and speakers - DTS Connect - X99-DELUXE specifications summary ASMedia® SATA Express controller*** - 1 x SATA Express ports (gray at bottom, compatible with exceptional clarity and fidelity - Separate layer for front panel support - 6 x USB 2.0/1.1 ports (4 ports at mid-board, 4 ports at rear panel) (continued on the CPU installed. *** These SATA ports are not supported. Absolute pitch 192 KHz/24-bit True BD Lossless Sound - Gigabit LAN controllers-802.3az Energy Efficient Ethernet (EEE) appliance - ASUS Turbo LAN utility Speedy...
User Guide
Page 13
..., and ASUS DRAM SPD (Serial Presence Detect) memory information WfM 2.0, DMI 2.7, WOL by PME, PXE Drivers ASUS Utilities EZ Update Anti-virus software (OEM version) Windows® 8.1 / Windows® 8 / Windows® 7 ATX form factor: 12 in . (30.5 cm x 24.4 cm) Specifications are subject to change without notice. xiii x 9.6 in . button 1 x Clear CMOS button 1 x EPU switch 1 x TPU switch (with auto-detection support 1 x 4-pin CPU Optional Fan connector (CPU_OPT) 4 x 4-pin Chassis Fan connectors for 3-pin (DC mode) and 4-pin (PWM mode) coolers control 1 x Front panel audio connector...
..., and ASUS DRAM SPD (Serial Presence Detect) memory information WfM 2.0, DMI 2.7, WOL by PME, PXE Drivers ASUS Utilities EZ Update Anti-virus software (OEM version) Windows® 8.1 / Windows® 8 / Windows® 7 ATX form factor: 12 in . (30.5 cm x 24.4 cm) Specifications are subject to change without notice. xiii x 9.6 in . button 1 x Clear CMOS button 1 x EPU switch 1 x TPU switch (with auto-detection support 1 x 4-pin CPU Optional Fan connector (CPU_OPT) 4 x 4-pin Chassis Fan connectors for 3-pin (DC mode) and 4-pin (PWM mode) coolers control 1 x Front panel audio connector...

User Guide
Page 21
...37 Chapter 1 ASUS X99-DELUXE Series 1-5 LGA2011-v3 CPU socket 4. USB1314) 16. TPM connector (20-1 pin TPM) 20. Clear CMOS button (CLR_CMOS) 21. Front panel audio connector (10-1 pin AAFP) 25. Layout contents Connectors/Jumpers/Buttons and switches/Slots 1. M.2 Socket 3 7. Intel® Serial ATA 6 Gb/s connectors (7-pin SATA6G_12, SATA 6G_34, SATA 6G_56/SATAEXPRESS_1, SATA 6G_78, SATA6G_910) 9. Thunderbolt header (5-pin TB_HEADER) 12. USB 3.0 connectors (20-1 pin USB3_12, USB3_34) 18. Power-on button 24. DirectKey connector (2-pin DRCT) 15. Reset button 23. DDR4...
...37 Chapter 1 ASUS X99-DELUXE Series 1-5 LGA2011-v3 CPU socket 4. USB1314) 16. TPM connector (20-1 pin TPM) 20. Clear CMOS button (CLR_CMOS) 21. Front panel audio connector (10-1 pin AAFP) 25. Layout contents Connectors/Jumpers/Buttons and switches/Slots 1. M.2 Socket 3 7. Intel® Serial ATA 6 Gb/s connectors (7-pin SATA6G_12, SATA 6G_34, SATA 6G_56/SATAEXPRESS_1, SATA 6G_78, SATA6G_910) 9. Thunderbolt header (5-pin TB_HEADER) 12. USB 3.0 connectors (20-1 pin USB3_12, USB3_34) 18. Power-on button 24. DirectKey connector (2-pin DRCT) 15. Reset button 23. DDR4...
User Guide
Page 41
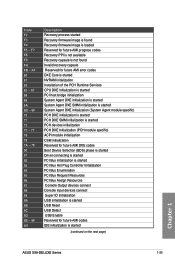
...module specific) ACPI module initialization CSM initialization Reserved for future AMI DXE codes Boot Device Selection (BDS) phase is started Driver connecting is started PCI Bus initialization is started PCI Bus Hot Plug Controller Initialization PCI Bus Enumeration PCI Bus Request Resources PCI Bus Assign Resources Console Output devices connect Console input devices connect Super IO Initialization USB initialization is started USB Reset USB Detect USB Enable Reserved for future AMI codes IDE initialization is started (continued on the next page) Chapter 1 ASUS X99-DELUXE Series 1-25 Code...
...module specific) ACPI module initialization CSM initialization Reserved for future AMI DXE codes Boot Device Selection (BDS) phase is started Driver connecting is started PCI Bus initialization is started PCI Bus Hot Plug Controller Initialization PCI Bus Enumeration PCI Bus Request Resources PCI Bus Assign Resources Console Output devices connect Console input devices connect Super IO Initialization USB initialization is started USB Reset USB Detect USB Enable Reserved for future AMI codes IDE initialization is started (continued on the next page) Chapter 1 ASUS X99-DELUXE Series 1-25 Code...
User Guide
Page 42
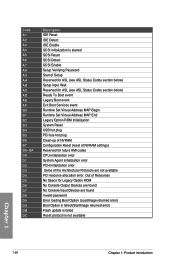
... SCSI Enable Setup Verifying Password Start of Setup Reserved for ASL (see ASL Status Codes section below) Setup Input Wait Reserved for ASL (see ASL Status Codes section below) Ready To Boot event Legacy Boot event Exit Boot Services event Runtime Set Virtual Address MAP Begin Runtime Set Virtual Address MAP End Legacy Option ROM Initialization System Reset USB hot plug PCI bus hot plug Clean-up of NVRAM Configuration Reset (reset of the Architectural Protocols are found Invalid password Error loading Boot Option...
... SCSI Enable Setup Verifying Password Start of Setup Reserved for ASL (see ASL Status Codes section below) Setup Input Wait Reserved for ASL (see ASL Status Codes section below) Ready To Boot event Legacy Boot event Exit Boot Services event Runtime Set Virtual Address MAP Begin Runtime Set Virtual Address MAP End Legacy Option ROM Initialization System Reset USB hot plug PCI bus hot plug Clean-up of NVRAM Configuration Reset (reset of the Architectural Protocols are found Invalid password Error loading Boot Option...
User Guide
Page 43
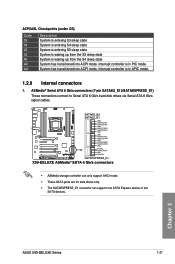
... 6 Gb/s connectors (7-pin SATA6G_E12/SATAEXPRESS_E1) These connectors connect to Serial ATA 6 Gb/s hard disk drives via Serial ATA 6 Gb/s signal cables. Chapter 1 • ASMedia storage controller can only support AHCI mode. • These SATA ports are for data drives only. • The SATAEXPRESS_E1 connector can support one SATA Express device or two SATA devices. Interrupt controller is in PIC mode. Interrupt controller is in APIC mode. 1.2.9 Internal connectors 1. ASUS X99-DELUXE Series 1-27 System has transitioned into ACPI mode. ACPI/ASL Checkpoints (under OS) Code 03 04...
... 6 Gb/s connectors (7-pin SATA6G_E12/SATAEXPRESS_E1) These connectors connect to Serial ATA 6 Gb/s hard disk drives via Serial ATA 6 Gb/s signal cables. Chapter 1 • ASMedia storage controller can only support AHCI mode. • These SATA ports are for data drives only. • The SATAEXPRESS_E1 connector can support one SATA Express device or two SATA devices. Interrupt controller is in PIC mode. Interrupt controller is in APIC mode. 1.2.9 Internal connectors 1. ASUS X99-DELUXE Series 1-27 System has transitioned into ACPI mode. ACPI/ASL Checkpoints (under OS) Code 03 04...
User Guide
Page 46
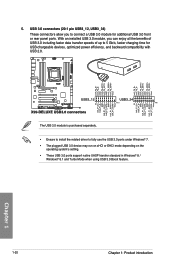
... plugged USB 3.0 device may run on xHCI or EHCI mode depending on the operating system's setting. • These USB 3.0 ports support native UASP transfer standard in Windows® 8 / Windows® 8.1 and Turbo Mode when using USB 3.0 Boost feature. Chapter 1 1-30 Chapter 1: Product introduction The USB 3.0 module is purchased separately. • Ensure to install the related driver to connect a USB 3.0 module for USB-chargeable devices, optimized power efficiency, and backward compatibility with USB 2.0. USB 3.0 connectors (20-1 pin...
... plugged USB 3.0 device may run on xHCI or EHCI mode depending on the operating system's setting. • These USB 3.0 ports support native UASP transfer standard in Windows® 8 / Windows® 8.1 and Turbo Mode when using USB 3.0 Boost feature. Chapter 1 1-30 Chapter 1: Product introduction The USB 3.0 module is purchased separately. • Ensure to install the related driver to connect a USB 3.0 module for USB-chargeable devices, optimized power efficiency, and backward compatibility with USB 2.0. USB 3.0 connectors (20-1 pin...
User Guide
Page 67
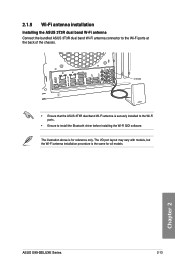
... USB 3.0/UASP 2.1.9 Wi-Fi antenna installation Installing the ASUS 3T3R dual band W-Fi antenna Connect the bundled ASUS 3T3R dual band Wi-Fi antenna connector to install the Bluetooth driver before installing the Wi-Fi GO! Chapter 2 ASUS X99-DELUXE Series 2-13 The I/O port layout may vary with models, but the Wi-Fi antenna installation procedure is for all models. The illustration above is the same for reference only. IO Shield BIOS...
... USB 3.0/UASP 2.1.9 Wi-Fi antenna installation Installing the ASUS 3T3R dual band W-Fi antenna Connect the bundled ASUS 3T3R dual band Wi-Fi antenna connector to install the Bluetooth driver before installing the Wi-Fi GO! Chapter 2 ASUS X99-DELUXE Series 2-13 The I/O port layout may vary with models, but the Wi-Fi antenna installation procedure is for all models. The illustration above is the same for reference only. IO Shield BIOS...
User Guide
Page 77
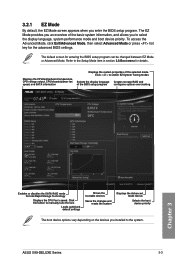
...boot device priority The boot device options vary depending on the devices you to the system. Refer to switch EZ System Tuning modes Selects the display language Creates storage RAID and of the selected mode. 3.2.1 EZ Mode By default, the EZ Mode screen appears when you enter the BIOS setup program. Displays the CPU/motherboard temperature, CPU voltage output, CPU/chassis/power fan speed, and SATA information Displays the system properties of the BIOS setup program configures system overclocking Chapter 3 Enables or disables the SATA RAID mode for details. ASUS X99-DELUXE...
...boot device priority The boot device options vary depending on the devices you to the system. Refer to switch EZ System Tuning modes Selects the display language Creates storage RAID and of the selected mode. 3.2.1 EZ Mode By default, the EZ Mode screen appears when you enter the BIOS setup program. Displays the CPU/motherboard temperature, CPU voltage output, CPU/chassis/power fan speed, and SATA information Displays the system properties of the BIOS setup program configures system overclocking Chapter 3 Enables or disables the SATA RAID mode for details. ASUS X99-DELUXE...

User Guide
Page 86
... the following items to save as Memory SPD Information, system time and date. 4. Select an item from main menu panel, then click the submenu that you want to My Favorite items: • Items with submenu options • User-managed items such as language and boot order • Configuration items such as favorite from the BIOS screen to close Setup Tree Map...
... the following items to save as Memory SPD Information, system time and date. 4. Select an item from main menu panel, then click the submenu that you want to My Favorite items: • Items with submenu options • User-managed items such as language and boot order • Configuration items such as favorite from the BIOS screen to close Setup Tree Map...
User Guide
Page 98
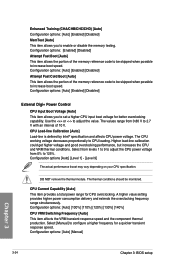
... adjust the CPU power voltage from 0.80 V to 2.7 V with an interval of the memory reference code to be skipped when possible to increase boot speed. DO NOT remove the thermal module. Configuration options: [Auto] [100%] [110%] [120%] [130%] [140%] CPU VRM Switching Frequency [Auto] This item affects the VRM transient response speed and the component thermal production. Configuration options: [Auto] [Manual] Chapter 3 3-24 Chapter 3: BIOS setup Use the or to enable or disable the memory testing...
... adjust the CPU power voltage from 0.80 V to 2.7 V with an interval of the memory reference code to be skipped when possible to increase boot speed. DO NOT remove the thermal module. Configuration options: [Auto] [100%] [110%] [120%] [130%] [140%] CPU VRM Switching Frequency [Auto] This item affects the VRM transient response speed and the component thermal production. Configuration options: [Auto] [Manual] Chapter 3 3-24 Chapter 3: BIOS setup Use the or to enable or disable the memory testing...

User Guide
Page 111
... Mode] when you want the SATA hard disk drives to use the Serial ATA hard disk drives as Parallel ATA physical storage devices. [AHCI Mode] Set to [AHCI Mode] when you to Intel® chipset specification, the SATA ports from the SATA hard disk drives. When disabled, the hot plug function of commands. SATA Controller 1 Mode Selection [AHCI] This item allows you to set the SATA Mode Selection to [IDE]. Due to enable/disable SATA Hot Plug Support. If some ports are disabled. Configuration options: [Disabled] [Enabled] ASUS X99-DELUXE Series 3-37 Support Aggressive Link Power...
... Mode] when you want the SATA hard disk drives to use the Serial ATA hard disk drives as Parallel ATA physical storage devices. [AHCI Mode] Set to [AHCI Mode] when you to Intel® chipset specification, the SATA ports from the SATA hard disk drives. When disabled, the hot plug function of commands. SATA Controller 1 Mode Selection [AHCI] This item allows you to set the SATA Mode Selection to [IDE]. Due to enable/disable SATA Hot Plug Support. If some ports are disabled. Configuration options: [Disabled] [Enabled] ASUS X99-DELUXE Series 3-37 Support Aggressive Link Power...

User Guide
Page 126
...) [Enabled] [Disabled] Disables the DirectKey button. Connect the 2-pin connector of the chassis reset buton cable to a SATA ports are detected during POST. This process extends the POST time. The system will only power on or off when you press the DirectKey button. [Enabled] Allows the system to power on the next boot after an AC power loss. The following items appear only when you set the Boot Logo Display to [Auto] and [Full Screen]. USB Support...
...) [Enabled] [Disabled] Disables the DirectKey button. Connect the 2-pin connector of the chassis reset buton cable to a SATA ports are detected during POST. This process extends the POST time. The system will only power on or off when you press the DirectKey button. [Enabled] Allows the system to power on the next boot after an AC power loss. The following items appear only when you set the Boot Logo Display to [Auto] and [Full Screen]. USB Support...

User Guide
Page 131
... to enable or disable the Setup animator. ASUS X99-DELUXE Series 3-57 Chapter 3 Setup Animator This item allows you to section 3.11.2 ASUS EZ Flash 2. Select an item then press to run ASUS EZ Flash 2. Use the left/right arrow key to select between [Yes] or [No], then press to confirm your motherboard for special functions. GPU Post This item shows the installed graphics cards in your motherboard. Configuration options: [Disabled] [Enabled] 3.9.1 ASUS EZ Flash 2 Utility This...
... to enable or disable the Setup animator. ASUS X99-DELUXE Series 3-57 Chapter 3 Setup Animator This item allows you to section 3.11.2 ASUS EZ Flash 2. Select an item then press to run ASUS EZ Flash 2. Use the left/right arrow key to select between [Yes] or [No], then press to confirm your motherboard for special functions. GPU Post This item shows the installed graphics cards in your motherboard. Configuration options: [Disabled] [Enabled] 3.9.1 ASUS EZ Flash 2 Utility This...

User Guide
Page 135
... failure to manage and update the motherboard BIOS setup program. 1. Carefully follow the instructions in this motherboard. Before you to boot. Chapter 3 ASUS X99-DELUXE Series 3-61 ASUS BIOS Updater: Updates the BIOS in Windows® environment. • EZ Update requires an Internet connection either through a network or an ISP (Internet Service Provider). • This utility is potentially risky. To update the BIOS using this utility, download the latest BIOS from the ASUS website at www.asus.com. ASUS EZ Flash 2: Updates the BIOS using the motherboard support DVD...
... failure to manage and update the motherboard BIOS setup program. 1. Carefully follow the instructions in this motherboard. Before you to boot. Chapter 3 ASUS X99-DELUXE Series 3-61 ASUS BIOS Updater: Updates the BIOS in Windows® environment. • EZ Update requires an Internet connection either through a network or an ISP (Internet Service Provider). • This utility is potentially risky. To update the BIOS using this utility, download the latest BIOS from the ASUS website at www.asus.com. ASUS EZ Flash 2: Updates the BIOS using the motherboard support DVD...
User Guide
Page 137
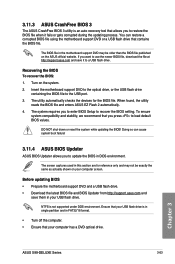
... your computer has a DVD optical drive. NTFS is an auto recovery tool that your computer screen. Doing so can restore a corrupted BIOS file using the motherboard support DVD or a USB flash drive that you to enter BIOS Setup to update the BIOS in DOS environment. Recovering the BIOS To recover the BIOS: 1. When found, the utility reads the BIOS file and enters ASUS EZ Flash 2 automatically. 4. Chapter 3 ASUS X99-DELUXE Series 3-63 3.11.3 ASUS CrashFree BIOS 3 The ASUS CrashFree BIOS 3 utility is not supported under DOS environment...
... your computer has a DVD optical drive. NTFS is an auto recovery tool that your computer screen. Doing so can restore a corrupted BIOS file using the motherboard support DVD or a USB flash drive that you to enter BIOS Setup to update the BIOS in DOS environment. Recovering the BIOS To recover the BIOS: 1. When found, the utility reads the BIOS file and enters ASUS EZ Flash 2 automatically. 4. Chapter 3 ASUS X99-DELUXE Series 3-63 3.11.3 ASUS CrashFree BIOS 3 The ASUS CrashFree BIOS 3 utility is not supported under DOS environment...
User Guide
Page 138
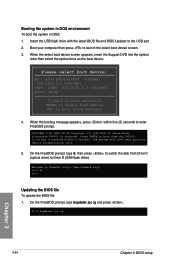
...: ASUS DVD-E818A6T (4069MB) USB DISK 2.0 (3824MB) UEFI: (FAT) USB DISK 2.0 (3824MB) Enter Setup and to move selection ENTER to select boot device ESC to launch the select boot device screen. 3. Welcome to enter FreeDOS prompt. When the booting message appears, press within 5 seconds, the system will boot next priority device automatically. On the FreeDOS prompt, type bupdater /pc /g and press . Insert the USB flash drive with the latest BIOS file and BIOS Updater to Drive D (USB flash drive...
...: ASUS DVD-E818A6T (4069MB) USB DISK 2.0 (3824MB) UEFI: (FAT) USB DISK 2.0 (3824MB) Enter Setup and to move selection ENTER to select boot device ESC to launch the select boot device screen. 3. Welcome to enter FreeDOS prompt. When the booting message appears, press within 5 seconds, the system will boot next priority device automatically. On the FreeDOS prompt, type bupdater /pc /g and press . Insert the USB flash drive with the latest BIOS file and BIOS Updater to Drive D (USB flash drive...


