User Manual
Page 2
...and software described in it, may obtain it for free by downloading it shipped to : ASUSTeK Computer Inc. ii All Rights Reserved. ASUS PROVIDES THIS MANUAL "AS IS" WITHOUT WARRANTY OF ANY KIND, EITHER EXPRESS OR IMPLIED, INCLUDING BUT NOT LIMITED TO THE IMPLIED WARRANTIES OR CONDITIONS OF ...OR DATA, INTERRUPTION OF BUSINESS AND THE LIKE), EVEN IF ASUS HAS BEEN ADVISED OF THE POSSIBILITY OF SUCH DAMAGES ARISING FROM ANY DEFECT OR ERROR IN THIS MANUAL OR PRODUCT. SPECIFICATIONS AND INFORMATION CONTAINED IN THIS MANUAL ARE FURNISHED FOR INFORMATIONAL USE ONLY, AND ARE SUBJECT TO CHANGE...
...and software described in it, may obtain it for free by downloading it shipped to : ASUSTeK Computer Inc. ii All Rights Reserved. ASUS PROVIDES THIS MANUAL "AS IS" WITHOUT WARRANTY OF ANY KIND, EITHER EXPRESS OR IMPLIED, INCLUDING BUT NOT LIMITED TO THE IMPLIED WARRANTIES OR CONDITIONS OF ...OR DATA, INTERRUPTION OF BUSINESS AND THE LIKE), EVEN IF ASUS HAS BEEN ADVISED OF THE POSSIBILITY OF SUCH DAMAGES ARISING FROM ANY DEFECT OR ERROR IN THIS MANUAL OR PRODUCT. SPECIFICATIONS AND INFORMATION CONTAINED IN THIS MANUAL ARE FURNISHED FOR INFORMATIONAL USE ONLY, AND ARE SUBJECT TO CHANGE...

User Manual
Page 6
... connecting or removing signal cables from the motherboard, ensure that your power supply is broken, do not try to fix it , carefully read all the manuals that the power cables for the devices are unplugged before the signal cables are connected. Safety information Electrical safety • To prevent electrical shock hazard...
... connecting or removing signal cables from the motherboard, ensure that your power supply is broken, do not try to fix it , carefully read all the manuals that the power cables for the devices are unplugged before the signal cables are connected. Safety information Electrical safety • To prevent electrical shock hazard...

User Manual
Page 8
... that you complete a task. If you must press two or more keys simultaneously, the key names are linked with a plus sign (+). Conventions used throughout this manual. DANGER/WARNING: Information to prevent injury to yourself when trying to help you perform certain tasks properly, take note of the following symbols used in...
... that you complete a task. If you must press two or more keys simultaneously, the key names are linked with a plus sign (+). Conventions used throughout this manual. DANGER/WARNING: Information to prevent injury to yourself when trying to help you perform certain tasks properly, take note of the following symbols used in...
User Manual
Page 12
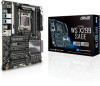
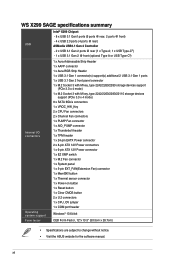
...-bit CEB Form Factor, 12"x 10.5" (30.5cm x 26.7cm) • Specifications are subject to change without notice. • Visit the ASUS website for the software manual. xii WS X299 SAGE specifications summary Intel® X299 Chipset - 8 x USB 3.1 Gen1 ports (6 ports @ rear, 2 ports @ front) - 4 x USB 2.0 ports (4 ports @ rear) USB ASMedia USB3.1 Gen 2 Controller - 2 x USB 3.1 Gen 2 ports...
...-bit CEB Form Factor, 12"x 10.5" (30.5cm x 26.7cm) • Specifications are subject to change without notice. • Visit the ASUS website for the software manual. xii WS X299 SAGE specifications summary Intel® X299 Chipset - 8 x USB 3.1 Gen1 ports (6 ports @ rear, 2 ports @ front) - 4 x USB 2.0 ports (4 ports @ rear) USB ASMedia USB3.1 Gen 2 Controller - 2 x USB 3.1 Gen 2 ports...

User Manual
Page 43
Chapter 2 ASUS WS X299 SAGE 2-3 The plastic cap will pop up automatically once the CPU is in this manual. Follow the instructions printed on the metal sealing hatch or the illustrations shown below in place and the hatch properly sealed down. 2.1.2 CPU installation Please note the order in opening/ closing the double latch.
Chapter 2 ASUS WS X299 SAGE 2-3 The plastic cap will pop up automatically once the CPU is in this manual. Follow the instructions printed on the metal sealing hatch or the illustrations shown below in place and the hatch properly sealed down. 2.1.2 CPU installation Please note the order in opening/ closing the double latch.

User Manual
Page 59
... the motherboard CMOS. In normal circumstances, the default BIOS settings apply to most conditions to the latest BIOS version for this user manual refers to run the BIOS Setup. • You have installed a new system component that requires further BIOS settings or update.... downloading or updating the BIOS file, rename it as WSXSG.CAP for settings and options. Please refer to ensure optimal performance. Chapter 3 ASUS WS X299 SAGE 3-1 Inappropriate BIOS settings may vary due to enable a more flexible and convenient mouse input. BIOS (Basic Input and Output System) stores ...
... the motherboard CMOS. In normal circumstances, the default BIOS settings apply to most conditions to the latest BIOS version for this user manual refers to run the BIOS Setup. • You have installed a new system component that requires further BIOS settings or update.... downloading or updating the BIOS file, rename it as WSXSG.CAP for settings and options. Please refer to ensure optimal performance. Chapter 3 ASUS WS X299 SAGE 3-1 Inappropriate BIOS settings may vary due to enable a more flexible and convenient mouse input. BIOS (Basic Input and Output System) stores ...

User Manual
Page 60
... power button to erase the RTC RAM via the Clear CMOS button. • The BIOS setup program does not support the Bluetooth devices. Please visit ASUS website for reference purposes only, and may not exactly match what you see on . See section 3.10 Exit Menu for information on how to turn... screens shown in this option only if you in Boot menu or by pressing the hotkey. Do this section are for the detailed BIOS content manual. The BIOS screen include navigation keys and brief onscreen help to guide you failed to ensure system compatibility and stability.
... power button to erase the RTC RAM via the Clear CMOS button. • The BIOS setup program does not support the Bluetooth devices. Please visit ASUS website for reference purposes only, and may not exactly match what you see on . See section 3.10 Exit Menu for information on how to turn... screens shown in this option only if you in Boot menu or by pressing the hotkey. Do this section are for the detailed BIOS content manual. The BIOS screen include navigation keys and brief onscreen help to guide you failed to ensure system compatibility and stability.
User Manual
Page 61
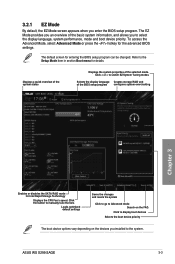
...status Displays the system properties of the basic system information, and allows you an overview of the selected mode. Click the button to manually tune the fans Loads optimized default settings Saves the changes and resets the system Click to go to Advanced mode Search on the ...display language Creates storage RAID and of the BIOS setup program configures system overclocking Chapter 3 Enables or disables the SATA RAID mode for details. ASUS WS X299 SAGE 3-3 3.2.1 EZ Mode By default, the EZ Mode screen appears when you installed to the system. Refer to the Setup Mode item in section...
...status Displays the system properties of the basic system information, and allows you an overview of the selected mode. Click the button to manually tune the fans Loads optimized default settings Saves the changes and resets the system Click to go to Advanced mode Search on the ...display language Creates storage RAID and of the BIOS setup program configures system overclocking Chapter 3 Enables or disables the SATA RAID mode for details. ASUS WS X299 SAGE 3-3 3.2.1 EZ Mode By default, the EZ Mode screen appears when you installed to the system. Refer to the Setup Mode item in section...

User Manual
Page 63
... screen has the following main items: My Favorites Main Ai Tweaker Advanced For saving the frequently-used system settings and configuration. Click this button to manually tweak the fans to MyFavorites menu. Refer to section 3.2.3 QFan Control for your system. For changing the basic system configuration For changing the overclocking settings... menu bar shows all BIOS items in your desired settings. Refer to section 3.2.4 EZ Tuning Wizard for that you can select for more information. Chapter 3 ASUS WS X299 SAGE 3-5
... screen has the following main items: My Favorites Main Ai Tweaker Advanced For saving the frequently-used system settings and configuration. Click this button to manually tweak the fans to MyFavorites menu. Refer to section 3.2.3 QFan Control for your system. For changing the basic system configuration For changing the overclocking settings... menu bar shows all BIOS items in your desired settings. Refer to section 3.2.4 EZ Tuning Wizard for that you can select for more information. Chapter 3 ASUS WS X299 SAGE 3-5

User Manual
Page 65
3.2.3 QFan Control The QFan Control allows you to manually configure your CPU and chassis fans. Click to select a fan to be configured Click to activate PWM Mode Click to activate DC Mode Select a profile to apply to your fans Click to apply the fan setting Click to undo the changes Click to go back to main menu Select to set a fan profile or manually configure the operating speed of your fans Chapter 3 ASUS WS X299 SAGE 3-7
3.2.3 QFan Control The QFan Control allows you to manually configure your CPU and chassis fans. Click to select a fan to be configured Click to activate PWM Mode Click to activate DC Mode Select a profile to apply to your fans Click to apply the fan setting Click to undo the changes Click to go back to main menu Select to set a fan profile or manually configure the operating speed of your fans Chapter 3 ASUS WS X299 SAGE 3-7

User Manual
Page 66
Click and drag the speed points to save the changes then click Exit (ESC). 3-8 Chapter 3: BIOS Setup Click Apply to adjust the fans' operating speed. 3. Chapter 3 Speed points Select to manually configure your fans To configure your fans' operating speed. Select the fan that you want to configure and to view its current status. 2. Configuring fans manually Select Manual from the list of profiles to manually configure your fans: 1.
Click and drag the speed points to save the changes then click Exit (ESC). 3-8 Chapter 3: BIOS Setup Click Apply to adjust the fans' operating speed. 3. Chapter 3 Speed points Select to manually configure your fans To configure your fans' operating speed. Select the fan that you want to configure and to view its current status. 2. Configuring fans manually Select Manual from the list of profiles to manually configure your fans: 1.

User Manual
Page 72
See section 1.1.6 Onboard buttons and switches for the system. [Manual] Allows you set the value based on the CPU specification, as high BCLK frequencies may damage the CPU permanently. The following item appears only when ... system to malfunction The configuration options for this item to set a password, these items show the default [Not Installed]. Ai Overclock Tuner Allows you to [Manual]. BCLK Frequency This item allows you to set the BCLK (base clock) frequency to adjust the value. The [X.M.P.] configuration option appears only when you enter...
See section 1.1.6 Onboard buttons and switches for the system. [Manual] Allows you set the value based on the CPU specification, as high BCLK frequencies may damage the CPU permanently. The following item appears only when ... system to malfunction The configuration options for this item to set a password, these items show the default [Not Installed]. Ai Overclock Tuner Allows you to [Manual]. BCLK Frequency This item allows you to set the BCLK (base clock) frequency to adjust the value. The [X.M.P.] configuration option appears only when you enter...

User Manual
Page 81
...with any storage medium due to proceed with Secure Erase. You have password protection by ASUS. Secure Erase is only supported on its size. SSDs might be due to booting. Check the ASUS support site for a full list of a BIOS protective measure. The drive may become... click Tool > Secure Erase on an incompatible SSD. • The time to erase the contents of this manual. Displays the available SSDs Chapter 3 Status definition: • Frozen. ASUS WS X299 SAGE 3-23 3.9.2 Secure Erase SSD speeds may lower over time as with Secure Erase. Ensure to set the SATA...
...with any storage medium due to proceed with Secure Erase. You have password protection by ASUS. Secure Erase is only supported on its size. SSDs might be due to booting. Check the ASUS support site for a full list of a BIOS protective measure. The drive may become... click Tool > Secure Erase on an incompatible SSD. • The time to erase the contents of this manual. Displays the available SSDs Chapter 3 Status definition: • Frozen. ASUS WS X299 SAGE 3-23 3.9.2 Secure Erase SSD speeds may lower over time as with Secure Erase. Ensure to set the SATA...

User Manual
Page 84
... publishes the latest BIOS versions to update your BIOS when necessary. Carefully follow the instructions in Windows® environment. 2. ASUS EZ Flash 3: Updates the BIOS using the current version of BIOS, DO NOT manually update the BIOS. However, BIOS updating is no problem using a USB flash drive. 3. EZ Update: Updates the BIOS...
... publishes the latest BIOS versions to update your BIOS when necessary. Carefully follow the instructions in Windows® environment. 2. ASUS EZ Flash 3: Updates the BIOS using the current version of BIOS, DO NOT manually update the BIOS. However, BIOS updating is no problem using a USB flash drive. 3. EZ Update: Updates the BIOS...

User Manual
Page 108
... 5: Multiple GPU Support The graphics cards and the motherboard layout may vary with graphics cards) Goldfingers The CrossFireX™ bridge is firmly in this user manual for the locations of the PCIEX16 slots recommended for reference only. Align and firmly insert the CrossFireX™ bridge connector to Chapter 1 in place. To...
... 5: Multiple GPU Support The graphics cards and the motherboard layout may vary with graphics cards) Goldfingers The CrossFireX™ bridge is firmly in this user manual for the locations of the PCIEX16 slots recommended for reference only. Align and firmly insert the CrossFireX™ bridge connector to Chapter 1 in place. To...

User Manual
Page 109
... 2. Ensure that the connectors are properly seated on each graphics card. Ensure that the cards are firmly in this user manual for the locations of the PCIEX16 slots recommended for multi-graphics card installation. 3. Connect three independent auxiliary power sources from the...cards: 1. Insert the three graphics card into the PCIEX16 slots. Connect a VGA or a DVI cable to the goldfingers on the slots. 4. ASUS WS X299 SAGE 5-3 Chapter 5 5. Align and firmly insert the two CrossFireX™ bridge connectors to the graphics card. Connect a VGA or a DVI cable to...
... 2. Ensure that the connectors are properly seated on each graphics card. Ensure that the cards are firmly in this user manual for the locations of the PCIEX16 slots recommended for multi-graphics card installation. 3. Connect three independent auxiliary power sources from the...cards: 1. Insert the three graphics card into the PCIEX16 slots. Connect a VGA or a DVI cable to the goldfingers on the slots. 4. ASUS WS X299 SAGE 5-3 Chapter 5 5. Align and firmly insert the two CrossFireX™ bridge connectors to the graphics card. Connect a VGA or a DVI cable to...

User Manual
Page 110
... are properly seated on each graphics card. Refer to the graphics card. 5-4 Chapter 5: Multiple GPU Support Ensure that the cards are firmly in this user manual for the locations of the PCIEX16 slots recommended for multi-graphics card installation. 3. Connect four independent auxiliary power sources from the power supply to the...
... are properly seated on each graphics card. Refer to the graphics card. 5-4 Chapter 5: Multiple GPU Support Ensure that the cards are firmly in this user manual for the locations of the PCIEX16 slots recommended for multi-graphics card installation. 3. Connect four independent auxiliary power sources from the power supply to the...

User Manual
Page 113
... multi-graphics processing units (GPU) graphics cards. ASUS WS X299 SAGE 5-7 Follow the installation procedures in this section. 5.2.1 Requirements • In SLI® mode, you should have two identical SLI-ready graphics cards that are NVIDIA® certified. • Ensure that you to Chapter 1 in this user manual for the locations of the PCIEX16 slots...
... multi-graphics processing units (GPU) graphics cards. ASUS WS X299 SAGE 5-7 Follow the installation procedures in this section. 5.2.1 Requirements • In SLI® mode, you should have two identical SLI-ready graphics cards that are NVIDIA® certified. • Ensure that you to Chapter 1 in this user manual for the locations of the PCIEX16 slots...

User Manual
Page 114
... 5 4. To install three SLI-ready graphics cards: 1. Insert the three graphics cards into the PCIEX16 slots. Ensure that the connector is firmly in this user manual for locations of the PCIEX16 slots recommended for multi-graphics card installation. 3. SLI® bridge Goldfingers 5.2.3 Installing three SLI-ready graphics cards Refer to the...
... 5 4. To install three SLI-ready graphics cards: 1. Insert the three graphics cards into the PCIEX16 slots. Ensure that the connector is firmly in this user manual for locations of the PCIEX16 slots recommended for multi-graphics card installation. 3. SLI® bridge Goldfingers 5.2.3 Installing three SLI-ready graphics cards Refer to the...

User Manual
Page 115
Connect three independent auxiliary power sources from the power supply to the graphics card. 4-way SLI® bridge ASUS WS X299 SAGE 5-9 Prepare four SLI-ready graphics cards. 2. Insert the four graphics cards into the PCIEX16 slots. Ensure that the connector is firmly in place. 5. Align and ... motherboard has more than two PCIEX16 slots, refer to Chapter 1 in place. 3-way SLI® bridge 5. Ensure that the connector is firmly in this user manual for the locations of the PCIEX16 slots recommended for multi-graphics card installation. 3.
Connect three independent auxiliary power sources from the power supply to the graphics card. 4-way SLI® bridge ASUS WS X299 SAGE 5-9 Prepare four SLI-ready graphics cards. 2. Insert the four graphics cards into the PCIEX16 slots. Ensure that the connector is firmly in place. 5. Align and ... motherboard has more than two PCIEX16 slots, refer to Chapter 1 in place. 3-way SLI® bridge 5. Ensure that the connector is firmly in this user manual for the locations of the PCIEX16 slots recommended for multi-graphics card installation. 3.


