User Guide
Page 2
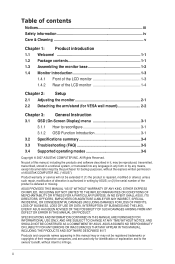
... NOT BE CONSTRUED AS A COMMITMENT BY ASUS. Welcome 1-1 1.2. Detaching.the.arm/stand.(for.VESA.wall.mount 2-2 Chapter.3:. OSD.(On-Screen.Display).menu 3-1 3.1.1 How to infringe. Setup 2.1. ASUS PROVIDES THIS MANUAL "AS IS" WITHOUT ...ASUS; Table of the product is authorized in any form or by any language in writing by the purchaser for backup purposes, without intent to reconfigure 3-1 3.1.2 OSD Function Introduction 3-1 3.2. Supported.operating.modes 3-6 Copyright © 2007 ASUSTeK COMPUTER INC. Monitor.introduction 1-3 1.4.1 Front of the LCD monitor...
... NOT BE CONSTRUED AS A COMMITMENT BY ASUS. Welcome 1-1 1.2. Detaching.the.arm/stand.(for.VESA.wall.mount 2-2 Chapter.3:. OSD.(On-Screen.Display).menu 3-1 3.1.1 How to infringe. Setup 2.1. ASUS PROVIDES THIS MANUAL "AS IS" WITHOUT ...ASUS; Table of the product is authorized in any form or by any language in writing by the purchaser for backup purposes, without intent to reconfigure 3-1 3.1.2 OSD Function Introduction 3-1 3.2. Supported.operating.modes 3-6 Copyright © 2007 ASUSTeK COMPUTER INC. Monitor.introduction 1-3 1.4.1 Front of the LCD monitor...
User Guide
Page 10
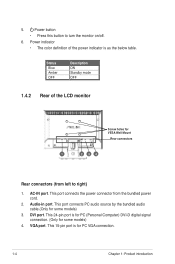
... indicator is as the below table. This port connects the power connector from .left.to turn the monitor on/off. 6. 5. This 24-pin port is for . Power indicator • The color definition of .the.LCD.monitor. VESA.Wall.Mount Rear.connectors 1 234 Rear.connectors.(from the bundled power cord. 2. Audio-in.port. Status Blue...
... indicator is as the below table. This port connects the power connector from .left.to turn the monitor on/off. 6. 5. This 24-pin port is for . Power indicator • The color definition of .the.LCD.monitor. VESA.Wall.Mount Rear.connectors 1 234 Rear.connectors.(from the bundled power cord. 2. Audio-in.port. Status Blue...
User Guide
Page 12
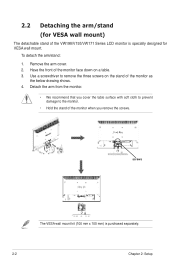
... detachable stand of the VW198/V193/VW171 Series LCD monitor is purchased separately. 2-2 Chapter 2: Setup screws The VESA wall mount kit (100 mm x 100 mm) is specially designed for VESA wall mount. To detach the arm/stand: 1. Use a screwdriver to the monitor. • Hold the stand of the monitor as the below drawing shows. 4. Have the...
... detachable stand of the VW198/V193/VW171 Series LCD monitor is purchased separately. 2-2 Chapter 2: Setup screws The VESA wall mount kit (100 mm x 100 mm) is specially designed for VESA wall mount. To detach the arm/stand: 1. Use a screwdriver to the monitor. • Hold the stand of the monitor as the below drawing shows. 4. Have the...
User Guide
Page 16
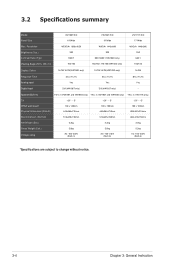
...(VW193T and VW193S only) 1W x 2 (VW171S only) Tilt +20° ~ -5° +20° ~ -5° +20° ~ -5° VESA wall mount Physical Dimension (WxHxD) 100 x 100mm 444x364x210mm 100 x 100mm 444x364x210mm 100 x 100mm 408x341x210mm Box Dimension (WxHxD) 513x425x155mm 513x425x155mm 469x412x150mm Net Weight (Esti.) 4.... General Instruction Resolution Brightness (Typ.) Contrast Ratio (Typ.) Viewing Angle (H/V), CR≧10 VW198T/S/D 19"Wide WSXGA+ 1680x1050 300 1000:1 160/160 VW193T/S/D 19"Wide WXGA+ 1440x900 300 800:1/850:1(VW193D only) 160/160; 170/160(VW193D only) VW171T/S/D...
...(VW193T and VW193S only) 1W x 2 (VW171S only) Tilt +20° ~ -5° +20° ~ -5° +20° ~ -5° VESA wall mount Physical Dimension (WxHxD) 100 x 100mm 444x364x210mm 100 x 100mm 444x364x210mm 100 x 100mm 408x341x210mm Box Dimension (WxHxD) 513x425x155mm 513x425x155mm 469x412x150mm Net Weight (Esti.) 4.... General Instruction Resolution Brightness (Typ.) Contrast Ratio (Typ.) Viewing Angle (H/V), CR≧10 VW198T/S/D 19"Wide WSXGA+ 1680x1050 300 1000:1 160/160 VW193T/S/D 19"Wide WXGA+ 1440x900 300 800:1/850:1(VW193D only) 160/160; 170/160(VW193D only) VW171T/S/D...