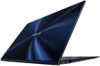
User's Manual for English Edition
Page 2
...damages for backup purposes, without intent to ASUS' suppliers and its reseller. Copyright © 2013 ASUSTeK COMPUTER INC. SERVICE AND SUPPORT Visit our multi-language web site at http://support.asus.com Notebook PC E-Manual ASUS ASSUMES NO RESPONSIBILITY OR LIABILITY FOR ANY ERRORS... OR INACCURACIES THAT MAY APPEAR IN THIS MANUAL, INCLUDING THE PRODUCTS AND SOFTWARE DESCRIBED IN IT. All Rights Reserved....
User's Manual for English Edition
Page 3
Table of Contents About this manual...6 Conventions used in this manual 7 Icons...7 Typography...7 Safety precautions...8 Using your Notebook PC 8 Caring for your Notebook PC 9 Proper disposal...10 Chapter 1: Hardware Setup Getting to know your Notebook PC ... screen panel and touchpad 23 Using the touch screen panel 23 Using the touchpad...25 Using the keyboard 32 Function keys...32 Function keys for ASUS Apps 33 Windows®8 keys...34 Chapter 3: Working with Windows® 8 Starting for the first time 36 Windows® 8 lock screen 36 Windows® UI...
User's Manual for English Edition
Page 4
... connection 59 Configuring a static IP network connection 61 Turning your Notebook PC off 62 Putting your Notebook PC to sleep 62 Chapter 4: ASUS apps Featured ASUS Apps 64 Power4Gear Hybrid...64 Chapter 5: Power-on Self Test (POST) The Power-on Self Test (POST 70 Using POST to access... BIOS and Troubleshoot 70 BIOS...70 Accessing BIOS...70 BIOS Settings...71 Troubleshoot...81 Refresh your PC...81 Reset your PC...82 Advanced options...83 Notebook PC E-Manual
User's Manual for English Edition
Page 5
... (for Notebook PC with built-in Modem 110 ENERGY STAR complied product 112 European Union Eco-label 112 Global Environmental Regulation Compliance and Declaration 113 ASUS Recycling/Takeback Services 113 Regional notice for Singapore 113 Notebook PC...
User's Manual for English Edition
Page 6
... This chapter shows you can refer to for your Notebook PC. Chapter 4: ASUS Apps This chapter features the ASUS apps included with Windows® 8 This chapter provides an overview of using Windows® 8 in your Notebook PC. Notebook PC E-Manual Tips and FAQs This section presents some recommended tips, hardware FAQs, and software...
User's Manual for English Edition
Page 7
WARNING! Notebook PC E-Manual Italic = This indicates sections that you can use for completing a series of tasks or procedures on your Notebook PC's data and components. Icons The icons ... and prevent damage to your Notebook PC. = Use the touch screen panel. = Use the touchpad. = Use the keyboard. Conventions used in this manual To highlight key information in this manual, some text are presented as follows: IMPORTANT! This message contains important information that can refer to complete a task. NOTE: This message contains...
User's Manual for English Edition
Page 8
... 5°C (41°F) and 35°C (95°F). Safety precautions Using your Notebook PC This Notebook PC should only be used in -flight. Notebook PC E-Manual While powered on uneven or unstable work surfaces.
User's Manual for English Edition
Page 9
... to strong magnetic or electrical fields. Do not expose your Notebook PC near liquids, rain, or moisture. Do not use your Notebook PC. Notebook PC E-Manual Caring for your Notebook PC Disconnect the AC power and remove the battery pack (if applicable) before cleaning your Notebook PC near gas leaks. Do...
User's Manual for English Edition
Page 10
The symbol of the crossed out wheeled bin indicates that the product (electrical, electronic equipment and mercurycontaining button cell battery) should not be placed in municipal waste. 10 Notebook PC E-Manual The symbol of the crossed out wheeled bin indicates that the battery should not be placed in municipal waste. Proper disposal Do not throw your Notebook PC in municipal waste. Do not throw the battery in municipal waste. Check local regulations for disposal of parts and recycling. This product has been designed to enable proper reuse of electronic products.
User's Manual for English Edition
Page 12
Getting to know your Notebook PC Top View NOTE: The keyboard's layout may also vary in appearance depending on the Notebook PC model. 12 Notebook PC E-Manual The top view may vary per region or country.
User's Manual for English Edition
Page 13
... system to take pictures or record videos using touch gestures. Camera The built-in camera allows you to operate your Notebook PC's keyboard. Notebook PC E-Manual 13 Bluetooth / Wireless indicator This indicator lights up when the capital lock function is activated. Array microphones The array microphones feature echo canceling, noise suppression...
User's Manual for English Edition
Page 14
... and hold the power button for about four (4) seconds until your Notebook PC on and blinks slowly when the Notebook PC is in this manual. 14 Notebook PC E-Manual Keyboard The keyboard provides full-sized QWERTY keys with a comfortable travel depth for the touchpad section in sleep mode. Touchpad The touchpad allows...
User's Manual for English Edition
Page 15
... place it on model. Bottom NOTE: The bottom side may occur. IMPORTANT! WARNING! Ensure that can get warm to exit the Notebook PC. Notebook PC E-Manual 15 The battery pack cannot be disassembled. Battery time varies by usage and by the specifications for this Notebook PC. When working on your Notebook...
User's Manual for English Edition
Page 16
USB 3.0 port This USB (Universal Serial Bus) 3.0 port provides a transfer rate of up to 5 Gbit/s and are backward compatible to a DisplayPort, VGA, DVI, or HDMI external display and experience high-resolution display features. 16 Notebook PC E-Manual Mini DisplayPort port Use a mini DisplayPort adapter to connect your Notebook PC to USB 2.0. Right Side Memory card reader This built-in memory card reader supports SD and SDXC card formats.
User's Manual for English Edition
Page 17
WARNING! USB 3.0 port This USB (Universal Serial Bus) 3.0 port provides a transfer rate of up to 5 Gbit/s and are backward compatible to a power source. Notebook PC E-Manual 17 IMPORTANT! Micro HDMI port This port is for the micro HDMI (High-Definition Multimedia Interface) connector and is connected to USB 2.0. Headphone output jack ...
User's Manual for English Edition
Page 20
... your Notebook PC. • To disconnect your Notebook PC from its main power supply, unplug your Notebook PC from the power socket. 20 Notebook PC E-Manual Charge the Notebook PC for 3 hours before turning it in appearance, depending on for the first time. Plug the AC power adapter into your Notebook...
User's Manual for English Edition
Page 21
...; Rating output current: 2.37 A (45W)* or 3.42A (65W)* • Rating output voltage: 19V WARNING! Read the following precautions for your Notebook PC's battery. • Only ASUS-authorized technicians should remove the battery inside the device. • The battery used in this device may present a risk of fire or chemical burn if... components must be recycled or disposed of properly. • Keep the battery and other small components away from children. * on selected models only Notebook PC E-Manual 21
User's Manual for English Edition
Page 22
Press the power button. 22 Notebook PC E-Manual Lift to open the display panel.