

U1 user's manual (English)
Page 24
...also select "Scan ... If the POST discovers a difference between the record and the existing hardware, it will display a message on the screen when you turn ON the Notebook PC, it will run slower. This indicates that controls the POST is not a problem with any ... it back ON. Self Monitoring and Reporting Technology The S.M.A.R.T. (Self Monitoring and Reporting Technology) checks the hard disk drive during the splash screen, standard boot information such as a permanent part of the Notebook PC's architecture. To run Windows disk checking program. IMPORTANT! If you ...
...also select "Scan ... If the POST discovers a difference between the record and the existing hardware, it will display a message on the screen when you turn ON the Notebook PC, it will run slower. This indicates that controls the POST is not a problem with any ... it back ON. Self Monitoring and Reporting Technology The S.M.A.R.T. (Self Monitoring and Reporting Technology) checks the hard disk drive during the splash screen, standard boot information such as a permanent part of the Notebook PC's architecture. To run Windows disk checking program. IMPORTANT! If you ...

U1 user's manual (English)
Page 25
... Battery Power The battery system implements the Smart Battery standard under the Windows environment, which allows the battery to charge in the future. 25 Note: Screen captures shown here are examples only and may fail to accurately report the amount of working power. It takes a few hours of charge left in...
... Battery Power The battery system implements the Smart Battery standard under the Windows environment, which allows the battery to charge in the future. 25 Note: Screen captures shown here are examples only and may fail to accurately report the amount of working power. It takes a few hours of charge left in...

U1 user's manual (English)
Page 29
stretches the screen area to fill the entire display when using low resolution modes.) LCD/Monitor Icons (F8): Toggles between the touchpad buttons will light. "Zz" Icon (F1): ... Colors, select High Color in touchpad LOCKED (disabled) and UNLOCKED (enabled). Radio Tower (F2): Wireless Models Only: Toggles the internal wireless LAN or Bluetooth (on -screen-display. Filled Sun Icon (F5): Decreases the display brightness Open Sun Icon (F6): Increases the display brightness LCD Icon (F7): Toggles the display panel ON...
stretches the screen area to fill the entire display when using low resolution modes.) LCD/Monitor Icons (F8): Toggles between the touchpad buttons will light. "Zz" Icon (F1): ... Colors, select High Color in touchpad LOCKED (disabled) and UNLOCKED (enabled). Radio Tower (F2): Wireless Models Only: Toggles the internal wireless LAN or Bluetooth (on -screen-display. Filled Sun Icon (F5): Decreases the display brightness Open Sun Icon (F6): Increases the display brightness LCD Icon (F7): Toggles the display panel ON...
U1 user's manual (English)
Page 30
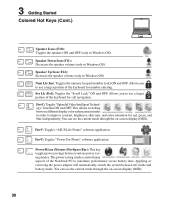
... OFF. Applying or removing the power adapter will automatically switch the system between various power saving modes. Fn+V: Toggles "ASUS Life Frame" software application. You can see the current mode through the on -screen display (OSD). 30 3 Getting Started Colored Hot Keys (Cont.) Speaker Icons (F10): Toggles the speakers ON and OFF... order to improve contrast, brightness, skin tone, and color saturation for red, green, and blue independently. You can see the current mode through the on -screen display (OSD).
... OFF. Applying or removing the power adapter will automatically switch the system between various power saving modes. Fn+V: Toggles "ASUS Life Frame" software application. You can see the current mode through the on -screen display (OSD). 30 3 Getting Started Colored Hot Keys (Cont.) Speaker Icons (F10): Toggles the speakers ON and OFF... order to improve contrast, brightness, skin tone, and color saturation for red, green, and blue independently. You can see the current mode through the on -screen display (OSD).

U1 user's manual (English)
Page 32
... Status Indicators Switches Power4Gear eXtreme Key The Power4Gear eXtreme key toggles power savings between AC mode and battery mode. The selected mode is shown on -screen display. Power Switch The power switch turns ON and OFF the Notebook PC or putting the Notebook PC into sleep or hibernation modes. Windows software...
... Status Indicators Switches Power4Gear eXtreme Key The Power4Gear eXtreme key toggles power savings between AC mode and battery mode. The selected mode is shown on -screen display. Power Switch The power switch turns ON and OFF the Notebook PC or putting the Notebook PC into sleep or hibernation modes. Windows software...

U1 user's manual (English)
Page 36
...; Scrolling on the fingerprint scanner After software setup, you can be used in a direction to move the cursor around or select items displayed on the screen with some application software. therefore, mechanical failures can use of your fingertip instead of your finger up or down . Scrolling (on selected models) Slide your...
...; Scrolling on the fingerprint scanner After software setup, you can be used in a direction to move the cursor around or select items displayed on the screen with some application software. therefore, mechanical failures can use of your fingertip instead of your finger up or down . Scrolling (on selected models) Slide your...

U1 user's manual (English)
Page 37
... succession, and the system launches the corresponding program. You can move the cursor over an item, press the left button and slide finger on the screen you can set the double-click speed using the Windows Control Panel "Mouse." Lightly but rapidly strike the touchpad. Clicking Tapping Press the left button...
... succession, and the system launches the corresponding program. You can move the cursor over an item, press the left button and slide finger on the screen you can set the double-click speed using the Windows Control Panel "Mouse." Lightly but rapidly strike the touchpad. Clicking Tapping Press the left button...

U1 user's manual (English)
Page 61
... BIOS Settings Boot Device A Appendix 1. If the battery calibration process fails, stop charging and contact an authorized service center. On the Boot screen, select Boot Device Priority. 2. On the Power screen, select Start Battery Calibration. 2. Battery calibration is complete after the battery power is used up. 3. Select each item and press [Enter...
... BIOS Settings Boot Device A Appendix 1. If the battery calibration process fails, stop charging and contact an authorized service center. On the Boot screen, select Boot Device Priority. 2. On the Power screen, select Start Battery Calibration. 2. Battery calibration is complete after the battery power is used up. 3. Select each item and press [Enter...

U1 user's manual (English)
Page 62
Type in the BIOS setup utility. On the Security screen, select Change Supervisor or Change User Password. You must save changes to keep the manufacture default settings. Password is then cleared. Leave the password field ...
Type in the BIOS setup utility. On the Security screen, select Change Supervisor or Change User Password. You must save changes to keep the manufacture default settings. Password is then cleared. Leave the password field ...

U1 user's manual (English)
Page 65
Reinstall the latest version "Power4 Gear" utility to see if the problem is available on the ASUS website. Blue screen with white text A blue screen with white text appears after purchase, power OFF, remove the additional memory, and power ON to solve your local service ...power during the BIOS flashing process.) 5. A Appendix Common Problems and Solutions (Cont.) Software Problem - Update the BIOS to protect yourself from the ASUS website. (WARNING: Make sure your system. If problem still cannot be solved, use the recovery process to un-install them in DOS mode. ...
Reinstall the latest version "Power4 Gear" utility to see if the problem is available on the ASUS website. Blue screen with white text A blue screen with white text appears after purchase, power OFF, remove the additional memory, and power ON to solve your local service ...power during the BIOS flashing process.) 5. A Appendix Common Problems and Solutions (Cont.) Software Problem - Update the BIOS to protect yourself from the ASUS website. (WARNING: Make sure your system. If problem still cannot be solved, use the recovery process to un-install them in DOS mode. ...
U1 user's manual (English)
Page 69
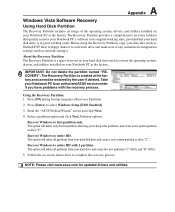
... from your Notebook PC's software to a network drive and make note of the operating system, drivers, and utilities installed on -screen instructions to an authorized ASUS service center if you to entire HD. Follow the on your Notebook PC at the factory. NOTE: Please visit www...Enter] to restore the operating system, drivers, and utilities installed on your hard disk drive is created at the factory. Read the "ASUS Preload Wizard" screen and click Next. 4. Partition options: Recover Windows to entire HD with the recovery process. Recover Windows to first partition only.
... from your Notebook PC's software to a network drive and make note of the operating system, drivers, and utilities installed on -screen instructions to an authorized ASUS service center if you to entire HD. Follow the on your Notebook PC at the factory. NOTE: Please visit www...Enter] to restore the operating system, drivers, and utilities installed on your hard disk drive is created at the factory. Read the "ASUS Preload Wizard" screen and click Next. 4. Partition options: Recover Windows to entire HD with the recovery process. Recover Windows to first partition only.
U1 user's manual (English)
Page 70
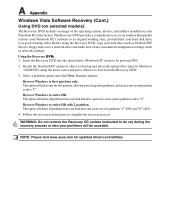
... DVD into the optical drive (Notebook PC needs to entire HD with 2 partition. NOTE: Please visit www.asus.com for updated drivers and utilities. Recover Windows to complete the recovery process. Follow the on-screen instructions to entire HD. A Appendix Windows Vista Software Recovery (Cont.) Using DVD (on selected models) The Recovery...
... DVD into the optical drive (Notebook PC needs to entire HD with 2 partition. NOTE: Please visit www.asus.com for updated drivers and utilities. Recover Windows to complete the recovery process. Follow the on-screen instructions to entire HD. A Appendix Windows Vista Software Recovery (Cont.) Using DVD (on selected models) The Recovery...


