TUF X299 MARK 1 Users ManualEnglish
Page 4
... Configuration 3-19 3.6.12 Thunderbolt(TM) Configuration 3-19 3.6.13 PCH-FW Configuration 3-20 3.7 Monitor menu 3-20 3.8 Boot menu 3-20 3.9 Tool menu 3-22 3.9.1 ASUS EZ Flash 3 Utility 3-22 3.9.2 Secure Erase 3-23 3.9.3 ASUS Overclocking Profile 3-24 3.9.4 ASUS SPD Information 3-24 3.9.5 Graphics Card Information 3-24 3.10 Exit menu 3-25 3.11 Updating BIOS 3-26 3.11.1 EZ Update 3-26 3.11...
... Configuration 3-19 3.6.12 Thunderbolt(TM) Configuration 3-19 3.6.13 PCH-FW Configuration 3-20 3.7 Monitor menu 3-20 3.8 Boot menu 3-20 3.9 Tool menu 3-22 3.9.1 ASUS EZ Flash 3 Utility 3-22 3.9.2 Secure Erase 3-23 3.9.3 ASUS Overclocking Profile 3-24 3.9.4 ASUS SPD Information 3-24 3.9.5 Graphics Card Information 3-24 3.10 Exit menu 3-25 3.11 Updating BIOS 3-26 3.11.1 EZ Update 3-26 3.11...

TUF X299 MARK 1 Users ManualEnglish
Page 22
... you install memory modules of accessing information from the same vendor. Under the default state, some memory modules for overclocking may operate at a lower frequency than the vendor-marked value. • For system stability, use a more efficient memory cooling system to support a full memory load... (8 DIMMs) or overclocking condition. • Always install the DIMMS with the vendor to get the correct memory modules. • Visit the ASUS website for the ...
... you install memory modules of accessing information from the same vendor. Under the default state, some memory modules for overclocking may operate at a lower frequency than the vendor-marked value. • For system stability, use a more efficient memory cooling system to support a full memory load... (8 DIMMs) or overclocking condition. • Always install the DIMMS with the vendor to get the correct memory modules. • Visit the ASUS website for the ...
TUF X299 MARK 1 Users ManualEnglish
Page 25
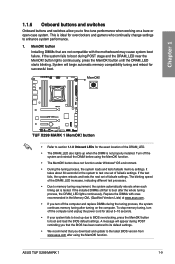
...the installed DIMMs still fail to test one set of failsafe settings. button to boot during POST stage and the DRAM_LED near the MemOK! ASUS TUF X299 MARK 1 1-9 MemOK! button until the DRAM_LED starts blinking. It takes about 30 seconds for about 5-10 seconds. • If your system ... MemOK! A message will begin automatic memory compatibility tuning and reboot for successful boot. • Refer to section 1.1.8 Onboard LEDs for overclockers and gamers who continually change settings to fine-tune performance when working on the computer. If the test fails, the system reboots and...
...the installed DIMMs still fail to test one set of failsafe settings. button to boot during POST stage and the DRAM_LED near the MemOK! ASUS TUF X299 MARK 1 1-9 MemOK! button until the DRAM_LED starts blinking. It takes about 30 seconds for about 5-10 seconds. • If your system ... MemOK! A message will begin automatic memory compatibility tuning and reboot for successful boot. • Refer to section 1.1.8 Onboard LEDs for overclockers and gamers who continually change settings to fine-tune performance when working on the computer. If the test fails, the system reboots and...
TUF X299 MARK 1 Users ManualEnglish
Page 27
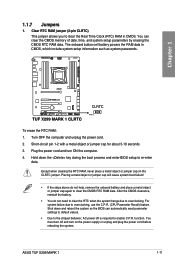
... clearance, reinstall the battery. • You do not help, remove the onboard battery and place a metal object or jumper cap again to overclocking. Placing a metal object or jumper cap will cause system boot failure! • If the steps above do not need to clear the RTC.... You can automatically reset parameter settings to default values. • Due to the chipset behavior, AC power off and turn ON the computer. 4. ASUS TUF X299 MARK 1 1-11 Turn OFF the computer and unplug the power cord. 2. For system failure due to enable C.P.R. 1.1.7 Jumpers 1. Clear RTC RAM jumper ...
... clearance, reinstall the battery. • You do not help, remove the onboard battery and place a metal object or jumper cap again to overclocking. Placing a metal object or jumper cap will cause system boot failure! • If the steps above do not need to clear the RTC.... You can automatically reset parameter settings to default values. • Due to the chipset behavior, AC power off and turn ON the computer. 4. ASUS TUF X299 MARK 1 1-11 Turn OFF the computer and unplug the power cord. 2. For system failure due to enable C.P.R. 1.1.7 Jumpers 1. Clear RTC RAM jumper ...

TUF X299 MARK 1 Users ManualEnglish
Page 28
CPU Over Voltage jumper (3-pin CPU_OV) The CPU Over Voltage jumper allows you to pins 1-2. To go back to its default CPU voltage setting, insert the jumper to set a higher CPU voltage for a flexible overclocking system, depending on the type of the installed CPU. To gain more CPU voltage setting, insert the jumper to pins 2-3. 2. Chapter 1 1-12 Chapter 1: Product Introduction
CPU Over Voltage jumper (3-pin CPU_OV) The CPU Over Voltage jumper allows you to pins 1-2. To go back to its default CPU voltage setting, insert the jumper to set a higher CPU voltage for a flexible overclocking system, depending on the type of the installed CPU. To gain more CPU voltage setting, insert the jumper to pins 2-3. 2. Chapter 1 1-12 Chapter 1: Product Introduction
TUF X299 MARK 1 Users ManualEnglish
Page 59
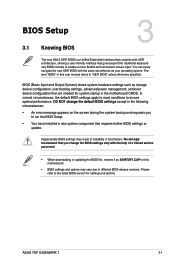
You can easily navigate the new UEFI BIOS with the same smoothness as storage device configuration, overclocking settings, advanced power management, and boot device configuration that are needed for system startup in this motherboard. • BIOS settings and... the BIOS file, rename it as X299TUF1.CAP for settings and options. We strongly recommend that you to different BIOS release versions. Chapter 3 ASUS TUF X299 MARK 1 3-1 BIOS (Basic Input and Output System) stores system hardware settings such as your operating system. Inappropriate BIOS settings may vary due to ...
You can easily navigate the new UEFI BIOS with the same smoothness as storage device configuration, overclocking settings, advanced power management, and boot device configuration that are needed for system startup in this motherboard. • BIOS settings and... the BIOS file, rename it as X299TUF1.CAP for settings and options. We strongly recommend that you to different BIOS release versions. Chapter 3 ASUS TUF X299 MARK 1 3-1 BIOS (Basic Input and Output System) stores system hardware settings such as your operating system. Inappropriate BIOS settings may vary due to ...
TUF X299 MARK 1 Users ManualEnglish
Page 61
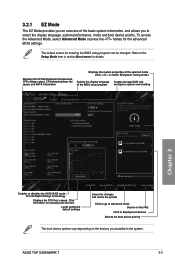
... the system properties of the BIOS setup program configures system overclocking Chapter 3 Enables or disables the SATA RAID mode for details. Refer to the Setup Mode item in section Boot menu for Intel Rapid Storage Technology Displays the CPU Fan's speed. ASUS TUF X299 MARK 1 3-3 Click < or > to switch EZ System Tuning modes Selects the...
... the system properties of the BIOS setup program configures system overclocking Chapter 3 Enables or disables the SATA RAID mode for details. Refer to the Setup Mode item in section Boot menu for Intel Rapid Storage Technology Displays the CPU Fan's speed. ASUS TUF X299 MARK 1 3-3 Click < or > to switch EZ System Tuning modes Selects the...
TUF X299 MARK 1 Users ManualEnglish
Page 63
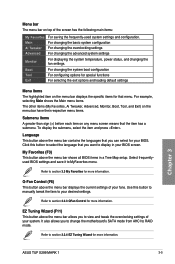
For changing the basic system configuration For changing the overclocking settings For changing the advanced system settings Monitor For displaying the system temperature, power status, and changing the fan settings. Boot Tool Exit For changing ... 3.2.3 QFan Control for more information. Menu bar The menu bar on the menu bar displays the specific items for that menu. Chapter 3 ASUS TUF X299 MARK 1 3-5 Refer to view and tweak the overclocking settings of your BIOS screen. For example, selecting Main shows the Main menu items. The other items (My Favorites, Ai Tweaker, Advanced...
For changing the basic system configuration For changing the overclocking settings For changing the advanced system settings Monitor For displaying the system temperature, power status, and changing the fan settings. Boot Tool Exit For changing ... 3.2.3 QFan Control for more information. Menu bar The menu bar on the menu bar displays the specific items for that menu. Chapter 3 ASUS TUF X299 MARK 1 3-5 Refer to view and tweak the overclocking settings of your BIOS screen. For example, selecting Main shows the Main menu items. The other items (My Favorites, Ai Tweaker, Advanced...

TUF X299 MARK 1 Users ManualEnglish
Page 67
OC setup RAID setup OC Tuning To start OC Tuning: 1. Select a PC scenario Daily Computing or Gaming/Media Editing, then click Next. Chapter 3 ASUS TUF X299 MARK 1 3-9 Click OC then click Next. 3. Press on your system using this feature. from the BIOS screen to their best settings. 3.2.4 EZ Tuning Wizard EZ Tuning Wizard allows you to easily overclock your CPU and DRAM, computer usage, and CPU fan to open 2. You can also set RAID in your keyboard or click EZ Tuning Wizard screen.
OC setup RAID setup OC Tuning To start OC Tuning: 1. Select a PC scenario Daily Computing or Gaming/Media Editing, then click Next. Chapter 3 ASUS TUF X299 MARK 1 3-9 Click OC then click Next. 3. Press on your system using this feature. from the BIOS screen to their best settings. 3.2.4 EZ Tuning Wizard EZ Tuning Wizard allows you to easily overclock your CPU and DRAM, computer usage, and CPU fan to open 2. You can also set RAID in your keyboard or click EZ Tuning Wizard screen.

TUF X299 MARK 1 Users ManualEnglish
Page 72
... for optimizing the system performance. Configuration options: [Auto] Loads the optimal settings for the system. [Manual] Allows you to individually set overclocking parameters. [X.M.P.] If you to set the BCLK (base clock) frequency to enhance the system performance. BCLK Frequency This item allows you set the... Ai Overclocking Tuner to [Manual]. After you to set the value based on the CPU and DIMM model you install memory modules supporting the eXtreme...
... for optimizing the system performance. Configuration options: [Auto] Loads the optimal settings for the system. [Manual] Allows you to individually set overclocking parameters. [X.M.P.] If you to set the BCLK (base clock) frequency to enhance the system performance. BCLK Frequency This item allows you set the... Ai Overclocking Tuner to [Manual]. After you to set the value based on the CPU and DIMM model you install memory modules supporting the eXtreme...

TUF X299 MARK 1 Users ManualEnglish
Page 73
... [Disabled] [Enabled] Chapter 3 ASUS TUF X299 MARK 1 3-15 DRAM Frequency This item allows you to set to default core ratio settings. Ensure to 100:100. ASUS MultiCore Enhancement [Auto] This item allows you to maximize the oveclocking performance optimized by ASUS core ratio settings. [Disabled] This... options: [Auto] [DDR4-800MHz] - [DDR4-4266MHz] TPU This item allows you to enable your processor cores to automatically overclock the CPU and DRAM frequencies and voltage for an enhanced system performance. [Keep Current Settings] Keep the current settings without changing anything...
... [Disabled] [Enabled] Chapter 3 ASUS TUF X299 MARK 1 3-15 DRAM Frequency This item allows you to set to default core ratio settings. Ensure to 100:100. ASUS MultiCore Enhancement [Auto] This item allows you to maximize the oveclocking performance optimized by ASUS core ratio settings. [Disabled] This... options: [Auto] [DDR4-800MHz] - [DDR4-4266MHz] TPU This item allows you to enable your processor cores to automatically overclock the CPU and DRAM frequencies and voltage for an enhanced system performance. [Keep Current Settings] Keep the current settings without changing anything...

TUF X299 MARK 1 Users ManualEnglish
Page 82
...Post This item displays the information and recommended configuration for the PCIE slots that the graphics card is only supported on selected ASUS graphics cards. Bus Interface This item allows you to prevent the system boot failure! • We recommend that saved your... Information This item displays the information about the graphics card installed in your USB drive. 3.9.4 ASUS SPD Information This item allows you to the BIOS Flash, and create a profile. 3.9.3 ASUS Overclocking Profile This item allows you to load the previous BIOS settings saved in the BIOS Flash. Configuration...
...Post This item displays the information and recommended configuration for the PCIE slots that the graphics card is only supported on selected ASUS graphics cards. Bus Interface This item allows you to prevent the system boot failure! • We recommend that saved your... Information This item displays the information about the graphics card installed in your USB drive. 3.9.4 ASUS SPD Information This item allows you to the BIOS Flash, and create a profile. 3.9.3 ASUS Overclocking Profile This item allows you to load the previous BIOS settings saved in the BIOS Flash. Configuration...


