VG259QMVG259QMY Series User Guide
Page 3
...1-1 1.2 Package contents 1-1 1.3.1 Front view 1-2 1.3.2 Back view 1-3 1.3.3 GamePlus Function 1-4 1.3.4 GameVisual Function 1-5 Chapter 2: Setup 2.1 Assembling the monitor arm/base 2-1 2.2 Adjusting the monitor 2-2 2.3 Detaching the arm (for VESA wall mount 2-3 2.4 Connecting the cables 2-4 2.5 Turning on the monitor 2-4 Chapter 3: General instructions 3.1 OSD (On-Screen Display) menu 3-1 3.1.1 How to reconfigure 3-1 3.1.2 OSD function introduction 3-1 3.2 Specifications summary 3-7 3.3 Outline dimensions 3-9 3.4 Troubleshooting (FAQ 3-10 3.5 Supported operating mode 3-11 iii
...1-1 1.2 Package contents 1-1 1.3.1 Front view 1-2 1.3.2 Back view 1-3 1.3.3 GamePlus Function 1-4 1.3.4 GameVisual Function 1-5 Chapter 2: Setup 2.1 Assembling the monitor arm/base 2-1 2.2 Adjusting the monitor 2-2 2.3 Detaching the arm (for VESA wall mount 2-3 2.4 Connecting the cables 2-4 2.5 Turning on the monitor 2-4 Chapter 3: General instructions 3.1 OSD (On-Screen Display) menu 3-1 3.1.1 How to reconfigure 3-1 3.1.2 OSD function introduction 3-1 3.2 Specifications summary 3-7 3.3 Outline dimensions 3-9 3.4 Troubleshooting (FAQ 3-10 3.5 Supported operating mode 3-11 iii

VG259QMVG259QMY Series User Guide
Page 4
...digital apparatus complies with Part 15 of the FCC Rules. iv Notices Federal Communications Commission Statement This device complies with Canadian ICES-003. This equipment generates, uses and can be determined by turning the equipment off and on a circuit different from digital apparatus set out in a particular installation... interference that interference will not occur in the Radio Interference Regulations of the Canadian Department of the monitor to the graphics card is required to operate this equipment. Cet appareil numérique de la classe B respecte toutes...
...digital apparatus complies with Part 15 of the FCC Rules. iv Notices Federal Communications Commission Statement This device complies with Canadian ICES-003. This equipment generates, uses and can be determined by turning the equipment off and on a circuit different from digital apparatus set out in a particular installation... interference that interference will not occur in the Radio Interference Regulations of the Canadian Department of the monitor to the graphics card is required to operate this equipment. Cet appareil numérique de la classe B respecte toutes...
VG259QMVG259QMY Series User Guide
Page 5
... power plug which have appropriate configured receptacles marked between 100-240V AC. • If you detect any damage, contact your dealer immediately. • Slots and openings on the monitor cabinet. • To ensure satisfactory operation, use it for other settings than the center position may become wet. Manufacturer: Delta Electronics Inc., Model: ADP-40KD BB This symbol of power source...
... power plug which have appropriate configured receptacles marked between 100-240V AC. • If you detect any damage, contact your dealer immediately. • Slots and openings on the monitor cabinet. • To ensure satisfactory operation, use it for other settings than the center position may become wet. Manufacturer: Delta Electronics Inc., Model: ADP-40KD BB This symbol of power source...

VG259QMVG259QMY Series User Guide
Page 6
... when positioning the monitor. Use a cleaner intended for use . • When the same image is better to the nature of the monitor. The following symptoms are normal with the monitor. NOTE: Tips and additional information to make sure that you MUST follow to complete a task. Turn off and unplug the power cord. Do not repair the screen by the stand or the cord. • Cleaning. Do...
... when positioning the monitor. Use a cleaner intended for use . • When the same image is better to the nature of the monitor. The following symptoms are normal with the monitor. NOTE: Tips and additional information to make sure that you MUST follow to complete a task. Turn off and unplug the power cord. Do not repair the screen by the stand or the cord. • Cleaning. Do...
VG259QMVG259QMY Series User Guide
Page 9
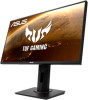
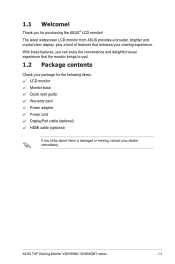
... the ASUS® LCD monitor! The latest widescreen LCD monitor from ASUS provides a broader, brighter and crystal-clear display, plus a host of the above items is damaged or missing, contact your viewing experience. With these features, you can enjoy the convenience and delightful visual experience that the monitor brings to you for the following items: LCD monitor Monitor base Quick start guide Warranty card Power adapter Power cord DisplayPort cable (optional) HDMI cable (optional...
... the ASUS® LCD monitor! The latest widescreen LCD monitor from ASUS provides a broader, brighter and crystal-clear display, plus a host of the above items is damaged or missing, contact your viewing experience. With these features, you can enjoy the convenience and delightful visual experience that the monitor brings to you for the following items: LCD monitor Monitor base Quick start guide Warranty card Power adapter Power cord DisplayPort cable (optional) HDMI cable (optional...
VG259QMVG259QMY Series User Guide
Page 11
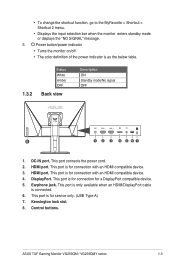
... ASUS TUF Gaming Monitor VG259QM / VG259QMY series 1-3 • To change the shortcut function, go to the MyFavorite > Shortcut > Shortcut 2 menu. • Displays the input selection bar when the monitor enters standby mode or displays the "NO SIGNAL" message. 5. Kensington lock slot. 8. Control buttons. HDMI port. HDMI port. DisplayPort. DC-IN port. Earphone jack. This port is connected. 6. This port is only available when an HDMI/DisplayPort cable is for connection with an HDMI compatible device. 3. Power button/power indicator • Turns the monitor...
... ASUS TUF Gaming Monitor VG259QM / VG259QMY series 1-3 • To change the shortcut function, go to the MyFavorite > Shortcut > Shortcut 2 menu. • Displays the input selection bar when the monitor enters standby mode or displays the "NO SIGNAL" message. 5. Kensington lock slot. 8. Control buttons. HDMI port. HDMI port. DisplayPort. DC-IN port. Earphone jack. This port is connected. 6. This port is only available when an HDMI/DisplayPort cable is for connection with an HDMI compatible device. 3. Power button/power indicator • Turns the monitor...
VG259QMVG259QMY Series User Guide
Page 13
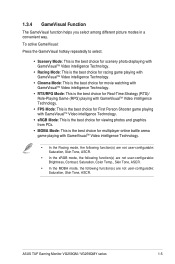
... function(s) are not user-configurable: Saturation, Skin Tone, ASCR. • In the sRGB mode, the following function(s) are not user-configurable: Brightness, Contrast, Saturation, Color Temp., Skin Tone, ASCR. • In the MOBA mode, the following function(s) are not user-configurable: Saturation, Skin Tone, ASCR. ASUS TUF Gaming Monitor VG259QM / VG259QMY series 1-5 1.3.4 GameVisual Function The GameVisual function helps you select among different picture modes in a convenient way...
... function(s) are not user-configurable: Saturation, Skin Tone, ASCR. • In the sRGB mode, the following function(s) are not user-configurable: Brightness, Contrast, Saturation, Color Temp., Skin Tone, ASCR. • In the MOBA mode, the following function(s) are not user-configurable: Saturation, Skin Tone, ASCR. ASUS TUF Gaming Monitor VG259QM / VG259QMY series 1-5 1.3.4 GameVisual Function The GameVisual function helps you select among different picture modes in a convenient way...
VG259QMVG259QMY Series User Guide
Page 15
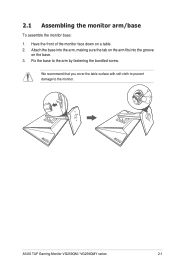
Attach the base into the arm, making sure the tab on the arm fits into the groove on a table. 2. We recommend that you cover the table surface with soft cloth to prevent damage to the arm by fastening the bundled screw. Fix the base to the monitor. 2.1 Assembling the monitor arm/base To assemble the monitor base: 1. Have the front of the monitor face down on the base. 3. ASUS TUF Gaming Monitor VG259QM / VG259QMY series 2-1
Attach the base into the arm, making sure the tab on the arm fits into the groove on a table. 2. We recommend that you cover the table surface with soft cloth to prevent damage to the arm by fastening the bundled screw. Fix the base to the monitor. 2.1 Assembling the monitor arm/base To assemble the monitor base: 1. Have the front of the monitor face down on the base. 3. ASUS TUF Gaming Monitor VG259QM / VG259QMY series 2-1
VG259QMVG259QMY Series User Guide
Page 17
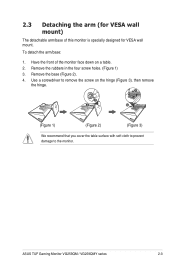
Remove the base (Figure 2). 4. Remove the rubbers in the four screw holes. (Figure 1) 3. ASUS TUF Gaming Monitor VG259QM / VG259QMY series 2-3 To detach the arm/base: 1. 2.3 Detaching the arm (for VESA wall mount. Have the front of this monitor is specially designed for VESA wall mount) The detachable arm/base of the monitor face down on the hinge (Figure 3), then remove the hinge. 1 1 2 2 (Figure 1) (Figure 2) (Figure 3) We recommend that you cover the table surface...
Remove the base (Figure 2). 4. Remove the rubbers in the four screw holes. (Figure 1) 3. ASUS TUF Gaming Monitor VG259QM / VG259QMY series 2-3 To detach the arm/base: 1. 2.3 Detaching the arm (for VESA wall mount. Have the front of this monitor is specially designed for VESA wall mount) The detachable arm/base of the monitor face down on the hinge (Figure 3), then remove the hinge. 1 1 2 2 (Figure 1) (Figure 2) (Figure 3) We recommend that you cover the table surface...

VG259QMVG259QMY Series User Guide
Page 18
... power button . Connect the power adapter securely to the monitor's earphone jack when an HDMI or DisplayPort signal is ON. 2-4 Chapter 2: Setup b. The power indicator lights up in white to the monitor's DisplayPort/HDMI port. Plug one end of the DisplayPort/HDMI cable to your computer's DisplayPort/HDMI port. • To use the earphone: connect the end with plug type to the monitor's DC input. Connect one end of the power button. 2.4 Connecting the cables Connect the cables as the following instructions: For service...
... power button . Connect the power adapter securely to the monitor's earphone jack when an HDMI or DisplayPort signal is ON. 2-4 Chapter 2: Setup b. The power indicator lights up in white to the monitor's DisplayPort/HDMI port. Plug one end of the DisplayPort/HDMI cable to your computer's DisplayPort/HDMI port. • To use the earphone: connect the end with plug type to the monitor's DC input. Connect one end of the power button. 2.4 Connecting the cables Connect the cables as the following instructions: For service...
VG259QMVG259QMY Series User Guide
Page 19
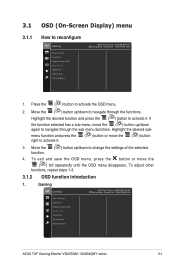
... 1. To exit and save the OSD menu, press the button or move the ( ) button 3. Move the ( ) button up /down to change the settings of the selected 4. Move the function. ( ) button up /down to navigate through the sub-menu functions. Gaming Gaming ASUS TUF Gaming VG259QM HDR Off Racing Mode DisplayPort 1920x1080@ 60Hz Overclocking OverDrive Adaptive-Sync (DP) ELMB SYNC GamePlus GameVisual Shadow Boost ASUS TUF Gaming Monitor VG259QM / VG259QMY series 3-1 Press the ( ) button to activate it...
... 1. To exit and save the OSD menu, press the button or move the ( ) button 3. Move the ( ) button up /down to change the settings of the selected 4. Move the function. ( ) button up /down to navigate through the sub-menu functions. Gaming Gaming ASUS TUF Gaming VG259QM HDR Off Racing Mode DisplayPort 1920x1080@ 60Hz Overclocking OverDrive Adaptive-Sync (DP) ELMB SYNC GamePlus GameVisual Shadow Boost ASUS TUF Gaming Monitor VG259QM / VG259QMY series 3-1 Press the ( ) button to activate it...

VG259QMVG259QMY Series User Guide
Page 20
... DisplayPort cable and use the monitor OSD menu to activate the setting. When Adaptive-Sync (DP)/ Variable Refresh Rate is Off, this function can only be seen. Refresh rate. • OverDrive: Improves the gray level response time of 280Hz (Only for DisplayPort input). Overclocking may cause screen flickering. This function is not available when ELMB SYNC is enabled. • Adaptive-Sync (DP)/ Variable Refresh Rate: Allows an Adaptive-Sync supported* graphics source to dynamically adjust display refresh rate based...
... DisplayPort cable and use the monitor OSD menu to activate the setting. When Adaptive-Sync (DP)/ Variable Refresh Rate is Off, this function can only be seen. Refresh rate. • OverDrive: Improves the gray level response time of 280Hz (Only for DisplayPort input). Overclocking may cause screen flickering. This function is not available when ELMB SYNC is enabled. • Adaptive-Sync (DP)/ Variable Refresh Rate: Allows an Adaptive-Sync supported* graphics source to dynamically adjust display refresh rate based...
VG259QMVG259QMY Series User Guide
Page 21
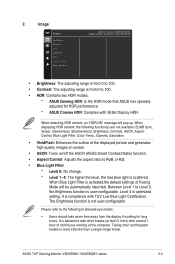
... break. ASUS TUF Gaming Monitor VG259QM / VG259QMY series 3-3 Image Image Brightness Contrast HDR VividPixel ASCR Aspect Control Blue Light Filter ASUS TUF Gaming VG259QM HDR Off Racing Mode DisplayPort 1920x1080@ 60Hz • Brightness: The adjusting range is from 0 to Full, or 4:3. • Blue Light Filter * Level 0: No change. * Level 1~4: The higher the level, the less blue light is optimized setting. Taking short and frequent breaks is user-configurable. It is not user-configurable. When Blue Light Filter is compliance with VESA Display HDR...
... break. ASUS TUF Gaming Monitor VG259QM / VG259QMY series 3-3 Image Image Brightness Contrast HDR VividPixel ASCR Aspect Control Blue Light Filter ASUS TUF Gaming VG259QM HDR Off Racing Mode DisplayPort 1920x1080@ 60Hz • Brightness: The adjusting range is from 0 to Full, or 4:3. • Blue Light Filter * Level 0: No change. * Level 1~4: The higher the level, the less blue light is optimized setting. Taking short and frequent breaks is user-configurable. It is not user-configurable. When Blue Light Filter is compliance with VESA Display HDR...
VG259QMVG259QMY Series User Guide
Page 22
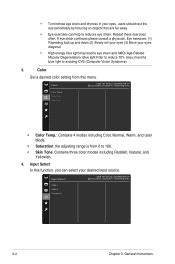
... eyes (3) Move your desired input source. Color ASUS TUF Gaming VG259QM HDR Off Racing Mode DisplayPort 1920x1080@ 60Hz Color Temp. Saturation Skin Tone • Color Temp.: Contains 4 modes including Cool, Normal, Warm, and User Mode. • Saturation: the adjusting range is from this function, you can help to reduces eye strain. If eye strain continues please consult a physician. Input Select In this menu. Color Set a desired color setting from 0 to avoiding...
... eyes (3) Move your desired input source. Color ASUS TUF Gaming VG259QM HDR Off Racing Mode DisplayPort 1920x1080@ 60Hz Color Temp. Saturation Skin Tone • Color Temp.: Contains 4 modes including Cool, Normal, Warm, and User Mode. • Saturation: the adjusting range is from this function, you can help to reduces eye strain. If eye strain continues please consult a physician. Input Select In this menu. Color Set a desired color setting from 0 to avoiding...
VG259QMVG259QMY Series User Guide
Page 23
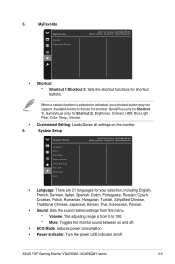
...ASUS TUF Gaming Monitor VG259QM / VG259QMY series 3-5 MyFavorite MyFavorite Shortcut Customized Setting ASUS TUF Gaming VG259QM HDR Off Racing Mode DisplayPort 1920x1080@ 60Hz • Shortcut: * Shortcut 1/Shortcut 2: Sets the shortcut functions for Shortcut 2), Brightness, Contrast, HDR, Blue Light Filter, Color Temp., Volume. System Setup System Setup Language Sound ECO Mode Power Indicator Power Key Lock Key Lock OSD Setup More ASUS TUF Gaming VG259QM HDR Off Racing Mode DisplayPort 1920x1080@ 60Hz • Language: There are 21 languages for your shortcut button may not support...
...ASUS TUF Gaming Monitor VG259QM / VG259QMY series 3-5 MyFavorite MyFavorite Shortcut Customized Setting ASUS TUF Gaming VG259QM HDR Off Racing Mode DisplayPort 1920x1080@ 60Hz • Shortcut: * Shortcut 1/Shortcut 2: Sets the shortcut functions for Shortcut 2), Brightness, Contrast, HDR, Blue Light Filter, Color Temp., Volume. System Setup System Setup Language Sound ECO Mode Power Indicator Power Key Lock Key Lock OSD Setup More ASUS TUF Gaming VG259QM HDR Off Racing Mode DisplayPort 1920x1080@ 60Hz • Language: There are 21 languages for your shortcut button may not support...

VG259QMVG259QMY Series User Guide
Page 24
... available when OverClocking and Adaptive-Sync (DP)/ Variable Refresh Rate are off. • Information: Shows the monitor information. • All Reset: "Yes" allows you to transparent. • DisplayPort Ver.: Compatibility with graphic card. • Power Key Lock: Enables or disables the power key. • Key Lock: To disable all function keys. Press over 5 seconds to cancel the key lock function. • OSD Setup: * Adjusts the OSD timeout from 10...
... available when OverClocking and Adaptive-Sync (DP)/ Variable Refresh Rate are off. • Information: Shows the monitor information. • All Reset: "Yes" allows you to transparent. • DisplayPort Ver.: Compatibility with graphic card. • Power Key Lock: Enables or disables the power key. • Key Lock: To disable all function keys. Press over 5 seconds to cancel the key lock function. • OSD Setup: * Adjusts the OSD timeout from 10...
VG259QMVG259QMY Series User Guide
Page 25
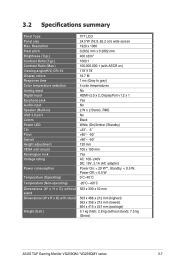
3.2 Specifications summary Panel Type Panel size Max. Resolution Pixel pitch Brightness (Typ.) Contrast Ratio (Typ.) Contrast Ratio (Max.) Viewing angle(H/V) CR>10 Display colors Response time Color temperature selection Analog input Digital input Earphone jack Audio input Speaker (Built-in) USB 3.0 port Colors Power LED Tilt Pivot Swivel Height adjustment VESA wall mount Kensington lock Voltage rating Power consumption Temperature (Operating) Temperature (Non-operating) Dimensions (W x H x D) without stand Dimensions (W x H x D) with stand Weight (Esti.) TFT LCD 24.5"W (16:9, 62.2 cm) wide ...
3.2 Specifications summary Panel Type Panel size Max. Resolution Pixel pitch Brightness (Typ.) Contrast Ratio (Typ.) Contrast Ratio (Max.) Viewing angle(H/V) CR>10 Display colors Response time Color temperature selection Analog input Digital input Earphone jack Audio input Speaker (Built-in) USB 3.0 port Colors Power LED Tilt Pivot Swivel Height adjustment VESA wall mount Kensington lock Voltage rating Power consumption Temperature (Operating) Temperature (Non-operating) Dimensions (W x H x D) without stand Dimensions (W x H x D) with stand Weight (Esti.) TFT LCD 24.5"W (16:9, 62.2 cm) wide ...

VG259QMVG259QMY Series User Guide
Page 26
..., Japanese, Korean, Thai, Indonesian, Persian) Quick start guide, warranty card, power adapter, power cord, DisplayPort cable (optional), HDMI cable (optional) UL/cUL, CB, CE, ErP, FCC, CCC, CU, RCM, BSMI, VCCI, RoHS, J-MOSS, WEEE, Windows 7 & 8.1 & 10 WHQL, CEL, MEPS, PSE, UkrSEPRO, KCC, E-Standby, TUV-Flicker Free, TUV-Low Blue Light, ICES-3, PC Recycle *Specifications are subject to change without notice. **Measuring a screen brightness of 200 nits without audio/ USB/ Card reader connection. 3-8 Chapter 3: General Instructions
..., Japanese, Korean, Thai, Indonesian, Persian) Quick start guide, warranty card, power adapter, power cord, DisplayPort cable (optional), HDMI cable (optional) UL/cUL, CB, CE, ErP, FCC, CCC, CU, RCM, BSMI, VCCI, RoHS, J-MOSS, WEEE, Windows 7 & 8.1 & 10 WHQL, CEL, MEPS, PSE, UkrSEPRO, KCC, E-Standby, TUV-Flicker Free, TUV-Low Blue Light, ICES-3, PC Recycle *Specifications are subject to change without notice. **Measuring a screen brightness of 200 nits without audio/ USB/ Card reader connection. 3-8 Chapter 3: General Instructions

VG259QMVG259QMY Series User Guide
Page 28
... light or dark • Adjust the Contrast and Brightness settings via OSD. 3-10 Chapter 3: General Instructions Screen image has color defects (white does • Inspect the signal cable and make sure none of the pins are bent. • Connect the computer with another available monitor to check if the computer is properly connected to the monitor and the power outlet. 3.4 Troubleshooting (FAQ) Problem Possible Solution Power LED is not ON • Press the button to check...
... light or dark • Adjust the Contrast and Brightness settings via OSD. 3-10 Chapter 3: General Instructions Screen image has color defects (white does • Inspect the signal cable and make sure none of the pins are bent. • Connect the computer with another available monitor to check if the computer is properly connected to the monitor and the power outlet. 3.4 Troubleshooting (FAQ) Problem Possible Solution Power LED is not ON • Press the button to check...
VG259QMVG259QMY Series User Guide
Page 29
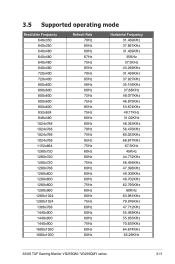
3.5 Supported operating mode Resolution Frequency 640x350 640x350 640x480 640x480 640x480 640x480 720x400 720x400 800x600 800x600 800x600 800x600 800x600 832x624 848x480 1024x768 1024x768 1024x768 1024x768 1152x864 1280x720 1280x720 1280x720 1280x768 1280x800 1280x800 1280x800 1280x960 1280x1024 1280x1024 1366x768 1440x900 1440x900 1440x900 1680x1050 1680x1050 Refresh Rate 70Hz 85Hz 60Hz 67Hz 75Hz 85Hz 70Hz 85Hz 56Hz 60Hz 72Hz...306KHz 49.702KHz 62.795KHz 60KHz 63.981KHz 79.976KHz 47.712KHz 55.469KHz 55.935KHz 70.635KHz 64.674KHz 65.29KHz ASUS TUF Gaming Monitor VG259QM / VG259QMY series 3-11
3.5 Supported operating mode Resolution Frequency 640x350 640x350 640x480 640x480 640x480 640x480 720x400 720x400 800x600 800x600 800x600 800x600 800x600 832x624 848x480 1024x768 1024x768 1024x768 1024x768 1152x864 1280x720 1280x720 1280x720 1280x768 1280x800 1280x800 1280x800 1280x960 1280x1024 1280x1024 1366x768 1440x900 1440x900 1440x900 1680x1050 1680x1050 Refresh Rate 70Hz 85Hz 60Hz 67Hz 75Hz 85Hz 70Hz 85Hz 56Hz 60Hz 72Hz...306KHz 49.702KHz 62.795KHz 60KHz 63.981KHz 79.976KHz 47.712KHz 55.469KHz 55.935KHz 70.635KHz 64.674KHz 65.29KHz ASUS TUF Gaming Monitor VG259QM / VG259QMY series 3-11


