T2-R User Manual
Page 10
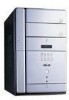
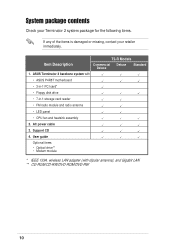
... 2. AC power cable 3. System package contents Check your Terminator 2 system package for the following items. If any of the items is damaged or missing, contact your retailer immediately. Support CD 4. ASUS Terminator 2 barebone system with dipolar antenna), and Gigabit LAN ** CD-ROM/CD-RW/DVD-ROM/DVD-RW 10 Item Description T2-R Models Commercial Deluxe Deluxe Standard 1.
... 2. AC power cable 3. System package contents Check your Terminator 2 system package for the following items. If any of the items is damaged or missing, contact your retailer immediately. Support CD 4. ASUS Terminator 2 barebone system with dipolar antenna), and Gigabit LAN ** CD-ROM/CD-RW/DVD-ROM/DVD-RW 10 Item Description T2-R Models Commercial Deluxe Deluxe Standard 1.

T2-R User Manual
Page 50
Check the box opposite Mic2 Select to display the Advanced Controls for Microphone window. 2. Click on the Windows® taskbar to take effect. Only one Mic .... The Advanced Controls for the new settings to display the Volume Control window. 2. Adjusting the volume settings 1. To achieve 6-channel audio capability when playing DVDs, check the boxes opposite AC3 SPDIF and PCM SPDIF. Click Close for Volume Control window appears.
Check the box opposite Mic2 Select to display the Advanced Controls for Microphone window. 2. Click on the Windows® taskbar to take effect. Only one Mic .... The Advanced Controls for the new settings to display the Volume Control window. 2. Adjusting the volume settings 1. To achieve 6-channel audio capability when playing DVDs, check the boxes opposite AC3 SPDIF and PCM SPDIF. Click Close for Volume Control window appears.

T2-R User Manual
Page 64
...a hexadecimal digit or ASCII character WEP key. Select Fully Auto to allow your station to connect to the most suitable connection. Check the Data encryption (WEP enabled) option to open the Encryption or Advanced property tab sheet. A 128-bit encryption contains 26 ... to allow the wireless LAN adapter to adjust to any available access point. Encryption tab Wireless data transmissions between your country/region. Check the Network Authentication (Shared Mode) option if you to authenticate a preferred wireless network. Null string may also fix data transfer rates...
...a hexadecimal digit or ASCII character WEP key. Select Fully Auto to allow your station to connect to the most suitable connection. Check the Data encryption (WEP enabled) option to open the Encryption or Advanced property tab sheet. A 128-bit encryption contains 26 ... to allow the wireless LAN adapter to adjust to any available access point. Encryption tab Wireless data transmissions between your country/region. Check the Network Authentication (Shared Mode) option if you to authenticate a preferred wireless network. Null string may also fix data transfer rates...

T2-R User Manual
Page 66
.... To enable Internet Connection Sharing (ICS), drag the network connection to other computers in the network diagram are enabled when Soft AP mode is enabled. Check this option is disabled, the available Internet connection may be bridged with other wireless devices (Ad-hoc mode). Enable Firewall. Config - This field allows you...
.... To enable Internet Connection Sharing (ICS), drag the network connection to other computers in the network diagram are enabled when Soft AP mode is enabled. Check this option is disabled, the available Internet connection may be bridged with other wireless devices (Ad-hoc mode). Enable Firewall. Config - This field allows you...
T2-R User Manual
Page 86
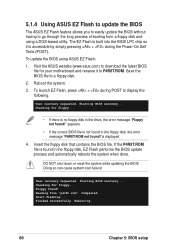
... Flash: 1. Visit the ASUS website (www.asus.com) to P4R8T.ROM. To launch EZ Flash, press + during the Power-On Self Tests (POST). Start flashing... Starting BIOS recovery... Checking for floppy... • If there is found ! DO NOT shut down or reset the system while updating the...found in the drive, the error message "Floppy not found !"is accessible by simply pressing + during POST to a floppy disk. 2. Checking for your motherboard and rename it is displayed. 4. Starting BIOS recovery... Reading file "p4r8t.rom". Flashed successfully. The EZ Flash is built...
... Flash: 1. Visit the ASUS website (www.asus.com) to P4R8T.ROM. To launch EZ Flash, press + during the Power-On Self Tests (POST). Start flashing... Starting BIOS recovery... Checking for floppy... • If there is found ! DO NOT shut down or reset the system while updating the...found in the drive, the error message "Floppy not found !"is accessible by simply pressing + during POST to a floppy disk. 2. Checking for your motherboard and rename it is displayed. 4. Starting BIOS recovery... Reading file "p4r8t.rom". Flashed successfully. The EZ Flash is built...

T2-R User Manual
Page 87
... bootable floppy disk, you downloaded from a floppy disk: 1. Bad BIOS checksum. Doing so can also use this motherboard (P4R8T.ROM). ASUS Terminator 2 barebone system 87 Starting BIOS recovery... Starting BIOS recovery... Reading file "p4r8t.rom". Completed. See section "5.1.1 Creating a bootable floppy...the original, or the latest, BIOS file for floppy... When the BIOS update process is detected, the following message appears. Checking for floppy... 3. Floppy found . When a corrupted BIOS is complete, reboot the system. P4R8T11.ROM), rename it to ...
... bootable floppy disk, you downloaded from a floppy disk: 1. Bad BIOS checksum. Doing so can also use this motherboard (P4R8T.ROM). ASUS Terminator 2 barebone system 87 Starting BIOS recovery... Starting BIOS recovery... Reading file "p4r8t.rom". Completed. See section "5.1.1 Creating a bootable floppy...the original, or the latest, BIOS file for floppy... When the BIOS update process is detected, the following message appears. Checking for floppy... 3. Floppy found . When a corrupted BIOS is complete, reboot the system. P4R8T11.ROM), rename it to ...

T2-R User Manual
Page 88
... floppy... DO NOT shut down or reset the system while updating the BIOS! When the BIOS update process is detected, the following screen message appears. Checking for this motherboard. CD-ROM found ! Start flashing... Completed. The recovered BIOS may not be the latest BIOS version for this motherboard. To recover the... the support CD: Make sure that the optical drive is no floppy disk in the optical drive. Boot the system. 2. Bad BIOS checksum. Visit the ASUS website (www.asus.com) to download the latest BIOS file. 88 Chapter 5: BIOS setup
... floppy... DO NOT shut down or reset the system while updating the BIOS! When the BIOS update process is detected, the following screen message appears. Checking for this motherboard. CD-ROM found ! Start flashing... Completed. The recovered BIOS may not be the latest BIOS version for this motherboard. To recover the... the support CD: Make sure that the optical drive is no floppy disk in the optical drive. Boot the system. 2. Bad BIOS checksum. Visit the ASUS website (www.asus.com) to download the latest BIOS file. 88 Chapter 5: BIOS setup

T2-R User Manual
Page 112
... letters and/or numbers, then press . 3. Security Settings Supervisor Password User Password Change Supervisor Password User Access Level Change User Password Clear User Password Password Check Not Installed Not Installed [Full Access] [Setup] to set a User Password: 1. again to selected fields, such as Date and Time. Limited allows changes only to...
... letters and/or numbers, then press . 3. Security Settings Supervisor Password User Password Change Supervisor Password User Access Level Change User Password Clear User Password Password Check Not Installed Not Installed [Full Access] [Setup] to set a User Password: 1. again to selected fields, such as Date and Time. Limited allows changes only to...

T2-R User Manual
Page 113
The message "Password Installed" appears after you successfully set to [Always], BIOS checks for user password when accessing the Setup utility. To change the user password, follow the same steps as in setting a user password. Clear User Password Select this item to [Setup], BIOS checks for user password both when accessing Setup and booting the system. Password Check [Setup] When set to clear the user password. Configuration options: [Setup] [Always] ASUS Terminator 2 barebone system 113 The User Password item now shows Installed. When set your password.
The message "Password Installed" appears after you successfully set to [Always], BIOS checks for user password when accessing the Setup utility. To change the user password, follow the same steps as in setting a user password. Clear User Password Select this item to [Setup], BIOS checks for user password both when accessing Setup and booting the system. Password Check [Setup] When set to clear the user password. Configuration options: [Setup] [Always] ASUS Terminator 2 barebone system 113 The User Password item now shows Installed. When set your password.


