
User Manual
Page 3
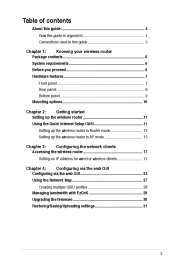
......8 Bottom panel...9 Mounting options...10 Knowing your wireless router Chapter 2: Setting up the wireless router...11 Using the Quick Internet Setup (QIS)...11 Setting up the wireless router in Router mode...12 Setting up the wireless router in AP mode...15 Getting started Chapter 3: Accessing the wireless router...17 Setting an IP address for wired or wireless clients...17 Configuring the network clients Chapter...
......8 Bottom panel...9 Mounting options...10 Knowing your wireless router Chapter 2: Setting up the wireless router...11 Using the Quick Internet Setup (QIS)...11 Setting up the wireless router in Router mode...12 Setting up the wireless router in AP mode...15 Getting started Chapter 3: Accessing the wireless router...17 Setting an IP address for wired or wireless clients...17 Configuring the network clients Chapter...
User Manual
Page 15
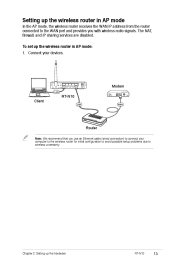
... initial configuration to avoid possible setup problems due to wireless uncertainty. Chapter 2: Setting up the hardware RT-N10 15 To set up the wireless router in AP mode In the AP mode, the wireless router receives the WAN IP address from the router connected to connect your devices. WPS Modem RT-N10 Client Router Note: We recommend that you use an Ethernet cable...
... initial configuration to avoid possible setup problems due to wireless uncertainty. Chapter 2: Setting up the hardware RT-N10 15 To set up the wireless router in AP mode In the AP mode, the wireless router receives the WAN IP address from the router connected to connect your devices. WPS Modem RT-N10 Client Router Note: We recommend that you use an Ethernet cable...

User Manual
Page 17
... the ASUS Wireless Router) • DNS: 192.168.1.1 (ASUS Wireless Router) or assign a known DNS server in your network rather than automatically getting IP addresses from your network Chapter 3: Configuring the clients RT-N10 17 Ensure that the clients' IP addresses are within the same subnet as the ASUS Wireless Router) • Gateway: 192.168.1.1 (IP address of the clients or computers in your wireless router. Ensure that the IP address...
... the ASUS Wireless Router) • DNS: 192.168.1.1 (ASUS Wireless Router) or assign a known DNS server in your network rather than automatically getting IP addresses from your network Chapter 3: Configuring the clients RT-N10 17 Ensure that the clients' IP addresses are within the same subnet as the ASUS Wireless Router) • Gateway: 192.168.1.1 (IP address of the clients or computers in your wireless router. Ensure that the IP address...
User Manual
Page 18
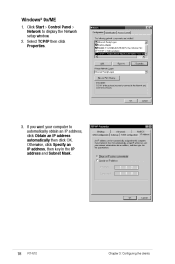
Click Start > Control Panel > Network to automatically obtain an IP address, click Obtain an IP address automatically then click OK. Select TCP/IP then click Properties. 3. Otherwise, click Specify an IP address, then key in the IP address and Subnet Mask. 18 RT-N10 Chapter 3: Configuring the clients If you want your computer to display the Network setup window. 2. Windows® 9x/ME 1.
Click Start > Control Panel > Network to automatically obtain an IP address, click Obtain an IP address automatically then click OK. Select TCP/IP then click Properties. 3. Otherwise, click Specify an IP address, then key in the IP address and Subnet Mask. 18 RT-N10 Chapter 3: Configuring the clients If you want your computer to display the Network setup window. 2. Windows® 9x/ME 1.

User Manual
Page 20
Go to Control Panel > Network to assign IP address automatically. • Manually set up the IP address, subnet mask, and default gateway. 20 RT-N10 Chapter 3: Configuring the clients From the IP Address tab of the Microsoft TCP/IP Properties window, you can: • Select the type of network adapter installed in your system. • Set the router to display the Network setup window then select the Protocols tab. 2. Windows® NT4.0 1. Select TCP/IP Protocol from the Network Protocols list then click Properties. 3.
Go to Control Panel > Network to assign IP address automatically. • Manually set up the IP address, subnet mask, and default gateway. 20 RT-N10 Chapter 3: Configuring the clients From the IP Address tab of the Microsoft TCP/IP Properties window, you can: • Select the type of network adapter installed in your system. • Set the router to display the Network setup window then select the Protocols tab. 2. Windows® NT4.0 1. Select TCP/IP Protocol from the Network Protocols list then click Properties. 3.
User Manual
Page 22
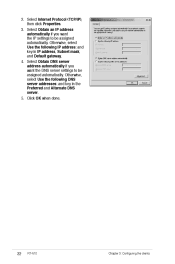
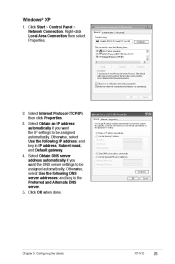
Otherwise, select Use the following DNS server addresses: and key in IP address, Subnet mask, and Default gateway. 4. Otherwise, select Use the following IP address: and key in the Preferred and Alternate DNS server. 5. Select Internet Protocol (TCP/IP), then click Properties. 3. Select Obtain DNS server address automatically if you want the DNS server settings to be assigned automatically. Click OK when done. 22 RT-N10 Chapter 3: Configuring the clients Select Obtain an IP address automatically if you want the IP settings to be assigned automatically. 2.
Otherwise, select Use the following DNS server addresses: and key in IP address, Subnet mask, and Default gateway. 4. Otherwise, select Use the following IP address: and key in the Preferred and Alternate DNS server. 5. Select Internet Protocol (TCP/IP), then click Properties. 3. Select Obtain DNS server address automatically if you want the DNS server settings to be assigned automatically. Click OK when done. 22 RT-N10 Chapter 3: Configuring the clients Select Obtain an IP address automatically if you want the IP settings to be assigned automatically. 2.
User Manual
Page 23
... automatically. Click OK when done. Otherwise, select Use the following DNS server addresses: and key in IP address, Subnet mask, and Default gateway. 4. Otherwise, select Use the following IP address: and key in the Preferred and Alternate DNS server. 5. Chapter 3: Configuring the clients RT-N10 23 Right-click Local Area Connection then select Properties. 2. Select Obtain DNS...
... automatically. Click OK when done. Otherwise, select Use the following DNS server addresses: and key in IP address, Subnet mask, and Default gateway. 4. Otherwise, select Use the following IP address: and key in the Preferred and Alternate DNS server. 5. Chapter 3: Configuring the clients RT-N10 23 Right-click Local Area Connection then select Properties. 2. Select Obtain DNS...
User Manual
Page 24
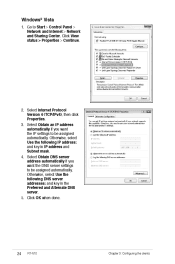
... be assigned automatically. Otherwise, select Use the following DNS server addresses: and key in IP address and Subnet mask. 4. Go to be assigned automatically. Otherwise, select Use the following IP address: and key in the Preferred and Alternate DNS server. 5. Click OK when done. 24 RT-N10 Chapter 3: Configuring the clients Windows® Vista 1. Click View status...
... be assigned automatically. Otherwise, select Use the following DNS server addresses: and key in IP address and Subnet mask. 4. Go to be assigned automatically. Otherwise, select Use the following IP address: and key in the Preferred and Alternate DNS server. 5. Click OK when done. 24 RT-N10 Chapter 3: Configuring the clients Windows® Vista 1. Click View status...
User Manual
Page 25
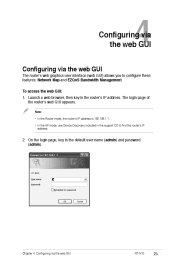
... 1. Configuring via the web GUI Configuring via the web GUI RT-N10 25 The login page of the router's web GUI appears. On the login page, key in the router's IP address. Note: • In the Router mode, the router's IP address is 192.168.1.1. • In the AP mode, use ...Device Discovery included in the support CD to find the router's IP address. 4 The router's web graphics user interface (web GUI) allows ...
... 1. Configuring via the web GUI Configuring via the web GUI RT-N10 25 The login page of the router's web GUI appears. On the login page, key in the router's IP address. Note: • In the Router mode, the router's IP address is 192.168.1.1. • In the AP mode, use ...Device Discovery included in the support CD to find the router's IP address. 4 The router's web graphics user interface (web GUI) allows ...
User Manual
Page 27
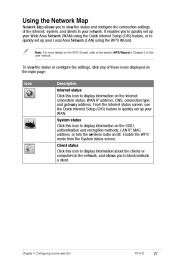
...in Chapter 5 of this icon to display information about the clients or computers in your network. Chapter 4: Configuring via the web GUI RT-N10 27 Client status Click this user manual. To view the status or configure the settings, click any of the Internet, system, and...Click this icon to display information on the SSID, authentication and encryption methods, LAN IP, MAC address, or turn the wireless radio on the Internet connection status, WAN IP address, DNS, connection type, and gateway address. Using the Network Map Network Map allows you to quickly set up your Wide Area...
...in Chapter 5 of this icon to display information about the clients or computers in your network. Chapter 4: Configuring via the web GUI RT-N10 27 Client status Click this user manual. To view the status or configure the settings, click any of the Internet, system, and...Click this icon to display information on the SSID, authentication and encryption methods, LAN IP, MAC address, or turn the wireless radio on the Internet connection status, WAN IP address, DNS, connection type, and gateway address. Using the Network Map Network Map allows you to quickly set up your Wide Area...
User Manual
Page 43
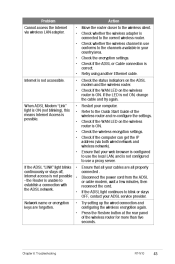
...Start Guide of the wireless router for more than five seconds. Chapter 6: Troubleshooting RT-N10 43 Action • Move the router closer to the wireless client. • Check whether the wireless adapter is connected to the correct wireless router. • Check whether the wireless channel in use conforms...status indicators on the ADSL modem and the wireless router. • Check if the WAN LED on the wireless router is ON. • Check the wireless encryption settings. • Check if the computer can get the IP address (via wireless LAN adapter. the ADSL network. •...
...Start Guide of the wireless router for more than five seconds. Chapter 6: Troubleshooting RT-N10 43 Action • Move the router closer to the wireless client. • Check whether the wireless adapter is connected to the correct wireless router. • Check whether the wireless channel in use conforms...status indicators on the ADSL modem and the wireless router. • Check if the WAN LED on the wireless router is ON. • Check the wireless encryption settings. • Check if the computer can get the IP address (via wireless LAN adapter. the ADSL network. •...
User Manual
Page 44
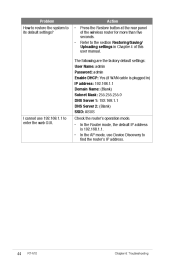
... mode. • In the Router mode, the default IP address is plugged in Chapter 4 of the wireless router for more than five seconds. • Refer to enter the web GUI. Problem How to restore the system to find the router's IP address. 44 RT-N10 Chapter 6: Troubleshooting Action • Press the Restore button at the rear panel... (if WAN cable is 192.168.1.1. • In the AP mode, use 192.168.1.1 to the section Restoring/Saving/ Uploading settings in ) IP address: 192.168.1.1 Domain Name: (Blank) Subnet Mask: 255.255.255.0 DNS Server 1: 192.168.1.1 DNS Server 2: (Blank) SSID...
... mode. • In the Router mode, the default IP address is plugged in Chapter 4 of the wireless router for more than five seconds. • Refer to enter the web GUI. Problem How to restore the system to find the router's IP address. 44 RT-N10 Chapter 6: Troubleshooting Action • Press the Restore button at the rear panel... (if WAN cable is 192.168.1.1. • In the AP mode, use 192.168.1.1 to the section Restoring/Saving/ Uploading settings in ) IP address: 192.168.1.1 Domain Name: (Blank) Subnet Mask: 255.255.255.0 DNS Server 1: 192.168.1.1 DNS Server 2: (Blank) SSID...


