

User Manual
Page 17
... as the ASUS Wireless Router) • Gateway: 192.168.1.1 (IP address of the clients or computers in your network rather than automatically getting IP addresses from your client or computer. But in some of the ASUS Wireless Router) • DNS: 192.168.1.1 (ASUS Wireless Router) or assign...RT-N10 17 Note: In the Router mode, if you may want to manually assign an IP address to the clients in your wired or wireless clients. Configuring the network clients Accessing the wireless router 3 Setting an IP address for wired or wireless clients To access the ASUS Wireless Router...
... as the ASUS Wireless Router) • Gateway: 192.168.1.1 (IP address of the clients or computers in your network rather than automatically getting IP addresses from your client or computer. But in some of the ASUS Wireless Router) • DNS: 192.168.1.1 (ASUS Wireless Router) or assign...RT-N10 17 Note: In the Router mode, if you may want to manually assign an IP address to the clients in your wired or wireless clients. Configuring the network clients Accessing the wireless router 3 Setting an IP address for wired or wireless clients To access the ASUS Wireless Router...

User Manual
Page 19
4. Select the DNS configuration tab and click Enable DNS. Chapter 3: Configuring the clients RT-N10 19 Key in New gateway then click Add. 5. Click OK. Select the Gateway tab, and key in Host, Domain, and DNS Server Search Order, then click Add. 6.
4. Select the DNS configuration tab and click Enable DNS. Chapter 3: Configuring the clients RT-N10 19 Key in New gateway then click Add. 5. Click OK. Select the Gateway tab, and key in Host, Domain, and DNS Server Search Order, then click Add. 6.

User Manual
Page 20
From the IP Address tab of the Microsoft TCP/IP Properties window, you can: • Select the type of network adapter installed in your system. • Set the router to display the Network setup window then select the Protocols tab. 2. Go to Control Panel > Network to assign IP address automatically. • Manually set up the IP address, subnet mask, and default gateway. 20 RT-N10 Chapter 3: Configuring the clients Select TCP/IP Protocol from the Network Protocols list then click Properties. 3. Windows® NT4.0 1.
From the IP Address tab of the Microsoft TCP/IP Properties window, you can: • Select the type of network adapter installed in your system. • Set the router to display the Network setup window then select the Protocols tab. 2. Go to Control Panel > Network to assign IP address automatically. • Manually set up the IP address, subnet mask, and default gateway. 20 RT-N10 Chapter 3: Configuring the clients Select TCP/IP Protocol from the Network Protocols list then click Properties. 3. Windows® NT4.0 1.
User Manual
Page 22
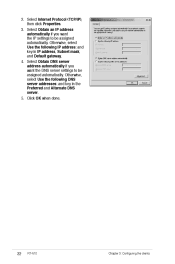
2. Click OK when done. 22 RT-N10 Chapter 3: Configuring the clients Select Obtain DNS server address automatically if you want the DNS server settings to be assigned automatically. Otherwise, select Use the following IP address: and key in the Preferred and Alternate DNS server. 5. Select Obtain an IP address automatically if you want the IP settings to be assigned automatically. Otherwise, select Use the following DNS server addresses: and key in IP address, Subnet mask, and Default gateway. 4. Select Internet Protocol (TCP/IP), then click Properties. 3.
2. Click OK when done. 22 RT-N10 Chapter 3: Configuring the clients Select Obtain DNS server address automatically if you want the DNS server settings to be assigned automatically. Otherwise, select Use the following IP address: and key in the Preferred and Alternate DNS server. 5. Select Obtain an IP address automatically if you want the IP settings to be assigned automatically. Otherwise, select Use the following DNS server addresses: and key in IP address, Subnet mask, and Default gateway. 4. Select Internet Protocol (TCP/IP), then click Properties. 3.
User Manual
Page 23
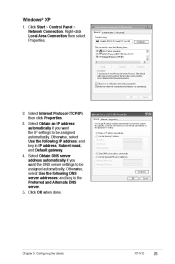
..., select Use the following IP address: and key in the Preferred and Alternate DNS server. 5. Chapter 3: Configuring the clients RT-N10 23 Select Obtain DNS server address automatically if you want the DNS server settings to be assigned automatically. Select Obtain an IP...the IP settings to be assigned automatically. Otherwise, select Use the following DNS server addresses: and key in IP address, Subnet mask, and Default gateway. 4. Right-click Local Area Connection then select Properties. 2. Select Internet Protocol (TCP/IP), then click Properties. 3. Windows® XP 1....
..., select Use the following IP address: and key in the Preferred and Alternate DNS server. 5. Chapter 3: Configuring the clients RT-N10 23 Select Obtain DNS server address automatically if you want the DNS server settings to be assigned automatically. Select Obtain an IP...the IP settings to be assigned automatically. Otherwise, select Use the following DNS server addresses: and key in IP address, Subnet mask, and Default gateway. 4. Right-click Local Area Connection then select Properties. 2. Select Internet Protocol (TCP/IP), then click Properties. 3. Windows® XP 1....
User Manual
Page 27
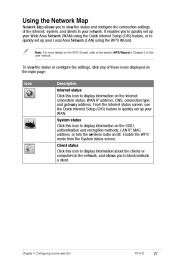
... (QIS) feature, or to quickly set up your Local Area Network (LAN) using the WPS Wizard. Chapter 4: Configuring via the web GUI RT-N10 27 Client status Click this icon to view the status and configure the connection settings of the Internet, system, and clients in Chapter 5 of ... display information on the SSID, authentication and encryption methods, LAN IP, MAC address, or turn the wireless radio on the Internet connection status, WAN IP address, DNS, connection type, and gateway address. To view the status or configure the settings, click any of this icon to the section ...
... (QIS) feature, or to quickly set up your Local Area Network (LAN) using the WPS Wizard. Chapter 4: Configuring via the web GUI RT-N10 27 Client status Click this icon to view the status and configure the connection settings of the Internet, system, and clients in Chapter 5 of ... display information on the SSID, authentication and encryption methods, LAN IP, MAC address, or turn the wireless radio on the Internet connection status, WAN IP address, DNS, connection type, and gateway address. To view the status or configure the settings, click any of this icon to the section ...