Asus RS520A-E12-RS12U Support and Manuals
Get Help and Manuals for this Asus item
View All Support Options Below
Free Asus RS520A-E12-RS12U manuals!
Problems with Asus RS520A-E12-RS12U?
Ask a Question
Free Asus RS520A-E12-RS12U manuals!
Problems with Asus RS520A-E12-RS12U?
Ask a Question
Asus RS520A-E12-RS12U Videos

ASUS RS520A-E12-RS12U #AMD | 2022
Duration: 2:02
Total Views: 1,094
Duration: 2:02
Total Views: 1,094
Popular Asus RS520A-E12-RS12U Manual Pages
User Manual - Page 9

... to change system settings through the BIOS Setup menus and describes the BIOS parameters. 6. ix This chapter includes the motherboard layout, jumper settings, and connector locations. 5. Chapter 6: Driver Installation This chapter provides instructions for installing the necessary drivers for system integrators, and experienced users with the server. About this guide Audience
This user...
User Manual - Page 10

...to set up and use the proprietary ASUS server management utility.
ASUS Control Center (ACC) user guide
This manual tells how to select. ASUS websites
The ASUS websites provide updated information ....
Visit asuscontrolcenter.asus.com for product and software updates. 1. Visit https://www.asus.com for all ASUS hardware and software products.
IMPORTANT: Instructions that you must...
User Manual - Page 12

... contents
Check your system package for the following items.
Model Name Chassis Motherboard Component
Accessories
Optional Items
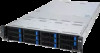
RS520A-E12-RS12U
ASUS R2P-E 2U Rackmount Chassis
ASUS K14PA-U24 Server Board
12 x 3.5-inch Storage Device Trays or Dummy Trays 2 x 2.5-inch Storage Device Trays 4 x System Fans 1x AMD EPYC™ Support DVD 1 x CPU Heatsink 2 x AC Power Cable 1+1 Redundant 1200W...
User Manual - Page 13

The correct serial number of the product is required if you need to request for support from the ASUS Technical Support team.
12 34 RESET
RS520A-E12-RS12U
xxSxxxxxxxxx
ASUS RS520A-E12 Series
1-3 1.2 Serial number label
The product's serial number contains 12 characters such as xxSxxxxxxxxx and printed on the sticker at the server's front cover.
User Manual - Page 14

Model Name
RS520A-E12-RS12U
Motherboard
K14PA-U24
Processor Support Core Logic
1 x Socket SP5 (LGA 6096) AMD EPYC™ 9004 series (up to 6TB
Memory
Memory Type
DDR5 4800/4400 RDIMM / 3DS RDIMM * Please refer to www.asus.com for latest memory AVL update
Memory Size
256GB, 128GB, 64GB, 32GB RDIMM 256GB, 128GB, 64GB, 32GB 3DS RDIMM * Refer...
User Manual - Page 15

Model Name
Storage Bays
Backplane Connectors
MB Onboard Connectors
Networking
VGA Graphic Front I/O Ports
Rear I/O Ports
Switch/LED
Security Options
OS Support
Management Solution
Software
Out of Band Remote Management
Regulatory Compliance
Dimension
RS520A-E12-RS12U
6 x MCIO x2 (for NVMe) 3 x SlimSAS x4 (for SATA) 2 x M.2 connectors 8 x MCIO connectors 1 x Dual Port Intel I350-AM2 ...
User Manual - Page 23

... supported Attempt to unmap permanently mapped TLB to PSP secure region Unable to map an SMN address to AXI space Unable to map a SYSHUB address to AXI space
(continued on the next page)
ASUS RS520A-E12 Series
1-13 1.7.5 Q-Code table
Action
PHASE
SEC Start up Security Phase
PSP Boot
PSP Boot Loader phase (Error Post Codes)
POST CODE...
User Manual - Page 39

...
22 DIMMs P P P P P P P P P P P P P P P P P P P P P P
24 DIMMs P P P P P P P P P P P P P P P P P P P P P P P P
ASUS RS520A-E12 Series
2-11 2.4 System memory
The motherboard comes with 24 Double Data Rate 5 (DDR5) Dual Inline Memory Modules (DIMM) sockets. The figure illustrates the location of the DDR5 DIMM sockets:
2.4.1 Memory Configurations
You may install 32GB, 64GB, 128GB, or 256GB RDIMM...
User Manual - Page 41

...DIMM.
3.
2.4.2
Installing a DIMM
Ensure to unlock the DIMM.
3. Apply force to prevent DIMM notch damage.
2.4.3 Removing a DIMM
1. Remove the DIMM from the socket. Support the DIMM lightly with... to unplug the power supply before adding or removing DIMMs or other system components. ASUS RS520A-E12 Series
2-13 Unlock a DIMM socket by both the motherboard and the components.
1....
User Manual - Page 43

Attach the right side of the front bezel to the notch holes on the front bezel to the right front panel. ASUS RS520A-E12 Series
2-15
2.5.2 Installing the front bezel
1. Align the two (2) right notches on the right front panel.
2.
User Manual - Page 45

Push the bezel release latch of the front bezel towards the left to lock the bezel. ASUS RS520A-E12 Series
2-17 5.
User Manual - Page 47

Prepare the 3.5" storage device and the bundled set of the bay.
Place the storage device tray on a flat and stable surface. 4. Place the 3.5" storage device into the tray then secure it with four screws. Tray lever
3. Firmly hold the tray lever and pull the storage device tray out of screws. 5. ASUS RS520A-E12 Series
2-19 2.
User Manual - Page 64

Install the software drivers for ISA or PCI devices.
2-36
Chapter 2: Hardware Information Programmable Interrupt
3*
11 ...to the card. 2.7.7 Configuring an expansion card
After installing the expansion card, configure it by adjusting the software settings.
1. Assign an IRQ to the following tables.
3. Turn on BIOS setup.
2. Standard Interrupt assignments
IRQ Priority
Standard function
...
User Manual - Page 135

...Configuration options: [Disabled] [Enabled]
ASUS RS520A-E12 Series
5-25 SR-IOV Support [Enabled]
This option enables or disables Single Root IO Virtualization Support if the system has SRIOV capable PCIe devices. Configuration options: [Auto] [128 Bytes] [256 Bytes] [512 Bytes] [1024 Bytes] [2048 Bytes] [4096 Bytes]
PCI Express Link Register Settings
ASPM Support [Disabled]
Allows you to...
User Manual - Page 139

...] [10 sec] [20 sec]
Device reset time-out [20 sec] Configuration options: [10 sec] [20 sec] [30 sec] [40 sec]
ASUS RS520A-E12 Series
5-29 Configuration options: [Enabled] [Disabled]
USB Mass Storage Driver Support [Enabled] Configuration options: [Disabled] [Enabled]
USB Keyboard and Mouse Simulator [Enabled]
Enable this item to simulate USB keyboard and mouse to...
Asus RS520A-E12-RS12U Reviews
We have not received any reviews for Asus yet.