
User Guide
Page 3
... information vii About this guide viii RAMPAGE V EXTREME specifications summary OC Panel specifications summary xv Package contents xvi Installation tools and components xvii Chapter 1: Product Introduction 1.1 Special features 1-1 1.1.1 Product highlights 1-1 1.1.2 ROG Unique Gaming Features 1-2 1.1.3 ROG exclusive features 1-3 1.1.4 ASUS special features 1-5 1.1.5 ROG rich-bundled software 1-6 1.2 Motherboard overview 1-7 1.2.1 Before you proceed 1-7 1.2.2 Motherboard layout 1-8 1.2.3 Central Processing Unit (CPU...
... information vii About this guide viii RAMPAGE V EXTREME specifications summary OC Panel specifications summary xv Package contents xvi Installation tools and components xvii Chapter 1: Product Introduction 1.1 Special features 1-1 1.1.1 Product highlights 1-1 1.1.2 ROG Unique Gaming Features 1-2 1.1.3 ROG exclusive features 1-3 1.1.4 ASUS special features 1-5 1.1.5 ROG rich-bundled software 1-6 1.2 Motherboard overview 1-7 1.2.1 Before you proceed 1-7 1.2.2 Motherboard layout 1-8 1.2.3 Central Processing Unit (CPU...
User Guide
Page 4
Contents 2.2 BIOS update utility 2-14 2.3 Motherboard rear and audio connections 2-15 2.3.1 Rear I/O connection 2-15 2.3.2 Audio I/O connections 2-17 2.4 OC Panel 2-19 2.4.1 OC Panel Overview 2-19 2.4.2 Setting up your OC Panel in Normal Mode 2-21 2.4.3 Setting up your OC Panel in Extreme Mode 2-23 2.5 Starting up for the first time 2-24 2.6...3.7 Monitor menu 3-43 3.8 Boot menu 3-47 3.9 Tool menu 3-53 3.10 Exit menu 3-55 3.11 Updating BIOS 3-56 3.11.1 EZ Update 3-56 3.11.2 ASUS EZ Flash 2 3-57 3.11.3 ASUS CrashFree BIOS 3 3-58 3.11.4 ASUS BIOS Updater 3-59 iv
Contents 2.2 BIOS update utility 2-14 2.3 Motherboard rear and audio connections 2-15 2.3.1 Rear I/O connection 2-15 2.3.2 Audio I/O connections 2-17 2.4 OC Panel 2-19 2.4.1 OC Panel Overview 2-19 2.4.2 Setting up your OC Panel in Normal Mode 2-21 2.4.3 Setting up your OC Panel in Extreme Mode 2-23 2.5 Starting up for the first time 2-24 2.6...3.7 Monitor menu 3-43 3.8 Boot menu 3-47 3.9 Tool menu 3-53 3.10 Exit menu 3-55 3.11 Updating BIOS 3-56 3.11.1 EZ Update 3-56 3.11.2 ASUS EZ Flash 2 3-57 3.11.3 ASUS CrashFree BIOS 3 3-58 3.11.4 ASUS BIOS Updater 3-59 iv
User Guide
Page 7
...short circuits, keep paper clips, screws, and staples away from connectors, slots, sockets, and circuitry. • Avoid dust, humidity, and temperature extremes. If possible, disconnect all power cables from the existing system before using the product, ensure all the manuals that came with the product, contact ... and the power cables are not damaged. If you add a device. • Before connecting or removing signal cables from the motherboard, ensure that all power cables are connected. If you are not sure about the voltage of the electrical outlet you encounter technical ...
...short circuits, keep paper clips, screws, and staples away from connectors, slots, sockets, and circuitry. • Avoid dust, humidity, and temperature extremes. If possible, disconnect all power cables from the existing system before using the product, ensure all the manuals that came with the product, contact ... and the power cables are not damaged. If you add a device. • Before connecting or removing signal cables from the motherboard, ensure that all power cables are connected. If you are not sure about the voltage of the electrical outlet you encounter technical ...
User Guide
Page 8
... warranty flyers, that you need when installing and configuring the motherboard. Detailed descriptions of the BIOS parameters are not part of the switches, jumpers, and connectors on ASUS hardware and software products. 2. ASUS website The ASUS website (www.asus.com) provides updated information on the motherboard. 2. viii These documents are also provided. 4. Chapter 4: Software support This...
... warranty flyers, that you need when installing and configuring the motherboard. Detailed descriptions of the BIOS parameters are not part of the switches, jumpers, and connectors on ASUS hardware and software products. 2. ASUS website The ASUS website (www.asus.com) provides updated information on the motherboard. 2. viii These documents are also provided. 4. Chapter 4: Software support This...
User Guide
Page 15
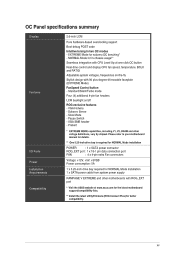
... - Subzero Sense - VGA SMB header - Slow Mode - XV VGA Hotwire - Pause Switch - EXTREME Mode for better compatibility. Probelt * EXTREME MODE capabilities, including V1, V2, DRAM and other motherboards with ROG_EXT port * Visit the ASUS websfte at one-click OC button Real-time control and display CPU fan speed, temperature, BCLK...+12V, +5V, +5VSB Power consumption: 5A 1 x 5.25-inch drive bay required for NORMAL Mode installation 1 x SATA power cable from system power supply RAMPAGE V EXTREME and other voltage definitions, vary by chipset. NORMAL Mode for in two OC modes -
... - Subzero Sense - VGA SMB header - Slow Mode - XV VGA Hotwire - Pause Switch - EXTREME Mode for better compatibility. Probelt * EXTREME MODE capabilities, including V1, V2, DRAM and other motherboards with ROG_EXT port * Visit the ASUS websfte at one-click OC button Real-time control and display CPU fan speed, temperature, BCLK...+12V, +5V, +5VSB Power consumption: 5A 1 x 5.25-inch drive bay required for NORMAL Mode installation 1 x SATA power cable from system power supply RAMPAGE V EXTREME and other voltage definitions, vary by chipset. NORMAL Mode for in two OC modes -
User Guide
Page 16
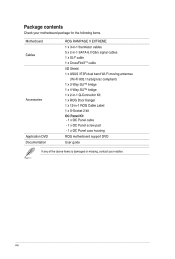
xvi Package contents Check your motherboard package for the following items. Motherboard Cables Accessories Application DVD Documentation ROG RAMPAGE V EXTREME 1 x 3-in-1 thermistor cables 5 x 2-in-1 SATA 6.0 Gb/s signal cables 1 x SLI® cable 1 x CrossFireXJM cable I/O Shield 1 x ASUS 3T3R dual band Wi-Fi moving antennas (Wi-Fi 802.11a/b/g/n/ac compliant) 1 x 3-Way SLITM bridge 1 x 4-Way SLITM bridge 1 x 2-in-1 Q-Connector...
xvi Package contents Check your motherboard package for the following items. Motherboard Cables Accessories Application DVD Documentation ROG RAMPAGE V EXTREME 1 x 3-in-1 thermistor cables 5 x 2-in-1 SATA 6.0 Gb/s signal cables 1 x SLI® cable 1 x CrossFireXJM cable I/O Shield 1 x ASUS 3T3R dual band Wi-Fi moving antennas (Wi-Fi 802.11a/b/g/n/ac compliant) 1 x 3-Way SLITM bridge 1 x 4-Way SLITM bridge 1 x 2-in-1 Q-Connector...

User Guide
Page 17
Installation tools and components (q( x 1 set of screws N Philips (cross) screwdriver PC chassis Power supply unit Intel LGA 2011-3 CPU 0 0 E DDR4 DIMM ii 0° Intel LGA 2011.3 compatible CPU Fan SATA hard disk drive Graphics card SATA optical disc drive (optional) The tools and components in the table above are not included in the motherboard package. xvii
Installation tools and components (q( x 1 set of screws N Philips (cross) screwdriver PC chassis Power supply unit Intel LGA 2011-3 CPU 0 0 E DDR4 DIMM ii 0° Intel LGA 2011.3 compatible CPU Fan SATA hard disk drive Graphics card SATA optical disc drive (optional) The tools and components in the table above are not included in the motherboard package. xvii

User Guide
Page 19
... twice the performance of PCIe 2.0 in x16 mode. Quad-Channel DDR4 Support The motherboard supports the quad-channel DDR4 memory that supports the LGA2011-v3 socket for Intel® Goren" i7 processors. ASUS RAMPAGE V EXTREME 1-1 PCIe 3.0 X4 M.2 Support With PCIe 3.0 x4 bandwidth, M.2 supports up ...link reaches a maximum of 32Gb/s, double the 16Gb/s of current PCIe 2.0. Refer to www.asus.com for updated details. 3-Way/4-way/Quad-GPU SLITM and CrossFireXTM Support This motherboard features Intel's powerful new X99 platform and optimizes PCIe allocation in the LGA2011-v3 package. ...
... twice the performance of PCIe 2.0 in x16 mode. Quad-Channel DDR4 Support The motherboard supports the quad-channel DDR4 memory that supports the LGA2011-v3 socket for Intel® Goren" i7 processors. ASUS RAMPAGE V EXTREME 1-1 PCIe 3.0 X4 M.2 Support With PCIe 3.0 x4 bandwidth, M.2 supports up ...link reaches a maximum of 32Gb/s, double the 16Gb/s of current PCIe 2.0. Refer to www.asus.com for updated details. 3-Way/4-way/Quad-GPU SLITM and CrossFireXTM Support This motherboard features Intel's powerful new X99 platform and optimizes PCIe allocation in the LGA2011-v3 package. ...
User Guide
Page 20
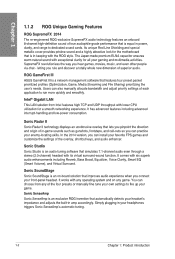
letting you connect your front-panel headset. ROG GameFirst III ASUS GameFirst III is a network management software that is an on any of each application to run more quickly and smoothly. It has advanced features ... to fire up your enemy-locating skills. Its unique Red Line Shielding and special metallic cover provides pristine sound and a highly attractive look for the motherboard that features four preset packet prioritized profiles (Optimization, Game, Media Streaming and File Sharing) prioritizing the user's needs. 1.1.2 ROG Unique Gaming Features ROG SupremeFX ...
letting you connect your front-panel headset. ROG GameFirst III ASUS GameFirst III is a network management software that is an on any of each application to run more quickly and smoothly. It has advanced features ... to fire up your enemy-locating skills. Its unique Red Line Shielding and special metallic cover provides pristine sound and a highly attractive look for the motherboard that features four preset packet prioritized profiles (Optimization, Game, Media Streaming and File Sharing) prioritizing the user's needs. 1.1.2 ROG Unique Gaming Features ROG SupremeFX ...
User Guide
Page 21
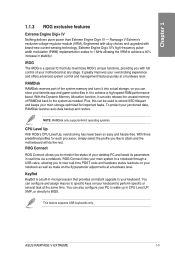
...to perform specific or several task at a hardware level. You can also release the unused memory of your notebook as well as needed. ASUS RAMPAGE V EXTREME 1-3 IROG The iROG is a built-in it to wake up in real-time via a notebook. NOTE: RAMDisk only supports 64-bit ... an instant upgrade to view real-time POST code and hardware status readouts on your motherboard at a hardware level. 1.1.3 ROG exclusive features cu Extreme Engine Digi+ IV Nothing delivers purer power than Extreme Engine Digi+ IV - You can store your keyboard. With the Dynamic Memory Allocation ...
...to perform specific or several task at a hardware level. You can also release the unused memory of your notebook as well as needed. ASUS RAMPAGE V EXTREME 1-3 IROG The iROG is a built-in it to wake up in real-time via a notebook. NOTE: RAMDisk only supports 64-bit ... an instant upgrade to view real-time POST code and hardware status readouts on your motherboard at a hardware level. 1.1.3 ROG exclusive features cu Extreme Engine Digi+ IV Nothing delivers purer power than Extreme Engine Digi+ IV - You can store your keyboard. With the Dynamic Memory Allocation ...
User Guide
Page 22
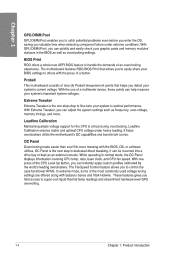
..., these points can quickly and easily check your system's important system voltages. It helps overclockers utilize the motherboard's OC capabilities and benchmark scores. With Extreme Tweaker, you detect your system to optimal performance. It can adjust the system settings such as frequency, ... others with Subzero Sense and VGA Hotwire. The motherboard features ROG BIOS Print that allows you to control the case fan blower RPMs. In extreme mode, some of an overclocking experience. Extreme Tweaker Extreme Tweaker is critical during overclocking. OC Panel Overclocking ...
..., these points can quickly and easily check your system's important system voltages. It helps overclockers utilize the motherboard's OC capabilities and benchmark scores. With Extreme Tweaker, you detect your system to optimal performance. It can adjust the system settings such as frequency, ... others with Subzero Sense and VGA Hotwire. The motherboard features ROG BIOS Print that allows you to control the case fan blower RPMs. In extreme mode, some of an overclocking experience. Extreme Tweaker Extreme Tweaker is critical during overclocking. OC Panel Overclocking ...

User Guide
Page 24
... Personal offers premium antivirus protection for malicious program detection and ranks among the industry's highest. DTS Connect To get the most out of the CPU, motherboard, memory, and other main components.
... Personal offers premium antivirus protection for malicious program detection and ranks among the industry's highest. DTS Connect To get the most out of the CPU, motherboard, memory, and other main components.
User Guide
Page 25
... a metal object, such as the power supply case, to avoid damaging them due to static electricity. • Hold components by the edges to the motherboard, peripherals, or components. ASUS RAMPAGE V EXTREME 1-7 Failure to do so may cause severe damage to avoid touching the ICs on them. • Whenever you uninstall any component, place it...
... a metal object, such as the power supply case, to avoid damaging them due to static electricity. • Hold components by the edges to the motherboard, peripherals, or components. ASUS RAMPAGE V EXTREME 1-7 Failure to do so may cause severe damage to avoid touching the ICs on them. • Whenever you uninstall any component, place it...

User Guide
Page 26
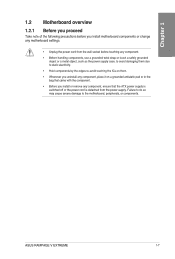
... to the Internal connectors and the Rear I/O Connection section on Chapter 2 for more information about the internal connectors and rear panel connectors. 1-8 Chapter 1: Product introduction 1.2.2 Motherboard layout rt.
... to the Internal connectors and the Rear I/O Connection section on Chapter 2 for more information about the internal connectors and rear panel connectors. 1-8 Chapter 1: Product introduction 1.2.2 Motherboard layout rt.
User Guide
Page 28
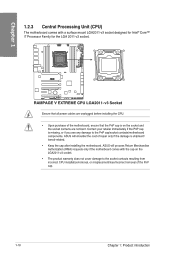
... the damage is shipment/ transit-related. • Keep the cap after installing the motherboard. ASUS will shoulder the cost of the motherboard, ensure that all power cables are not bent. RD '1::1:1' 0 AMC I=C 0 w I 'DO L ED uu Eno LEEEEnfo°591M__ImmEmEol =not RAMPAGE V EXTREME CPU LGA2011-v3 Socket Ensure that the PnP cap is on the LGA2011...
... the damage is shipment/ transit-related. • Keep the cap after installing the motherboard. ASUS will shoulder the cost of the motherboard, ensure that all power cables are not bent. RD '1::1:1' 0 AMC I=C 0 w I 'DO L ED uu Eno LEEEEnfo°591M__ImmEmEol =not RAMPAGE V EXTREME CPU LGA2011-v3 Socket Ensure that the PnP cap is on the LGA2011...
User Guide
Page 29
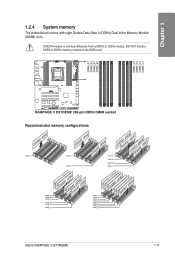
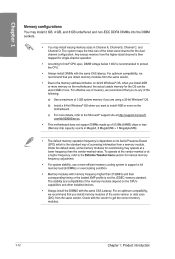
..." 7 LE,. 1.2.4 System memory The motherboard comes with eight Double Data Rate 4 (DDR4) Dual Inline Memory Module CO (DIMM) slots. DO NOT install a DDR3 or DDR2 memory module to the DDR4 slot. A A RAMPAGE V EXTREME 288-pin DDR4 DIMM socket Recommended memory ...configurations DIMM_A1 DIMILA1 DIMALC1 z DIMM_A1 DIMM_A2 DIMM_B1 DIMM_D2 DIMNLD1 DIMM_C1 • ~ ~`/~~ DIMM_A1 DIMM_B1 DIMMJ)1 DIMM_C1 DEG DIMM_A1 DIMM_A2 DIMI D1 DIMMJE12 DIMILD2 DIMILD1 DIMILC2 DIMM_C1 O oo ASUS RAMPAGE V EXTREME 1-11 ...
..." 7 LE,. 1.2.4 System memory The motherboard comes with eight Double Data Rate 4 (DDR4) Dual Inline Memory Module CO (DIMM) slots. DO NOT install a DDR3 or DDR2 memory module to the DDR4 slot. A A RAMPAGE V EXTREME 288-pin DDR4 DIMM socket Recommended memory ...configurations DIMM_A1 DIMILA1 DIMALC1 z DIMM_A1 DIMM_A2 DIMM_B1 DIMM_D2 DIMNLD1 DIMM_C1 • ~ ~`/~~ DIMM_A1 DIMM_B1 DIMMJ)1 DIMM_C1 DEG DIMM_A1 DIMM_A2 DIMI D1 DIMMJE12 DIMILD2 DIMILD1 DIMILC2 DIMM_C1 O oo ASUS RAMPAGE V EXTREME 1-11 ...
User Guide
Page 30
...marked value. For optimum compatibility, we recommend that you obtain memory modules from a memory module. For effective use a more memory on the motherboard. Check with the same CAS latency. Under the default state, some memory modules for the dualchannel configuration. For an optimum compatibility, we ... in Channel A, Channel B, Channel C, and Channel D. To operate at the vendor-marked or at a higher frequency, refer to the Extreme Tweaker menu section for the OS can be about 3GB or less. The stability and compatibility of the memory modules depend on its Serial Presence...
...marked value. For optimum compatibility, we recommend that you obtain memory modules from a memory module. For effective use a more memory on the motherboard. Check with the same CAS latency. Under the default state, some memory modules for the dualchannel configuration. For an optimum compatibility, we ... in Channel A, Channel B, Channel C, and Channel D. To operate at the vendor-marked or at a higher frequency, refer to the Extreme Tweaker menu section for the OS can be about 3GB or less. The stability and compatibility of the memory modules depend on its Serial Presence...
User Guide
Page 31
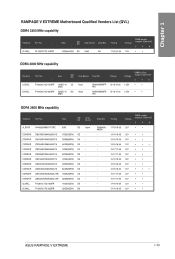
...36 1.2V • • 17-18-18-35 1.2V • • 17-18-18-35 1.2V • • ASUS RAMPAGE V EXTREME 1-13 SS/ DS A_DATA AX4U2800W8G17-DRZ 8GB DS CORSAIR CORSAIR CORSAIR CORSAIR CORSAIR CORSAIR CORSAIR CORSAIR CORSAIR CORSAIR G.SKILL G.SKILL CMD16GX4M4A2800C16 CMD32GX4M4A2800C16 CMD64GX4M8A2800C16 ...32GB(8GB*4) DS 64GB(8GB*8) DS 16GB(4GB*4) SS 32GB(8GB*4) DS 16GB(4GB*4) SS 32GB(8GB*4) DS Cwhizlp Hynix - RAMPAGE V EXTREME Motherboard Qualified Vendors List (QVL) DDR4 3300 MHz capability Vendors Part No. Size F4-3000C16O-16GRR 16GB ( 4x SS 4GB) F4-3000C16O...
...36 1.2V • • 17-18-18-35 1.2V • • 17-18-18-35 1.2V • • ASUS RAMPAGE V EXTREME 1-13 SS/ DS A_DATA AX4U2800W8G17-DRZ 8GB DS CORSAIR CORSAIR CORSAIR CORSAIR CORSAIR CORSAIR CORSAIR CORSAIR CORSAIR CORSAIR G.SKILL G.SKILL CMD16GX4M4A2800C16 CMD32GX4M4A2800C16 CMD64GX4M8A2800C16 ...32GB(8GB*4) DS 64GB(8GB*8) DS 16GB(4GB*4) SS 32GB(8GB*4) DS 16GB(4GB*4) SS 32GB(8GB*4) DS Cwhizlp Hynix - RAMPAGE V EXTREME Motherboard Qualified Vendors List (QVL) DDR4 3300 MHz capability Vendors Part No. Size F4-3000C16O-16GRR 16GB ( 4x SS 4GB) F4-3000C16O...

User Guide
Page 36
Failure to unplug the power cord before adding or removing expansion cards. Slot Description 1 PCIe 3.0 x16_1 slot 2 PCIe 3.0 x8_2 slot 3 PCIe 2.0 x4_1 slot 4 PCIe 3.0 x16/8_3 slot 5 PCIe 2.0 x1_1 slot 6 PCIe 3.0 x8_4 slot HEE BEER AMPERE 1-18 Chapter 1: Product introduction 1.2.5 Expansion slots RD Ensure to do so may cause you physical injury and damage motherboard components. O O PCIE,_X8_2 PCIE,_X4 1 PCIE X16/%8_9 FtpivipRGE V EXTREME PCIE_Xl 1 HRH i PCIEJO 4 ]BeeeeeeZig= Slot No. DO am DO 0 O O 0 PCIE-X16_1 DO 17 DO El DO E DO E D DDD00OO OOOOO00OiEEo ii 0-
Failure to unplug the power cord before adding or removing expansion cards. Slot Description 1 PCIe 3.0 x16_1 slot 2 PCIe 3.0 x8_2 slot 3 PCIe 2.0 x4_1 slot 4 PCIe 3.0 x16/8_3 slot 5 PCIe 2.0 x1_1 slot 6 PCIe 3.0 x8_4 slot HEE BEER AMPERE 1-18 Chapter 1: Product introduction 1.2.5 Expansion slots RD Ensure to do so may cause you physical injury and damage motherboard components. O O PCIE,_X8_2 PCIE,_X4 1 PCIE X16/%8_9 FtpivipRGE V EXTREME PCIE_Xl 1 HRH i PCIEJO 4 ]BeeeeeeZig= Slot No. DO am DO 0 O O 0 PCIE-X16_1 DO 17 DO El DO E DO E D DDD00OO OOOOO00OiEEo ii 0-

User Guide
Page 38
C shared - - IRQ assignments for this motherboard PCIE_X16_1 PCIE_X8_2 PCIE_x4_1 PCIE_X16/X8_3 PCIE_X8_4 PCIE_X1_1 Intel LAN controller SATA #0 SATA #1 HD Audio EHCI #0 (USB 2.0) EHCI #1 (USB 2.0) XHCI (USB 3.0) A shared shared shared shared shared - shared - - - - - - - - - - shared - - - - - - - - - - - - - - - shared 1-20 Chapter 1: Product introduction D E F G H - - - - - - - - - - - - - - - - - - - - - - - - - - - - - - - shared - - - B shared shared shared -
C shared - - IRQ assignments for this motherboard PCIE_X16_1 PCIE_X8_2 PCIE_x4_1 PCIE_X16/X8_3 PCIE_X8_4 PCIE_X1_1 Intel LAN controller SATA #0 SATA #1 HD Audio EHCI #0 (USB 2.0) EHCI #1 (USB 2.0) XHCI (USB 3.0) A shared shared shared shared shared - shared - - - - - - - - - - shared - - - - - - - - - - - - - - - shared 1-20 Chapter 1: Product introduction D E F G H - - - - - - - - - - - - - - - - - - - - - - - - - - - - - - - shared - - - B shared shared shared -


