
User Manual
Page 78
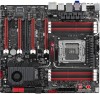
Bluetooth module 4. USB 3.0 ports 1 and 2 12. Clear CMOS switch 8. External SATA port 1 11. LAN (RJ-45) port* 5. External SATA port 2 6. USB 3.0 ports 3 and 4 13. 2.3.10 Rear panel connection 1 23 4 5 Chapter 2 6 78 9 10 11 ...
Bluetooth module 4. USB 3.0 ports 1 and 2 12. Clear CMOS switch 8. External SATA port 1 11. LAN (RJ-45) port* 5. External SATA port 2 6. USB 3.0 ports 3 and 4 13. 2.3.10 Rear panel connection 1 23 4 5 Chapter 2 6 78 9 10 11 ...
User Manual
Page 79
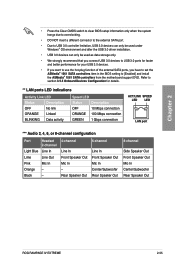
... Out Mic In Center/Subwoofer Rear Speaker Out ROG RAMPAGE IV EXTREME 2-55 Black - 4-channel Line In Front Speaker Out Mic In - Refer to [Enabled] and install the ASMedia® 1061 SATA controllers from the motherboard support DVD. Chapter 2 • Press the Clear CMOS switch to clear BIOS setup information only when the system hangs due...
... Out Mic In Center/Subwoofer Rear Speaker Out ROG RAMPAGE IV EXTREME 2-55 Black - 4-channel Line In Front Speaker Out Mic In - Refer to [Enabled] and install the ASMedia® 1061 SATA controllers from the motherboard support DVD. Chapter 2 • Press the Clear CMOS switch to clear BIOS setup information only when the system hangs due...
User Manual
Page 87
... BIOS may not exactly match what you see on how to enter the Setup utility. Chapter 3 ROG RAMPAGE IV EXTREME 3-1 Chapter 3 Chapter 3: 3.1 Knowing BIOS BIOS setup The new ASUS UEFI BIOS is an Unified Extensible Firmware Interface that complies with the opportunity to run the BIOS Setup....mouse. See section 3.9 Exit Menu for details. • If the system fails to boot after changing any BIOS setting, try to clear the CMOS and reset the motherboard to the default value. �S�e�e��s�e��c�ti�o�n� 2.3.10 ...
... BIOS may not exactly match what you see on how to enter the Setup utility. Chapter 3 ROG RAMPAGE IV EXTREME 3-1 Chapter 3 Chapter 3: 3.1 Knowing BIOS BIOS setup The new ASUS UEFI BIOS is an Unified Extensible Firmware Interface that complies with the opportunity to run the BIOS Setup....mouse. See section 3.9 Exit Menu for details. • If the system fails to boot after changing any BIOS setting, try to clear the CMOS and reset the motherboard to the default value. �S�e�e��s�e��c�ti�o�n� 2.3.10 ...

User Manual
Page 106
Administrator Password If you have forgotten your BIOS password, erase the CMOS Real Time Clock (RTC) RAM to create/confirm the password. Confirm the password when prompted. To change an administrator password: 1. From the Enter Current Password ... password, then press . 3. See section 2.3.10 Rear panel connection for accessing the system. To set a password, these items show the default Not Installed. After you clear the password, the Administrator Password item on top of the screen shows Not Installed. 3-20 Chapter 3: BIOS setup Otherwise, you might be able to change...
Administrator Password If you have forgotten your BIOS password, erase the CMOS Real Time Clock (RTC) RAM to create/confirm the password. Confirm the password when prompted. To change an administrator password: 1. From the Enter Current Password ... password, then press . 3. See section 2.3.10 Rear panel connection for accessing the system. To set a password, these items show the default Not Installed. After you clear the password, the Administrator Password item on top of the screen shows Not Installed. 3-20 Chapter 3: BIOS setup Otherwise, you might be able to change...


