P8Z77-V PRO user's manual
Page 42
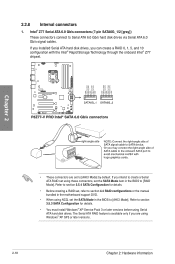
... the BIOS to [RAID Mode]. Refer to section 3.5.3 SATA Configuration for details. • Before creating a RAID set, refer to section 4.4 RAID configurations or the manual bundled in the motherboard support DVD. • When using these connectors, set to Serial ATA 6.0 Gb/s hard disk drives via Serial ATA 6.0 Gb/s signal cables. 2.2.8 Internal...
... the BIOS to [RAID Mode]. Refer to section 3.5.3 SATA Configuration for details. • Before creating a RAID set, refer to section 4.4 RAID configurations or the manual bundled in the motherboard support DVD. • When using these connectors, set to Serial ATA 6.0 Gb/s hard disk drives via Serial ATA 6.0 Gb/s signal cables. 2.2.8 Internal...
P8Z77-V PRO user's manual
Page 43
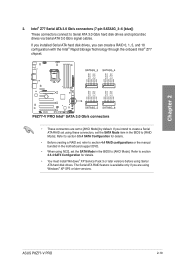
... Rapid Storage Technology through the onboard Intel® Z77 chipset. • These connectors are using Windows® XP SP3 or later versions. ASUS P8Z77-V PRO 2-19 Refer to [RAID Mode]. Intel® Z77 Serial ATA 3.0 Gb/s connectors (7-pin SATA3G_3-6 [blue]) These connectors connect to [... Refer to section 3.5.4 SAT3 Configuration for details. • Before creating a RAID set, refer to section 4.4 RAID configurations or the manual bundled in the motherboard support DVD. • When using NCQ, set the SATA Mode in the BIOS to section 3.5.4 SATA Configuration for details....
... Rapid Storage Technology through the onboard Intel® Z77 chipset. • These connectors are using Windows® XP SP3 or later versions. ASUS P8Z77-V PRO 2-19 Refer to [RAID Mode]. Intel® Z77 Serial ATA 3.0 Gb/s connectors (7-pin SATA3G_3-6 [blue]) These connectors connect to [... Refer to section 3.5.4 SAT3 Configuration for details. • Before creating a RAID set, refer to section 4.4 RAID configurations or the manual bundled in the motherboard support DVD. • When using NCQ, set the SATA Mode in the BIOS to section 3.5.4 SATA Configuration for details....
P8Z77-V PRO user's manual
Page 148
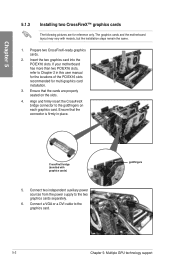
... cards The following pictures are properly seated on each graphics card. Align and firmly insert the CrossFireX bridge connector to Chapter 2 in place. CrossFireX bridge (bundled with models, but the installation steps remain the same. 1. Prepare two CrossFireX-ready graphics cards. 2. Connect a VGA or a DVI cable to the two graphics cards...
... cards The following pictures are properly seated on each graphics card. Align and firmly insert the CrossFireX bridge connector to Chapter 2 in place. CrossFireX bridge (bundled with models, but the installation steps remain the same. 1. Prepare two CrossFireX-ready graphics cards. 2. Connect a VGA or a DVI cable to the two graphics cards...