
User Manual
Page 4
Contents 1.11 Software support 1-28 1.11.1 Installing an operating system 1-28 1.11.2 Support DVD information 1-28 Chapter 2: BIOS information 2.1 Managing and updating your BIOS 2-1 2.1.1 ASUS Update utility 2-1 2.1.2 ASUS EZ Flash 2 2-2 2.1.3 ASUS CrashFree BIOS 3 utility 2-3 2.1.4 ASUS BIOS Updater 2-4 2.2 BIOS setup program 2-7 2.3 Main menu 2-11 2.3.1 System Language [English 2-11 2.3.2 System Date [Day xx/xx/xxxx 2-11 2.3.3 System Time [xx:xx:xx 2-11...
Contents 1.11 Software support 1-28 1.11.1 Installing an operating system 1-28 1.11.2 Support DVD information 1-28 Chapter 2: BIOS information 2.1 Managing and updating your BIOS 2-1 2.1.1 ASUS Update utility 2-1 2.1.2 ASUS EZ Flash 2 2-2 2.1.3 ASUS CrashFree BIOS 3 utility 2-3 2.1.4 ASUS BIOS Updater 2-4 2.2 BIOS setup program 2-7 2.3 Main menu 2-11 2.3.1 System Language [English 2-11 2.3.2 System Date [Day xx/xx/xxxx 2-11 2.3.3 System Time [xx:xx:xx 2-11...

User Manual
Page 8
...as warranty flyers, that may have been added by your dealer. ASUS websites The ASUS website provides updated information on ASUS hardware and software products. About this guide is organized This guide ...contains the following parts: • Chapter 1: Product introduction This chapter describes the features of the motherboard and the new technology it supports. • Chapter 2: BIOS information This chapter tells how to change system settings through the BIOS...
...as warranty flyers, that may have been added by your dealer. ASUS websites The ASUS website provides updated information on ASUS hardware and software products. About this guide is organized This guide ...contains the following parts: • Chapter 1: Product introduction This chapter describes the features of the motherboard and the new technology it supports. • Chapter 2: BIOS information This chapter tells how to change system settings through the BIOS...
User Manual
Page 10
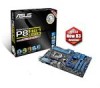
... voltage control - P8H61 Series specifications summary ASUS unique features Other features ASUS exclusive overclocking features Rear panel ports Internal connectors/ switches/ buttons BIOS features Accessories ASUS Anti-Surge Protection ASUS EPU ASUS TurboV ASUS Fan Xpert ASUS EFI BIOS ASUS AI Suite II ASUS AI Charger ASUS CrashFree BIOS 3 ASUS EZ Flash 2 ASUS MyLogo 2™ 100% All High-quality Conductive Polymer Capacitors (P8H61 PLUS and P8H61/USB3 only) Precision...
... voltage control - P8H61 Series specifications summary ASUS unique features Other features ASUS exclusive overclocking features Rear panel ports Internal connectors/ switches/ buttons BIOS features Accessories ASUS Anti-Surge Protection ASUS EPU ASUS TurboV ASUS Fan Xpert ASUS EFI BIOS ASUS AI Suite II ASUS AI Charger ASUS CrashFree BIOS 3 ASUS EZ Flash 2 ASUS MyLogo 2™ 100% All High-quality Conductive Polymer Capacitors (P8H61 PLUS and P8H61/USB3 only) Precision...

User Manual
Page 15
... easy OC tool allows you to convert your favorite photo into one software offers diverse and ease to use software package. ASUS Anti-Surge Protection This special design prevents expensive devices and the motherboard from damage caused by different climate conditions in -one ...simple to use functions, with the same smoothness as their operating system. 1.3.2 Innovative ASUS features ASUS EFI BIOS (EZ Mode) ASUS brand new EFI BIOS offers a user-friendly interface that goes beyond traditional keyboard BIOS input to enable more colorful and vivid image on your PC's loading. and its ...
... easy OC tool allows you to convert your favorite photo into one software offers diverse and ease to use software package. ASUS Anti-Surge Protection This special design prevents expensive devices and the motherboard from damage caused by different climate conditions in -one ...simple to use functions, with the same smoothness as their operating system. 1.3.2 Innovative ASUS features ASUS EFI BIOS (EZ Mode) ASUS brand new EFI BIOS offers a user-friendly interface that goes beyond traditional keyboard BIOS input to enable more colorful and vivid image on your PC's loading. and its ...

User Manual
Page 16
...ready The motherboard is in regards to energy consumptions. ASUS CrashFree BIOS 3 ASUS CrashFree BIOS 3 is an auto-recovery tool that allows you to restore a corrupted BIOS file using the bundled support DVD or USB flash disk that allows you to update the BIOS without using an OS-based utility. C.P.R. This is ...chassis and clear the RTC data. eliminates the need to reduce carbon footprint of the product and thus mitigate environmental impacts. 1-4 ASUS P8H61 Series ASUS EZ Flash 2 ASUS EZ Flash 2 is a utility that contains the latest BIOS file. C.P.R. (CPU Parameter Recall) The...
...ready The motherboard is in regards to energy consumptions. ASUS CrashFree BIOS 3 ASUS CrashFree BIOS 3 is an auto-recovery tool that allows you to restore a corrupted BIOS file using the bundled support DVD or USB flash disk that allows you to update the BIOS without using an OS-based utility. C.P.R. This is ...chassis and clear the RTC data. eliminates the need to reduce carbon footprint of the product and thus mitigate environmental impacts. 1-4 ASUS P8H61 Series ASUS EZ Flash 2 ASUS EZ Flash 2 is a utility that contains the latest BIOS file. C.P.R. (CPU Parameter Recall) The...

User Manual
Page 19
....0in) EATXPWR AUDIO RTL 8111E AAFP asmedia ASM1042 CHA_FAN Lithium Cell CMOS Power P8H61 Series PCIEX16 Super I/O PCIEX1_1 PCIEX1_2 ASM 1083 Intel® H61 PCI1 PCI2 ALC 887 CLRTC 5 32Mb BIOS PCI3 SATA3G_4 SATA3G_3 SPDIF_OUT USB56 USB78 USB910 F_PANEL 6 SATA3G_2 SATA3G_1 SB_PWR SPEAKER 12 11 10 9 87 P8H61/USB3 only Here labeled USB34 on...
....0in) EATXPWR AUDIO RTL 8111E AAFP asmedia ASM1042 CHA_FAN Lithium Cell CMOS Power P8H61 Series PCIEX16 Super I/O PCIEX1_1 PCIEX1_2 ASM 1083 Intel® H61 PCI1 PCI2 ALC 887 CLRTC 5 32Mb BIOS PCI3 SATA3G_4 SATA3G_3 SPDIF_OUT USB56 USB78 USB910 F_PANEL 6 SATA3G_2 SATA3G_1 SB_PWR SPEAKER 12 11 10 9 87 P8H61/USB3 only Here labeled USB34 on...
User Manual
Page 32
...graphic cards complying with it by adjusting the software settings. 1. Remove the system unit cover (if your motherboard is completely seated on BIOS setup. 2. Replace the system cover. 1.8.2 Configuring an expansion card After installing the expansion card, configure it and make the necessary.... 1.8.5 PCI Express x16 slot This motherboard has a PCI Express 2.0 x16 slot that came with the PCI Express specifications. 1-20 ASUS P8H61 Series Align the card connector with the screw you may cause you intend to install expansion cards. Failure to do not need to ...
...graphic cards complying with it by adjusting the software settings. 1. Remove the system unit cover (if your motherboard is completely seated on BIOS setup. 2. Replace the system cover. 1.8.2 Configuring an expansion card After installing the expansion card, configure it and make the necessary.... 1.8.5 PCI Express x16 slot This motherboard has a PCI Express 2.0 x16 slot that came with the PCI Express specifications. 1-20 ASUS P8H61 Series Align the card connector with the screw you may cause you intend to install expansion cards. Failure to do not need to ...

User Manual
Page 33
The onboard button cell battery powers the RAM data in CMOS. P8H61 Series CLRTC 12 23 Normal (Default) P8H61 Series Clear RTC RAM Clear RTC To erase the RTC RAM: 1. Plug the power cord and turn ON the computer. 4. After clearing the CMOS, reinstall...setup information such as system passwords. Move the jumper cap from pins 1-2 (default) to re-enter data. Hold down and reboot the system, then the BIOS automatically resets parameter settings to overclocking, use the CPU Parameter Recall (C.P.R.) feature. Keep the cap on CLRTC jumper default position. Turn OFF the computer and...
The onboard button cell battery powers the RAM data in CMOS. P8H61 Series CLRTC 12 23 Normal (Default) P8H61 Series Clear RTC RAM Clear RTC To erase the RTC RAM: 1. Plug the power cord and turn ON the computer. 4. After clearing the CMOS, reinstall...setup information such as system passwords. Move the jumper cap from pins 1-2 (default) to re-enter data. Hold down and reboot the system, then the BIOS automatically resets parameter settings to overclocking, use the CPU Parameter Recall (C.P.R.) feature. Keep the cap on CLRTC jumper default position. Turn OFF the computer and...
User Manual
Page 35
... Keyboard port (purple). Front panel audio connector (10-1 pin AAFP) This connector is set the Front Panel Type item in the BIOS setup to [HD]. AAFP P8H61 Series SENSE2_RETUR PORT2 L SENSE_SEND SENSE1_RETUR PORT2 R PRESENCE# PORT1 R GND PORT1 L PIN 1 HD-audio-compliant pin definition NC Line...legacy AC`97 audio standard. If you connect USB 3.0 devices to [HD]. 7. USB 2.0 ports 3 and 4 (P8H61 and P8H61 PLUS only). USB 3.0 ports 1 and 2 (P8H61/USB3 only). Connect one end of the motherboard's high-definition audio capability. • If you want to connect an AC'97...
... Keyboard port (purple). Front panel audio connector (10-1 pin AAFP) This connector is set the Front Panel Type item in the BIOS setup to [HD]. AAFP P8H61 Series SENSE2_RETUR PORT2 L SENSE_SEND SENSE1_RETUR PORT2 R PRESENCE# PORT1 R GND PORT1 L PIN 1 HD-audio-compliant pin definition NC Line...legacy AC`97 audio standard. If you connect USB 3.0 devices to [HD]. 7. USB 2.0 ports 3 and 4 (P8H61 and P8H61 PLUS only). USB 3.0 ports 1 and 2 (P8H61/USB3 only). Connect one end of the motherboard's high-definition audio capability. • If you want to connect an AC'97...
User Manual
Page 38
.... See section 2.5.4 SATA Configuration for USB 2.0 ports. Doing so will damage the motherboard! The USB module cable is purchased separately. 1-26 ASUS P8H61 Series Intel® H61 Serial ATA 3.0Gb/s connectors (7-pin SATA3G_1~4) These connectors connect to [AHCI Mode]. SATA3G_4 SATA3G_3 GND RSATA_TXP4 RSATA_TXN4 GND... GND RSATA_RXP2 RSATA_RXN2 GND P8H61 Series SATA connectors • You must install Windows® XP Service Pack 3 or later version before using Serial ATA hard disk drives. • When using hot-plug and NCQ, set the SATA Mode item in the BIOS to Serial ATA 3.0 ...
.... See section 2.5.4 SATA Configuration for USB 2.0 ports. Doing so will damage the motherboard! The USB module cable is purchased separately. 1-26 ASUS P8H61 Series Intel® H61 Serial ATA 3.0Gb/s connectors (7-pin SATA3G_1~4) These connectors connect to [AHCI Mode]. SATA3G_4 SATA3G_3 GND RSATA_TXP4 RSATA_TXN4 GND... GND RSATA_RXP2 RSATA_RXN2 GND P8H61 Series SATA connectors • You must install Windows® XP Service Pack 3 or later version before using Serial ATA hard disk drives. • When using hot-plug and NCQ, set the SATA Mode item in the BIOS to Serial ATA 3.0 ...
User Manual
Page 41
...Suite II. 3. Follow the onscreen instructions to manage, save, and update the motherboard BIOS in Windows® environment. • ASUS Update requires an Internet connection either of the original motherboard BIOS file to a USB flash disk in the support DVD that comes with the motherboard ...package. Quit all Windows® applications before you update the BIOS using the ASUS Update utility. 2.1.1 ASUS Update utility The ASUS Update is available in case you to complete the installation. From the list, select either through a network ...
...Suite II. 3. Follow the onscreen instructions to manage, save, and update the motherboard BIOS in Windows® environment. • ASUS Update requires an Internet connection either of the original motherboard BIOS file to a USB flash disk in the support DVD that comes with the motherboard ...package. Quit all Windows® applications before you update the BIOS using the ASUS Update utility. 2.1.1 ASUS Update utility The ASUS Update is available in case you to complete the installation. From the list, select either through a network ...
User Manual
Page 42
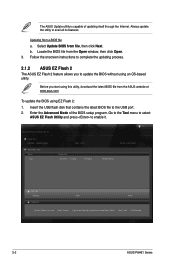
...P8H61/USB3 File Path: fs0:\ Drive fs0:\ VER: 0301 Folder Info 01/01/11 10:23p 4194304 Exit DATE: 02/23/2011 P8H61.ROM File Info MODEL: Help Info VER: DATE [Enter] Select or Load [Tab] Switch [Up/Down/PageUp/PageDown/Home/End] Move [Esc] Exit [F2] Backup 2-2 ASUS P8H61 Series Locate the BIOS... file from the ASUS website at www.asus.com. Enter the Advanced Mode of updating itself through the Internet. To update the BIOS using this utility, download the latest BIOS file from the Open window, then click Open...
...P8H61/USB3 File Path: fs0:\ Drive fs0:\ VER: 0301 Folder Info 01/01/11 10:23p 4194304 Exit DATE: 02/23/2011 P8H61.ROM File Info MODEL: Help Info VER: DATE [Enter] Select or Load [Tab] Switch [Up/Down/PageUp/PageDown/Home/End] Move [Esc] Exit [F2] Backup 2-2 ASUS P8H61 Series Locate the BIOS... file from the ASUS website at www.asus.com. Enter the Advanced Mode of updating itself through the Internet. To update the BIOS using this utility, download the latest BIOS file from the Open window, then click Open...
User Manual
Page 43
... or reset the system while updating the BIOS! The utility automatically checks the devices for P8H61/USB3). • The BIOS file in the removable device into P8H61.ROM (for P8H61), H61PLUS.ROM (for P8H61 PLUS), or P8H61U3.ROM (for the BIOS file. When found, the utility reads the BIOS file and enters ASUS EZ Flash 2 utility automatically. 4. To ensure system...
... or reset the system while updating the BIOS! The utility automatically checks the devices for P8H61/USB3). • The BIOS file in the removable device into P8H61.ROM (for P8H61), H61PLUS.ROM (for P8H61 PLUS), or P8H61U3.ROM (for the BIOS file. When found, the utility reads the BIOS file and enters ASUS EZ Flash 2 utility automatically. 4. To ensure system...
User Manual
Page 44
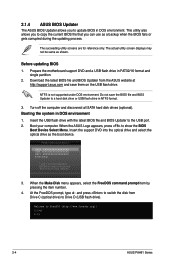
... hard disk drives (optional). Before updating BIOS 1. Boot your computer. Welcome to boot using defaults 3. C:\>d: D:\> 2-4 ASUS P8H61 Series Download the latest BIOS file and BIOS Updater from Drive C (optical drive) to switch the disk from the ASUS website at http://support.asus.com and save the BIOS file and BIOS Updater to update BIOS in NTFS format. 3. Booting the system...
... hard disk drives (optional). Before updating BIOS 1. Boot your computer. Welcome to boot using defaults 3. C:\>d: D:\> 2-4 ASUS P8H61 Series Download the latest BIOS file and BIOS Updater from Drive C (optical drive) to switch the disk from the ASUS website at http://support.asus.com and save the BIOS file and BIOS Updater to update BIOS in NTFS format. 3. Booting the system...

User Manual
Page 45
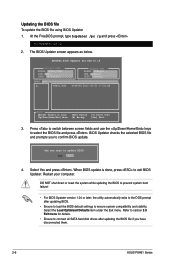
...alphanumeric characters for the filename and three alphanumeric characters for DOS V1.18 Current ROM BOARD: P8H61/USB3 VER: 0301 DATE: 02/23/2011 Update ROM BOARD: Unknown VER: Unknown DATE: Unknown PATH: A:\ BIOS backup is any key to continue. At the FreeDOS prompt, type bupdater /o[filename] and...free space to save the file. 1. Backing up the current BIOS To backup the current BIOS file using the BIOS Updater Ensure that the USB flash drive is done, press any key to return to the DOS prompt. ASUSTek BIOS Updater for the extension. 2. D:\>bupdater /oOLDBIOS1.rom Filename Extension...
...alphanumeric characters for the filename and three alphanumeric characters for DOS V1.18 Current ROM BOARD: P8H61/USB3 VER: 0301 DATE: 02/23/2011 Update ROM BOARD: Unknown VER: Unknown DATE: Unknown PATH: A:\ BIOS backup is any key to continue. At the FreeDOS prompt, type bupdater /o[filename] and...free space to save the file. 1. Backing up the current BIOS To backup the current BIOS file using the BIOS Updater Ensure that the USB flash drive is done, press any key to return to the DOS prompt. ASUSTek BIOS Updater for the extension. 2. D:\>bupdater /oOLDBIOS1.rom Filename Extension...
User Manual
Page 46
..., press to select the BIOS file and press . ASUSTek BIOS Updater for details. • Ensure to connect all SATA hard disk drives after updating BIOS. • Ensure to load the BIOS default settings to section 2.9 Exit menu for DOS V1.18 Current ROM BOARD: P8H61/USB3 VER: 0301 DATE: 02...and stability. Select the Load Optimized Defaults item under the Exit menu. BIOS Updater checks the selected BIOS file and prompts you sure to the DOS prompt after updating the BIOS file if you have disconnected them. 2-6 ASUS P8H61 Series Yes No 4. Select Yes and press . DO NOT shut down...
..., press to select the BIOS file and press . ASUSTek BIOS Updater for details. • Ensure to connect all SATA hard disk drives after updating BIOS. • Ensure to load the BIOS default settings to section 2.9 Exit menu for DOS V1.18 Current ROM BOARD: P8H61/USB3 VER: 0301 DATE: 02...and stability. Select the Load Optimized Defaults item under the Exit menu. BIOS Updater checks the selected BIOS file and prompts you sure to the DOS prompt after updating the BIOS file if you have disconnected them. 2-6 ASUS P8H61 Series Yes No 4. Select Yes and press . DO NOT shut down...

User Manual
Page 47
...is connected to your motherboard if you see on your data or system. Entering BIOS Setup after POST To enter BIOS Setup after changing any BIOS setting, load the default settings to your screen. • Visit the ASUS website at startup: • Press during the Power-On Self Test (POST...system properly from a running operating system can cause damage to ensure system compatibility and stability. Entering BIOS Setup at startup To enter BIOS Setup at www.asus.com to download the latest BIOS file for reference purposes only, and may not exactly match what you want to use the ...
...is connected to your motherboard if you see on your data or system. Entering BIOS Setup after POST To enter BIOS Setup after changing any BIOS setting, load the default settings to your screen. • Visit the ASUS website at startup: • Press during the Power-On Self Test (POST...system properly from a running operating system can cause damage to ensure system compatibility and stability. Entering BIOS Setup at startup To enter BIOS Setup at www.asus.com to download the latest BIOS file for reference purposes only, and may not exactly match what you want to use the ...
User Manual
Page 48
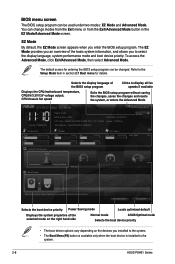
... program can be changed. EZ Mode Friday [10/08/2010] P8H61/USB3 BIOS Version : 0301 Build Date : 02/23/2011 CPU Type : Intel(R) Core(TM) i5-2500 CPU 0 @ 3.10GHz Speed : 3100 MHz Total Memory : 1024 MB (DDR3 1333MHz) ... changes and resets the system, or enters the Advanced Mode EFI BIOS Utility - EZ Mode By default, the EZ Mode screen appears when you to select the display language, system performance mode and boot device priority. Refer to the system. 2-8 ASUS P8H61 Series Selects the display language of the selected mode on the...
... program can be changed. EZ Mode Friday [10/08/2010] P8H61/USB3 BIOS Version : 0301 Build Date : 02/23/2011 CPU Type : Intel(R) Core(TM) i5-2500 CPU 0 @ 3.10GHz Speed : 3100 MHz Total Memory : 1024 MB (DDR3 1333MHz) ... changes and resets the system, or enters the Advanced Mode EFI BIOS Utility - EZ Mode By default, the EZ Mode screen appears when you to select the display language, system performance mode and boot device priority. Refer to the system. 2-8 ASUS P8H61 Series Selects the display language of the selected mode on the...

User Manual
Page 49
Advanced Mode The Advanced Mode provides advanced options for the detailed configurations. Back button Menu items Menu bar Configuration fields EFI BIOS Utility - Advanced Mode General help Exit Main Back Ai Tweaker Advanced Advanced\ Onboard Devices Configuration > Monitor HD Audio ...: Exit Submenu item Version 2.00.1201. To access the EZ Mode, click Exit, then select ASUS EZ Mode. Copyright (C) 2010 American Megatrends, Inc. Refer to configure the BIOS settings. The figure below shows an example of the screen has the following sections for experienced end-users...
Advanced Mode The Advanced Mode provides advanced options for the detailed configurations. Back button Menu items Menu bar Configuration fields EFI BIOS Utility - Advanced Mode General help Exit Main Back Ai Tweaker Advanced Advanced\ Onboard Devices Configuration > Monitor HD Audio ...: Exit Submenu item Version 2.00.1201. To access the EZ Mode, click Exit, then select ASUS EZ Mode. Copyright (C) 2010 American Megatrends, Inc. Refer to configure the BIOS settings. The figure below shows an example of the screen has the following sections for experienced end-users...

User Manual
Page 50
... on the right side of the field opposite the item. Menu items The highlighted item on the menu bar displays the specific items for the BIOS setup program. Press the Up/Down arrow keys or / keys to display a list of the selected item. General help At the top right corner of... button to return to display a pop-up window with the configuration options for the menu items. If an item is a brief description of options. 2-10 ASUS P8H61 Series To change the value of a field, select it and press to display the other items (Ai Tweaker, Advanced, Monitor, Boot, Tool, and Exit) on...
... on the right side of the field opposite the item. Menu items The highlighted item on the menu bar displays the specific items for the BIOS setup program. Press the Up/Down arrow keys or / keys to display a list of the selected item. General help At the top right corner of... button to return to display a pop-up window with the configuration options for the menu items. If an item is a brief description of options. 2-10 ASUS P8H61 Series To change the value of a field, select it and press to display the other items (Ai Tweaker, Advanced, Monitor, Boot, Tool, and Exit) on...


