P8H61-MX R2.0 User's Manual
Page 7
... perform certain tasks properly, take note of the following parts: • Chapter 1: Product introduction This chapter describes the supported features of the motherboard. • Chapter 2: BIOS information This chapter provides a detailed guide to navigating and setting up the...
... perform certain tasks properly, take note of the following parts: • Chapter 1: Product introduction This chapter describes the supported features of the motherboard. • Chapter 2: BIOS information This chapter provides a detailed guide to navigating and setting up the...
P8H61-MX R2.0 User's Manual
Page 10
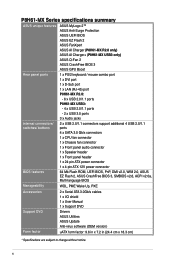
P8H61-MX Series specifications summary ASUS unique features ASUS MyLogo 2™ ASUS Anti-Surge Protection ASUS UEFI BIOS ASUS EZ Flash 2 ASUS FanXpert ASUS AI Charger (P8H61-MX R2.0 only) ASUS AI Charger+ (P8H61-MX USB3 only) ASUS Q-Fan 2 ASUS CrashFree BIOS 3 ASUS GPU Boost Rear panel ports 1 x PS/2 keyboard / mouse combo port 1 x DVI port 1 x D-Sub port 1 x LAN (RJ-45) port P8H61-MX R2.0: - 6 x USB 2.0/1.1 ports P8H61-MX USB3: - 4 x USB 2.0/1.1 ports - 2 x USB 3.0 ports 3 x Audio jacks Internal...
P8H61-MX Series specifications summary ASUS unique features ASUS MyLogo 2™ ASUS Anti-Surge Protection ASUS UEFI BIOS ASUS EZ Flash 2 ASUS FanXpert ASUS AI Charger (P8H61-MX R2.0 only) ASUS AI Charger+ (P8H61-MX USB3 only) ASUS Q-Fan 2 ASUS CrashFree BIOS 3 ASUS GPU Boost Rear panel ports 1 x PS/2 keyboard / mouse combo port 1 x DVI port 1 x D-Sub port 1 x LAN (RJ-45) port P8H61-MX R2.0: - 6 x USB 2.0/1.1 ports P8H61-MX USB3: - 4 x USB 2.0/1.1 ports - 2 x USB 3.0 ports 3 x Audio jacks Internal...
P8H61-MX R2.0 User's Manual
Page 14
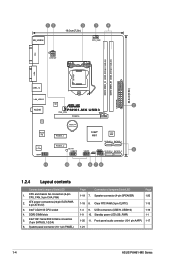
...LGA1155 CPU socket 4. Clear RTC RAM (3-pin CLRTC) 1-15 1-4 9. Front panel audio connector (10-1 pin AAFP) 1-17 1-21 1-4 ASUS P8H61-MX Series DDR3 DIMM slots 5. Speaker connector (4-pin SPEAKER) Page 1-20 1-18 8. ATX power connectors (24-pin EATXPWR, 4-pin ATX12V) ... module) EATXPWR 24.4cm(9.6in) VGA LGA1155 USB3_12 LAN_USB12 ASM 1042 2 AUDIO P8H61-MX USB3 CHA_FAN PCIEX16 RTL 8111F Lithium Cell CMOS Power Super I/O PCIEX1_1 Intel® 64Mb H61 BIOS VIA VT1708S AAFP SATA3G_3 SATA3G_1 PCIEX1_2 SB_PWR USB910 USB78 SPEAKER CLRTC SATA3G_4 SATA3G_2 5 F_PANEL...
...LGA1155 CPU socket 4. Clear RTC RAM (3-pin CLRTC) 1-15 1-4 9. Front panel audio connector (10-1 pin AAFP) 1-17 1-21 1-4 ASUS P8H61-MX Series DDR3 DIMM slots 5. Speaker connector (4-pin SPEAKER) Page 1-20 1-18 8. ATX power connectors (24-pin EATXPWR, 4-pin ATX12V) ... module) EATXPWR 24.4cm(9.6in) VGA LGA1155 USB3_12 LAN_USB12 ASM 1042 2 AUDIO P8H61-MX USB3 CHA_FAN PCIEX16 RTL 8111F Lithium Cell CMOS Power Super I/O PCIEX1_1 Intel® 64Mb H61 BIOS VIA VT1708S AAFP SATA3G_3 SATA3G_1 PCIEX1_2 SB_PWR USB910 USB78 SPEAKER CLRTC SATA3G_4 SATA3G_2 5 F_PANEL...
P8H61-MX R2.0 User's Manual
Page 28
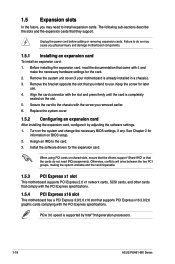
...adding or removing expansion cards. Keep the screw for information on the system and change the necessary BIOS settings, if any. Secure the card to install expansion cards. Assign an IRQ to use .... is supported by adjusting the software settings. 1. Install the software drivers for the card. 2. Turn on BIOS setup. 2. Failure to do not need to the chassis with the PCI Express specifications. Before installing the expansion...connector with it by Intel® 3rd generation processors. 1-18 ASUS P8H61-MX Series PCIe 3.0 speed is already installed in a chassis). 3.
...adding or removing expansion cards. Keep the screw for information on the system and change the necessary BIOS settings, if any. Secure the card to install expansion cards. Assign an IRQ to use .... is supported by adjusting the software settings. 1. Install the software drivers for the card. 2. Turn on BIOS setup. 2. Failure to do not need to the chassis with the PCI Express specifications. Before installing the expansion...connector with it by Intel® 3rd generation processors. 1-18 ASUS P8H61-MX Series PCIe 3.0 speed is already installed in a chassis). 3.
P8H61-MX R2.0 User's Manual
Page 29
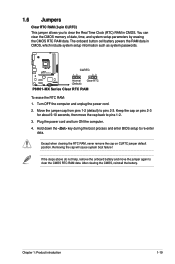
... RAM data in CMOS. If the steps above do not help, remove the onboard battery and move the cap back to pins 1-2. 3. P8H61-MX R2.0 CLRTC 12 23 Normal (Default) Clear RTC P8H61-MX Series Clear RTC RAM To erase the RTC RAM: 1. Move the jumper cap from pins 1-2 (default) to re-enter data. Removing..., and system setup parameters by erasing the CMOS RTC RAM data. Chapter 1: Product introduction 1-19 Hold down the key during the boot process and enter BIOS setup to pins 2-3.
... RAM data in CMOS. If the steps above do not help, remove the onboard battery and move the cap back to pins 1-2. 3. P8H61-MX R2.0 CLRTC 12 23 Normal (Default) Clear RTC P8H61-MX Series Clear RTC RAM To erase the RTC RAM: 1. Move the jumper cap from pins 1-2 (default) to re-enter data. Removing..., and system setup parameters by erasing the CMOS RTC RAM data. Chapter 1: Product introduction 1-19 Hold down the key during the boot process and enter BIOS setup to pins 2-3.

P8H61-MX R2.0 User's Manual
Page 32
...that complies with more power-consuming devices. ATX power connectors (24-pin EATXPWR, 4-pin ATX12V) These connectors are for details. 1-22 ASUS P8H61-MX Series EATX12V EATXPWR +12V DC +12V DC P8H61-MX R2.0 GND GND +3 Volts +12 Volts +12 Volts +5V Standby Power OK PIN 1 GND +5 Volts GND +5 Volts GND +3 .../PSCalculator.aspx?SLanguage=en-us for ATX power supply plugs. By default, this connector, set the Front Panel Type item in the BIOS setup to fit these connectors in only one orientation. If you want to connect a high-definition front panel audio module to this...
...that complies with more power-consuming devices. ATX power connectors (24-pin EATXPWR, 4-pin ATX12V) These connectors are for details. 1-22 ASUS P8H61-MX Series EATX12V EATXPWR +12V DC +12V DC P8H61-MX R2.0 GND GND +3 Volts +12 Volts +12 Volts +5V Standby Power OK PIN 1 GND +5 Volts GND +5 Volts GND +3 .../PSCalculator.aspx?SLanguage=en-us for ATX power supply plugs. By default, this connector, set the Front Panel Type item in the BIOS setup to fit these connectors in only one orientation. If you want to connect a high-definition front panel audio module to this...
P8H61-MX R2.0 User's Manual
Page 34
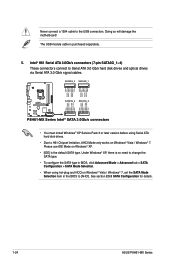
... BIOS to H61 Chipset limitation, AHCI Mode only works on Windows® Vista / Windows® 7. Never connect a 1394 cable to Serial ATA 3.0 Gb/s hard disk drives and optical drives via Serial ATA 3.0 Gb/s signal cables. SATA3G_3 SATA3G_1 GND RSATA_TXP3 RSATA_TXN3 GND RSATA_RXN3 RSATA_RXP3 GND GND RSATA_TXP1 RSATA_TXN1 GND RSATA_RXN1 RSATA_RXP1 GND P8H61-MX R2... (7-pin SATA3G_1~4) These connectors connect to the USB connectors. The USB module cable is the default SATA type. See section 2.5.3 SATA Configuration for details. 1-24 ASUS P8H61-MX Series
... BIOS to H61 Chipset limitation, AHCI Mode only works on Windows® Vista / Windows® 7. Never connect a 1394 cable to Serial ATA 3.0 Gb/s hard disk drives and optical drives via Serial ATA 3.0 Gb/s signal cables. SATA3G_3 SATA3G_1 GND RSATA_TXP3 RSATA_TXN3 GND RSATA_RXN3 RSATA_RXP3 GND GND RSATA_TXP1 RSATA_TXN1 GND RSATA_RXN1 RSATA_RXP1 GND P8H61-MX R2... (7-pin SATA3G_1~4) These connectors connect to the USB connectors. The USB module cable is the default SATA type. See section 2.5.3 SATA Configuration for details. 1-24 ASUS P8H61-MX Series
P8H61-MX R2.0 User's Manual
Page 37
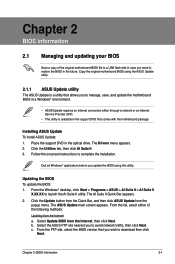
...to complete the installation. Chapter 2: BIOS information 2-1 Copy the original motherboard BIOS using this utility. The ASUS Update main screen appears. Select the ASUS FTP site nearest you to download then click Next. Chapter 2 BIOS information 2.1 Managing and updating your BIOS Save a copy of the following ... Service Provider (ISP). • This utility is available in a Windows® environment. • ASUS Update requires an Internet connection either of the original motherboard BIOS file to a USB flash disk in case you wish to avoid network traffic, then click Next. ...
...to complete the installation. Chapter 2: BIOS information 2-1 Copy the original motherboard BIOS using this utility. The ASUS Update main screen appears. Select the ASUS FTP site nearest you to download then click Next. Chapter 2 BIOS information 2.1 Managing and updating your BIOS Save a copy of the following ... Service Provider (ISP). • This utility is available in a Windows® environment. • ASUS Update requires an Internet connection either of the original motherboard BIOS file to a USB flash disk in case you wish to avoid network traffic, then click Next. ...

P8H61-MX R2.0 User's Manual
Page 38
... menu to select ASUS EZ Flash Utility and press to update the BIOS without using an OS‑based utility. Insert the USB flash disk that contains the latest BIOS file into the USB port. 2. ASUSTek EZ Flash BIOS ROM Utility V01.04 Flash Info MODEL: P8H61-MX R2.0 File Path: fs0...03/14/2012 P8H61-MX-R2-SI-0401.ROM File Info MODEL: Help Info VER: DATE [Enter] Select or Load [Tab] Switch [Up/Down/PageUp/PageDown/Home/End] Move [Esc] Exit 2-2 ASUS P8H61-MX Series Updating from the ASUS website at www.asus.com. The ASUS Update utility is capable of the BIOS setup program. ...
... menu to select ASUS EZ Flash Utility and press to update the BIOS without using an OS‑based utility. Insert the USB flash disk that contains the latest BIOS file into the USB port. 2. ASUSTek EZ Flash BIOS ROM Utility V01.04 Flash Info MODEL: P8H61-MX R2.0 File Path: fs0...03/14/2012 P8H61-MX-R2-SI-0401.ROM File Info MODEL: Help Info VER: DATE [Enter] Select or Load [Tab] Switch [Up/Down/PageUp/PageDown/Home/End] Move [Esc] Exit 2-2 ASUS P8H61-MX Series Updating from the ASUS website at www.asus.com. The ASUS Update utility is capable of the BIOS setup program. ...
P8H61-MX R2.0 User's Manual
Page 39
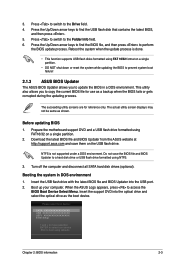
... the motherboard support DVD and a USB flash drive formatted using defaults Chapter 2: BIOS information 2-3 Download the latest BIOS file and BIOS Updater from the ASUS website at http://support.asus.com and save the BIOS file and BIOS Updater to update the BIOS in DOS environment 1. Do not save them on the USB flash drive. Boot up your...
... the motherboard support DVD and a USB flash drive formatted using defaults Chapter 2: BIOS information 2-3 Download the latest BIOS file and BIOS Updater from the ASUS website at http://support.asus.com and save the BIOS file and BIOS Updater to update the BIOS in DOS environment 1. Do not save them on the USB flash drive. Boot up your...

P8H61-MX R2.0 User's Manual
Page 40
C:\>d: D:\> Updating the BIOS file To update the BIOS file using BIOS Updater 1. ASUSTek BIOS Updater for DOS V1.18 Current ROM BOARD: P8H61-MX R2.0 VER: 0401 DATE: 02/16/2012 Update ROM BOARD: Unknown VER: Unknown DATE: Unknown PATH: A:\ A: P8H61-MX-R2-SI-0401 4194304 2012-03-12 17:...fields and use the keys to Drive D (USB flash drive). BIOS Updater checks the selected BIOS file and prompts you sure to update BIOS? D:\>bupdater /pc /g 2. The BIOS Updater screen appears as below. 3. Yes No 2-4 ASUS P8H61-MX Series At the FreeDOS prompt, type bupdater /pc /g and ...
C:\>d: D:\> Updating the BIOS file To update the BIOS file using BIOS Updater 1. ASUSTek BIOS Updater for DOS V1.18 Current ROM BOARD: P8H61-MX R2.0 VER: 0401 DATE: 02/16/2012 Update ROM BOARD: Unknown VER: Unknown DATE: Unknown PATH: A:\ A: P8H61-MX-R2-SI-0401 4194304 2012-03-12 17:...fields and use the keys to Drive D (USB flash drive). BIOS Updater checks the selected BIOS file and prompts you sure to update BIOS? D:\>bupdater /pc /g 2. The BIOS Updater screen appears as below. 3. Yes No 2-4 ASUS P8H61-MX Series At the FreeDOS prompt, type bupdater /pc /g and ...
P8H61-MX R2.0 User's Manual
Page 41
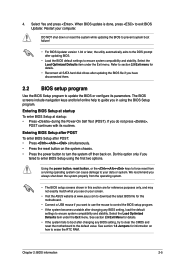
...ASUS website at startup: • Press during the Power-On Self Test (POST). If you have disconnected them. 2.2 BIOS setup program Use the BIOS Setup program to enter BIOS Setup using the BIOS Setup program. Entering BIOS Setup after POST To enter BIOS Setup after updating BIOS. • Load the BIOS ...properly from a running operating system can cause damage to ensure system compatibility and stability. Entering BIOS Setup at startup To enter BIOS Setup at www.asus.com to download the latest BIOS file for this motherboard. • Connect a USB mouse if you failed to update ...
...ASUS website at startup: • Press during the Power-On Self Test (POST). If you have disconnected them. 2.2 BIOS setup program Use the BIOS Setup program to enter BIOS Setup using the BIOS Setup program. Entering BIOS Setup after POST To enter BIOS Setup after updating BIOS. • Load the BIOS ...properly from a running operating system can cause damage to ensure system compatibility and stability. Entering BIOS Setup at startup To enter BIOS Setup at www.asus.com to download the latest BIOS file for this motherboard. • Connect a USB mouse if you failed to update ...

P8H61-MX R2.0 User's Manual
Page 42
...the system. • The Boot Menu(F8) button is available only when the boot device is installed to the system. 2-6 ASUS P8H61-MX Series BIOS menu screen The BIOS setup program can be used under two modes: EZ Mode and Advanced Mode. Refer to select the display language, system performance ...the boot device priority Turbo mode • The boot device options vary depending on the devices you enter the BIOS setup program. The default screen for entering the BIOS setup program can be changed. To access the Advanced Mode, click Exit/Advanced Mode, then select Advanced Mode ...
...the system. • The Boot Menu(F8) button is available only when the boot device is installed to the system. 2-6 ASUS P8H61-MX Series BIOS menu screen The BIOS setup program can be used under two modes: EZ Mode and Advanced Mode. Refer to select the display language, system performance ...the boot device priority Turbo mode • The boot device options vary depending on the devices you enter the BIOS setup program. The default screen for entering the BIOS setup program can be changed. To access the Advanced Mode, click Exit/Advanced Mode, then select Advanced Mode ...
P8H61-MX R2.0 User's Manual
Page 43
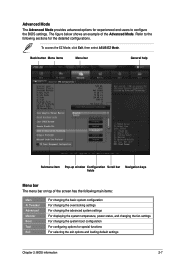
Refer to configure the BIOS settings. Back button Menu items Menu bar General help Submenu item Pop-up window Configuration Scroll bar Navigation keys fields Menu bar The menu bar ... of the screen has the following sections for special functions For selecting the exit options and loading default settings Chapter 2: BIOS information 2-7 To access the EZ Mode, click Exit, then select ASUS EZ Mode. Advanced Mode The Advanced Mode provides advanced options for experienced end-users to the following main items: Main...
Refer to configure the BIOS settings. Back button Menu items Menu bar General help Submenu item Pop-up window Configuration Scroll bar Navigation keys fields Menu bar The menu bar ... of the screen has the following sections for special functions For selecting the exit options and loading default settings Chapter 2: BIOS information 2-7 To access the EZ Mode, click Exit, then select ASUS EZ Mode. Advanced Mode The Advanced Mode provides advanced options for experienced end-users to the following main items: Main...

P8H61-MX R2.0 User's Manual
Page 44
..., select it and press to display a pop-up window with the configuration options for that menu. Configuration fields These fields show the values for the BIOS setup program. To change the settings. Scroll bar A scroll bar appears on the right side of the menu screen are items that do not fit..., selecting Main shows the Main menu items. The other items on the screen. A configurable field is user-configurable, you can change the value of options. 2-8 ASUS P8H61-MX Series Pop-up window Select a menu item and press to display a list of the field opposite the item.
..., select it and press to display a pop-up window with the configuration options for that menu. Configuration fields These fields show the values for the BIOS setup program. To change the settings. Scroll bar A scroll bar appears on the right side of the menu screen are items that do not fit..., selecting Main shows the Main menu items. The other items on the screen. A configurable field is user-configurable, you can change the value of options. 2-8 ASUS P8H61-MX Series Pop-up window Select a menu item and press to display a list of the field opposite the item.

P8H61-MX R2.0 User's Manual
Page 45
...date, time, language, and security settings. 2.3.1 System Language [English] Allows you enter the Advanced Mode of the screen show Installed. Chapter 2: BIOS information 2-9 After you set the system time. 2.3.4 Security The Security menu items allow you to change the system security settings. • If ...you to set a password, these items show the default Not Installed. 2.3 Main menu The Main menu screen appears when you to choose the BIOS language version from the options. Configuration options: [English] [Español 2.3.2 System Date [Day xx/xx/xxxx] Allows you to set the...
...date, time, language, and security settings. 2.3.1 System Language [English] Allows you enter the Advanced Mode of the screen show Installed. Chapter 2: BIOS information 2-9 After you set the system time. 2.3.4 Security The Security menu items allow you to change the system security settings. • If ...you to set a password, these items show the default Not Installed. 2.3 Main menu The Main menu screen appears when you to choose the BIOS language version from the options. Configuration options: [English] [Español 2.3.2 System Date [Day xx/xx/xxxx] Allows you to set the...

P8H61-MX R2.0 User's Manual
Page 46
... the same steps as in the BIOS setup program. From the Create New Password box, key in the current password, then press . 3. From the Enter Current Password box, key in a password, then press . 3. The User Password item on top of the screen shows Not Installed. 2-10 ASUS P8H61-MX Series From the Enter Current...
... the same steps as in the BIOS setup program. From the Create New Password box, key in the current password, then press . 3. From the Enter Current Password box, key in a password, then press . 3. The User Password item on top of the screen shows Not Installed. 2-10 ASUS P8H61-MX Series From the Enter Current...
P8H61-MX R2.0 User's Manual
Page 47
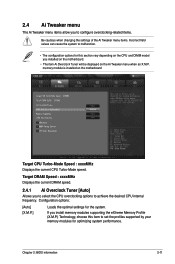
Chapter 2: BIOS information 2-11 2.4 Ai Tweaker menu The Ai Tweaker menu items allow you to configure overclocking-related items. Be cautious when changing the settings of the ...
Chapter 2: BIOS information 2-11 2.4 Ai Tweaker menu The Ai Tweaker menu items allow you to configure overclocking-related items. Be cautious when changing the settings of the ...

P8H61-MX R2.0 User's Manual
Page 49
Secondary Plane Current Limit [Auto] Use / to run faster than marked frequency in specific conditions. Chapter 2: BIOS information 2-13 Turbo Mode [Enabled] This item appears only when you set the Enhanced Intel® SpeedStep Technology item to [Enabled]. [Enabled] [Disabled] Allows processor ...
Secondary Plane Current Limit [Auto] Use / to run faster than marked frequency in specific conditions. Chapter 2: BIOS information 2-13 Turbo Mode [Enabled] This item appears only when you set the Enhanced Intel® SpeedStep Technology item to [Enabled]. [Enabled] [Disabled] Allows processor ...
P8H61-MX R2.0 User's Manual
Page 51
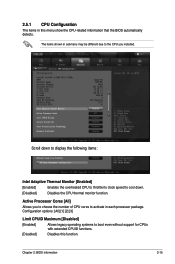
... its clock speed to boot even without support for CPUs with extended CPUID functions. [Disabled] Disables this menu show the CPU-related information that the BIOS automatically detects. Scroll down . [Disabled] Disables the CPU thermal monitor function. Active Processor Cores [All] Allows you to choose the number of CPU cores to... you installed. The items shown in submenu may be different due to activate in this function. 2.5.1 CPU Configuration The items in each processor package. Chapter 2: BIOS information 2-15
... its clock speed to boot even without support for CPUs with extended CPUID functions. [Disabled] Disables this menu show the CPU-related information that the BIOS automatically detects. Scroll down . [Disabled] Disables the CPU thermal monitor function. Active Processor Cores [All] Allows you to choose the number of CPU cores to... you installed. The items shown in submenu may be different due to activate in this function. 2.5.1 CPU Configuration The items in each processor package. Chapter 2: BIOS information 2-15


