
P8H61-M LX3 PLUS R2.0 User's Manual
Page 4
Contents 1.11 Software support 1-27 1.11.1 Installing an operating system 1-27 1.11.2 Support DVD information 1-27 Chapter 2: BIOS information 2.1 Managing and updating your BIOS 2-1 2.1.1 ASUS Update utility 2-1 2.1.2 ASUS EZ Flash 2 2-2 2.1.3 ASUS CrashFree BIOS 3 utility 2-3 2.1.4 ASUS BIOS Updater 2-4 2.2 BIOS setup program 2-6 2.3 Main menu 2-10 2.3.1 System Language [English 2-10 2.3.2 System Date [Day xx/xx/xxxx 2-10 2.3.3 System Time [xx:xx:xx 2-10...
Contents 1.11 Software support 1-27 1.11.1 Installing an operating system 1-27 1.11.2 Support DVD information 1-27 Chapter 2: BIOS information 2.1 Managing and updating your BIOS 2-1 2.1.1 ASUS Update utility 2-1 2.1.2 ASUS EZ Flash 2 2-2 2.1.3 ASUS CrashFree BIOS 3 utility 2-3 2.1.4 ASUS BIOS Updater 2-4 2.2 BIOS setup program 2-6 2.3 Main menu 2-10 2.3.1 System Language [English 2-10 2.3.2 System Date [Day xx/xx/xxxx 2-10 2.3.3 System Time [xx:xx:xx 2-10...

P8H61-M LX3 PLUS R2.0 User's Manual
Page 6
...in any damage, contact your local power company. • If the power supply is broken, do not try to change system settings through the BIOS Setup menus. Operation safety • Before installing the motherboard and adding devices on a stable surface. • If you are not damaged. If ... adapter or extension cord. How this guide This user guide contains the information you detect any area where it supports. • Chapter 2: BIOS information This chapter tells how to fix it , carefully read all the manuals that came with the product, contact a qualified service technician or...
...in any damage, contact your local power company. • If the power supply is broken, do not try to change system settings through the BIOS Setup menus. Operation safety • Before installing the motherboard and adding devices on a stable surface. • If you are not damaged. If ... adapter or extension cord. How this guide This user guide contains the information you detect any area where it supports. • Chapter 2: BIOS information This chapter tells how to fix it , carefully read all the manuals that came with the product, contact a qualified service technician or...
P8H61-M LX3 PLUS R2.0 User's Manual
Page 9
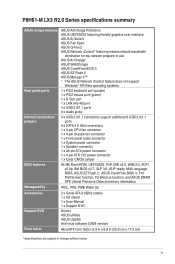
... P8H61-M LX3 R2.0 Series specifications summary ASUS unique features Rear panel ports Internal connectors/ jumpers BIOS features Manageability Accessories Support DVD Form factor ASUS Anti-Surge Protection ASUS UEFI BIOS featuring friendly graphics user interface ASUS AI Suite II ASUS Fan Xpert ASUS Q-Fan 2 ASUS Network iControl* featuring instant network bandwidth domination for top network program in use ASUS AI Charger ASUS WebStorage ASUS CrashFree BIOS 3 ASUS...
... P8H61-M LX3 R2.0 Series specifications summary ASUS unique features Rear panel ports Internal connectors/ jumpers BIOS features Manageability Accessories Support DVD Form factor ASUS Anti-Surge Protection ASUS UEFI BIOS featuring friendly graphics user interface ASUS AI Suite II ASUS Fan Xpert ASUS Q-Fan 2 ASUS Network iControl* featuring instant network bandwidth domination for top network program in use ASUS AI Charger ASUS WebStorage ASUS CrashFree BIOS 3 ASUS...
P8H61-M LX3 PLUS R2.0 User's Manual
Page 13
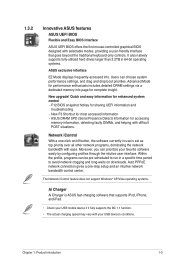
... your USB device's conditions. Network iControl With a one -step setup and an intuitive network bandwidth control center. 1.3.2 Innovative ASUS features ASUS UEFI BIOS Flexible and Easy BIOS Interface ASUS UEFI BIOS offers the first mouse-controlled graphical BIOS designed with difficult POST situations. Users can be pre-scheduled to run in a specific time period to avoid network...
... your USB device's conditions. Network iControl With a one -step setup and an intuitive network bandwidth control center. 1.3.2 Innovative ASUS features ASUS UEFI BIOS Flexible and Easy BIOS Interface ASUS UEFI BIOS offers the first mouse-controlled graphical BIOS designed with difficult POST situations. Users can be pre-scheduled to run in a specific time period to avoid network...
P8H61-M LX3 PLUS R2.0 User's Manual
Page 14
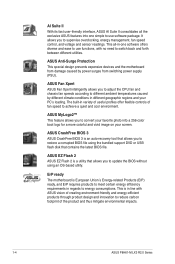
...you to adjust the CPU fan and chassis fan speeds according to switch back and forth between different utilities. ASUS CrashFree BIOS 3 ASUS CrashFree BIOS 3 is in line with no need to different ambient temperatures caused by power surges from damage caused by different.... ASUS EZ Flash 2 ASUS EZ Flash 2 is European Union´s Energy-related Products (ErP) ready, and ErP requires products to meet certain energy efficiency requirements in variety of useful profiles offer flexible controls of the product and thus mitigate environmental impacts. 1-4 ASUS P8H61-M LX3 R2.0 ...
...you to adjust the CPU fan and chassis fan speeds according to switch back and forth between different utilities. ASUS CrashFree BIOS 3 ASUS CrashFree BIOS 3 is in line with no need to different ambient temperatures caused by power surges from damage caused by different.... ASUS EZ Flash 2 ASUS EZ Flash 2 is European Union´s Energy-related Products (ErP) ready, and ErP requires products to meet certain energy efficiency requirements in variety of useful profiles offer flexible controls of the product and thus mitigate environmental impacts. 1-4 ASUS P8H61-M LX3 R2.0 ...
P8H61-M LX3 PLUS R2.0 User's Manual
Page 17
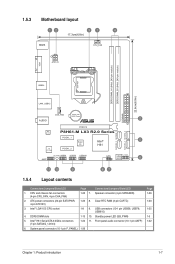
... USB34 22.6cm(8.9in) LAN1_USB12 EATXPWR CHA_FAN Lithium Cell CMOS Power AUDIO 2 PCIEX16 RTL 8111F P8H61-M LX3 R2.0 Series SATA3G_3 SATA3G_1 SATA3G_4 SATA3G_2 PCIEX1_1 Super Intel® 5 I/O H61 VIA VT1708S PCIEX1_2 AAFP SB_PWR USB56 USB78 USB910 CLRTC F_PANEL 64Mb BIOS 6 SPEAKER 11 10 9 87 1.5.4 Layout contents Connectors/Jumpers/Slots/LED Page Connectors/Jumpers/Slots...
... USB34 22.6cm(8.9in) LAN1_USB12 EATXPWR CHA_FAN Lithium Cell CMOS Power AUDIO 2 PCIEX16 RTL 8111F P8H61-M LX3 R2.0 Series SATA3G_3 SATA3G_1 SATA3G_4 SATA3G_2 PCIEX1_1 Super Intel® 5 I/O H61 VIA VT1708S PCIEX1_2 AAFP SB_PWR USB56 USB78 USB910 CLRTC F_PANEL 64Mb BIOS 6 SPEAKER 11 10 9 87 1.5.4 Layout contents Connectors/Jumpers/Slots/LED Page Connectors/Jumpers/Slots...
P8H61-M LX3 PLUS R2.0 User's Manual
Page 29
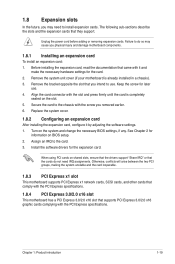
...the card. 3. Unplug the power cord before adding or removing expansion cards. Remove the system unit cover (if your motherboard is completely seated on BIOS setup. 2. Secure the card to install expansion cards. Replace the system cover. 1.8.2 Configuring an expansion card After installing the expansion card, configure ... press firmly until the card is already installed in a chassis). 3. When using PCI cards on the system and change the necessary BIOS settings, if any. Remove the bracket opposite the slot that they support. Install the software drivers for the card. 2.
...the card. 3. Unplug the power cord before adding or removing expansion cards. Remove the system unit cover (if your motherboard is completely seated on BIOS setup. 2. Secure the card to install expansion cards. Replace the system cover. 1.8.2 Configuring an expansion card After installing the expansion card, configure ... press firmly until the card is already installed in a chassis). 3. When using PCI cards on the system and change the necessary BIOS settings, if any. Remove the bracket opposite the slot that they support. Install the software drivers for the card. 2.
P8H61-M LX3 PLUS R2.0 User's Manual
Page 30
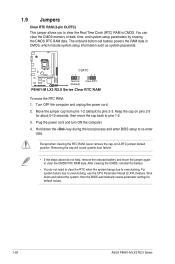
... back to default values. 1-20 ASUS P8H61-M LX3 R2.0 Series Turn OFF the computer and unplug the power cord. 2. CLRTC P8H61-M LX3 R2.0 Series 12 Normal (Default) 23 Clear RTC P8H61-M LX3 R2.0 Series Clear RTC RAM To erase the RTC RAM: 1. Hold down and reboot the system, then the BIOS automatically resets parameter settings to pins ...for about 5-10 seconds, then move the jumper again to re-enter data. Shut down the key during the boot process and enter BIOS setup to clear the CMOS RTC RAM data. You can clear the CMOS memory of date, time, and system setup parameters by ...
... back to default values. 1-20 ASUS P8H61-M LX3 R2.0 Series Turn OFF the computer and unplug the power cord. 2. CLRTC P8H61-M LX3 R2.0 Series 12 Normal (Default) 23 Clear RTC P8H61-M LX3 R2.0 Series Clear RTC RAM To erase the RTC RAM: 1. Hold down and reboot the system, then the BIOS automatically resets parameter settings to pins ...for about 5-10 seconds, then move the jumper again to re-enter data. Shut down the key during the boot process and enter BIOS setup to clear the CMOS RTC RAM data. You can clear the CMOS memory of date, time, and system setup parameters by ...

P8H61-M LX3 PLUS R2.0 User's Manual
Page 32
...; We recommend that supports either HD Audio or legacy AC`97 audio standard. These two 4-pin Universal Serial Bus (USB) ports are for details. 1-22 ASUS P8H61-M LX3 R2.0 Series USB 2.0 ports 3 and 4. Connect one end of the motherboard's high-definition audio capability. • If you connect a high-definition front panel audio module to... this connector. D-Sub port. Front panel audio connector (10-1 pin AAFP) This connector is set the Front Panel Type item in the BIOS setup to [HD]. By default, this connector, set to [HD]. 6.
...; We recommend that supports either HD Audio or legacy AC`97 audio standard. These two 4-pin Universal Serial Bus (USB) ports are for details. 1-22 ASUS P8H61-M LX3 R2.0 Series USB 2.0 ports 3 and 4. Connect one end of the motherboard's high-definition audio capability. • If you connect a high-definition front panel audio module to... this connector. D-Sub port. Front panel audio connector (10-1 pin AAFP) This connector is set the Front Panel Type item in the BIOS setup to [HD]. By default, this connector, set to [HD]. 6.

P8H61-M LX3 PLUS R2.0 User's Manual
Page 34
...BIOS, click Advanced Mode > Advanced tab > SATA Configuration > SATA Mode Selection. • When using Serial ATA hard disk drives. • Due to Serial ATA 3.0 Gb/s hard disk drives and optical drives via Serial ATA 3.0 Gb/s signal cables. P8H61-M LX3 R2...GND SATA3G_2 GND RSATA_TXP2 RSATA_TXN2 GND RSATA_RXN2 RSATA_RXP2 GND SATA3G_4 GND RSATA_TXP4 RSATA_TXN4 GND RSATA_RXN4 RSATA_RXP4 GND P8H61-M LX3 R2.0 Series Intel® SATA 3.0Gb/s connectors • You must install Windows® XP Service...; 7. See section 2.5.3 SATA Configuration for details. 1-24 ASUS P8H61-M LX3 R2.0 Series
...BIOS, click Advanced Mode > Advanced tab > SATA Configuration > SATA Mode Selection. • When using Serial ATA hard disk drives. • Due to Serial ATA 3.0 Gb/s hard disk drives and optical drives via Serial ATA 3.0 Gb/s signal cables. P8H61-M LX3 R2...GND SATA3G_2 GND RSATA_TXP2 RSATA_TXN2 GND RSATA_RXN2 RSATA_RXP2 GND SATA3G_4 GND RSATA_TXP4 RSATA_TXN4 GND RSATA_RXN4 RSATA_RXP4 GND P8H61-M LX3 R2.0 Series Intel® SATA 3.0Gb/s connectors • You must install Windows® XP Service...; 7. See section 2.5.3 SATA Configuration for details. 1-24 ASUS P8H61-M LX3 R2.0 Series

P8H61-M LX3 PLUS R2.0 User's Manual
Page 39
... The Specials menu appears. 2. Follow the onscreen instructions to launch the AI Suite II utility. Chapter 2: BIOS information 2-1 From the Windows® desktop, click Start > Programs > ASUS > AI Suite II > AI Suite II X.XX.XX to complete the installation. The AI Suite II ...to manage, save, and update the motherboard BIOS in Windows® environment. • ASUS Update requires an Internet connection either of the original motherboard BIOS file to restore the BIOS in the optical drive. Updating the BIOS To update the BIOS: 1. From the list, select either through...
... The Specials menu appears. 2. Follow the onscreen instructions to launch the AI Suite II utility. Chapter 2: BIOS information 2-1 From the Windows® desktop, click Start > Programs > ASUS > AI Suite II > AI Suite II X.XX.XX to complete the installation. The AI Suite II ...to manage, save, and update the motherboard BIOS in Windows® environment. • ASUS Update requires an Internet connection either of the original motherboard BIOS file to restore the BIOS in the optical drive. Updating the BIOS To update the BIOS: 1. From the list, select either through...
P8H61-M LX3 PLUS R2.0 User's Manual
Page 40
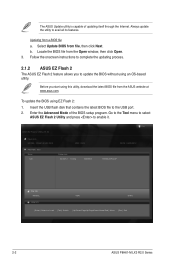
... to enable it. Enter the Advanced Mode of updating itself through the Internet. Locate the BIOS file from a BIOS file a. ASUS EZ Flash 2 Utility v01.04 Flash Info MODEL: P8H61-M LX3 R2.0 VER: 0303 File Path: fs0:\ Drive fs0:\ Folder Info 04/25/12 10:23p 8390656 Exit DATE: ...Switch [Up/Down/PageUp/PageDown/Home/End] Move [Esc] Exit 2-2 ASUS P8H61-M LX3 R2.0 Series Go to the Tool menu to select ASUS EZ Flash 2 Utility and press to the USB port. 2. Always update the utility to update the BIOS without using EZ Flash 2: 1. Follow the onscreen instructions to complete the...
... to enable it. Enter the Advanced Mode of updating itself through the Internet. Locate the BIOS file from a BIOS file a. ASUS EZ Flash 2 Utility v01.04 Flash Info MODEL: P8H61-M LX3 R2.0 VER: 0303 File Path: fs0:\ Drive fs0:\ Folder Info 04/25/12 10:23p 8390656 Exit DATE: ...Switch [Up/Down/PageUp/PageDown/Home/End] Move [Esc] Exit 2-2 ASUS P8H61-M LX3 R2.0 Series Go to the Tool menu to select ASUS EZ Flash 2 Utility and press to the USB port. 2. Always update the utility to update the BIOS without using EZ Flash 2: 1. Follow the onscreen instructions to complete the...
P8H61-M LX3 PLUS R2.0 User's Manual
Page 41
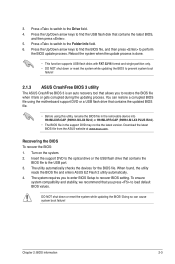
...BIOS file to load default BIOS values. To ensure system compatibility and stability, we recommend that contains the updated BIOS file. • Before using this utility, rename the BIOS file in the removable device into H61MLX3R.CAP (P8H61-M LX3 R2.0) or H61ML3PR.CAP (P8H61-M LX3 PLUS R2.0). • The BIOS...the system while updating the BIOS to prevent system boot failure! 2.1.3 ASUS CrashFree BIOS 3 utility The ASUS CrashFree BIOS 3 is an auto recovery tool that contains the latest BIOS, and then press . 5. The utility automatically checks the devices for the BIOS file. Reboot the system...
...BIOS file to load default BIOS values. To ensure system compatibility and stability, we recommend that contains the updated BIOS file. • Before using this utility, rename the BIOS file in the removable device into H61MLX3R.CAP (P8H61-M LX3 R2.0) or H61ML3PR.CAP (P8H61-M LX3 PLUS R2.0). • The BIOS...the system while updating the BIOS to prevent system boot failure! 2.1.3 ASUS CrashFree BIOS 3 utility The ASUS CrashFree BIOS 3 is an auto recovery tool that contains the latest BIOS, and then press . 5. The utility automatically checks the devices for the BIOS file. Reboot the system...
P8H61-M LX3 PLUS R2.0 User's Manual
Page 42
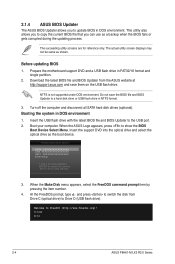
...as the boot device. Insert the USB flash drive with the latest BIOS file and BIOS Updater to boot using defaults 3. 2.1.4 ASUS BIOS Updater The ASUS BIOS Updater allows you can use as a backup when the BIOS fails or gets corrupted during the updating process. Do not save ...: XXXXXXXXXXXXXXXX Enter Setup ↑ and ↓ to move selection ENTER to select boot device ESC to the USB port. 2. C:\>d: D:\> 2-4 ASUS P8H61-M LX3 R2.0 Series Prepare the motherboard support DVD and a USB flash drive in NTFS format. 3. Turn off the computer and disconnect all SATA hard disk drives...
...as the boot device. Insert the USB flash drive with the latest BIOS file and BIOS Updater to boot using defaults 3. 2.1.4 ASUS BIOS Updater The ASUS BIOS Updater allows you can use as a backup when the BIOS fails or gets corrupted during the updating process. Do not save ...: XXXXXXXXXXXXXXXX Enter Setup ↑ and ↓ to move selection ENTER to select boot device ESC to the USB port. 2. C:\>d: D:\> 2-4 ASUS P8H61-M LX3 R2.0 Series Prepare the motherboard support DVD and a USB flash drive in NTFS format. 3. Turn off the computer and disconnect all SATA hard disk drives...

P8H61-M LX3 PLUS R2.0 User's Manual
Page 43
.... DO NOT shut down or reset the system while updating the BIOS to prevent system boot failure! • For BIOS Updater version 1.04 or later, the utility automatically exits to section 2.9 Exit menu for DOS V1.18 Current ROM BOARD: P8H61-M LX3 R2.0 VER: 0303 DATE: 04/25/2012 Update ROM BOARD: Unknown VER: Unknown...
.... DO NOT shut down or reset the system while updating the BIOS to prevent system boot failure! • For BIOS Updater version 1.04 or later, the utility automatically exits to section 2.9 Exit menu for DOS V1.18 Current ROM BOARD: P8H61-M LX3 R2.0 VER: 0303 DATE: 04/25/2012 Update ROM BOARD: Unknown VER: Unknown...
P8H61-M LX3 PLUS R2.0 User's Manual
Page 44
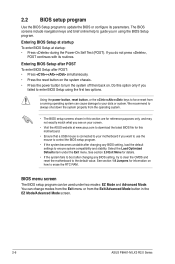
...Test (POST). Entering BIOS Setup after POST To enter BIOS Setup after POST: • Press ++ simultaneously. • Press the reset button on the system chassis. • Press the power button to your motherboard if you in the EZ Mode/Advanced Mode screen. 2-6 ASUS P8H61-M LX3 R2.0 Series If you do... not press , POST continues with its parameters. Do this option only if you see on . Using the power button, reset button, or the ++ keys to enter BIOS Setup using the BIOS Setup program. See section 2.9 Exit...
...Test (POST). Entering BIOS Setup after POST To enter BIOS Setup after POST: • Press ++ simultaneously. • Press the reset button on the system chassis. • Press the power button to your motherboard if you in the EZ Mode/Advanced Mode screen. 2-6 ASUS P8H61-M LX3 R2.0 Series If you do... not press , POST continues with its parameters. Do this option only if you see on . Using the power button, reset button, or the ++ keys to enter BIOS Setup using the BIOS Setup program. See section 2.9 Exit...

P8H61-M LX3 PLUS R2.0 User's Manual
Page 45
... mode and boot device priority. Selects the display language of the BIOS setup program Displays the CPU/motherboard temperature, CPU/5V/3.3V/12V voltage output, CPU/chassis fan speed Exits... the BIOS setup program without saving the changes, saves the changes and resets the system, or ... the boot device priority Displays the system properties of the basic system information, and allows you enter the BIOS setup program. To access the Advanced Mode, click Exit/Advanced Mode or press Esc, then select Advanced...
... mode and boot device priority. Selects the display language of the BIOS setup program Displays the CPU/motherboard temperature, CPU/5V/3.3V/12V voltage output, CPU/chassis fan speed Exits... the BIOS setup program without saving the changes, saves the changes and resets the system, or ... the boot device priority Displays the system properties of the basic system information, and allows you enter the BIOS setup program. To access the Advanced Mode, click Exit/Advanced Mode or press Esc, then select Advanced...

P8H61-M LX3 PLUS R2.0 User's Manual
Page 46
Advanced Mode The Advanced Mode provides advanced options for special functions For selecting the exit options and loading default settings 2-8 ASUS P8H61-M LX3 R2.0 Series The figure below shows an example of the screen has the following sections for the detailed configurations. Back button Menu items Menu bar Configuration ... system temperature, power status, and changing the fan settings For changing the system boot configuration For configuring options for experienced end-users to configure the BIOS settings. To access the EZ Mode, click Exit, then select...
Advanced Mode The Advanced Mode provides advanced options for special functions For selecting the exit options and loading default settings 2-8 ASUS P8H61-M LX3 R2.0 Series The figure below shows an example of the screen has the following sections for the detailed configurations. Back button Menu items Menu bar Configuration ... system temperature, power status, and changing the fan settings For changing the system boot configuration For configuring options for experienced end-users to configure the BIOS settings. To access the EZ Mode, click Exit, then select...

P8H61-M LX3 PLUS R2.0 User's Manual
Page 47
... items for that is user-configurable, you can change the value of the field opposite the item. You cannot select an item that item. Chapter 2: BIOS information 2-9 To display the submenu, select the item and press . Press the Up/Down arrow keys or / keys to display a pop-up window with the... menu and change the value of a field, select it and press to the previous menu screen. Configuration fields These fields show the values for the BIOS setup program. To change the settings.
... items for that is user-configurable, you can change the value of the field opposite the item. You cannot select an item that item. Chapter 2: BIOS information 2-9 To display the submenu, select the item and press . Press the Up/Down arrow keys or / keys to display a pop-up window with the... menu and change the value of a field, select it and press to the previous menu screen. Configuration fields These fields show the values for the BIOS setup program. To change the settings.

P8H61-M LX3 PLUS R2.0 User's Manual
Page 48
2.3 Main menu The Main menu screen appears when you enter the Advanced Mode of the screen show Installed. 2-10 ASUS P8H61-M LX3 R2.0 Series Configuration options: [English] [Español 2.3.2 System Date [Day xx/xx/xxxx] Allows you to set the system date. 2.3.3 System Time [xx:xx:xx]... Installed. See section 1.9 Jumpers for information on how to erase the RTC RAM. • The Administrator or User Password items on top of the BIOS Setup program. The Main menu provides you an overview of the basic system information, and allows you to set the system date, time, language, and...
2.3 Main menu The Main menu screen appears when you enter the Advanced Mode of the screen show Installed. 2-10 ASUS P8H61-M LX3 R2.0 Series Configuration options: [English] [Español 2.3.2 System Date [Day xx/xx/xxxx] Allows you to set the system date. 2.3.3 System Time [xx:xx:xx]... Installed. See section 1.9 Jumpers for information on how to erase the RTC RAM. • The Administrator or User Password items on top of the BIOS Setup program. The Main menu provides you an overview of the basic system information, and allows you to set the system date, time, language, and...


