
P8H61-M LX3 PLUS R2.0 User's Manual
Page 4
...11.2 Support DVD information 1-27 Chapter 2: BIOS information 2.1 Managing and updating your BIOS 2-1 2.1.1 ASUS Update utility 2-1 2.1.2 ASUS EZ Flash 2 2-2 2.1.3 ASUS CrashFree BIOS 3 utility 2-3 2.1.4 ASUS BIOS Updater 2-4 2.2 BIOS setup program 2-6 2.3 Main menu 2-10 2.3.1 System Language [English ...Ai Tweaker menu 2-12 2.4.1 Ai Overclock Tuner [Auto 2-12 2.4.2 ASUS MultiCore Enhancement [Enabled 2-12 2.4.3 Memory Frequency [Auto 2-12 2.4.4 GPU Boost 2-13 2.4.5 DRAM Timing Control 2-13 2.4.6 CPU Power Management 2-13 2.5 Advanced menu 2-14 2.5.1 CPU Configuration 2-14 2.5.2...
...11.2 Support DVD information 1-27 Chapter 2: BIOS information 2.1 Managing and updating your BIOS 2-1 2.1.1 ASUS Update utility 2-1 2.1.2 ASUS EZ Flash 2 2-2 2.1.3 ASUS CrashFree BIOS 3 utility 2-3 2.1.4 ASUS BIOS Updater 2-4 2.2 BIOS setup program 2-6 2.3 Main menu 2-10 2.3.1 System Language [English ...Ai Tweaker menu 2-12 2.4.1 Ai Overclock Tuner [Auto 2-12 2.4.2 ASUS MultiCore Enhancement [Enabled 2-12 2.4.3 Memory Frequency [Auto 2-12 2.4.4 GPU Boost 2-13 2.4.5 DRAM Timing Control 2-13 2.4.6 CPU Power Management 2-13 2.5 Advanced menu 2-14 2.5.1 CPU Configuration 2-14 2.5.2...

P8H61-M LX3 PLUS R2.0 User's Manual
Page 6
...and temperature extremes. Detailed descriptions of the electrical outlet you need when installing and configuring the motherboard. If possible, disconnect all power cables from the existing system before you encounter technical problems with the package. • Before using the product, ensure that all... cables are correctly connected and the power cables are not damaged. Operation safety • Before installing the motherboard and adding devices on a stable surface. • If you...
...and temperature extremes. Detailed descriptions of the electrical outlet you need when installing and configuring the motherboard. If possible, disconnect all power cables from the existing system before you encounter technical problems with the package. • Before using the product, ensure that all... cables are correctly connected and the power cables are not damaged. Operation safety • Before installing the motherboard and adding devices on a stable surface. • If you...
P8H61-M LX3 PLUS R2.0 User's Manual
Page 9
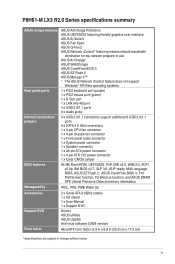
P8H61-M LX3 R2.0 Series specifications summary ASUS unique features Rear panel ports Internal connectors/ jumpers BIOS features Manageability Accessories Support DVD Form factor ASUS Anti-Surge Protection ASUS UEFI BIOS featuring friendly graphics user interface ASUS AI Suite II ASUS Fan Xpert ASUS Q-Fan 2 ASUS Network iControl* featuring instant network bandwidth domination for top network program in use ASUS AI Charger ASUS... 1 x System panel connector 1 x Speaker connector 1 x 24-pin ATX power connector 1 x 4-pin ATX 12V power connector 1 x Clear CMOS jumper 64 Mb Flash ROM, UEFI BIOS, PnP,...
P8H61-M LX3 R2.0 Series specifications summary ASUS unique features Rear panel ports Internal connectors/ jumpers BIOS features Manageability Accessories Support DVD Form factor ASUS Anti-Surge Protection ASUS UEFI BIOS featuring friendly graphics user interface ASUS AI Suite II ASUS Fan Xpert ASUS Q-Fan 2 ASUS Network iControl* featuring instant network bandwidth domination for top network program in use ASUS AI Charger ASUS... 1 x System panel connector 1 x Speaker connector 1 x 24-pin ATX power connector 1 x 4-pin ATX 12V power connector 1 x Clear CMOS jumper 64 Mb Flash ROM, UEFI BIOS, PnP,...
P8H61-M LX3 PLUS R2.0 User's Manual
Page 11
.... Motherboard Cables Accessories Application DVD Documentation ASUS P8H61-M LX3 R2.0 Series motherboard 2 x Serial ATA 3.0Gb/s cables 1 x I/O shield ASUS motherboard support DVD User Manual • P8H61-M LX3 R2.0 Series motherboards include P8H61-M LX3 R2.0 and P8H61-M LX3 PLUS R2.0 two models. Intel® 3rd/2nd generation Core™ i7/i5/i3/Pentium®/Celeron® processors are among the most powerful and energy efficient CPUs in the...
.... Motherboard Cables Accessories Application DVD Documentation ASUS P8H61-M LX3 R2.0 Series motherboard 2 x Serial ATA 3.0Gb/s cables 1 x I/O shield ASUS motherboard support DVD User Manual • P8H61-M LX3 R2.0 Series motherboards include P8H61-M LX3 R2.0 and P8H61-M LX3 PLUS R2.0 two models. Intel® 3rd/2nd generation Core™ i7/i5/i3/Pentium®/Celeron® processors are among the most powerful and energy efficient CPUs in the...
P8H61-M LX3 PLUS R2.0 User's Manual
Page 12
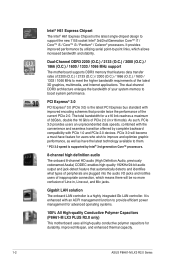
... and Mic jacks. It is enhanced with an ACPI management function to provide efficient power management for advanced operating systems. 100% All High-quality Conductive Polymer Capacitors (P8H61-M LX3 PLUS R2.0 only) This motherboard uses all high-quality conductive polymer capacitors for a x16 link...bus standard with PCIe 1.0 and PCIe 2.0 devices. The total bandwidth for durability, improved lifespan, and enhanced thermal capacity. 1-2 ASUS P8H61-M LX3 R2.0 Series Gigabit LAN solution The onboard LAN controller is a highly integrated Gb LAN controller. PCIe 3.0 will be no more confusion...
... and Mic jacks. It is enhanced with an ACPI management function to provide efficient power management for advanced operating systems. 100% All High-quality Conductive Polymer Capacitors (P8H61-M LX3 PLUS R2.0 only) This motherboard uses all high-quality conductive polymer capacitors for a x16 link...bus standard with PCIe 1.0 and PCIe 2.0 devices. The total bandwidth for durability, improved lifespan, and enhanced thermal capacity. 1-2 ASUS P8H61-M LX3 R2.0 Series Gigabit LAN solution The onboard LAN controller is a highly integrated Gb LAN controller. PCIe 3.0 will be no more confusion...
P8H61-M LX3 PLUS R2.0 User's Manual
Page 14
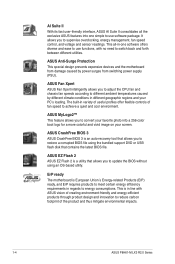
... special design prevents expensive devices and the motherboard from switching power supply (PSU). AI Suite II With its fast user-friendly interface, ASUS AI Suite II consolidates all -in-one simple to use functions, with ASUS vision of creating environment-friendly and energy-efficient products through ... energy efficiency requirements in variety of useful profiles offer flexible controls of the product and thus mitigate environmental impacts. 1-4 ASUS P8H61-M LX3 R2.0 Series ErP ready The motherboard is in line with no need to switch back and forth between different utilities.
... special design prevents expensive devices and the motherboard from switching power supply (PSU). AI Suite II With its fast user-friendly interface, ASUS AI Suite II consolidates all -in-one simple to use functions, with ASUS vision of creating environment-friendly and energy-efficient products through ... energy efficiency requirements in variety of useful profiles offer flexible controls of the product and thus mitigate environmental impacts. 1-4 ASUS P8H61-M LX3 R2.0 Series ErP ready The motherboard is in line with no need to switch back and forth between different utilities.
P8H61-M LX3 PLUS R2.0 User's Manual
Page 15
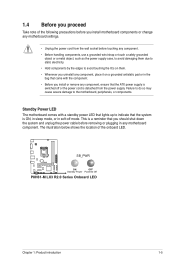
... should shut down the system and unplug the power cable before removing or plugging in any motherboard settings. • Unplug the power cord from the power supply. SB_PWR P8H61-M LX3 R2.0 Series ON OFF Standby Power Powered Off P8H61-M LX3 R2.0 Series Onboard LED Chapter 1: Product introduction 1-5 Standby Power LED The motherboard comes with a standby power LED that the system is ON, in...
... should shut down the system and unplug the power cable before removing or plugging in any motherboard settings. • Unplug the power cord from the power supply. SB_PWR P8H61-M LX3 R2.0 Series ON OFF Standby Power Powered Off P8H61-M LX3 R2.0 Series Onboard LED Chapter 1: Product introduction 1-5 Standby Power LED The motherboard comes with a standby power LED that the system is ON, in...

P8H61-M LX3 PLUS R2.0 User's Manual
Page 16
... chassis to ensure that you place it . The edge with external ports goes to the rear part of the chassis P8H61-M LX3 R2.0 Series 1-6 ASUS P8H61-M LX3 R2.0 Series Doing so can cause you unplug the power cord before installing or removing the motherboard. Place this side towards the rear of the chassis as indicated in the image...
... chassis to ensure that you place it . The edge with external ports goes to the rear part of the chassis P8H61-M LX3 R2.0 Series 1-6 ASUS P8H61-M LX3 R2.0 Series Doing so can cause you unplug the power cord before installing or removing the motherboard. Place this side towards the rear of the chassis as indicated in the image...
P8H61-M LX3 PLUS R2.0 User's Manual
Page 17
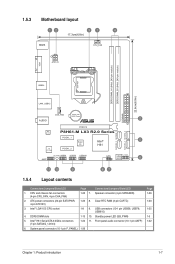
... DDR3 DIMM_A1 (64bit, 240-pin module) DDR3 DIMM_B1 (64bit, 240-pin module) LGA1155 USB34 22.6cm(8.9in) LAN1_USB12 EATXPWR CHA_FAN Lithium Cell CMOS Power AUDIO 2 PCIEX16 RTL 8111F P8H61-M LX3 R2.0 Series SATA3G_3 SATA3G_1 SATA3G_4 SATA3G_2 PCIEX1_1 Super Intel® 5 I/O H61 VIA VT1708S PCIEX1_2 AAFP SB_PWR USB56 USB78 USB910 CLRTC F_PANEL 64Mb BIOS 6 SPEAKER...
... DDR3 DIMM_A1 (64bit, 240-pin module) DDR3 DIMM_B1 (64bit, 240-pin module) LGA1155 USB34 22.6cm(8.9in) LAN1_USB12 EATXPWR CHA_FAN Lithium Cell CMOS Power AUDIO 2 PCIEX16 RTL 8111F P8H61-M LX3 R2.0 Series SATA3G_3 SATA3G_1 SATA3G_4 SATA3G_2 PCIEX1_1 Super Intel® 5 I/O H61 VIA VT1708S PCIEX1_2 AAFP SB_PWR USB56 USB78 USB910 CLRTC F_PANEL 64Mb BIOS 6 SPEAKER...
P8H61-M LX3 PLUS R2.0 User's Manual
Page 18
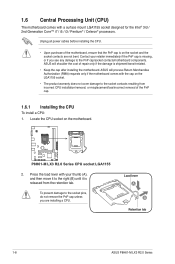
...2nd Generation Core™ i7 / i5 / i3 / Pentium® / Celeron® processors. Load lever A B Retention tab 1-8 ASUS P8H61-M LX3 R2.0 Series ASUS will shoulder the cost of repair only if the damage is released from incorrect CPU installation/removal, or misplacement/loss/incorrect removal of the ... P8H61-M LX3 R2.0 Series CPU socket LGA1155 2. Contact your thumb (A), and then move it to the right (B) until it is shipment/transit-related. • Keep the cap after installing the motherboard. Unplug all power cables before installing the CPU. • Upon purchase of the ...
...2nd Generation Core™ i7 / i5 / i3 / Pentium® / Celeron® processors. Load lever A B Retention tab 1-8 ASUS P8H61-M LX3 R2.0 Series ASUS will shoulder the cost of repair only if the damage is released from incorrect CPU installation/removal, or misplacement/loss/incorrect removal of the ... P8H61-M LX3 R2.0 Series CPU socket LGA1155 2. Contact your thumb (A), and then move it to the right (B) until it is shipment/transit-related. • Keep the cap after installing the motherboard. Unplug all power cables before installing the CPU. • Upon purchase of the ...
P8H61-M LX3 PLUS R2.0 User's Manual
Page 23
...as a DDR2 DIMM but is notched differently to ensure correct orientation when reinstalling. 1.7 System memory 1.7.1 Overview The motherboard comes with less power consumption. 4. DDR3 modules are developed for better performance with two Double Data Rate 3 (DDR3) Dual Inline Memory Modules (DIMM) sockets.... installation on a DDR2 DIMM socket. The figure illustrates the location of the DDR3 DIMM sockets: DIMM_A1 DIMM_B1 P8H61-M LX3 R2.0 Series Channel Channel A Channel B Sockets DIMM_A1 DIMM_B1 P8H61-M LX3 R2.0 Series 240-pin DDR3 DIMM sockets Chapter 1: Product introduction 1-13
...as a DDR2 DIMM but is notched differently to ensure correct orientation when reinstalling. 1.7 System memory 1.7.1 Overview The motherboard comes with less power consumption. 4. DDR3 modules are developed for better performance with two Double Data Rate 3 (DDR3) Dual Inline Memory Modules (DIMM) sockets.... installation on a DDR2 DIMM socket. The figure illustrates the location of the DDR3 DIMM sockets: DIMM_A1 DIMM_B1 P8H61-M LX3 R2.0 Series Channel Channel A Channel B Sockets DIMM_A1 DIMM_B1 P8H61-M LX3 R2.0 Series 240-pin DDR3 DIMM sockets Chapter 1: Product introduction 1-13
P8H61-M LX3 PLUS R2.0 User's Manual
Page 28
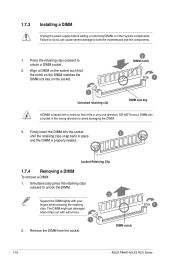
... 3 and the DIMM is keyed with extra force. 1 2. Simultaneously press the retaining clips outward to avoid damaging the DIMM. 3. DIMM notch 1-18 ASUS P8H61-M LX3 R2.0 Series 1.7.3 Installing a DIMM Unplug the power supply before adding or removing DIMMs or other system components. Press the retaining clips outward to both the motherboard and the components. 1. Firmly...
... 3 and the DIMM is keyed with extra force. 1 2. Simultaneously press the retaining clips outward to avoid damaging the DIMM. 3. DIMM notch 1-18 ASUS P8H61-M LX3 R2.0 Series 1.7.3 Installing a DIMM Unplug the power supply before adding or removing DIMMs or other system components. Press the retaining clips outward to both the motherboard and the components. 1. Firmly...
P8H61-M LX3 PLUS R2.0 User's Manual
Page 29
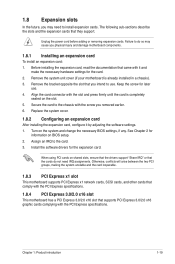
... PCI Express specifications. 1.8.4 PCI Express 3.0/2.0 x16 slot This motherboard has a PCI Express 3.0/2.0 x16 slot that the cards do so may need IRQ assignments. Unplug the power cord before adding or removing expansion cards. Keep the screw for the card. 2. Turn on shared slots, ensure that the drivers support "Share IRQ" or...
... PCI Express specifications. 1.8.4 PCI Express 3.0/2.0 x16 slot This motherboard has a PCI Express 3.0/2.0 x16 slot that the cards do so may need IRQ assignments. Unplug the power cord before adding or removing expansion cards. Keep the screw for the card. 2. Turn on shared slots, ensure that the drivers support "Share IRQ" or...
P8H61-M LX3 PLUS R2.0 User's Manual
Page 30
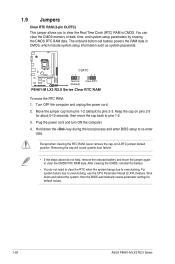
...information such as system passwords. Hold down and reboot the system, then the BIOS automatically resets parameter settings to default values. 1-20 ASUS P8H61-M LX3 R2.0 Series After clearing the CMOS, reinstall the battery. • You do not help, remove the onboard battery and move the ... move the jumper again to pins 1-2. 3. For system failure due to pins 2-3. CLRTC P8H61-M LX3 R2.0 Series 12 Normal (Default) 23 Clear RTC P8H61-M LX3 R2.0 Series Clear RTC RAM To erase the RTC RAM: 1. Plug the power cord and turn ON the computer. 4. Turn OFF the computer and unplug the...
...information such as system passwords. Hold down and reboot the system, then the BIOS automatically resets parameter settings to default values. 1-20 ASUS P8H61-M LX3 R2.0 Series After clearing the CMOS, reinstall the battery. • You do not help, remove the onboard battery and move the ... move the jumper again to pins 1-2. 3. For system failure due to pins 2-3. CLRTC P8H61-M LX3 R2.0 Series 12 Normal (Default) 23 Clear RTC P8H61-M LX3 R2.0 Series Clear RTC RAM To erase the RTC RAM: 1. Plug the power cord and turn ON the computer. 4. Turn OFF the computer and unplug the...

P8H61-M LX3 PLUS R2.0 User's Manual
Page 33
...the Recommended Power Supply Wattage Calculator at http://support.asus. The system may become unstable or may not boot up . • We recommend that you use a power supply unit (PSU) that you are uncertain about the minimum power supply requirement for details. ATX power connectors ... down firmly until the connectors completely fit. 2. Chapter 1: Product introduction 1-23 ATX12V EATXPWR +12V DC +12V DC P8H61-M LX3 R2.0 Series GND GND +3 Volts +12 Volts +12 Volts +5V Standby Power OK PIN 1 GND +5 Volts GND +5 Volts GND +3 Volts +3 Volts PIN 1 GND +5 Volts +5 Volts ...
...the Recommended Power Supply Wattage Calculator at http://support.asus. The system may become unstable or may not boot up . • We recommend that you use a power supply unit (PSU) that you are uncertain about the minimum power supply requirement for details. ATX power connectors ... down firmly until the connectors completely fit. 2. Chapter 1: Product introduction 1-23 ATX12V EATXPWR +12V DC +12V DC P8H61-M LX3 R2.0 Series GND GND +3 Volts +12 Volts +12 Volts +5V Standby Power OK PIN 1 GND +5 Volts GND +5 Volts GND +3 Volts +3 Volts PIN 1 GND +5 Volts +5 Volts ...
P8H61-M LX3 PLUS R2.0 User's Manual
Page 35
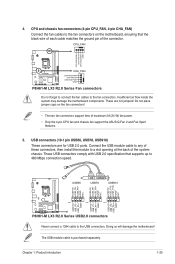
...+5V USB_P7USB_P7+ GND USB+5V USB_P9USB_P9+ GND P8H61-M LX3 R2.0 Series PIN 1 PIN 1 PIN 1 P8H61-M LX3 R2.0 Series USB2.0 connectors Never connect a 1394 cable to a slot opening at the back of maximum 2A (24 W) fan power. • Only the 4-pin CPU fan and chassis fan support the ASUS Q-Fan 2 and Fan Xpert features. 5....the module to the USB connectors. CPU_FAN CPU FAN PWM CPU FAN IN CPU FAN PWR GND P8H61-M LX3 R2.0 Series CHA_FAN CHA FAN PWM CHA FAN IN CHA FAN PWR GND P8H61-M LX3 R2.0 Series Fan connectors Do not forget to connect the fan cables to 480 Mbps connection speed.
...+5V USB_P7USB_P7+ GND USB+5V USB_P9USB_P9+ GND P8H61-M LX3 R2.0 Series PIN 1 PIN 1 PIN 1 P8H61-M LX3 R2.0 Series USB2.0 connectors Never connect a 1394 cable to a slot opening at the back of maximum 2A (24 W) fan power. • Only the 4-pin CPU fan and chassis fan support the ASUS Q-Fan 2 and Fan Xpert features. 5....the module to the USB connectors. CPU_FAN CPU FAN PWM CPU FAN IN CPU FAN PWR GND P8H61-M LX3 R2.0 Series CHA_FAN CHA FAN PWM CHA FAN IN CHA FAN PWR GND P8H61-M LX3 R2.0 Series Fan connectors Do not forget to connect the fan cables to 480 Mbps connection speed.

P8H61-M LX3 PLUS R2.0 User's Manual
Page 36
... is read from or written to this connector. SPEAKER P8H61-M LX3 R2.0 Series PIN 1 P8H61-M LX3 R2.0 Series speaker out connector +5V GND GND Speaker Out 1-26 ASUS P8H61-M LX3 R2.0 Series Ground Reset 6. PLED+ PLEDPWR GND HD_LED+ HD_LED- F_PANEL PLED PWRBTN PIN 1 P8H61-M LX3 R2.0 Series +HDLED RESET P8H61-M LX3 R2.0 Series System panel connector • System power LED (2-pin PLED) This 2-pin connector is for...
... is read from or written to this connector. SPEAKER P8H61-M LX3 R2.0 Series PIN 1 P8H61-M LX3 R2.0 Series speaker out connector +5V GND GND Speaker Out 1-26 ASUS P8H61-M LX3 R2.0 Series Ground Reset 6. PLED+ PLEDPWR GND HD_LED+ HD_LED- F_PANEL PLED PWRBTN PIN 1 P8H61-M LX3 R2.0 Series +HDLED RESET P8H61-M LX3 R2.0 Series System panel connector • System power LED (2-pin PLED) This 2-pin connector is for...
P8H61-M LX3 PLUS R2.0 User's Manual
Page 44
... Setup after POST To enter BIOS Setup after changing any BIOS setting, load the default settings to your motherboard if you see on . Using the power button, reset button, or the ++ keys to the default value. See section 1.9 Jumpers for details. • If the system fails to boot after POST: •... recommend to always shut down the system properly from the operating system. • The BIOS setup screens shown in the EZ Mode/Advanced Mode screen. 2-6 ASUS P8H61-M LX3 R2.0 Series
... Setup after POST To enter BIOS Setup after changing any BIOS setting, load the default settings to your motherboard if you see on . Using the power button, reset button, or the ++ keys to the default value. See section 1.9 Jumpers for details. • If the system fails to boot after POST: •... recommend to always shut down the system properly from the operating system. • The BIOS setup screens shown in the EZ Mode/Advanced Mode screen. 2-6 ASUS P8H61-M LX3 R2.0 Series

P8H61-M LX3 PLUS R2.0 User's Manual
Page 46
...Mode The Advanced Mode provides advanced options for the detailed configurations. To access the EZ Mode, click Exit, then select ASUS EZ Mode. Back button Menu items Menu bar Configuration fields General help Submenu item Pop-up window Scroll bar Navigation keys...overclocking settings For changing the advanced system settings For displaying the system temperature, power status, and changing the fan settings For changing the system boot configuration For configuring options for special functions For selecting the exit options and loading default settings 2-8 ASUS P8H61-M LX3 R2.0 Series
...Mode The Advanced Mode provides advanced options for the detailed configurations. To access the EZ Mode, click Exit, then select ASUS EZ Mode. Back button Menu items Menu bar Configuration fields General help Submenu item Pop-up window Scroll bar Navigation keys...overclocking settings For changing the advanced system settings For displaying the system temperature, power status, and changing the fan settings For changing the system boot configuration For configuring options for special functions For selecting the exit options and loading default settings 2-8 ASUS P8H61-M LX3 R2.0 Series

P8H61-M LX3 PLUS R2.0 User's Manual
Page 50
...DDR3-1866MHz] [DDR3-2133MHz] [DDR3-2400MHz] Selecting a very high memory frequency may cause the system to the default setting. 2-12 ASUS P8H61-M LX3 R2.0 Series UEFI BIOS Utility - Advanced Mode Exit Main Ai Tweaker Advanced Monitor Boot Tool Target CPU Turbo Mode Speed : 3700MHz Target ...DRAM Speed : 1333MHz Ai Overclock Tuner Auto ASUS MultiCore Enhancement Enabled Memory Frequency Auto > GPU Boost > DRAM Timing Control > CPU Power Management [X.M.P.] When XMP is enabled BLCK frequency, CPU ratio and memory parameters will be...
...DDR3-1866MHz] [DDR3-2133MHz] [DDR3-2400MHz] Selecting a very high memory frequency may cause the system to the default setting. 2-12 ASUS P8H61-M LX3 R2.0 Series UEFI BIOS Utility - Advanced Mode Exit Main Ai Tweaker Advanced Monitor Boot Tool Target CPU Turbo Mode Speed : 3700MHz Target ...DRAM Speed : 1333MHz Ai Overclock Tuner Auto ASUS MultiCore Enhancement Enabled Memory Frequency Auto > GPU Boost > DRAM Timing Control > CPU Power Management [X.M.P.] When XMP is enabled BLCK frequency, CPU ratio and memory parameters will be...


