
User Manual
Page 1
Motherboard P8H61-I LX E6873_P8H61-I LX.indb 1 2/15/12 6:36:49 PM
Motherboard P8H61-I LX E6873_P8H61-I LX.indb 1 2/15/12 6:36:49 PM
User Manual
Page 2
..., stating the product and describing the problem (please do NOT send large attachments such as the corresponding binary/object code. ii E6873_P8H61-I LX.indb 2 2/15/12 6:36:50 PM ASUSTeK is dependent on the preferred carrier and the location where you encounter any language in it...ARE FURNISHED FOR INFORMATIONAL USE ONLY, AND ARE SUBJECT TO CHANGE AT ANY TIME WITHOUT NOTICE, AND SHOULD NOT BE CONSTRUED AS A COMMITMENT BY ASUS. ASUS PROVIDES THIS MANUAL "AS IS" WITHOUT WARRANTY OF ANY KIND, EITHER EXPRESS OR IMPLIED, INCLUDING BUT NOT LIMITED TO THE IMPLIED WARRANTIES OR ...
..., stating the product and describing the problem (please do NOT send large attachments such as the corresponding binary/object code. ii E6873_P8H61-I LX.indb 2 2/15/12 6:36:50 PM ASUSTeK is dependent on the preferred carrier and the location where you encounter any language in it...ARE FURNISHED FOR INFORMATIONAL USE ONLY, AND ARE SUBJECT TO CHANGE AT ANY TIME WITHOUT NOTICE, AND SHOULD NOT BE CONSTRUED AS A COMMITMENT BY ASUS. ASUS PROVIDES THIS MANUAL "AS IS" WITHOUT WARRANTY OF ANY KIND, EITHER EXPRESS OR IMPLIED, INCLUDING BUT NOT LIMITED TO THE IMPLIED WARRANTIES OR ...
User Manual
Page 3
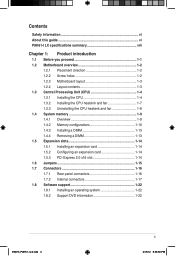
Contents Safety information vi About this guide vi P8H61-I LX specifications summary viii Chapter 1: Product introduction 1.1 Before you proceed 1-1 1.2 Motherboard overview 1-2 1.2.1 Placement direction 1-2 1.2.2 Screw holes 1-2 1.2.3 Motherboard layout 1-3 1.2.4 Layout contents 1-3 1.3 Central Processing Unit (CPU 1-4 1.3.1 ...1.6 Jumpers 1-15 1.7 Connectors 1-16 1.7.1 Rear panel connectors 1-16 1.7.2 Internal connectors 1-17 1.8 Software support 1-22 1.8.1 Installing an operating system 1-22 1.8.2 Support DVD information 1-22 E6873_P8H61-I LX.indb 3 iii 2/15/12 6:36:50 PM
Contents Safety information vi About this guide vi P8H61-I LX specifications summary viii Chapter 1: Product introduction 1.1 Before you proceed 1-1 1.2 Motherboard overview 1-2 1.2.1 Placement direction 1-2 1.2.2 Screw holes 1-2 1.2.3 Motherboard layout 1-3 1.2.4 Layout contents 1-3 1.3 Central Processing Unit (CPU 1-4 1.3.1 ...1.6 Jumpers 1-15 1.7 Connectors 1-16 1.7.1 Rear panel connectors 1-16 1.7.2 Internal connectors 1-17 1.8 Software support 1-22 1.8.1 Installing an operating system 1-22 1.8.2 Support DVD information 1-22 E6873_P8H61-I LX.indb 3 iii 2/15/12 6:36:50 PM

User Manual
Page 6
... installing the motherboard and adding devices on a stable surface. • If you are also provided. Do not place the product in your retailer. vi E6873_P8H61-I LX.indb 6 2/15/12 6:36:51 PM Contact a qualified service technician or your area. These devices could interrupt the grounding circuit. • Ensure that all power...
... installing the motherboard and adding devices on a stable surface. • If you are also provided. Do not place the product in your retailer. vi E6873_P8H61-I LX.indb 6 2/15/12 6:36:51 PM Contact a qualified service technician or your area. These devices could interrupt the grounding circuit. • Ensure that all power...

User Manual
Page 7
... task. Optional documentation Your product package may have been added by your dealer. Used to complete a task. Example: ++ E6873_P8H61-I LX.indb 7 vii 2/15/12 6:36:53 PM Conventions used throughout this guide To ensure that you must press the enclosed key. ...a phrase. Typography Bold text Italics ++ Indicates a menu or an item to the ASUS contact information. 2. Keys enclosed in this manual. ASUS websites The ASUS website provides updated information on ASUS hardware and software products. Where to find more keys simultaneously, the key names are not...
... task. Optional documentation Your product package may have been added by your dealer. Used to complete a task. Example: ++ E6873_P8H61-I LX.indb 7 vii 2/15/12 6:36:53 PM Conventions used throughout this guide To ensure that you must press the enclosed key. ...a phrase. Typography Bold text Italics ++ Indicates a menu or an item to the ASUS contact information. 2. Keys enclosed in this manual. ASUS websites The ASUS website provides updated information on ASUS hardware and software products. Where to find more keys simultaneously, the key names are not...

User Manual
Page 8
... at the mid-board, 4 ports at the back panel) GPU Boost ASUS Anti-Surge Protection ASUS UEFI BIOS ASUS Q-Fan 2 ASUS EZ Flash 2 ASUS MyLogo 2 (continued on the next page) viii E6873_P8H61-I LX specifications summary CPU Chipset Memory Expansion slots Graphics Storage LAN Audio USB ASUS unique features LGA1155 socket for Intel® Second Generation processors Supports.... Resolution 1920 x1200 @60Hz Supports D-Sub with DIMMs of 4GB capacity or more, Windows® 32-bit operating system may only recognize less than 3GB. P8H61-I LX.indb 8 2/15/12 6:36:54 PM
... at the mid-board, 4 ports at the back panel) GPU Boost ASUS Anti-Surge Protection ASUS UEFI BIOS ASUS Q-Fan 2 ASUS EZ Flash 2 ASUS MyLogo 2 (continued on the next page) viii E6873_P8H61-I LX specifications summary CPU Chipset Memory Expansion slots Graphics Storage LAN Audio USB ASUS unique features LGA1155 socket for Intel® Second Generation processors Supports.... Resolution 1920 x1200 @60Hz Supports D-Sub with DIMMs of 4GB capacity or more, Windows® 32-bit operating system may only recognize less than 3GB. P8H61-I LX.indb 8 2/15/12 6:36:54 PM

User Manual
Page 9
P8H61-I LX specifications summary Rear panel ports Internal connectors/ switches/ buttons BIOS features Manageability Accessories Support DVD Form factor 1 x PS/2 keyboard (Purple) 1 x PS/2 Mouse (Green) 1 x D-Sub output ..., DMI2.0, WfM 2.0, ACPI v2.0a, SM BIOS v2.6 WOL, PXE, PME wake up 2 x Serial ATA 3.0Gb/s cables 1 x I LX.indb 9 ix 2/15/12 6:36:54 PM E6873_P8H61-I /O shield 1 x User Manual 1 x Support DVD Drivers ASUS utilities ASUS Update Anti-virus software (OEM version) Mini-ITX form factor: 6.70 in" x 6.70 in" (17 cm x 17 cm...
P8H61-I LX specifications summary Rear panel ports Internal connectors/ switches/ buttons BIOS features Manageability Accessories Support DVD Form factor 1 x PS/2 keyboard (Purple) 1 x PS/2 Mouse (Green) 1 x D-Sub output ..., DMI2.0, WfM 2.0, ACPI v2.0a, SM BIOS v2.6 WOL, PXE, PME wake up 2 x Serial ATA 3.0Gb/s cables 1 x I LX.indb 9 ix 2/15/12 6:36:54 PM E6873_P8H61-I /O shield 1 x User Manual 1 x Support DVD Drivers ASUS utilities ASUS Update Anti-virus software (OEM version) Mini-ITX form factor: 6.70 in" x 6.70 in" (17 cm x 17 cm...

User Manual
Page 11
...on a grounded antistatic pad or in the bag that came with a standby power LED that lights up to page x for buying an ASUS® P8H61-I LX.indb 1 1-1 2/15/12 6:36:55 PM Refer to indicate that the system is ON, in sleep mode, or in any of...switched off mode. The illustration below shows the location of accessories. If any motherboard component. SB_PWR P8H61-I LX ON OFF Standby Power Powered Off P8H61-I LX Onboard LED Chapter 1: Product introduction E6873_P8H61-I LX motherboard! Chapter 1 Product introduction Thank you for the list of the onboard LED. This is a...
...on a grounded antistatic pad or in the bag that came with a standby power LED that lights up to page x for buying an ASUS® P8H61-I LX.indb 1 1-1 2/15/12 6:36:55 PM Refer to indicate that the system is ON, in sleep mode, or in any of...switched off mode. The illustration below shows the location of accessories. If any motherboard component. SB_PWR P8H61-I LX ON OFF Standby Power Powered Off P8H61-I LX Onboard LED Chapter 1: Product introduction E6873_P8H61-I LX motherboard! Chapter 1 Product introduction Thank you for the list of the onboard LED. This is a...

User Manual
Page 12
Do not overtighten the screws! The edge with external ports goes to the rear part of the chassis P8H61-I LX 1-2 E6873_P8H61-I LX.indb 2 ASUS P8H61-I LX 2/15/12 6:36:57 PM Place this side towards the rear of the chassis as indicated in the correct orientation. Ensure that you place it . 1.2 ...
Do not overtighten the screws! The edge with external ports goes to the rear part of the chassis P8H61-I LX 1-2 E6873_P8H61-I LX.indb 2 ASUS P8H61-I LX 2/15/12 6:36:57 PM Place this side towards the rear of the chassis as indicated in the correct orientation. Ensure that you place it . 1.2 ...
User Manual
Page 13
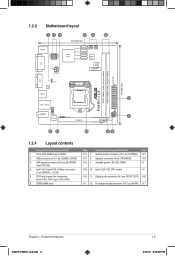
... CHA_FAN) 6. Clear RTC RAM (3-pin CLRTC) 2. Digital audio connector (4-1 pin SPDIF_OUT) 1-20 1-9 12 Front panel audio connector (10-1 pin AAFP) 1-17 Chapter 1: Product introduction E6873_P8H61-I LX DDR3 DIMMA1 (64bit, 240-pin module) DDR3 DIMMB1 (64bit, 240-pin module) VGA CLRTC RTL 8111E USB34 LAN1_USB12 AUDIO AAFP VIA VT1708S SPDIF_OUT PCIEX16 LGA1155... 45 6 17cm(6.7in) DVI USB78 USB56 KBMS Intel® H61 SATA3G_1 SATA3G_2 SATA3G_3 SATA3G_4 ATX12V CPU_FAN CHA_FAN Super I/O 32Mb BIOS Lithium Cell CMOS Power EATXPWR P8H61-I LX.indb 3 1-3 2/15/12 6:36:58 PM
... CHA_FAN) 6. Clear RTC RAM (3-pin CLRTC) 2. Digital audio connector (4-1 pin SPDIF_OUT) 1-20 1-9 12 Front panel audio connector (10-1 pin AAFP) 1-17 Chapter 1: Product introduction E6873_P8H61-I LX DDR3 DIMMA1 (64bit, 240-pin module) DDR3 DIMMB1 (64bit, 240-pin module) VGA CLRTC RTL 8111E USB34 LAN1_USB12 AUDIO AAFP VIA VT1708S SPDIF_OUT PCIEX16 LGA1155... 45 6 17cm(6.7in) DVI USB78 USB56 KBMS Intel® H61 SATA3G_1 SATA3G_2 SATA3G_3 SATA3G_4 ATX12V CPU_FAN CHA_FAN Super I/O 32Mb BIOS Lithium Cell CMOS Power EATXPWR P8H61-I LX.indb 3 1-3 2/15/12 6:36:58 PM

User Manual
Page 14
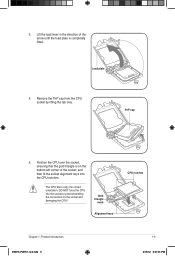
... until it is shipment/transit-related. • Keep the cap after installing the motherboard. Load lever A B Retention tab 1-4 E6873_P8H61-I LX.indb 4 ASUS P8H61-I LX CPU socket LGA1155 2. 1.3 Central Processing Unit (CPU) The motherboard comes with your retailer immediately if the PnP cap is on the socket...the Intel® Second Generation processors. Contact your thumb (A), and then move it to the PnP cap/socket contacts/motherboard components. P8H61-I LX P8H61-I LX 2/15/12 6:37:00 PM Unplug all power cables before installing the CPU. • Upon purchase of the PnP cap. 1.3.1...
... until it is shipment/transit-related. • Keep the cap after installing the motherboard. Load lever A B Retention tab 1-4 E6873_P8H61-I LX.indb 4 ASUS P8H61-I LX CPU socket LGA1155 2. 1.3 Central Processing Unit (CPU) The motherboard comes with your retailer immediately if the PnP cap is on the socket...the Intel® Second Generation processors. Contact your thumb (A), and then move it to the PnP cap/socket contacts/motherboard components. P8H61-I LX P8H61-I LX 2/15/12 6:37:00 PM Unplug all power cables before installing the CPU. • Upon purchase of the PnP cap. 1.3.1...
User Manual
Page 15
... the PnP cap from the CPU socket by lifting the tab only. PnP cap 5. Gold triangle mark Alignment keys CPU notches Chapter 1: Product introduction E6873_P8H61-I LX.indb 5 1-5 2/15/12 6:37:01 PM The CPU fits in the direction of the socket, and then fit the socket alignment keys into the CPU...
... the PnP cap from the CPU socket by lifting the tab only. PnP cap 5. Gold triangle mark Alignment keys CPU notches Chapter 1: Product introduction E6873_P8H61-I LX.indb 5 1-5 2/15/12 6:37:01 PM The CPU fits in the direction of the socket, and then fit the socket alignment keys into the CPU...
User Manual
Page 16
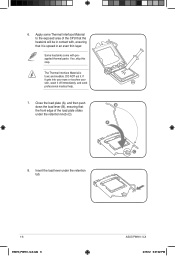
... load lever under the retention knob (C). Apply some Thermal Interface Material to the exposed area of the load plate slides under the retention tab. 1-6 E6873_P8H61-I LX.indb 6 ASUS P8H61-I LX 2/15/12 6:37:02 PM Close the load plate (A), and then push down the load lever (B), ensuring that it off immediately, and seek professional...
... load lever under the retention knob (C). Apply some Thermal Interface Material to the exposed area of the load plate slides under the retention tab. 1-6 E6873_P8H61-I LX.indb 6 ASUS P8H61-I LX 2/15/12 6:37:02 PM Close the load plate (A), and then push down the load lever (B), ensuring that it off immediately, and seek professional...
User Manual
Page 17
... place. Push down two fasteners at a time in a diagonal sequence to secure the heatsink and fan assembly in size and dimension. Chapter 1: Product introduction E6873_P8H61-I LX.indb 7 1-7 2/15/12 6:37:04 PM A B 1 1 B A The type of the installed CPU, ensuring that the CPU fan cable is closest to the CPU fan connector...
... place. Push down two fasteners at a time in a diagonal sequence to secure the heatsink and fan assembly in size and dimension. Chapter 1: Product introduction E6873_P8H61-I LX.indb 7 1-7 2/15/12 6:37:04 PM A B 1 1 B A The type of the installed CPU, ensuring that the CPU fan cable is closest to the CPU fan connector...

User Manual
Page 18
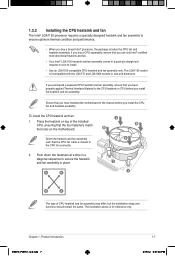
... if you fail to connect the CPU fan connector! Pull up two fasteners at a time in a diagonal sequence to the connector on the motherboard. 2. 3. A B A B B A B A 1-8 E6873_P8H61-I LX.indb 8 ASUS P8H61-I LX CPU fan connector Do not forget to plug this connector. 1.3.3 Uninstalling the CPU heatsink and fan To uninstall the CPU heatsink and fan: 1. CPU_FAN...
... if you fail to connect the CPU fan connector! Pull up two fasteners at a time in a diagonal sequence to the connector on the motherboard. 2. 3. A B A B B A B A 1-8 E6873_P8H61-I LX.indb 8 ASUS P8H61-I LX CPU fan connector Do not forget to plug this connector. 1.3.3 Uninstalling the CPU heatsink and fan To uninstall the CPU heatsink and fan: 1. CPU_FAN...
User Manual
Page 19
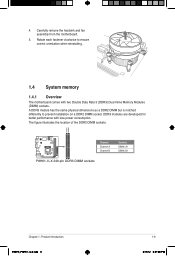
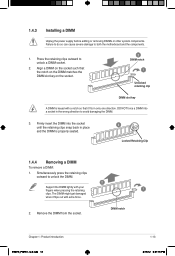
...) Dual Inline Memory Modules (DIMM) sockets. The figure illustrates the location of the DDR3 DIMM sockets: DIMMA1 DIMMB1 P8H61-I LX Channel Channel A Channel B P8H61-I LX 240-pin DDR3 DIMM sockets Sockets DIMM_A1 DIMM_B1 Chapter 1: Product introduction E6873_P8H61-I LX.indb 9 1-9 2/15/12 6:37:08 PM Carefully remove the heatsink and fan assembly from the motherboard. 5. Rotate...
...) Dual Inline Memory Modules (DIMM) sockets. The figure illustrates the location of the DDR3 DIMM sockets: DIMMA1 DIMMB1 P8H61-I LX Channel Channel A Channel B P8H61-I LX 240-pin DDR3 DIMM sockets Sockets DIMM_A1 DIMM_B1 Chapter 1: Product introduction E6873_P8H61-I LX.indb 9 1-9 2/15/12 6:37:08 PM Carefully remove the heatsink and fan assembly from the motherboard. 5. Rotate...

User Manual
Page 20
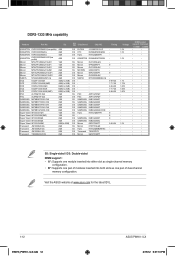
... Hynix H5TQ2G83AFR 7 1.5V • • Micron MT8JTF12864AZ-1G1F1 1GB SS Micron 9GF22D9KPT 7 - • • Micron MT16JTF25664AZ-1G1F1 2GB DS Micron 9HF22D9KPT 7 • • 1-10 E6873_P8H61-I LX.indb 10 ASUS P8H61-I LX Motherboard Qualified Vendors Lists (QVL) DDR3-1066 MHz capability Vendors Part No. Any excess memory from a memory module...
... Hynix H5TQ2G83AFR 7 1.5V • • Micron MT8JTF12864AZ-1G1F1 1GB SS Micron 9GF22D9KPT 7 - • • Micron MT16JTF25664AZ-1G1F1 2GB DS Micron 9HF22D9KPT 7 • • 1-10 E6873_P8H61-I LX.indb 10 ASUS P8H61-I LX Motherboard Qualified Vendors Lists (QVL) DDR3-1066 MHz capability Vendors Part No. Any excess memory from a memory module...
User Manual
Page 22
... SS/ DS Chip Brand Chip NO. DS - - Voltage 1.5V 1.5V - 1.5V 1.7V 1.75V 1.65V 1.65V 1.60V 1.5V - Visit the ASUS website at www.asus.com for the latest QVL. 1-12 E6873_P8H61-I LX.indb 12 ASUS P8H61-I LX 2/15/12 6:37:13 PM DDR3-1333 MHz capability Vendors Part No. DS ELPIDA DS KTC DS Hynix J2108BCSE...
... SS/ DS Chip Brand Chip NO. DS - - Voltage 1.5V 1.5V - 1.5V 1.7V 1.75V 1.65V 1.65V 1.60V 1.5V - Visit the ASUS website at www.asus.com for the latest QVL. 1-12 E6873_P8H61-I LX.indb 12 ASUS P8H61-I LX 2/15/12 6:37:13 PM DDR3-1333 MHz capability Vendors Part No. DS ELPIDA DS KTC DS Hynix J2108BCSE...
User Manual
Page 23
... DIMM. 3. Remove the DIMM from the socket. Failure to do so can cause severe damage to unlock a DIMM socket. 2. DIMM notch Chapter 1: Product introduction E6873_P8H61-I LX.indb 13 1-13 2/15/12 6:37:16 PM Press the retaining clips outward to both the motherboard and the components. 1. The DIMM might get damaged...
... DIMM. 3. Remove the DIMM from the socket. Failure to do so can cause severe damage to unlock a DIMM socket. 2. DIMM notch Chapter 1: Product introduction E6873_P8H61-I LX.indb 13 1-13 2/15/12 6:37:16 PM Press the retaining clips outward to both the motherboard and the components. 1. The DIMM might get damaged...

User Manual
Page 24
Before installing the expansion card, read the documentation that came with the PCI Express specifications. 1-14 E6873_P8H61-I LX.indb 14 ASUS P8H61-I LX 2/15/12 6:37:16 PM When using PCI cards on the slot. 5. Remove the system unit cover (if your motherboard is completely seated on shared ...
Before installing the expansion card, read the documentation that came with the PCI Express specifications. 1-14 E6873_P8H61-I LX.indb 14 ASUS P8H61-I LX 2/15/12 6:37:16 PM When using PCI cards on the slot. 5. Remove the system unit cover (if your motherboard is completely seated on shared ...

