P8H61-M LX R2 User's Manual
Page 10
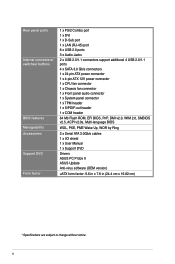
Rear panel ports Internal connectors/ switches/ buttons BIOS features Manageability Accessories Support DVD Form factor 1 x PS/2 Combo port 1 x DVI 1 x D-Sub port 1 x LAN (RJ-45) port 6 x USB 2.0 ports 3 x Audio Jacks 2 x USB 2.0/1.1 connectors support additional 4 ...-out header 1 x COM header 64 Mb Flash ROM, EFI BIOS, PnP, DMI v2.0, WfM 2.0, SMBIOS v2.5, ACPI v2.0a, Multi-language BIOS WOL, PXE, PME Wake Up, WOR by Ring 2 x Serial ATA 3.0Gb/s cables 1 x I/O shield 1 x User Manual 1 x Support DVD Drivers ASUS PC Probe II ASUS Update Anti-virus software (OEM version) uATX form factor: 9.6 in...
Rear panel ports Internal connectors/ switches/ buttons BIOS features Manageability Accessories Support DVD Form factor 1 x PS/2 Combo port 1 x DVI 1 x D-Sub port 1 x LAN (RJ-45) port 6 x USB 2.0 ports 3 x Audio Jacks 2 x USB 2.0/1.1 connectors support additional 4 ...-out header 1 x COM header 64 Mb Flash ROM, EFI BIOS, PnP, DMI v2.0, WfM 2.0, SMBIOS v2.5, ACPI v2.0a, Multi-language BIOS WOL, PXE, PME Wake Up, WOR by Ring 2 x Serial ATA 3.0Gb/s cables 1 x I/O shield 1 x User Manual 1 x Support DVD Drivers ASUS PC Probe II ASUS Update Anti-virus software (OEM version) uATX form factor: 9.6 in...
P8H61-M LX R2 User's Manual
Page 39
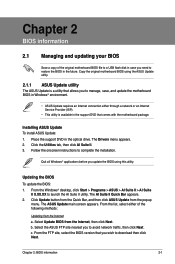
... II Quick Bar appears. 2. The ASUS Update main screen appears. Installing ASUS Update To install ASUS Update: 1. Chapter 2 BIOS information 2.1 Managing and updating your BIOS Save a copy of the following methods: Updating from the popup menu. Updating the BIOS To update the BIOS: 1. Follow the onscreen instructions to manage, save, and update the motherboard BIOS in Windows® environment. • ASUS Update requires an Internet connection either of...
... II Quick Bar appears. 2. The ASUS Update main screen appears. Installing ASUS Update To install ASUS Update: 1. Chapter 2 BIOS information 2.1 Managing and updating your BIOS Save a copy of the following methods: Updating from the popup menu. Updating the BIOS To update the BIOS: 1. Follow the onscreen instructions to manage, save, and update the motherboard BIOS in Windows® environment. • ASUS Update requires an Internet connection either of...
P8H61-M LX R2 User's Manual
Page 40
... flash disk that contains the latest BIOS file to enable it. 2-2 ASUS P8H61-M LX2 R2.0 Always update the utility to update the BIOS without using an OS‑based utility. Select Update BIOS from the Open window, then click Open. 3. To update the BIOS using this utility, download the latest BIOS file from a BIOS file a. Locate the BIOS file from file, then click Next...
... flash disk that contains the latest BIOS file to enable it. 2-2 ASUS P8H61-M LX2 R2.0 Always update the utility to update the BIOS without using an OS‑based utility. Select Update BIOS from the Open window, then click Open. 3. To update the BIOS using this utility, download the latest BIOS file from a BIOS file a. Locate the BIOS file from file, then click Next...
P8H61-M LX R2 User's Manual
Page 41
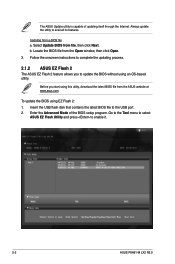
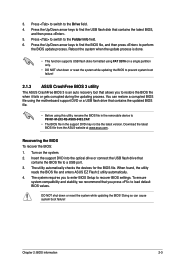
... ASUS CrashFree BIOS 3 is an auto recovery tool that contains the updated BIOS file. • Before using FAT 32/16 on the system. 2. Download the latest BIOS file from the ASUS website at www.asus.com. Doing so can restore a corrupted BIOS file using the motherboard support DVD or a USB flash drive that allows you press to P8H61-M-LX2-R2-ASUS...
... ASUS CrashFree BIOS 3 is an auto recovery tool that contains the updated BIOS file. • Before using FAT 32/16 on the system. 2. Download the latest BIOS file from the ASUS website at www.asus.com. Doing so can restore a corrupted BIOS file using the motherboard support DVD or a USB flash drive that allows you press to P8H61-M-LX2-R2-ASUS...
P8H61-M LX R2 User's Manual
Page 42
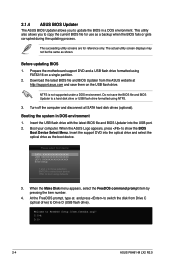
... appears, select the FreeDOS command prompt item by pressing the item number. 4. At the FreeDOS prompt, type d: and press to switch the disk from the ASUS website at http://support.asus.com and save the BIOS file and BIOS Updater to boot using defaults 3. C:\>d: D:\> 2-4 ASUS P8H61-M LX2 R2.0
... appears, select the FreeDOS command prompt item by pressing the item number. 4. At the FreeDOS prompt, type d: and press to switch the disk from the ASUS website at http://support.asus.com and save the BIOS file and BIOS Updater to boot using defaults 3. C:\>d: D:\> 2-4 ASUS P8H61-M LX2 R2.0
P8H61-M LX R2 User's Manual
Page 43
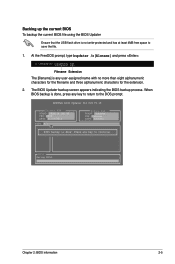
....18 Current ROM BOARD: P8H61-M LX2 R2 VER: 0402 DATE: 01/13/2012 Update ROM BOARD: Unknown VER: Unknown DATE: Unknown PATH: A:\ BIOS backup is done! At the FreeDOS prompt, type bupdater /o[filename] and press . ASUSTek BIOS Updater for the extension. 2. Backing up the current BIOS To backup the current BIOS file using the BIOS Updater Ensure that the USB...
....18 Current ROM BOARD: P8H61-M LX2 R2 VER: 0402 DATE: 01/13/2012 Update ROM BOARD: Unknown VER: Unknown DATE: Unknown PATH: A:\ BIOS backup is done! At the FreeDOS prompt, type bupdater /o[filename] and press . ASUSTek BIOS Updater for the extension. 2. Backing up the current BIOS To backup the current BIOS file using the BIOS Updater Ensure that the USB...
P8H61-M LX R2 User's Manual
Page 44
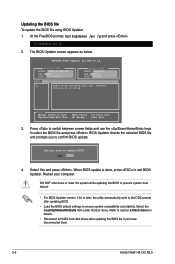
... Optimized Defaults item under the Exit menu. The BIOS Updater screen appears as below. BIOS Updater checks the selected BIOS file and prompts you to update BIOS? Are you have disconnected them. 2-6 ASUS P8H61-M LX2 R2.0 DO NOT shut down or reset the system while updating the BIOS to prevent system boot failure! • For BIOS Updater version 1.04 or later, the utility automatically...
... Optimized Defaults item under the Exit menu. The BIOS Updater screen appears as below. BIOS Updater checks the selected BIOS file and prompts you to update BIOS? Are you have disconnected them. 2-6 ASUS P8H61-M LX2 R2.0 DO NOT shut down or reset the system while updating the BIOS to prevent system boot failure! • For BIOS Updater version 1.04 or later, the utility automatically...
P8H61-M LX R2 User's Manual
Page 45
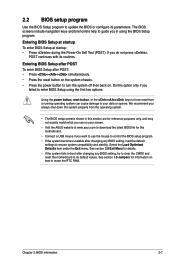
...reference purposes only, and may not exactly match what you in this section are for information on . We recommend you failed to update the BIOS or configure its parameters. Select the Load Optimized Defaults item under the Exit menu. See section 2.9 Exit Menu for this option ... damage to erase the RTC RAM. Chapter 2: BIOS information 2-7 2.2 BIOS setup program Use the BIOS Setup program to enter BIOS Setup using the BIOS Setup program. Entering BIOS Setup at startup To enter BIOS Setup at www.asus.com to download the latest BIOS file for details. • If the system ...
...reference purposes only, and may not exactly match what you in this section are for information on . We recommend you failed to update the BIOS or configure its parameters. Select the Load Optimized Defaults item under the Exit menu. See section 2.9 Exit Menu for this option ... damage to erase the RTC RAM. Chapter 2: BIOS information 2-7 2.2 BIOS setup program Use the BIOS Setup program to enter BIOS Setup using the BIOS Setup program. Entering BIOS Setup at startup To enter BIOS Setup at www.asus.com to download the latest BIOS file for details. • If the system ...

P8H61-M LX R2 User's Manual
Page 67
... CMOS settings, press , and then select Yes. • DO NOT shut down or reset the system while updating the BIOS to load the previous BIOS settings saved in a profile number from the same memory/CPU configuration and BIOS version. Load from Profile Allows you update the BIOS file only coming from one to run ASUS EZ Flash 2.
... CMOS settings, press , and then select Yes. • DO NOT shut down or reset the system while updating the BIOS to load the previous BIOS settings saved in a profile number from the same memory/CPU configuration and BIOS version. Load from Profile Allows you update the BIOS file only coming from one to run ASUS EZ Flash 2.


