

User Manual
Page 14
xiv P7P55D-E EVO specifications summary Back panel I/O ports Internal I/O connectors BIOS features Manageability Support DVD contents Form factor 1 x PS/2 keyboard port (purple) 1 x PS/2 mouse port (green) 1 x Clear CMOS ... 1 x Reset switch 16 Mb Flash ROM, AMI BIOS, PnP, DMI 2.0, WfM 2.0, SM BIOS 2.5, ACPI 2.0a, Multi-language BIOS, ASUS EZ Flash 2, ASUS CrashFree BIOS 3 WfM 2.0, DMI 2.0, WOL by PME, WOR by PME, PXE Drivers ASUS Utilities ASUS Update Anti-virus software (OEM version) ATX form factor: 12 in . (30.5 cm x 24.4 cm) *Specifications are subject...
xiv P7P55D-E EVO specifications summary Back panel I/O ports Internal I/O connectors BIOS features Manageability Support DVD contents Form factor 1 x PS/2 keyboard port (purple) 1 x PS/2 mouse port (green) 1 x Clear CMOS ... 1 x Reset switch 16 Mb Flash ROM, AMI BIOS, PnP, DMI 2.0, WfM 2.0, SM BIOS 2.5, ACPI 2.0a, Multi-language BIOS, ASUS EZ Flash 2, ASUS CrashFree BIOS 3 WfM 2.0, DMI 2.0, WOL by PME, WOR by PME, PXE Drivers ASUS Utilities ASUS Update Anti-virus software (OEM version) ATX form factor: 12 in . (30.5 cm x 24.4 cm) *Specifications are subject...

User Manual
Page 73
... device write protection. The AHCI allows the onboard storage driver to enable advanced Serial ATA features that increases storage performance on random workloads by allowing the drive to create a RAID configuration from the following options: [0] [5] [10] [15] [20] [25] [30] [35] Chapter 3 ASUS P7P55D-E EVO 3-13 Set to [RAID] when you to set the...
... device write protection. The AHCI allows the onboard storage driver to enable advanced Serial ATA features that increases storage performance on random workloads by allowing the drive to create a RAID configuration from the following options: [0] [5] [10] [15] [20] [25] [30] [35] Chapter 3 ASUS P7P55D-E EVO 3-13 Set to [RAID] when you to set the...
User Manual
Page 101
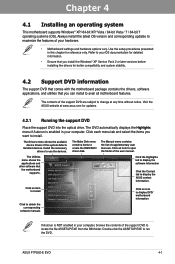
...174; XP Service Pack 2 or later versions before installing the drivers for detailed information. • Ensure that you can install to open the folder of supplementary user manuals. Chapter 4 ASUS P7P55D-E EVO 4-1 Refer to your hardware. • Motherboard settings and hardware ...options vary. Install the necessary drivers to run the DVD. Chapter 4: Chapter 4 Software support 4.1 Installing an operating system...
...174; XP Service Pack 2 or later versions before installing the drivers for detailed information. • Ensure that you can install to open the folder of supplementary user manuals. Chapter 4 ASUS P7P55D-E EVO 4-1 Refer to your hardware. • Motherboard settings and hardware ...options vary. Install the necessary drivers to run the DVD. Chapter 4: Chapter 4 Software support 4.1 Installing an operating system...

User Manual
Page 109
...utility. 2. With T.Probe enabled, select "Power Saving Mode" on motherboard model. Save BIOS settings and restart the computer. ASUS P7P55D-E EVO 4-9 Refer to Chapter 3 of the motherboard user manual for detailed instructions of the phase bars varies depending on the top-...the bundled T.Probe application Installing ASUS T.Probe To install ASUS T.Probe on your computer has an enabled Autorun feature. 2. This feature optimizes the power phase functions, allowing components to run at lower temperatures and extending their lifespan. The Drivers installation tab appears if your ...
...utility. 2. With T.Probe enabled, select "Power Saving Mode" on motherboard model. Save BIOS settings and restart the computer. ASUS P7P55D-E EVO 4-9 Refer to Chapter 3 of the motherboard user manual for detailed instructions of the phase bars varies depending on the top-...the bundled T.Probe application Installing ASUS T.Probe To install ASUS T.Probe on your computer has an enabled Autorun feature. 2. This feature optimizes the power phase functions, allowing components to run at lower temperatures and extending their lifespan. The Drivers installation tab appears if your ...

User Manual
Page 111
...setup. RAID 5 stripes both system performance and data safety. With the RAID 10 configuration you have to create a RAID driver disk and load the RAID driver during OS installation. You can be created by using only two identical hard disk drives. Refer to section 4.5 Creating a...® XP / Vista limitation, a RAID array with the Intel® P55 chipset that of both RAID 0 and RAID 1 configurations. Chapter 4 ASUS P7P55D-E EVO 4-11 If one drive to a second drive. 4.4 RAID configurations The motherboard comes with the total capacity over 2TB can only be set as a data...
...setup. RAID 5 stripes both system performance and data safety. With the RAID 10 configuration you have to create a RAID driver disk and load the RAID driver during OS installation. You can be created by using only two identical hard disk drives. Refer to section 4.5 Creating a...® XP / Vista limitation, a RAID array with the Intel® P55 chipset that of both RAID 0 and RAID 1 configurations. Chapter 4 ASUS P7P55D-E EVO 4-11 If one drive to a second drive. 4.4 RAID configurations The motherboard comes with the total capacity over 2TB can only be set as a data...

User Manual
Page 117
..., plug the USB floppy disk drive, and insert the floppy disk containing the RAID driver. 2. To solve this issue, add the USB floppy disk drive's Vendor ID (VID) and Product ID (PID) to the steps below: 1. Chapter 4 ASUS P7P55D-E EVO 4-17 or 3. Click Details tab. Insert the floppy disk or USB flash drive with...
..., plug the USB floppy disk drive, and insert the floppy disk containing the RAID driver. 2. To solve this issue, add the USB floppy disk drive's Vendor ID (VID) and Product ID (PID) to the steps below: 1. Chapter 4 ASUS P7P55D-E EVO 4-17 or 3. Click Details tab. Insert the floppy disk or USB flash drive with...

User Manual
Page 119
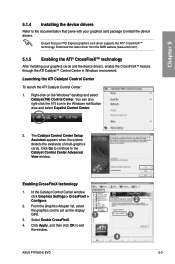
... unit (PSU) can provide at least the minimum power required by your system. For Windows XP, select Add/Remove. ASUS P7P55D-E EVO 5-1 To uninstall existing graphics card drivers: 1. For Windows Vista, select Uninstall. 5. For Windows XP, go to Control Panel > Add/Remove Programs. For ...Windows Vista, go to your system. Turn off your current graphics card driver/s. 4. Chapter 5: Chapter 5 Multiple GPU technology support 5.1 ATI® CrossFireX™ technology The motherboard supports the ATI® CrossFireX™ ...
... unit (PSU) can provide at least the minimum power required by your system. For Windows XP, select Add/Remove. ASUS P7P55D-E EVO 5-1 To uninstall existing graphics card drivers: 1. For Windows Vista, select Uninstall. 5. For Windows XP, go to Control Panel > Add/Remove Programs. For ...Windows Vista, go to your system. Turn off your current graphics card driver/s. 4. Chapter 5: Chapter 5 Multiple GPU technology support 5.1 ATI® CrossFireX™ technology The motherboard supports the ATI® CrossFireX™ ...
User Manual
Page 121
... Adapter list, select the graphics card to exit the window. 2 3 4 ASUS P7P55D-E EVO 5-3 Click Apply, and then click OK to act as the display GPU. 1 3. Enabling CrossFireX technology 1. Select Enable CrossFireX. 4. Download the latest driver from the AMD website (www.amd.com). 5.1.5 Enabling the ATI® CrossFireX.... Launching the ATI Catalyst Control Center To launch the ATI Catalyst Control Center: 1. Click Go to continue to install the device drivers. Right-click on the Windows® desktop and select Catalyst(TM) Control Center. You can also right-click the ATI icon ...
... Adapter list, select the graphics card to exit the window. 2 3 4 ASUS P7P55D-E EVO 5-3 Click Apply, and then click OK to act as the display GPU. 1 3. Enabling CrossFireX technology 1. Select Enable CrossFireX. 4. Download the latest driver from the AMD website (www.amd.com). 5.1.5 Enabling the ATI® CrossFireX.... Launching the ATI Catalyst Control Center To launch the ATI Catalyst Control Center: 1. Click Go to continue to install the device drivers. Right-click on the Windows® desktop and select Catalyst(TM) Control Center. You can also right-click the ATI icon ...
User Manual
Page 123
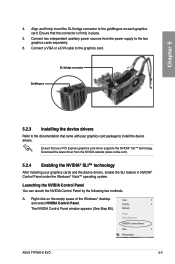
ASUS P7P55D-E EVO 5-5 A. Connect a VGA or a DVI cable to the goldfingers on the empty space of the Windows® desktop and select NVIDIA Control Panel. Launching the NVIDIA ... website (www.nvidia.com). 5.2.4 Enabling the NVIDIA® SLI™ technology After installing your graphics cards and the device drivers, enable the SLI feature in place. 5. Goldfingers SLI bridge connector 5.2.3 Installing the device drivers Refer to the documentation that your graphics card package to the two graphics cards separately. 6. Download the latest...
ASUS P7P55D-E EVO 5-5 A. Connect a VGA or a DVI cable to the goldfingers on the empty space of the Windows® desktop and select NVIDIA Control Panel. Launching the NVIDIA ... website (www.nvidia.com). 5.2.4 Enabling the NVIDIA® SLI™ technology After installing your graphics cards and the device drivers, enable the SLI feature in place. 5. Goldfingers SLI bridge connector 5.2.3 Installing the device drivers Refer to the documentation that your graphics card package to the two graphics cards separately. 6. Download the latest...


