
User Manual
Page 73
...For changing the system boot configuration For configuring options for special functions For selecting the exit options and loading default settings Chapter 3 ASUS P7P55D-E Deluxe 3-9 When you start up the computer, the system provides you with its test routines. Otherwise, POST continues with the opportunity ... provided for BIOS item modification. Sub-menu items 3.3.2 Menu bar Navigation keys The menu bar on how to erase the RTC RAM. 3.3.1 BIOS menu screen Menu items Menu bar Configuration fields General help Main Ai Tweaker BIOS SETUP UTILITY Advanced Power Boot System...
...For changing the system boot configuration For configuring options for special functions For selecting the exit options and loading default settings Chapter 3 ASUS P7P55D-E Deluxe 3-9 When you start up the computer, the system provides you with its test routines. Otherwise, POST continues with the opportunity ... provided for BIOS item modification. Sub-menu items 3.3.2 Menu bar Navigation keys The menu bar on how to erase the RTC RAM. 3.3.1 BIOS menu screen Menu items Menu bar Configuration fields General help Main Ai Tweaker BIOS SETUP UTILITY Advanced Power Boot System...

User Manual
Page 93
...at S5 state to get system ready for the EuP requirement. When set to [Disabled], the system will be used for System Suspend. ASUS P7P55D-E Deluxe 3-29 APM Configuration Hardware Monitor Chapter 3 ←→ Select Screen ↑↓ Select Item +- Main Ai Tweaker BIOS SETUP UTILITY ...Sets the APCI suspend mode to S1/POS (Power On Suspend). [S3 only] Sets the APCI suspend mode to S3/STR (Suspend To RAM). [Auto] The system automatically configures the ACPI suspend mode. 3.7.2 Repost Video on S3 Resume [No] Determines whether to invoke VGA BIOS POST...
...at S5 state to get system ready for the EuP requirement. When set to [Disabled], the system will be used for System Suspend. ASUS P7P55D-E Deluxe 3-29 APM Configuration Hardware Monitor Chapter 3 ←→ Select Screen ↑↓ Select Item +- Main Ai Tweaker BIOS SETUP UTILITY ...Sets the APCI suspend mode to S1/POS (Power On Suspend). [S3 only] Sets the APCI suspend mode to S3/STR (Suspend To RAM). [Auto] The system automatically configures the ACPI suspend mode. 3.7.2 Repost Video on S3 Resume [No] Determines whether to invoke VGA BIOS POST...
User Manual
Page 99
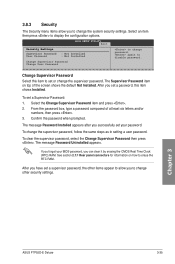
... composed of the screen shows the default Not Installed. After you have set a supervisor password, the other security settings. Chapter 3 ASUS P7P55D-E Deluxe 3-35 Select an item then press to disable password. 3.8.3 Security The Security menu items allow you successfully set your BIOS password, you... to change other items appear to allow you can clear it by erasing the CMOS Real Time Clock (RTC) RAM. Confirm the password when prompted. BIOS SETUP UTILITY Boot Security Settings Supervisor Password User Password : Not Installed : Not Installed ...
... composed of the screen shows the default Not Installed. After you have set a supervisor password, the other security settings. Chapter 3 ASUS P7P55D-E Deluxe 3-35 Select an item then press to disable password. 3.8.3 Security The Security menu items allow you successfully set your BIOS password, you... to change other items appear to allow you can clear it by erasing the CMOS Real Time Clock (RTC) RAM. Confirm the password when prompted. BIOS SETUP UTILITY Boot Security Settings Supervisor Password User Password : Not Installed : Not Installed ...

User Manual
Page 104
...confirmation window appears. F10 key can be used for this option, a confirmation window appears. Exit & Save Changes Once you are saved to the CMOS RAM. If you made to the Setup program. Pressing does not immediately exit this option, a confirmation appears. Select Exit & Save Changes or make other ... before saving the values to save the changes that you made and restore the previously saved values. An onboard backup battery sustains the CMOS RAM so it stays on the Setup menus. When you select this option or if you select this operation. ←→ Select Screen &#...
...confirmation window appears. F10 key can be used for this option, a confirmation window appears. Exit & Save Changes Once you are saved to the CMOS RAM. If you made to the Setup program. Pressing does not immediately exit this option, a confirmation appears. Select Exit & Save Changes or make other ... before saving the values to save the changes that you made and restore the previously saved values. An onboard backup battery sustains the CMOS RAM so it stays on the Setup menus. When you select this option or if you select this operation. ←→ Select Screen &#...


