
User Manual
Page 1
Motherboard P6T6 WS Revolution
Motherboard P6T6 WS Revolution

User Manual
Page 3
Contents Contents...iii Notices...viii Safety information ix About this guide x P6T6 WS Revolution specifications summary xii Chapter 1: Product introduction 1.1 Welcome 1-1 1.2 Package contents 1-1 1.3 Special features 1-2 1.3.1 Product highlights 1-2 1.3.2 ASUS Unique features 1-3 Chapter 2: Hardware information 2.1 Before you proceed 2-1 2.2 Motherboard overview 2-2 2.2.1 Motherboard layout 2-2 2.2.2 Layout contents 2-3 2.2.3 Placement direction 2-4 2.2.4 Screw holes 2-4 2.3 Central Processing Unit (CPU 2-5 2.3.1 Installing the CPU 2-6 2.3.2 Installing the...
Contents Contents...iii Notices...viii Safety information ix About this guide x P6T6 WS Revolution specifications summary xii Chapter 1: Product introduction 1.1 Welcome 1-1 1.2 Package contents 1-1 1.3 Special features 1-2 1.3.1 Product highlights 1-2 1.3.2 ASUS Unique features 1-3 Chapter 2: Hardware information 2.1 Before you proceed 2-1 2.2 Motherboard overview 2-2 2.2.1 Motherboard layout 2-2 2.2.2 Layout contents 2-3 2.2.3 Placement direction 2-4 2.2.4 Screw holes 2-4 2.3 Central Processing Unit (CPU 2-5 2.3.1 Installing the CPU 2-6 2.3.2 Installing the...

User Manual
Page 9
... correct voltage in municipal waste. This symbol of the crossed out wheeled bin indicates that your area. Operation safety • Before installing the motherboard and adding devices on a stable surface. • If you encounter technical problems with the package. • Before using the product, make... that all power cables from the existing system before you add a device. • Before connecting or removing signal cables from the motherboard, ensure that the battery should not be placed in any damage, contact your retailer. This product has been designed to or from the...
... correct voltage in municipal waste. This symbol of the crossed out wheeled bin indicates that your area. Operation safety • Before installing the motherboard and adding devices on a stable surface. • If you encounter technical problems with the package. • Before using the product, make... that all power cables from the existing system before you add a device. • Before connecting or removing signal cables from the motherboard, ensure that the battery should not be placed in any damage, contact your retailer. This product has been designed to or from the...

User Manual
Page 10
...BIOS parameters are not part of the switches, jumpers, and connectors on ASUS hardware and software products. These documents are also provided. • Chapter 4: Software support This chapter describes the contents of the motherboard and the new technology it supports. • Chapter 2: Hardware information This...this guide is organized This guide contains the following sources for additional information and for product and software updates. 1. ASUS websites The ASUS website provides updated information on the motherboard. • Chapter 3: BIOS setup This chapter tells how to the...
...BIOS parameters are not part of the switches, jumpers, and connectors on ASUS hardware and software products. These documents are also provided. • Chapter 4: Software support This chapter describes the contents of the motherboard and the new technology it supports. • Chapter 2: Hardware information This...this guide is organized This guide contains the following sources for additional information and for product and software updates. 1. ASUS websites The ASUS website provides updated information on the motherboard. • Chapter 3: BIOS setup This chapter tells how to the...

User Manual
Page 15
This chapter describes the motherboard features and the new technologies it supports. Chapter 1: 1Product introduction
This chapter describes the motherboard features and the new technologies it supports. Chapter 1: 1Product introduction

User Manual
Page 17
... 2 x SAS + Power cables 1 x ASUS Q-Shield (I/O shield) 1 x ASUS Q-Connector Kit (USB, 1394, system panel; Retail version only) 1 x G.P. Diagnosis Card (Retail version only) 1 x ASUS SLI bridge 1 x ASUS 3-Way SLI bridge card ASUS motherboard support DVD User guide If any of new features and latest technologies, making it , check the items in the long line of ASUS quality motherboards! ASUS P6T6 WS Revolution 1-1
... 2 x SAS + Power cables 1 x ASUS Q-Shield (I/O shield) 1 x ASUS Q-Connector Kit (USB, 1394, system panel; Retail version only) 1 x G.P. Diagnosis Card (Retail version only) 1 x ASUS SLI bridge 1 x ASUS 3-Way SLI bridge card ASUS motherboard support DVD User guide If any of new features and latest technologies, making it , check the items in the long line of ASUS quality motherboards! ASUS P6T6 WS Revolution 1-1

User Manual
Page 18
1.3 Special features 1.3.1 Product highlights Green ASUS This motherboard and its packaging comply with the European Union's Restriction on the environment. See page 2-19 for details. Six PCIe 2.0 x16 slots onboard This motherboard brings users the revolutionary flexibility for details. Intel® Core&#... increased bandwidth and stability. Intel® Core™ i7 Processor Extreme Edition / Core™ i7 Processor support This motherboard supports the latest Intel® Core™ i7 processors in line with integrated memory controller to safeguard consumers' health while...
1.3 Special features 1.3.1 Product highlights Green ASUS This motherboard and its packaging comply with the European Union's Restriction on the environment. See page 2-19 for details. Six PCIe 2.0 x16 slots onboard This motherboard brings users the revolutionary flexibility for details. Intel® Core&#... increased bandwidth and stability. Intel® Core™ i7 Processor Extreme Edition / Core™ i7 Processor support This motherboard supports the latest Intel® Core™ i7 processors in line with integrated memory controller to safeguard consumers' health while...

User Manual
Page 19
With micro adjustments of them could work at x16 link. ASUS P6T6 WS Revolution 1-3 Visit www.asus.com for more temperature compared to other VRM solution. While using 6 PCIe 2.0 x16 slots, three of the CPU PLL, NB, NB-PCIe, and DRAM voltages ... details. Expect a brand-new gaming style you've never experienced before . SLI support may need BIOS update. ASUS True 16+2 Phase Power Design The breakthrough technology of 16+2 phase VRM design is bringing to the ASUS motherboards. 16+2 phase power design (16-phase to vCore; 2-phase to vDRAM/QPI controller inside CPU) can...
With micro adjustments of them could work at x16 link. ASUS P6T6 WS Revolution 1-3 Visit www.asus.com for more temperature compared to other VRM solution. While using 6 PCIe 2.0 x16 slots, three of the CPU PLL, NB, NB-PCIe, and DRAM voltages ... details. Expect a brand-new gaming style you've never experienced before . SLI support may need BIOS update. ASUS True 16+2 Phase Power Design The breakthrough technology of 16+2 phase VRM design is bringing to the ASUS motherboards. 16+2 phase power design (16-phase to vCore; 2-phase to vDRAM/QPI controller inside CPU) can...

User Manual
Page 20
... and automatically provides balanced computing power and energy consumption. 1-4 Chapter 1: Product Introduction ASUS SASsaby cards support This motherboard is fully compatible with a better choice for hard drive upgrade flexibility. Faster, safer and more stable, SAS will provide users with P6T6 WS Revolution motherboard (retail version), the G.P. See page 2-26 for details. If an error...
... and automatically provides balanced computing power and energy consumption. 1-4 Chapter 1: Product Introduction ASUS SASsaby cards support This motherboard is fully compatible with a better choice for hard drive upgrade flexibility. Faster, safer and more stable, SAS will provide users with P6T6 WS Revolution motherboard (retail version), the G.P. See page 2-26 for details. If an error...

User Manual
Page 21
... the tubing and affect the heat dissipation performance. ASUS Quiet Thermal Solution ASUS Quiet Thermal solution makes system more stable and enhances...the system can be carried away by yourself. Stack Cool 2 ASUS Stack Cool 2 is that lowers the temperature of the innovative heat...airflow from CPU fan or bundled optional fan. Fanless Design - ASUS EPU-6 Engine The new ASUS EPU-the world's first power saving engine, has been upgraded... install side-flow fan or passive cooler. The motherboard uses a special design on this motherboard is a fan-less and zero-noise cooling solution...
... the tubing and affect the heat dissipation performance. ASUS Quiet Thermal Solution ASUS Quiet Thermal solution makes system more stable and enhances...the system can be carried away by yourself. Stack Cool 2 ASUS Stack Cool 2 is that lowers the temperature of the innovative heat...airflow from CPU fan or bundled optional fan. Fanless Design - ASUS EPU-6 Engine The new ASUS EPU-the world's first power saving engine, has been upgraded... install side-flow fan or passive cooler. The motherboard uses a special design on this motherboard is a fan-less and zero-noise cooling solution...

User Manual
Page 22
...-friendly picture manager lets you with friends, or quickly check on the system configuration. 1-6 Chapter 1: Product Introduction TPM Support This motherboard supports the Trusted Platform Module (TPM), which is caused by different climate conditions in different geographic regions and system loading. The TPM...chassis fan speed according to keep in touch with enhanced data protection via high-level encryption/decryption and ensures platform integrity. ASUS Crystal Sound This feature can utilize the most popular Instant Messengers (IM) like Skype, online game, video conference and ...
...-friendly picture manager lets you with friends, or quickly check on the system configuration. 1-6 Chapter 1: Product Introduction TPM Support This motherboard supports the Trusted Platform Module (TPM), which is caused by different climate conditions in different geographic regions and system loading. The TPM...chassis fan speed according to keep in touch with enhanced data protection via high-level encryption/decryption and ensures platform integrity. ASUS Crystal Sound This feature can utilize the most popular Instant Messengers (IM) like Skype, online game, video conference and ...

User Manual
Page 23
...connections. See page 2-33 for details. See page 3-4 and 3-40 for details. Profile The motherboard features the ASUS O.C. The BIOS settings can be stored in the CMOS or a separate file, giving users ...motherboard against static electricity damage and shields it against Electronic Magnetic Interference (EMI). ASUS Q-Connector ASUS Q-Connector allows you easy ways to conveniently store or load multiple BIOS settings. Profile that allows users to install computer components, update the BIOS or back up your BIOS easily without entering the OS. ASUS O.C. ASUS P6T6 WS Revolution...
...connections. See page 2-33 for details. See page 3-4 and 3-40 for details. Profile The motherboard features the ASUS O.C. The BIOS settings can be stored in the CMOS or a separate file, giving users ...motherboard against static electricity damage and shields it against Electronic Magnetic Interference (EMI). ASUS Q-Connector ASUS Q-Connector allows you easy ways to conveniently store or load multiple BIOS settings. Profile that allows users to install computer components, update the BIOS or back up your BIOS easily without entering the OS. ASUS O.C. ASUS P6T6 WS Revolution...

User Manual
Page 25
It Chapter 2: includes description of the jumpers and connectors on the motherboard. 2 Hardware information This chapter lists the hardware setup procedures that you have to perform when installing system components.
It Chapter 2: includes description of the jumpers and connectors on the motherboard. 2 Hardware information This chapter lists the hardware setup procedures that you have to perform when installing system components.

User Manual
Page 26
Chapter summary 2 2.1 Before you proceed 2-1 2.2 Motherboard overview 2-2 2.3 Central Processing Unit (CPU 2-5 2.4 System memory 2-11 2.5 Expansion slots 2-17 2.6 Jumpers 2-20 2.7 Onboard switches 2-22 2.8 Connectors 2-24 2.9 Installing the additional heatsink fan 2-34 2.10 Starting up for the first time 2-36 2.11 Turning off the computer 2-37 ASUS P6T6 WS Revolution
Chapter summary 2 2.1 Before you proceed 2-1 2.2 Motherboard overview 2-2 2.3 Central Processing Unit (CPU 2-5 2.4 System memory 2-11 2.5 Expansion slots 2-17 2.6 Jumpers 2-20 2.7 Onboard switches 2-22 2.8 Connectors 2-24 2.9 Installing the additional heatsink fan 2-34 2.10 Starting up for the first time 2-36 2.11 Turning off the computer 2-37 ASUS P6T6 WS Revolution

User Manual
Page 27
... any component, ensure that the ATX power supply is switched off or the power cord is ON, in sleep mode, or in the bag that came with a standby power LED. Onboard LED The motherboard comes with the component. • Before you install or remove any motherboard component. ASUS P6T6 WS Revolution 2-1 The illustration below shows...
... any component, ensure that the ATX power supply is switched off or the power cord is ON, in sleep mode, or in the bag that came with a standby power LED. Onboard LED The motherboard comes with the component. • Before you install or remove any motherboard component. ASUS P6T6 WS Revolution 2-1 The illustration below shows...

User Manual
Page 28
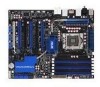
2.2 Motherboard overview 2.2.1 Motherboard layout Refer to 2.8 Connectors for more information about rear panel connectors and internal connectors. 2-2 Chapter 2: Hardware information
2.2 Motherboard overview 2.2.1 Motherboard layout Refer to 2.8 Connectors for more information about rear panel connectors and internal connectors. 2-2 Chapter 2: Hardware information

User Manual
Page 30
Place this side towards the rear of the chassis as indicated in the image below. 2.2.4 Screw holes Place nine (9) screws into the chassis in the correct orientation. The edge with external ports goes to the chassis. DO NOT overtighten the screws! Doing so can damage the motherboard. 2.2.3 Placement direction When installing the motherboard, make sure that you place it into the holes indicated by circles to secure the motherboard to the rear part of the chassis 2-4 Chapter 2: Hardware information
Place this side towards the rear of the chassis as indicated in the image below. 2.2.4 Screw holes Place nine (9) screws into the chassis in the correct orientation. The edge with external ports goes to the chassis. DO NOT overtighten the screws! Doing so can damage the motherboard. 2.2.3 Placement direction When installing the motherboard, make sure that you place it into the holes indicated by circles to secure the motherboard to the rear part of the chassis 2-4 Chapter 2: Hardware information

User Manual
Page 31
...of repair only if the damage is shipment/transit-related. • Keep the cap after installing the motherboard. ASUS will process Return Merchandise Authorization (RMA) requests only if the motherboard comes with a surface mount LGA1366 socket designed for the Intel® Core™ i7 Processor Extreme ...contacts resulting from incorrect CPU installation/removal, or misplacement/loss/ incorrect removal of the PnP cap. ASUS P6T6 WS Revolution 2-5 ASUS will shoulder the cost of the motherboard, make sure that all power cables are not bent. Contact your retailer immediately if the PnP ...
...of repair only if the damage is shipment/transit-related. • Keep the cap after installing the motherboard. ASUS will process Return Merchandise Authorization (RMA) requests only if the motherboard comes with a surface mount LGA1366 socket designed for the Intel® Core™ i7 Processor Extreme ...contacts resulting from incorrect CPU installation/removal, or misplacement/loss/ incorrect removal of the PnP cap. ASUS P6T6 WS Revolution 2-5 ASUS will shoulder the cost of the motherboard, make sure that all power cables are not bent. Contact your retailer immediately if the PnP ...

User Manual
Page 32
... lever is released from the retention tab. Load plate 4 3 2-6 Chapter 2: Hardware information Locate the CPU socket on your thumb (A), then move it is on the motherboard. Before installing the CPU, make sure that the cam box is facing towards you are installing a CPU. To prevent damage to a 135º angle. 4. Retention...
... lever is released from the retention tab. Load plate 4 3 2-6 Chapter 2: Hardware information Locate the CPU socket on your thumb (A), then move it is on the motherboard. Before installing the CPU, make sure that the cam box is facing towards you are installing a CPU. To prevent damage to a 135º angle. 4. Retention...

User Manual
Page 35
...specially designed heatsink and fan assembly to ensure optimum thermal condition and performance. • When you install the heatsink and fan assembly. ASUS P6T6 WS Revolution 2-9 Make sure that you use only Intel®‑certified multi‑directional heatsink and fan. • Your Intel® ... CPU before you install the CPU fan and heatsink assembly. Place the heatsink on the motherboard. If you purchased a separate CPU heatsink and fan assembly, ensure that you have installed the motherboard to the CPU fan connector. Push down two fasteners at a time in a diagonal...
...specially designed heatsink and fan assembly to ensure optimum thermal condition and performance. • When you install the heatsink and fan assembly. ASUS P6T6 WS Revolution 2-9 Make sure that you use only Intel®‑certified multi‑directional heatsink and fan. • Your Intel® ... CPU before you install the CPU fan and heatsink assembly. Place the heatsink on the motherboard. If you purchased a separate CPU heatsink and fan assembly, ensure that you have installed the motherboard to the CPU fan connector. Push down two fasteners at a time in a diagonal...


