
User Manual
Page 29
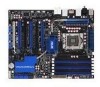
...Clear RTC RAM (3-pin CLRTC) 11. Digital audio connector (4-1 pin SPDIF_OUT) Page 2-30 2-6 2-28 2-11 2-21 2-26 2-25 2-1 2-32 2-20 2-29 2-24 2-27 2-31 2-29 3-31 ASUS P6T6 WS Revolution 2-3 DDR3... DIMM slots 5. Optical drive audio connector (4-pin CD) 15. Front panel audio connector (10-1 pin AAFP) 16. ICH10R Serial ATA connectors [blue] (7-pin SATA1-6) 8. Chassis intrusion connector (4-1 pin CHASSIS) 12. TPM connector (20-1 pin TPM) 13. Standby power LED (SB_PWR) 9. Marvell® 88SE6320 SAS RAID connector [black] (7-pin SAS1-2) 7. ATX...
...Clear RTC RAM (3-pin CLRTC) 11. Digital audio connector (4-1 pin SPDIF_OUT) Page 2-30 2-6 2-28 2-11 2-21 2-26 2-25 2-1 2-32 2-20 2-29 2-24 2-27 2-31 2-29 3-31 ASUS P6T6 WS Revolution 2-3 DDR3... DIMM slots 5. Optical drive audio connector (4-pin CD) 15. Front panel audio connector (10-1 pin AAFP) 16. ICH10R Serial ATA connectors [blue] (7-pin SATA1-6) 8. Chassis intrusion connector (4-1 pin CHASSIS) 12. TPM connector (20-1 pin TPM) 13. Standby power LED (SB_PWR) 9. Marvell® 88SE6320 SAS RAID connector [black] (7-pin SAS1-2) 7. ATX...

User Manual
Page 46
... • You do not help, remove the onboard battery and move the cap back to clear the CMOS RTC RAM data. For system failure due to overclocking. The onboard button cell battery powers the RAM data in CMOS. Move the jumper cap from pins 1-2 (default) to clear the Real Time Clock (RTC... system. 2-20 Chapter 2: Hardware information Shut down the key during the boot process and enter BIOS setup to re-enter data. To erase the RTC RAM 1. function. Removing the cap will cause system boot failure! • If the steps above do not need to clear the RTC when the system hangs...
... • You do not help, remove the onboard battery and move the cap back to clear the CMOS RTC RAM data. For system failure due to overclocking. The onboard button cell battery powers the RAM data in CMOS. Move the jumper cap from pins 1-2 (default) to clear the Real Time Clock (RTC... system. 2-20 Chapter 2: Hardware information Shut down the key during the boot process and enter BIOS setup to re-enter data. To erase the RTC RAM 1. function. Removing the cap will cause system boot failure! • If the steps above do not need to clear the RTC when the system hangs...

User Manual
Page 61
... for bootlock D2 Check and wake up system D3 Prepare system for memory detection and sizing D4 Memory test D5 Copy BIOS from ROM to RAM C0 Early CPU initiation C5 Wake up AP 0A Initiate KBC8042 0B Detect PS2 mouse 0C Detect PS2 keyboard 2A Initiate VGA BIOS 38 USB... S3 04 S4 05 S5 10 Resume from S1 30 Resume from S3 40 Resume from S4 00 Leave BIOS and pass control to OS ASUS P6T6 WS Revolution 2-35
... for bootlock D2 Check and wake up system D3 Prepare system for memory detection and sizing D4 Memory test D5 Copy BIOS from ROM to RAM C0 Early CPU initiation C5 Wake up AP 0A Initiate KBC8042 0B Detect PS2 mouse 0C Detect PS2 keyboard 2A Initiate VGA BIOS 38 USB... S3 04 S4 05 S5 10 Resume from S1 30 Resume from S3 40 Resume from S4 00 Leave BIOS and pass control to OS ASUS P6T6 WS Revolution 2-35

User Manual
Page 75
... Load Setup Defaults item under the Exit Menu. ASUS P6T6 WS Revolution 3-9 See section 3.9 Exit Menu. • The BIOS setup screens shown in section 3.1 Managing and updating your system using the provided utility described in this section are installing a motherboard, reconfiguring your computer in the CMOS RAM of your system, or prompted to run...
... Load Setup Defaults item under the Exit Menu. ASUS P6T6 WS Revolution 3-9 See section 3.9 Exit Menu. • The BIOS setup screens shown in section 3.1 Managing and updating your system using the provided utility described in this section are installing a motherboard, reconfiguring your computer in the CMOS RAM of your system, or prompted to run...

User Manual
Page 104
... disabled password. After you successfully set your BIOS password, you can clear it by erasing the CMOS Real Time Clock (RTC) RAM. To change password. again to display the configuration options. Change Supervisor Password Select this item shows Installed. The Supervisor Password item... on how to erase the RTC RAM. To set or change the supervisor password. The message "Password Installed" appears after you set a supervisor password, the other items...
... disabled password. After you successfully set your BIOS password, you can clear it by erasing the CMOS Real Time Clock (RTC) RAM. To change password. again to display the configuration options. Change Supervisor Password Select this item shows Installed. The Supervisor Password item... on how to erase the RTC RAM. To set or change the supervisor password. The message "Password Installed" appears after you set a supervisor password, the other items...

User Manual
Page 110
...Select one of the parameters on even when the PC is turned off. Exit & Save Changes Once you are saved to the non-volatile RAM. 3-44 Chapter 3: BIOS setup Press to load default values. After selecting this operation. When you selected are finished making your changes before... saving the values to the CMOS RAM. Exit & Discard Changes Select this menu or from the Exit menu to load the default values for this option, a confirmation appears. ...
...Select one of the parameters on even when the PC is turned off. Exit & Save Changes Once you are saved to the non-volatile RAM. 3-44 Chapter 3: BIOS setup Press to load default values. After selecting this operation. When you selected are finished making your changes before... saving the values to the CMOS RAM. Exit & Discard Changes Select this menu or from the Exit menu to load the default values for this option, a confirmation appears. ...


