User Manual
Page 9
...and electronic equipment) should not be placed in municipal waste. If you add a device. • Before connecting or removing signal cables from the motherboard, ensure that your retailer. DO NOT throw the mercury-containing button cell battery in municipal waste. These devices could interrupt the grounding circuit. &#...are unplugged before the signal cables are unplugged. • Seek professional assistance before using the product, make sure all the manuals that the battery should not be placed in municipal waste. Do not place the product in any damage, contact your retailer.
...and electronic equipment) should not be placed in municipal waste. If you add a device. • Before connecting or removing signal cables from the motherboard, ensure that your retailer. DO NOT throw the mercury-containing button cell battery in municipal waste. These devices could interrupt the grounding circuit. &#...are unplugged before the signal cables are unplugged. • Seek professional assistance before using the product, make sure all the manuals that the battery should not be placed in municipal waste. Do not place the product in any damage, contact your retailer.

User Manual
Page 54
.... • Before creating a RAID set, refer to section 4.4.3 Intel RAID configurations or the manual bundled in the BIOS to [RAID]. If you are set to create a Serial ATA RAID set the Configure SATA as item in the motherboard support DVD. • You must install the Windows® XP Service Pack 1 before using...
.... • Before creating a RAID set, refer to section 4.4.3 Intel RAID configurations or the manual bundled in the BIOS to [RAID]. If you are set to create a Serial ATA RAID set the Configure SATA as item in the motherboard support DVD. • You must install the Windows® XP Service Pack 1 before using...
User Manual
Page 85
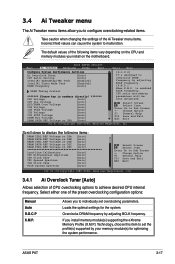
.... 3.4.1 Ai Overclock Tuner [Auto] Allows selection of the preset overclocking configuration options: Manual Auto D.O.C.P X.M.P. is enabled BLCK frequency, CPU ratio and memory parameters will be auto...ICH PCIE Voltage [Auto] DRAM Bus Voltage [Auto] DRAM DATA REF Voltage on the motherboard. Overclocks DRAM frequency by adjusting BCLK frequency. [X.M.P.] When X.M.P. Select Screen Select Item ... either one of CPU overclocking options to achieve desired CPU internal frequency. ASUS P6T 3-17 Loads the optimal settings for optimizing the system performance. Scroll down...
.... 3.4.1 Ai Overclock Tuner [Auto] Allows selection of the preset overclocking configuration options: Manual Auto D.O.C.P X.M.P. is enabled BLCK frequency, CPU ratio and memory parameters will be auto...ICH PCIE Voltage [Auto] DRAM Bus Voltage [Auto] DRAM DATA REF Voltage on the motherboard. Overclocks DRAM frequency by adjusting BCLK frequency. [X.M.P.] When X.M.P. Select Screen Select Item ... either one of CPU overclocking options to achieve desired CPU internal frequency. ASUS P6T 3-17 Loads the optimal settings for optimizing the system performance. Scroll down...
User Manual
Page 86
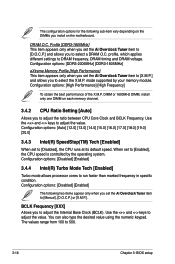
... DRAM frequency, DRAM timing and DRAM voltage. The configuration options for the following two items appear only when you to [Manual], [D.O.C.P.] or [X.M.P.]. DIMM or 1600MHz DIMM, install only one DIMM on the motherboard. Configuration options: [Disabled] [Enabled] The following sub-item vary depending on the DIMMs you install on each memory channel...
... DRAM frequency, DRAM timing and DRAM voltage. The configuration options for the following two items appear only when you to [Manual], [D.O.C.P.] or [X.M.P.]. DIMM or 1600MHz DIMM, install only one DIMM on the motherboard. Configuration options: [Disabled] [Enabled] The following sub-item vary depending on the DIMMs you install on each memory channel...

User Manual
Page 142
Use the Save Profile function to save your customized overclocking settings and manually load the profile after Windows starts. • For system stability, set ASUS EPU 6-Engine to High Performance Mode while using TurboV. • The BCLK Frequency setting in BIOS affects the ... range from 200MHz to 500MHz in TurboV. 4-26 Chapter 4: Software support To launch ASUS TurboV 1. For advanced overclocking: Set BCLK Frequency in BIOS to 200MHz or above for an adjustment range from the motherboard support DVD. 2. Setting a high voltage may damage the CPU permanently, and setting ...
Use the Save Profile function to save your customized overclocking settings and manually load the profile after Windows starts. • For system stability, set ASUS EPU 6-Engine to High Performance Mode while using TurboV. • The BCLK Frequency setting in BIOS affects the ... range from 200MHz to 500MHz in TurboV. 4-26 Chapter 4: Software support To launch ASUS TurboV 1. For advanced overclocking: Set BCLK Frequency in BIOS to 200MHz or above for an adjustment range from the motherboard support DVD. 2. Setting a high voltage may damage the CPU permanently, and setting ...

User Manual
Page 152
... a few seconds of 1024 x 768. click to the optical drive. Installing ASUS Express Gate • ASUS Express Gate supports installation on the computer. 4-36 Click any of BIOS setup in your motherboard user manual for you can start the web browser, Skype, or other Express Gate applications.... Gate on your computer has enabled Autorun feature. 2. Select the target disk volume for details. • ASUS Express Gate supports HDDs or ODDs connected to motherboard chipset-controlled onboard SATA ports only. Click Next to complete installation. See the chapter of the application icons to...
... a few seconds of 1024 x 768. click to the optical drive. Installing ASUS Express Gate • ASUS Express Gate supports installation on the computer. 4-36 Click any of BIOS setup in your motherboard user manual for you can start the web browser, Skype, or other Express Gate applications.... Gate on your computer has enabled Autorun feature. 2. Select the target disk volume for details. • ASUS Express Gate supports HDDs or ODDs connected to motherboard chipset-controlled onboard SATA ports only. Click Next to complete installation. See the chapter of the application icons to...

User Manual
Page 155
...a home router (which is enabled, the port it . • LAN settings: If you have to manually configure network settings. If your computer's LAN port. WEP or WAP) in the LaunchBar. 2. Click OK... Panel in the Encryption Type field, and enter the password. Make the proper network configurations. ASUS P6T 4-39 When PPPoE is then connected to your DSL/cable modem), enable LAN 1. To configure... the WiFi tab of the Advanced Network Settings box, enter the name of your motherboard supports wireless network, click Setup for any LAN port. Getting on the Internet In...
...a home router (which is enabled, the port it . • LAN settings: If you have to manually configure network settings. If your computer's LAN port. WEP or WAP) in the LaunchBar. 2. Click OK... Panel in the Encryption Type field, and enter the password. Make the proper network configurations. ASUS P6T 4-39 When PPPoE is then connected to your DSL/cable modem), enable LAN 1. To configure... the WiFi tab of the Advanced Network Settings box, enter the name of your motherboard supports wireless network, click Setup for any LAN port. Getting on the Internet In...

User Manual
Page 178
... two graphics cards separately. 6. Prepare two CrossFireX-ready graphics cards. 2. If your motherboard has more than two PCIEX16 slots, refer to the goldfingers on the slots. 4. The graphics cards and the motherboard layout may vary with models, but the installation steps remain the same. 1. Ensure... that the connector is firmly in this user manual for the locations of the PCIEX16 slots recommended for reference only. ...
... two graphics cards separately. 6. Prepare two CrossFireX-ready graphics cards. 2. If your motherboard has more than two PCIEX16 slots, refer to the goldfingers on the slots. 4. The graphics cards and the motherboard layout may vary with models, but the installation steps remain the same. 1. Ensure... that the connector is firmly in this user manual for the locations of the PCIEX16 slots recommended for reference only. ...

User Manual
Page 179
... the cards are firmly in this user manual for the locations of the PCIEX16 slots recommended for multi-graphics card installation. 3. Connect three independent auxiliary power sources from the power supply to the goldfingers on the slots. 4. ASUS P6T 5-3 5.1.4 Installing three CrossFireX graphics cards 1. If your motherboard has more than three PCIEX16 slots, refer...
... the cards are firmly in this user manual for the locations of the PCIEX16 slots recommended for multi-graphics card installation. 3. Connect three independent auxiliary power sources from the power supply to the goldfingers on the slots. 4. ASUS P6T 5-3 5.1.4 Installing three CrossFireX graphics cards 1. If your motherboard has more than three PCIEX16 slots, refer...

User Manual
Page 183
The graphics cards and the motherboard layout may vary with models, but the installation steps remain the same. 1. Connect two independent auxiliary power sources from the power supply to the graphics ... in this user manual for the locations of the PCIEX16 slots recommended for reference only. Align and firmly insert the SLI bridge connector to Chapter 2 in place. 5. SLI bridge Goldfingers ASUS P6T 5-7 5.2.2 Installing two SLI-ready graphics cards The following pictures are properly seated on each graphics card. If your motherboard has more than...
The graphics cards and the motherboard layout may vary with models, but the installation steps remain the same. 1. Connect two independent auxiliary power sources from the power supply to the graphics ... in this user manual for the locations of the PCIEX16 slots recommended for reference only. Align and firmly insert the SLI bridge connector to Chapter 2 in place. 5. SLI bridge Goldfingers ASUS P6T 5-7 5.2.2 Installing two SLI-ready graphics cards The following pictures are properly seated on each graphics card. If your motherboard has more than...

User Manual
Page 184
Prepare three SLI-ready graphics cards. 2. Ensure that the connector is firmly in this user manual for the locations of the PCIEX16 slots recommended for multi-graphics card installation. 3. Connect three independent auxiliary power sources from the power supply ... to Chapter 2 in place. 5. Connect a VGA or a DVI cable to the three graphics cards separately. 6. 5.2.3 Installing three SLI-ready graphics cards 1. If your motherboard has more than two PCIEX16 slots, refer to the goldfingers on the slots. 4. Ensure that the cards are properly seated on each graphics card.
Prepare three SLI-ready graphics cards. 2. Ensure that the connector is firmly in this user manual for the locations of the PCIEX16 slots recommended for multi-graphics card installation. 3. Connect three independent auxiliary power sources from the power supply ... to Chapter 2 in place. 5. Connect a VGA or a DVI cable to the three graphics cards separately. 6. 5.2.3 Installing three SLI-ready graphics cards 1. If your motherboard has more than two PCIEX16 slots, refer to the goldfingers on the slots. 4. Ensure that the cards are properly seated on each graphics card.


