
User Guide
Page 4
... 3: BIOS setup 3.1 Managing and updating your BIOS 3-1 3.1.1 ASUS Update utility 3-1 3.1.2 ASUS EZ Flash 2 utility 3-4 3.1.3 Creating a bootable floppy disk 3-5 3.1.4 AFUDOS utility 3-6 3.1.5 ASUS CrashFree BIOS 3 utility 3-8 3.2 BIOS setup program 3-9 3.2.1 BIOS menu screen 3-10 3.2.2 Menu bar 3-10 3.2.3 Navigation keys 3-10 3.2.4 Menu items 3-11 3.2.5 Sub-menu items 3-11 3.2.6 Configuration fields 3-11 3.2.7 Pop-up window 3-11 3.2.8 Scroll bar 3-11 3.2.9 General help 3-11...
... 3: BIOS setup 3.1 Managing and updating your BIOS 3-1 3.1.1 ASUS Update utility 3-1 3.1.2 ASUS EZ Flash 2 utility 3-4 3.1.3 Creating a bootable floppy disk 3-5 3.1.4 AFUDOS utility 3-6 3.1.5 ASUS CrashFree BIOS 3 utility 3-8 3.2 BIOS setup program 3-9 3.2.1 BIOS menu screen 3-10 3.2.2 Menu bar 3-10 3.2.3 Navigation keys 3-10 3.2.4 Menu items 3-11 3.2.5 Sub-menu items 3-11 3.2.6 Configuration fields 3-11 3.2.7 Pop-up window 3-11 3.2.8 Scroll bar 3-11 3.2.9 General help 3-11...

User Guide
Page 53
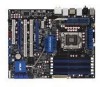
... 10 configuration with the Intel® Matrix Storage Technology through the onboard Intel® ICH10R RAID controller. • These connectors are set the Configure SATA as in the motherboard support DVD. • You must install the Windows® XP Service Pack 1 before using these connectors. ASUS P6T WS Professional ... for the Serial ATA signal cables for details. 2. ICH10R Serial ATA connectors (7-pin SATA 1-6 [blue]) These connectors are using Windows® XP or later version. • When using hot-plug and NCQ, set , refer to section 4.4.3 Intel RAID configurations...
... 10 configuration with the Intel® Matrix Storage Technology through the onboard Intel® ICH10R RAID controller. • These connectors are set the Configure SATA as in the motherboard support DVD. • You must install the Windows® XP Service Pack 1 before using these connectors. ASUS P6T WS Professional ... for the Serial ATA signal cables for details. 2. ICH10R Serial ATA connectors (7-pin SATA 1-6 [blue]) These connectors are using Windows® XP or later version. • When using hot-plug and NCQ, set , refer to section 4.4.3 Intel RAID configurations...

User Guide
Page 66
... the computer 2.10.1 Using the OS shut down . Refer to soft-off after Windows® shuts down the computer. 3. If you are using Windows® Vista™: 1. Click the Start button then select Turn Off Computer. 2. Pressing the power switch for more than four seconds puts the ...; shuts down function If you are using Windows® XP: 1. The power supply should turn off mode, depending on the BIOS setting. The power supply should turn off mode regardless of the BIOS setting. Click the Turn Off button to shut down . 2.10.2 Using the dual function power switch While ...
... the computer 2.10.1 Using the OS shut down . Refer to soft-off after Windows® shuts down the computer. 3. If you are using Windows® Vista™: 1. Click the Start button then select Turn Off Computer. 2. Pressing the power switch for more than four seconds puts the ...; shuts down function If you are using Windows® XP: 1. The power supply should turn off mode, depending on the BIOS setting. The power supply should turn off mode regardless of the BIOS setting. Click the Turn Off button to shut down . 2.10.2 Using the dual function power switch While ...

User Guide
Page 109
... time wizard will be cleared the next time you to stay at the Express Gate's first screen before starting Windows or other installed OS. ASUS P6T WS Professional 3-41 Configuration options: [Prompt User] [1 second] [3 seconds] [5 seconds] [10 seconds] [15 seconds] [20 seconds] [30 seconds] Reset User Data [No] Allows you enter the Express Gate environment after...
... time wizard will be cleared the next time you to stay at the Express Gate's first screen before starting Windows or other installed OS. ASUS P6T WS Professional 3-41 Configuration options: [Prompt User] [1 second] [3 seconds] [5 seconds] [10 seconds] [15 seconds] [20 seconds] [30 seconds] Reset User Data [No] Allows you enter the Express Gate environment after...

User Guide
Page 124
...from the drop down menu, and then click Next. 5. To launch the ASUS MyLogo 2: 1. Check the option Launch MyLogo to section 3.1.1 ASUS Update utility for details. • Before using the ASUS MyLogo 2, use ASUS MyLogo 2. The ASUS MyLogo 2 window appears. 6. Refer to replace system boot logo before flashing BIOS, and then... the BIOS item Full Screen Logo is set to [Enabled] if you wish to use as your boot logo. 4-10 Chapter 4: Software support Select Options from the ASUS website. Select Update BIOS from a file from the support DVD. When prompted, locate the new BIOS file, and...
...from the drop down menu, and then click Next. 5. To launch the ASUS MyLogo 2: 1. Check the option Launch MyLogo to section 3.1.1 ASUS Update utility for details. • Before using the ASUS MyLogo 2, use ASUS MyLogo 2. The ASUS MyLogo 2 window appears. 6. Refer to replace system boot logo before flashing BIOS, and then... the BIOS item Full Screen Logo is set to [Enabled] if you wish to use as your boot logo. 4-10 Chapter 4: Software support Select Options from the ASUS website. Select Update BIOS from a file from the support DVD. When prompted, locate the new BIOS file, and...

User Guide
Page 125
7. When the screen returns to the ASUS Update utility, flash the original BIOS to your desired size by clicking on it. 8. Adjust the boot image to load the new boot logo. 10. ASUS P6T WS Professional 4-11 After flashing the BIOS, restart the computer to enlarge by selecting a value on the right window pane, select an image to display the new boot logo during POST. When the logo images appear on the Ratio box. 9.
7. When the screen returns to the ASUS Update utility, flash the original BIOS to your desired size by clicking on it. 8. Adjust the boot image to load the new boot logo. 10. ASUS P6T WS Professional 4-11 After flashing the BIOS, restart the computer to enlarge by selecting a value on the right window pane, select an image to display the new boot logo during POST. When the logo images appear on the Ratio box. 9.

User Guide
Page 158
... to join the teaming set in the Team Name box. Follow the screen instructions to the optical drive. Configuring Realtek Teaming Utility in Windows® XP To create a teaming set . Launch the Realtek Teaming Utility by clicking Start > All Programs > Realtek > Teaming Utility...a name for the teaming in Windows® XP 1. Click OK to be grouped as one single connection, providing benefits such as bandwidth increase, load balancing, and fault tolerance. To install Realtek Teaming Utility 1. 4.3.10 Realtek Teaming Utility This motherboard features two Realtek® 8111C PCIe...
... to join the teaming set in the Team Name box. Follow the screen instructions to the optical drive. Configuring Realtek Teaming Utility in Windows® XP To create a teaming set . Launch the Realtek Teaming Utility by clicking Start > All Programs > Realtek > Teaming Utility...a name for the teaming in Windows® XP 1. Click OK to be grouped as one single connection, providing benefits such as bandwidth increase, load balancing, and fault tolerance. To install Realtek Teaming Utility 1. 4.3.10 Realtek Teaming Utility This motherboard features two Realtek® 8111C PCIe...

