
User Guide
Page 4
... the OS shut down function 2-40 2.10.2 Using the dual function power switch 2-40 Chapter 3: BIOS setup 3.1 Managing and updating your BIOS 3-1 3.1.1 ASUS Update utility 3-1 3.1.2 ASUS EZ Flash 2 utility 3-4 3.1.3 Creating a bootable floppy disk 3-5 3.1.4 AFUDOS utility 3-6 3.1.5 ASUS CrashFree BIOS 3 utility 3-8 3.2 BIOS setup program 3-9 3.2.1 BIOS menu screen 3-10 3.2.2 Menu bar 3-10 3.2.3 Navigation keys 3-10 3.2.4 Menu items 3-11 3.2.5 Sub-menu items...
... the OS shut down function 2-40 2.10.2 Using the dual function power switch 2-40 Chapter 3: BIOS setup 3.1 Managing and updating your BIOS 3-1 3.1.1 ASUS Update utility 3-1 3.1.2 ASUS EZ Flash 2 utility 3-4 3.1.3 Creating a bootable floppy disk 3-5 3.1.4 AFUDOS utility 3-6 3.1.5 ASUS CrashFree BIOS 3 utility 3-8 3.2 BIOS setup program 3-9 3.2.1 BIOS menu screen 3-10 3.2.2 Menu bar 3-10 3.2.3 Navigation keys 3-10 3.2.4 Menu items 3-11 3.2.5 Sub-menu items...

User Guide
Page 10
... lists the hardware setup procedures that you need when installing and configuring the motherboard. Optional documentation Your product package may have to change system settings through the BIOS Setup menus. ASUS websites The ASUS website provides updated information on the motherboard. • Chapter 3: BIOS setup This chapter tells how to perform when installing system components. Where...
... lists the hardware setup procedures that you need when installing and configuring the motherboard. Optional documentation Your product package may have to change system settings through the BIOS Setup menus. ASUS websites The ASUS website provides updated information on the motherboard. • Chapter 3: BIOS setup This chapter tells how to perform when installing system components. Where...

User Guide
Page 12
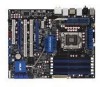
... x PCI-X slots 1 x PCI 2.2 slot Supports NVIDIA® SLI™ Technology* Supports ATI® CrossFireX™ Technology * SLI support may need BIOS update. one at back panel) (continued on eSATA ports. 2 x Realtek® 8111C PCIe Gigabit LAN controllers supporting teaming function 12 x USB 2.0 ports...definition, DIMMs of DDR3-1333 or above are supported by specific CPU models only. ** Refer to 6.4GT/s; Visit www.asus. P6T WS Professional specifications summary CPU Chipset System Bus Memory Expansion Slots Multi-GPU Support Storage LAN USB IEEE 1394 LGA1366 socket for Intel®...
... x PCI-X slots 1 x PCI 2.2 slot Supports NVIDIA® SLI™ Technology* Supports ATI® CrossFireX™ Technology * SLI support may need BIOS update. one at back panel) (continued on eSATA ports. 2 x Realtek® 8111C PCIe Gigabit LAN controllers supporting teaming function 12 x USB 2.0 ports...definition, DIMMs of DDR3-1333 or above are supported by specific CPU models only. ** Refer to 6.4GT/s; Visit www.asus. P6T WS Professional specifications summary CPU Chipset System Bus Memory Expansion Slots Multi-GPU Support Storage LAN USB IEEE 1394 LGA1366 socket for Intel®...
User Guide
Page 13
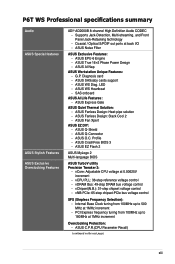
... out ports at 0.00625V increment - ASUS WS Heartbeat - ASUS Q-Shield - Diagnosis card - ASUS Fanless Design: Heat-pipe solution - Profile - vChipset(N.B.): 31-step chipset voltage control - ASUS AI Nap ASUS Workstation Unique Features: - Supports Jack-Detection, Multi-streaming, and Front Panel Jack-Retasking technology - P6T WS Professional specifications summary Audio ASUS Special features ASUS Stylish Features ASUS Exclusive Overclocking Features ADI® AD2000B...
... out ports at 0.00625V increment - ASUS WS Heartbeat - ASUS Q-Shield - Diagnosis card - ASUS Fanless Design: Heat-pipe solution - Profile - vChipset(N.B.): 31-step chipset voltage control - ASUS AI Nap ASUS Workstation Unique Features: - Supports Jack-Detection, Multi-streaming, and Front Panel Jack-Retasking technology - P6T WS Professional specifications summary Audio ASUS Special features ASUS Stylish Features ASUS Exclusive Overclocking Features ADI® AD2000B...

User Guide
Page 14
P6T WS Professional specifications summary Back Panel I/O Ports 1 x PS/2 Keyboard / Mouse combo port 1 x S/PDIF Out (Coaxial + Optical) 2 x External SATA ports 1 x IEEE1394a port 2 x RJ45 ports 6 x USB 2.0/1.1 ports 8-channel Audio I/O... CD audio in 24-pin ATX Power connector 8-pin ATX+ 12V Power connector System Panel (Q-Connector) 1 x TPM connector BIOS Features 16 Mb AMI BIOS, PnP, DMI 2.0, WfM 2.0, SM BIOS 2.4, Multi-language BIOS Manageability WOL by PME, WOR by PME, Chassis Intrusion, PXE Support DVD Contents Drivers ASUS PC Probe II ASUS Update ASUS AI Suite Image-Editing Suite...
P6T WS Professional specifications summary Back Panel I/O Ports 1 x PS/2 Keyboard / Mouse combo port 1 x S/PDIF Out (Coaxial + Optical) 2 x External SATA ports 1 x IEEE1394a port 2 x RJ45 ports 6 x USB 2.0/1.1 ports 8-channel Audio I/O... CD audio in 24-pin ATX Power connector 8-pin ATX+ 12V Power connector System Panel (Q-Connector) 1 x TPM connector BIOS Features 16 Mb AMI BIOS, PnP, DMI 2.0, WfM 2.0, SM BIOS 2.4, Multi-language BIOS Manageability WOL by PME, WOR by PME, Chassis Intrusion, PXE Support DVD Contents Drivers ASUS PC Probe II ASUS Update ASUS AI Suite Image-Editing Suite...

User Guide
Page 18
...processor is one of either SLI™ or CrossFireX™. SLI and CrossFireX on Demand The P6T WS Professional breaks the boundaries to safeguard consumers' health while minimizing the impact on the use of Hazardous Substances...See page 2-5 for details. 1.3 Special features 1.3.1 Product highlights Green ASUS This motherboard and its packaging comply with the European Union's Restriction on the environment. Visit www.asus.com for details. The triple-channel DDR3 architecture enlarges the bandwidth of..., allowing increased bandwidth and stability. SLI support may need BIOS update.
...processor is one of either SLI™ or CrossFireX™. SLI and CrossFireX on Demand The P6T WS Professional breaks the boundaries to safeguard consumers' health while minimizing the impact on the use of Hazardous Substances...See page 2-5 for details. 1.3 Special features 1.3.1 Product highlights Green ASUS This motherboard and its packaging comply with the European Union's Restriction on the environment. Visit www.asus.com for details. The triple-channel DDR3 architecture enlarges the bandwidth of..., allowing increased bandwidth and stability. SLI support may need BIOS update.

User Guide
Page 22
... install computer components, update the BIOS or back up your pictures without entering Windows at a time and avoiding wrong cable connections. ASUS EZ DIY ASUS EZ DIY feature collection provides you view your favorite settings. ASUS Q-Connector ASUS Q-Connector allows you with friends,... Yahoo! The actual boot time depends on the weather and e-mails just before leaving your motherboard against static electricity damage and shields it against Electronic Magnetic Interference (EMI). ASUS Express Gate Taking only 5 seconds to go online from bootup, Express Gate is purchased separately...
... install computer components, update the BIOS or back up your pictures without entering Windows at a time and avoiding wrong cable connections. ASUS EZ DIY ASUS EZ DIY feature collection provides you view your favorite settings. ASUS Q-Connector ASUS Q-Connector allows you with friends,... Yahoo! The actual boot time depends on the weather and e-mails just before leaving your motherboard against static electricity damage and shields it against Electronic Magnetic Interference (EMI). ASUS Express Gate Taking only 5 seconds to go online from bootup, Express Gate is purchased separately...

User Guide
Page 23
...ASUS CrashFree BIOS 3 The ASUS CrashFree BIOS 3 allows users to launch the utility and update the BIOS without preparing a bootable diskette or using an OS-based flash utility. ASUS EZ Flash 2 EZ Flash 2 is a user-friendly BIOS update utility. Update your screen. See page 4-10 for details. ASUS P6T WS Professional 1-7 ASUS O.C. The BIOS...the BIOS file. Profile that allows users to share and distribute their favorite settings. ASUS MyLogo2™ This feature allows you to select the language of your system easier and faster. Profile The motherboard features the ASUS O.C....
...ASUS CrashFree BIOS 3 The ASUS CrashFree BIOS 3 allows users to launch the utility and update the BIOS without preparing a bootable diskette or using an OS-based flash utility. ASUS EZ Flash 2 EZ Flash 2 is a user-friendly BIOS update utility. Update your screen. See page 4-10 for details. ASUS P6T WS Professional 1-7 ASUS O.C. The BIOS...the BIOS file. Profile that allows users to share and distribute their favorite settings. ASUS MyLogo2™ This feature allows you to select the language of your system easier and faster. Profile The motherboard features the ASUS O.C....

User Guide
Page 43
...ASUS P6T WS Professional 2-17 Make sure to the tables on the next page for information on the system and change the necessary BIOS settings, if any. Refer to unplug the power cord before adding or removing expansion cards. Failure to use . 4. Remove the system unit cover (if your motherboard ...is completely seated on shared slots, ensure that the drivers support "Share IRQ" or that the cards do so may cause you may need IRQ assignments. Turn on BIOS setup. 2. Refer to the card. Replace the system cover...
...ASUS P6T WS Professional 2-17 Make sure to the tables on the next page for information on the system and change the necessary BIOS settings, if any. Refer to unplug the power cord before adding or removing expansion cards. Failure to use . 4. Remove the system unit cover (if your motherboard ...is completely seated on shared slots, ensure that the drivers support "Share IRQ" or that the cards do so may cause you may need IRQ assignments. Turn on BIOS setup. 2. Refer to the card. Replace the system cover...

User Guide
Page 47
... unplug the power cord. 2. Hold down and reboot the system so the BIOS can clear the CMOS memory of date, time, and system setup parameters by erasing the CMOS RTC RAM data. You must turn ON the computer. 4. ASUS P6T WS Professional 2-21 Plug the power cord and turn off is required to pins 1-2. 3. Except... again to re-enter data. Clear RTC RAM (CLRTC) This jumper allows you to pins 2-3. Shut down the key during the boot process and enter BIOS setup to clear the CMOS RTC RAM data. 2.6 Jumpers 1. Move the jumper cap from pins 1-2 (default) to clear the Real Time Clock (RTC) RAM in...
... unplug the power cord. 2. Hold down and reboot the system so the BIOS can clear the CMOS memory of date, time, and system setup parameters by erasing the CMOS RTC RAM data. You must turn ON the computer. 4. ASUS P6T WS Professional 2-21 Plug the power cord and turn off is required to pins 1-2. 3. Except... again to re-enter data. Clear RTC RAM (CLRTC) This jumper allows you to pins 2-3. Shut down the key during the boot process and enter BIOS setup to clear the CMOS RTC RAM data. 2.6 Jumpers 1. Move the jumper cap from pins 1-2 (default) to clear the Real Time Clock (RTC) RAM in...

User Guide
Page 48
...with voltage requirement over 1.65V may cause the system to enable or disable the advanced CPU, DRAM Bus, and QPI DRAM overvoltage settings in BIOS. Make sure your system functions well under high voltage settings. 2-22 Chapter 2: Hardware information Doing so may damage the CPU permanently. 2.... and have not booted for example, a watercooling system) to work stably under the highest BIOS voltage settings before you change the jumper settings for extra-high overvoltage ability, use the BIOS items first to adjust the desired CPU, DRAM, and QPI performance. We recommend you change...
...with voltage requirement over 1.65V may cause the system to enable or disable the advanced CPU, DRAM Bus, and QPI DRAM overvoltage settings in BIOS. Make sure your system functions well under high voltage settings. 2-22 Chapter 2: Hardware information Doing so may damage the CPU permanently. 2.... and have not booted for example, a watercooling system) to work stably under the highest BIOS voltage settings before you change the jumper settings for extra-high overvoltage ability, use the BIOS items first to adjust the desired CPU, DRAM, and QPI performance. We recommend you change...

User Guide
Page 53
... [RAID]. See section 3.3.5 Storage Configuration for details. • Before creating a RAID set the Configure SATA as item in the BIOS to [AHCI]. ASUS P6T WS Professional 2-27 The Serial ATA RAID feature (RAID 0, 1, 5, and 10) is available only if you intend to these connectors, set using Serial ATA hard disk drives. 2.... IDE mode, you can connect Serial ATA boot/data hard disk drives to create a Serial ATA RAID set the Configure SATA as in the motherboard support DVD. • You must install the Windows® XP Service Pack 1 before using these connectors.
... [RAID]. See section 3.3.5 Storage Configuration for details. • Before creating a RAID set the Configure SATA as item in the BIOS to [AHCI]. ASUS P6T WS Professional 2-27 The Serial ATA RAID feature (RAID 0, 1, 5, and 10) is available only if you intend to these connectors, set using Serial ATA hard disk drives. 2.... IDE mode, you can connect Serial ATA boot/data hard disk drives to create a Serial ATA RAID set the Configure SATA as in the motherboard support DVD. • You must install the Windows® XP Service Pack 1 before using these connectors.

User Guide
Page 54
... set , see section 4.4.4 Marvell® SAS RAID configurations for SAS (Serial Attached SCSI) signal cables that you cannot enter the Marvell RAID utility and SAS BIOS setup during POST. 2-28 Chapter 2: Hardware information
... set , see section 4.4.4 Marvell® SAS RAID configurations for SAS (Serial Attached SCSI) signal cables that you cannot enter the Marvell RAID utility and SAS BIOS setup during POST. 2-28 Chapter 2: Hardware information

User Guide
Page 58
... to connect an AC' 97 front panel audio module to this connector when a chassis component is removed or replaced. Connect one end of the motherboard's high-definition audio capability. • If you intend to this connector, set to [AC97]. If you connect a high-definition front panel audio... sensor or switch cable to this connector. Connect one end of the front panel audio I /O module that the Front Panel Type item in the BIOS is for a chassis-mounted intrusion detection sensor or switch. By default , the pin labeled "Chassis Signal" and "Ground" are shorted with a jumper...
... to connect an AC' 97 front panel audio module to this connector when a chassis component is removed or replaced. Connect one end of the motherboard's high-definition audio capability. • If you intend to this connector, set to [AC97]. If you connect a high-definition front panel audio... sensor or switch cable to this connector. Connect one end of the front panel audio I /O module that the Front Panel Type item in the BIOS is for a chassis-mounted intrusion detection sensor or switch. By default , the pin labeled "Chassis Signal" and "Ground" are shorted with a jumper...

User Guide
Page 61
...power, and blinks when the system is in sleep or soft-off the system power. ASUS P6T WS Professional 2-35 Connect the chassis power LED cable to the HDD. • System warning ...connector. Connect the HDD Activity LED cable to hear system beeps and warnings. • ATX power button/soft-off button (2-pin PWRSW) This connector is for system reboot without ... 2-pin connector is for the system power button. Pressing the power button turns the system on the BIOS settings. System panel connector (20-8 pin PANEL) This connector supports several chassis-mounted functions. •...
...power, and blinks when the system is in sleep or soft-off the system power. ASUS P6T WS Professional 2-35 Connect the chassis power LED cable to the HDD. • System warning ...connector. Connect the HDD Activity LED cable to hear system beeps and warnings. • ATX power button/soft-off button (2-pin PWRSW) This connector is for system reboot without ... 2-pin connector is for the system power button. Pressing the power button turns the system on the BIOS settings. System panel connector (20-8 pin PANEL) This connector supports several chassis-mounted functions. •...

User Guide
Page 64
... D1 Enable IO device for bootlock D2 Check and wake up system D3 Prepare system for memory detection and sizing D4 Memory test D5 Copy BIOS from ROM to RAM C0 Early CPU initiation C5 Wake up AP 0A Initiate KBC8042 0B Detect PS2 mouse 0C Detect PS2 keyboard 2A Initiate... USB initiation 52 Display USB devices 75 Detect IDE 78 Initiate option ROM 85 Show post error 87 Enter BIOS setup A4 BIOS boot menu AC OS in PIC mode AA OS in APIC mode 01 S1 03 S3 04 S4 05 S5 10 Resume from S1 30 ...
... D1 Enable IO device for bootlock D2 Check and wake up system D3 Prepare system for memory detection and sizing D4 Memory test D5 Copy BIOS from ROM to RAM C0 Early CPU initiation C5 Wake up AP 0A Initiate KBC8042 0B Detect PS2 mouse 0C Detect PS2 keyboard 2A Initiate... USB initiation 52 Display USB devices 75 Detect IDE 78 Initiate option ROM 85 Show post error 87 Enter BIOS setup A4 BIOS boot menu AC OS in PIC mode AA OS in APIC mode 01 S1 03 S3 04 S4 05 S5 10 Resume from S1 30 ...

User Guide
Page 65
...on the chain) c. Check the jumper settings and connections or call your monitor complies with the last device on self tests or POST. ASUS P6T WS Professional 2-39 BIOS Beep Description One short beep VGA detected Quick boot set to the power connector at the back of the system chassis. 4. Follow the ...additional messages appear on the system front panel case lights up. At power on the devices in Chapter 3. Be sure that is equipped with ATX power supplies, the system LED lights up when you turned on the power, the system may light up or switch between orange and green...
...on the chain) c. Check the jumper settings and connections or call your monitor complies with the last device on self tests or POST. ASUS P6T WS Professional 2-39 BIOS Beep Description One short beep VGA detected Quick boot set to the power connector at the back of the system chassis. 4. Follow the ...additional messages appear on the system front panel case lights up. At power on the devices in Chapter 3. Be sure that is equipped with ATX power supplies, the system LED lights up when you turned on the power, the system may light up or switch between orange and green...

User Guide
Page 66
...; shuts down. Click the Start button then select Shut Down. 2. If you are using Windows® Vista™: 1. 2.10 Turning off mode regardless of the BIOS setting. The power supply should turn off mode, depending on the...
...; shuts down. Click the Start button then select Shut Down. 2. If you are using Windows® Vista™: 1. 2.10 Turning off mode regardless of the BIOS setting. The power supply should turn off mode, depending on the...

User Guide
Page 67
Detailed descriptions of the BIOS parameters are also provided. 3 BIOS setup This chapter tells how to change the system settings through the BIOS Setup menus.
Detailed descriptions of the BIOS parameters are also provided. 3 BIOS setup This chapter tells how to change the system settings through the BIOS Setup menus.

User Guide
Page 68
Chapter summary 3 3.1 Managing and updating your BIOS 3-1 3.2 BIOS setup program 3-9 3.3 Main menu 3-12 3.4 Ai Tweaker 3-17 3.5 Advanced menu 3-25 3.6 Power menu 3-32 3.7 Boot menu 3-36 3.8 Tools menu 3-40 3.9 Exit menu 3-44 ASUS P6T WS Professional
Chapter summary 3 3.1 Managing and updating your BIOS 3-1 3.2 BIOS setup program 3-9 3.3 Main menu 3-12 3.4 Ai Tweaker 3-17 3.5 Advanced menu 3-25 3.6 Power menu 3-32 3.7 Boot menu 3-36 3.8 Tools menu 3-40 3.9 Exit menu 3-44 ASUS P6T WS Professional


