
User Manual
Page 1
Motherboard
Motherboard

User Manual
Page 1
P6T SE Motherboard
P6T SE Motherboard

User Manual
Page 3
Contents Contents...iii Notices ...vii Safety information...viii About this guide...ix P6T SE specifications summary xi Chapter 1: Product introduction 1.1 Welcome!...1-1 1.2 Package contents 1-1 1.3 Special features 1-2 1.3.1 Product highlights 1-2 1.3.2 ASUS Unique features 1-2 Chapter 2: Hardware information 2.1 Before you proceed 2-1 2.2 Motherboard overview 2-2 2.2.1 Motherboard layout 2-2 2.2.2 Layout contents 2-3 2.2.3 Placement direction 2-4 2.2.4 Screw holes 2-4 2.3 Central Processing Unit (CPU 2-5 2.3.1 Installing the CPU 2-5 2.3.2 Installing the CPU...
Contents Contents...iii Notices ...vii Safety information...viii About this guide...ix P6T SE specifications summary xi Chapter 1: Product introduction 1.1 Welcome!...1-1 1.2 Package contents 1-1 1.3 Special features 1-2 1.3.1 Product highlights 1-2 1.3.2 ASUS Unique features 1-2 Chapter 2: Hardware information 2.1 Before you proceed 2-1 2.2 Motherboard overview 2-2 2.2.1 Motherboard layout 2-2 2.2.2 Layout contents 2-3 2.2.3 Placement direction 2-4 2.2.4 Screw holes 2-4 2.3 Central Processing Unit (CPU 2-5 2.3.1 Installing the CPU 2-5 2.3.2 Installing the CPU...
User Manual
Page 8
... adding or removing devices to or from the system, ensure that the power cables for disposal of electronic products. Operation safety • Before installing the motherboard and adding devices on a stable surface. • If you add a device. • Before connecting or removing signal cables from the... motherboard, ensure that all power cables are not sure about the voltage of the electrical outlet you detect any area where it may become wet. • ...
... adding or removing devices to or from the system, ensure that the power cables for disposal of electronic products. Operation safety • Before installing the motherboard and adding devices on a stable surface. • If you add a device. • Before connecting or removing signal cables from the... motherboard, ensure that all power cables are not sure about the voltage of the electrical outlet you detect any area where it may become wet. • ...

User Manual
Page 9
... support DVD that may have to perform when installing system components. ASUS websites The ASUS website provides updated information on the motherboard. • Chapter 3: BIOS setup This chapter tells how to the ASUS contact information. 2. Refer to change system settings through the BIOS Setup... are not part of the switches, jumpers, and connectors on ASUS hardware and software products. Optional documentation Your product package may include optional documentation, such as warranty flyers, that comes with the motherboard package and the software. • Chapter 5: ATI® ...
... support DVD that may have to perform when installing system components. ASUS websites The ASUS website provides updated information on the motherboard. • Chapter 3: BIOS setup This chapter tells how to the ASUS contact information. 2. Refer to change system settings through the BIOS Setup... are not part of the switches, jumpers, and connectors on ASUS hardware and software products. Optional documentation Your product package may include optional documentation, such as warranty flyers, that comes with the motherboard package and the software. • Chapter 5: ATI® ...
User Manual
Page 15
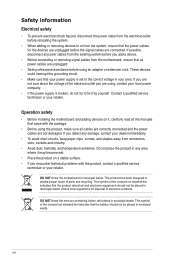
... following items. User Manual ASUS P6T SE motherboard User guide Support DVD 4 x Serial ATA signal cables 1 x Ultra DMA 133/ 100/66 cable 1 x ASUS Q-Shield 1 x ASUS Q-Connector kit • If any of ASUS quality motherboards! Product introduction Thank you start installing the motherboard, and hardware devices on it another standout in your package with different models. ASUS P6T SE 1-1 The motherboard delivers a host of...
... following items. User Manual ASUS P6T SE motherboard User guide Support DVD 4 x Serial ATA signal cables 1 x Ultra DMA 133/ 100/66 cable 1 x ASUS Q-Shield 1 x ASUS Q-Connector kit • If any of ASUS quality motherboards! Product introduction Thank you start installing the motherboard, and hardware devices on it another standout in your package with different models. ASUS P6T SE 1-1 The motherboard delivers a host of...
User Manual
Page 16
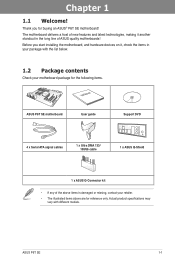
...is one of up to boost system performance. Triple-Channel DDR3 2000(O.C.) / 1866(O.C.) / 1800(O.C.) / 1600(O.C.) / 1333 / 1066 support The motherboard supports DDR3 memory that features data transfer rates of 2000(O.C.) / 1866(O.C.) / 1800(O.C.) / 1600(O.C.) /1333 / 1066 MHz to meet the ... micro adjustments of the latest 3D graphics, multimedia, and Internet applications. Chapter 1 1.3 Special features 1.3.1 Product highlights Green ASUS This motherboard and its packaging comply with the European Union's Restriction on the use interface-allowing you set new ambitions on the environment....
...is one of up to boost system performance. Triple-Channel DDR3 2000(O.C.) / 1866(O.C.) / 1800(O.C.) / 1600(O.C.) / 1333 / 1066 support The motherboard supports DDR3 memory that features data transfer rates of 2000(O.C.) / 1866(O.C.) / 1800(O.C.) / 1600(O.C.) /1333 / 1066 MHz to meet the ... micro adjustments of the latest 3D graphics, multimedia, and Internet applications. Chapter 1 1.3 Special features 1.3.1 Product highlights Green ASUS This motherboard and its packaging comply with the European Union's Restriction on the use interface-allowing you set new ambitions on the environment....
User Manual
Page 17
...intelligent acceleration and overclocking-helping save power and money. ASUS Express Gate Taking only 5 seconds to go online from CPU fan or bundled optional fan. ASUS P6T SE 1-3 Messenger to keep in OS. ASUS Power Saving Solution ASUS Power Saving solution intelligently and automatically provides balanced computing power...and high quality Japanese-made conductive polymer capacitors all add up to instant fun! The actual boot time depends on this motherboard is the one-stop gateway to ensure longer component life and lower power loss-creating more energy efficiency. What's more stable...
...intelligent acceleration and overclocking-helping save power and money. ASUS Express Gate Taking only 5 seconds to go online from CPU fan or bundled optional fan. ASUS P6T SE 1-3 Messenger to keep in OS. ASUS Power Saving Solution ASUS Power Saving solution intelligently and automatically provides balanced computing power...and high quality Japanese-made conductive polymer capacitors all add up to instant fun! The actual boot time depends on this motherboard is the one-stop gateway to ensure longer component life and lower power loss-creating more energy efficiency. What's more stable...
User Manual
Page 18
... users to adjust both the CPU and chassis fan speed according to the motherboard. See page 4-5 for details. 1-4 Chapter 1: Product Introduction ASUS O.C. See page 3-5 for details. ASUS Q-Connector ASUS Q-Connector allows you easy ways to install. Without the usual "fingers" present...a fan-less and zero-noise cooling solution that allows users to achieve a quiet and cool environment. Profile The motherboard features the ASUS O.C. Built-in different geographic regions and system loading. Profile that lowers the temperature of connecting the system panel cables...
... users to adjust both the CPU and chassis fan speed according to the motherboard. See page 4-5 for details. 1-4 Chapter 1: Product Introduction ASUS O.C. See page 3-5 for details. ASUS Q-Connector ASUS Q-Connector allows you easy ways to install. Without the usual "fingers" present...a fan-less and zero-noise cooling solution that allows users to achieve a quiet and cool environment. Profile The motherboard features the ASUS O.C. Built-in different geographic regions and system loading. Profile that lowers the temperature of connecting the system panel cables...
User Manual
Page 21
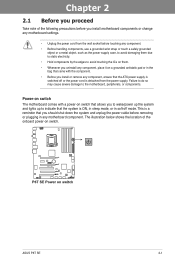
...such as the power supply case, to avoid damaging them due to static electricity. • Hold components by the edges to the motherboard, peripherals, or components. Chapter 2 ASUS P6T SE 2-1 Failure to do so may cause severe damage to avoid touching the ICs on them. • Whenever you uninstall any component, ...that came with a power-on switch The motherboard comes with the component. • Before you to wake/power up the system and lights up to indicate that the system is ON, in sleep mode, or in any component, ensure that the ATX power supply is a reminder that allows ...
...such as the power supply case, to avoid damaging them due to static electricity. • Hold components by the edges to the motherboard, peripherals, or components. Chapter 2 ASUS P6T SE 2-1 Failure to do so may cause severe damage to avoid touching the ICs on them. • Whenever you uninstall any component, ...that came with a power-on switch The motherboard comes with the component. • Before you to wake/power up the system and lights up to indicate that the system is ON, in sleep mode, or in any component, ensure that the ATX power supply is a reminder that allows ...

User Manual
Page 22
2.2 Motherboard overview 2.2.1 Motherboard layout Chapter 2 Refer to 2.8 Connectors for more information about rear panel connectors and internal connectors. 2-2 Chapter 2: Hardware information
2.2 Motherboard overview 2.2.1 Motherboard layout Chapter 2 Refer to 2.8 Connectors for more information about rear panel connectors and internal connectors. 2-2 Chapter 2: Hardware information

User Manual
Page 24
2.2.3 Placement direction When installing the motherboard, ensure that you place it into the holes indicated by circles to secure the motherboard to the rear part of the chassis Chapter 2 2-4 Chapter 2: Hardware information The edge with external ports goes to the chassis. Doing so can damage the motherboard. Place this side towards the rear of the chassis as indicated in the image below. 2.2.4 Screw holes Place nine screws into the chassis in the correct orientation. DO NOT overtighten the screws!
2.2.3 Placement direction When installing the motherboard, ensure that you place it into the holes indicated by circles to secure the motherboard to the rear part of the chassis Chapter 2 2-4 Chapter 2: Hardware information The edge with external ports goes to the chassis. Doing so can damage the motherboard. Place this side towards the rear of the chassis as indicated in the image below. 2.2.4 Screw holes Place nine screws into the chassis in the correct orientation. DO NOT overtighten the screws!
User Manual
Page 25
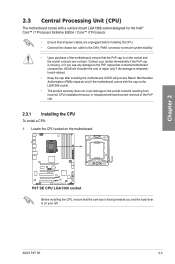
ASUS will process Return Merchandise Authorization (RMA) requests only if the motherboard comes with a surface mount LGA1366 socket designed for the Intel® Core™ i7 Processor Extreme Edition / Core™ i7 Processor. • Ensure that all ... shoulder the cost of repair only if the damage is shipment/ transit-related. • Keep the cap after installing the motherboard. ASUS P6T SE 2-5 Locate the CPU socket on the LGA1366 socket. • The product warranty does not cover damage to the socket contacts resulting from incorrect CPU installation/...
ASUS will process Return Merchandise Authorization (RMA) requests only if the motherboard comes with a surface mount LGA1366 socket designed for the Intel® Core™ i7 Processor Extreme Edition / Core™ i7 Processor. • Ensure that all ... shoulder the cost of repair only if the damage is shipment/ transit-related. • Keep the cap after installing the motherboard. ASUS P6T SE 2-5 Locate the CPU socket on the LGA1366 socket. • The product warranty does not cover damage to the socket contacts resulting from incorrect CPU installation/...
User Manual
Page 28
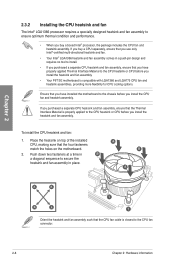
...1. If you buy a boxed Intel® processor, the package includes the CPU fan and heatsink assembly. Ensure that you have installed the motherboard to the CPU fan connector. 2-8 Chapter 2: Hardware information If you purchased a separate CPU heatsink and fan assembly, ensure that the four ...the Thermal Interface Material is properly applied to the CPU heatsink or CPU before you install the heatsink and fan assembly. • Your P6T SE motherboard is closest to the chassis before you install the CPU fan and heatsink assembly. Push down two fasteners at a time in B ...
...1. If you buy a boxed Intel® processor, the package includes the CPU fan and heatsink assembly. Ensure that you have installed the motherboard to the CPU fan connector. 2-8 Chapter 2: Hardware information If you purchased a separate CPU heatsink and fan assembly, ensure that the four ...the Thermal Interface Material is properly applied to the CPU heatsink or CPU before you install the heatsink and fan assembly. • Your P6T SE motherboard is closest to the chassis before you install the CPU fan and heatsink assembly. Push down two fasteners at a time in B ...

User Manual
Page 29
A B A A B B A 4. ASUS P6T SE 2-9 3. Connect the CPU fan cable to disengage the heatsink and fan assembly from the motherboard. Carefully remove the heatsink and fan assembly from the motherboard. Hardware monitoring errors can occur if you fail to connect the CPU fan connector! Pull up two fasteners... at a time in a B diagonal sequence to the connector on the motherboard. 2. Chapter 2 DO NOT forget to plug this connector. 2.3.3 Uninstalling the CPU heatsink and fan To uninstall the CPU heatsink and ...
A B A A B B A 4. ASUS P6T SE 2-9 3. Connect the CPU fan cable to disengage the heatsink and fan assembly from the motherboard. Carefully remove the heatsink and fan assembly from the motherboard. Hardware monitoring errors can occur if you fail to connect the CPU fan connector! Pull up two fasteners... at a time in a B diagonal sequence to the connector on the motherboard. 2. Chapter 2 DO NOT forget to plug this connector. 2.3.3 Uninstalling the CPU heatsink and fan To uninstall the CPU heatsink and ...

User Manual
Page 30
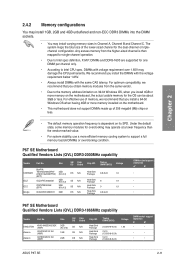
Follow the table above for better performance with six Double Data Rate 3 (DDR3) Dual Inline Memory Modules (DIMM) sockets. 2.4 System memory 2.4.1 Overview The motherboard comes with less power consumption. A DDR3 module has the same physical dimensions as a DDR2 DIMM but is installed in DIMM slot A2, B2, or C2. ...
Follow the table above for better performance with six Double Data Rate 3 (DDR3) Dual Inline Memory Modules (DIMM) sockets. 2.4 System memory 2.4.1 Overview The motherboard comes with less power consumption. A DDR3 module has the same physical dimensions as a DDR2 DIMM but is installed in DIMM slot A2, B2, or C2. ...
User Manual
Page 31
...) A* B* • • • • P6T SE Motherboard Qualified Vendors Lists (QVL) DDR3-1866MHz capability Vendor Part No. Heat-Sink Package Heat-Sink Package Heat-Sink Package Timing DIMM (BIOS) (1333-9-9-9-24) CL10 (1333-8-8-8-24) CL10 (1333-8-8-8-24) Voltage 1.65 DIMM socket support (Optional) A* B* • • • • • • ASUS P6T SE 2-11 For effective use...
...) A* B* • • • • P6T SE Motherboard Qualified Vendors Lists (QVL) DDR3-1866MHz capability Vendor Part No. Heat-Sink Package Heat-Sink Package Heat-Sink Package Timing DIMM (BIOS) (1333-9-9-9-24) CL10 (1333-8-8-8-24) CL10 (1333-8-8-8-24) Voltage 1.65 DIMM socket support (Optional) A* B* • • • • • • ASUS P6T SE 2-11 For effective use...
User Manual
Page 32
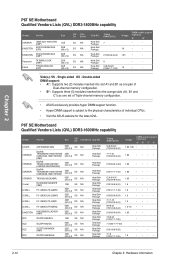
... Supports three (3) modules inserted into the orange slots (A1, B1 and C1) as one set of Triple-channel memory configuration. • ASUS exclusively provides hyper DIMM support function. • Hyper DIMM support is subject to the physical characteristics of 2) DS N/A Heat-Sink Package Heat... 3) 2GB (Kit of 2) 2GB (Kit of 2) SS/ Chip DS Brand SS N/A SS N/A SS N/A SS N/A SS N/A Chip NO. Chapter 2 P6T SE Motherboard Qualified Vendors Lists (QVL) DDR3-1800MHz capability Vendor Part No. Heat-Sink Package Heat-Sink Package Heat-Sink Package Heat-Sink Package Heat-Sink Package...
... Supports three (3) modules inserted into the orange slots (A1, B1 and C1) as one set of Triple-channel memory configuration. • ASUS exclusively provides hyper DIMM support function. • Hyper DIMM support is subject to the physical characteristics of 2) DS N/A Heat-Sink Package Heat... 3) 2GB (Kit of 2) 2GB (Kit of 2) SS/ Chip DS Brand SS N/A SS N/A SS N/A SS N/A SS N/A Chip NO. Chapter 2 P6T SE Motherboard Qualified Vendors Lists (QVL) DDR3-1800MHz capability Vendor Part No. Heat-Sink Package Heat-Sink Package Heat-Sink Package Heat-Sink Package Heat-Sink Package...
User Manual
Page 33
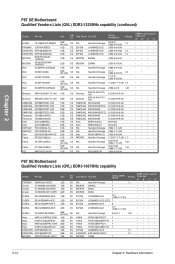
...Sink Package 7-7-7-21 (1333-8-8-824) Voltage 1.9 1.7-1.9 1.65 2.0 1.65 DIMM socket support (Optional) A* B* C* D 1.75-1.85 P6T SE Motherboard Qualified Vendors Lists (QVL) DDR3-1333MHz capability Vendor A-DATA A-DATA Apacer Apacer Apacer Apacer CORSAIR CORSAIR CORSAIR CORSAIR CORSAIR CORSAIR CORSAIR Crucial ...1.65 •••• (1333-9-9-9-24) 1.5-1.65 (1333-9-9-9-24) 1.65 •••• ASUS P6T SE 2-13 OCZ Aeneon Aeneon Cell Shock Mushkin Patriot Patriot Patriot PQI Team OCZ3X16004GK AXH760UD10-16H AXH860UD20-16H CS322271 996657 PVT33G1600ELK...
...Sink Package 7-7-7-21 (1333-8-8-824) Voltage 1.9 1.7-1.9 1.65 2.0 1.65 DIMM socket support (Optional) A* B* C* D 1.75-1.85 P6T SE Motherboard Qualified Vendors Lists (QVL) DDR3-1333MHz capability Vendor A-DATA A-DATA Apacer Apacer Apacer Apacer CORSAIR CORSAIR CORSAIR CORSAIR CORSAIR CORSAIR CORSAIR Crucial ...1.65 •••• (1333-9-9-9-24) 1.5-1.65 (1333-9-9-9-24) 1.65 •••• ASUS P6T SE 2-13 OCZ Aeneon Aeneon Cell Shock Mushkin Patriot Patriot Patriot PQI Team OCZ3X16004GK AXH760UD10-16H AXH860UD20-16H CS322271 996657 PVT33G1600ELK...
User Manual
Page 34
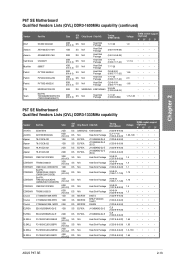
Chapter 2 P6T SE Motherboard Qualified Vendors Lists (QVL) DDR3-1333MHz capability (continued) Vendor Part No. N/A MICRON MICRON MICRON ELPIDA ELPIDA ELPIDA ELPIDA Heat-Sink Package Z9HWQ D9JNL ...Heat-Sink Package CL9-9-9-24 (1066-7-7-7-20) 1.65 1GB DS PQI PQC3648S15R (1333-9-9-9-24) • •••• •• •••• P6T SE Motherboard Qualified Vendors Lists (QVL) DDR3-1067MHz capability Vendor Part No. G.SKILL F3-10666CL9T-6GBNQ KINGMAX KINGSTON KINGSTON MICRON MICRON OCZ FLFD45F-B8EE9 KVR1333D3N9/1G KVR1333D3N9...
Chapter 2 P6T SE Motherboard Qualified Vendors Lists (QVL) DDR3-1333MHz capability (continued) Vendor Part No. N/A MICRON MICRON MICRON ELPIDA ELPIDA ELPIDA ELPIDA Heat-Sink Package Z9HWQ D9JNL ...Heat-Sink Package CL9-9-9-24 (1066-7-7-7-20) 1.65 1GB DS PQI PQC3648S15R (1333-9-9-9-24) • •••• •• •••• P6T SE Motherboard Qualified Vendors Lists (QVL) DDR3-1067MHz capability Vendor Part No. G.SKILL F3-10666CL9T-6GBNQ KINGMAX KINGSTON KINGSTON MICRON MICRON OCZ FLFD45F-B8EE9 KVR1333D3N9/1G KVR1333D3N9...


