
Motherboard Installation Guide
Page 3
...Welcome 1-1 1.2 Package contents 1-1 1.3 Special features 1-2 1.3.1 Product highlights 1-2 1.3.2 ASUS special features 1-4 1.3.3 ASUS stylish features 1-7 1.3.4 ASUS intelligent overclocking features 1-7 Chapter 2: Hardware information 2.1 Before you proceed 2-1 2.2 Motherboard overview 2-2 2.2.1 Placement direction 2-2 2.2.2 Screw holes 2-2 2.2.3 Motherboard layout 2-3 2.2.4 Layout contents 2-4 2.3 Central Processing Unit (CPU 2-6 2.3.1 Installing the CPU 2-7 2.3.2 Installing the CPU heatsink and fan 2-9 2.3.3 Uninstalling the CPU heatsink and fan 2-11 2.4 System memory 2-13...
...Welcome 1-1 1.2 Package contents 1-1 1.3 Special features 1-2 1.3.1 Product highlights 1-2 1.3.2 ASUS special features 1-4 1.3.3 ASUS stylish features 1-7 1.3.4 ASUS intelligent overclocking features 1-7 Chapter 2: Hardware information 2.1 Before you proceed 2-1 2.2 Motherboard overview 2-2 2.2.1 Placement direction 2-2 2.2.2 Screw holes 2-2 2.2.3 Motherboard layout 2-3 2.2.4 Layout contents 2-4 2.3 Central Processing Unit (CPU 2-6 2.3.1 Installing the CPU 2-7 2.3.2 Installing the CPU heatsink and fan 2-9 2.3.3 Uninstalling the CPU heatsink and fan 2-11 2.4 System memory 2-13...

Motherboard Installation Guide
Page 6
... support DVD 5-1 5.2.2 Drivers menu 5-2 5.2.3 Utilities menu 5-3 5.2.4 Make Disk menu 5-5 5.2.5 Manual menu 5-6 5.2.6 ASUS Contact information 5-6 5.2.7 Other information 5-7 5.3 Software information 5-9 5.3.1 ASUS MyLogo2 5-9 5.3.2 AI NET2 5-11 5.3.3 ASUS PC Probe II 5-12 vi Contents 4.5.1 CPU Configuration 4-25 4.5.2 Chipset 4-27 4.5.3 Onboard Devices Configuration 4-28 4.5.4 USB Configuration 4-29 4.5.5 PCI PnP 4-30 ...Boot menu 4-35 4.7.1 Boot Device Priority 4-35 4.7.2 Boot Settings Configuration 4-36 4.7.3 Security 4-37 4.8 Tools menu 4-39 4.8.1 ASUS EZ Flash 2 4-39...
... support DVD 5-1 5.2.2 Drivers menu 5-2 5.2.3 Utilities menu 5-3 5.2.4 Make Disk menu 5-5 5.2.5 Manual menu 5-6 5.2.6 ASUS Contact information 5-6 5.2.7 Other information 5-7 5.3 Software information 5-9 5.3.1 ASUS MyLogo2 5-9 5.3.2 AI NET2 5-11 5.3.3 ASUS PC Probe II 5-12 vi Contents 4.5.1 CPU Configuration 4-25 4.5.2 Chipset 4-27 4.5.3 Onboard Devices Configuration 4-28 4.5.4 USB Configuration 4-29 4.5.5 PCI PnP 4-30 ...Boot menu 4-35 4.7.1 Boot Device Priority 4-35 4.7.2 Boot Settings Configuration 4-36 4.7.3 Security 4-37 4.8 Tools menu 4-39 4.8.1 ASUS EZ Flash 2 4-39...
Motherboard Installation Guide
Page 7
Contents 5.3.4 ASUS AI Suite 5-18 5.3.5 ASUS EPU Utility -- AI Gear 3 5-20 5.3.6 ASUS AI Nap 5-21 5.3.7 ASUS Q-Fan 2 5-22 5.3.8 ASUS AI Booster 5-23 5.3.9 AI Audio 2 (SoundMAX® High Definition Audio utility)... ...begin 6-1 6.2 Installing CrossFire™ graphics cards 6-2 6.3 Software information 6-5 6.3.1 Installing the device drivers 6-5 6.3.2 Using the Catalyst™ Control Center 6-7 Appendix: CPU features A.1 Intel® EM64T A-1 Using the Intel® EM64T feature A-1 A.2 Enhanced Intel SpeedStep® Technology (EIST A-1 A.2.1 System requirements A-1 A.2.2 Using ...
Contents 5.3.4 ASUS AI Suite 5-18 5.3.5 ASUS EPU Utility -- AI Gear 3 5-20 5.3.6 ASUS AI Nap 5-21 5.3.7 ASUS Q-Fan 2 5-22 5.3.8 ASUS AI Booster 5-23 5.3.9 AI Audio 2 (SoundMAX® High Definition Audio utility)... ...begin 6-1 6.2 Installing CrossFire™ graphics cards 6-2 6.3 Software information 6-5 6.3.1 Installing the device drivers 6-5 6.3.2 Using the Catalyst™ Control Center 6-7 Appendix: CPU features A.1 Intel® EM64T A-1 Using the Intel® EM64T feature A-1 A.2 Enhanced Intel SpeedStep® Technology (EIST A-1 A.2.1 System requirements A-1 A.2.2 Using ...

Motherboard Installation Guide
Page 10
... describes the ATI CrossFire™ feature and shows the graphics card installation procedures. • Appendix: CPU features The Appendix describes the CPU features and technologies that the motherboard supports. Optional documentation Your product package may have to the ASUS contact information. 2. These documents are also provided. • Chapter 5: Software support This chapter describes...
... describes the ATI CrossFire™ feature and shows the graphics card installation procedures. • Appendix: CPU features The Appendix describes the CPU features and technologies that the motherboard supports. Optional documentation Your product package may have to the ASUS contact information. 2. These documents are also provided. • Chapter 5: Software support This chapter describes...

Motherboard Installation Guide
Page 12
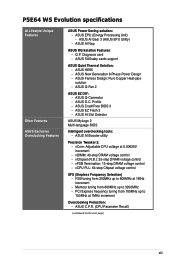
... controller - 1 x UltraDMA 133/100 for up to 12 USB 2.0 / 1.1 ports (6 at mid-board, 6 at back I/O - P5E64 WS Evolution specifications CPU Chipset System bus Memory Expansion slots Storage LAN High Definition audio IEEE 1394 USB LGA775 socket for Intel® Core™2 / Pentium® D...;u�m��e�r�a�ti�o�n�,�M��u�l�ti�- Supports up to www.asus.com for Intel® CPU support list Northbridge: Intel® MCH X48 Southbridge: Intel® ICH9R 1600 / 1333 / 1066 / 800 MHz Dual...
... controller - 1 x UltraDMA 133/100 for up to 12 USB 2.0 / 1.1 ports (6 at mid-board, 6 at back I/O - P5E64 WS Evolution specifications CPU Chipset System bus Memory Expansion slots Storage LAN High Definition audio IEEE 1394 USB LGA775 socket for Intel® Core™2 / Pentium® D...;u�m��e�r�a�ti�o�n�,�M��u�l�ti�- Supports up to www.asus.com for Intel® CPU support list Northbridge: Intel® MCH X48 Southbridge: Intel® ICH9R 1600 / 1333 / 1066 / 800 MHz Dual...
Motherboard Installation Guide
Page 13
... Flash 2 - Memory tuning from 200MHz up to 150MHz at 0.00625V increment - P5E64 WS Evolution specifications AI Lifestyle Unique Features Other Features ASUS Exclusive Overclocking Features ASUS Power Saving solution: - Diagnosis card - ASUS CrashFree BIOS 3 - vCore: Adjustable CPU voltage at 1MHz increment Overclocking Protection: - vCPU PLL: 64-step Chipset voltage control SFS (Stepless Frequency Selection) - FSB...
... Flash 2 - Memory tuning from 200MHz up to 150MHz at 0.00625V increment - P5E64 WS Evolution specifications AI Lifestyle Unique Features Other Features ASUS Exclusive Overclocking Features ASUS Power Saving solution: - Diagnosis card - ASUS CrashFree BIOS 3 - vCore: Adjustable CPU voltage at 1MHz increment Overclocking Protection: - vCPU PLL: 64-step Chipset voltage control SFS (Stepless Frequency Selection) - FSB...
Motherboard Installation Guide
Page 14
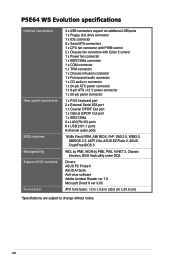
P5E64 WS Evolution specifications Internal connectors Rear panel connectors BIOS features Manageability Support DVD contents Form factor 3 x USB connectors support six additional USB ports 1 x Floppy disk drive connector 1 x IDE connector 6 x Serial ATA connectors 1 x CPU fan connector with PWM control 2 x Chassis fan conectors with Q-fan 2 control 1... USB 2.0/1.1 ports 8-channel audio ports 16 Mb Flash ROM, AMI BIOS, PnP, DMI 2.0, WfM2.0, SMBIOS 2.3, ACPI 2.0a, ASUS EZ Flash 2, ASUS CrashFree BIOS 3 WOL by PME, WOR by PME, PXE, AI NET 2, Chassis Intrusion, BIOS flash utility under DOS Drivers...
P5E64 WS Evolution specifications Internal connectors Rear panel connectors BIOS features Manageability Support DVD contents Form factor 3 x USB connectors support six additional USB ports 1 x Floppy disk drive connector 1 x IDE connector 6 x Serial ATA connectors 1 x CPU fan connector with PWM control 2 x Chassis fan conectors with Q-fan 2 control 1... USB 2.0/1.1 ports 8-channel audio ports 16 Mb Flash ROM, AMI BIOS, PnP, DMI 2.0, WfM2.0, SMBIOS 2.3, ACPI 2.0a, ASUS EZ Flash 2, ASUS CrashFree BIOS 3 WOL by PME, WOR by PME, PXE, AI NET 2, Chassis Intrusion, BIOS flash utility under DOS Drivers...
Motherboard Installation Guide
Page 20
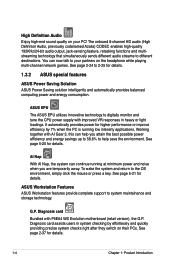
...tune the CPU power supply with improved VR responses in system checking by 7% when the PC is running at minimum power and noise when you attain the best possible power efficiency and energy savings up to 58.6% to help save the environment. ASUS EPU The ASUS EPU ... technology that simultaneously sends different audio streams to the OS environment, simply click the mouse or press a key. Working together with P5E64 WS Evolution motherboard (retail version), the G.P. See page 5-21 for higher performance or improve efficiency by effortlessly and quickly providing precise system checks...
...tune the CPU power supply with improved VR responses in system checking by 7% when the PC is running at minimum power and noise when you attain the best possible power efficiency and energy savings up to 58.6% to help save the environment. ASUS EPU The ASUS EPU ... technology that simultaneously sends different audio streams to the OS environment, simply click the mouse or press a key. Working together with P5E64 WS Evolution motherboard (retail version), the G.P. See page 5-21 for higher performance or improve efficiency by effortlessly and quickly providing precise system checks...
Motherboard Installation Guide
Page 21
... more stable, SAS will provide users with ASUS SASsaby cards (optional). It has the advantages...of quick transient response and stability, especially beneficial when CPU requires more stable and enhances the overclocking capability. DO... loading mode. New Generation 8-Phase Power Design The ASUS 8-Phase Power Design provides highly efficient operation to the...tubing and affect the heat dissipation performance. ASUS Quiet Thermal Solution ASUS Quiet Thermal solution makes system more current ...voltage, which keeps CPU and power module from CPU fan or bundled optional fan. Heat-...
... more stable, SAS will provide users with ASUS SASsaby cards (optional). It has the advantages...of quick transient response and stability, especially beneficial when CPU requires more stable and enhances the overclocking capability. DO... loading mode. New Generation 8-Phase Power Design The ASUS 8-Phase Power Design provides highly efficient operation to the...tubing and affect the heat dissipation performance. ASUS Quiet Thermal Solution ASUS Quiet Thermal solution makes system more current ...voltage, which keeps CPU and power module from CPU fan or bundled optional fan. Heat-...
Motherboard Installation Guide
Page 22
Noise Filter This feature detects repetitive and stationary noises (non-voice signals) like Skype, online game, video conference and recording. Q-Fan 2 ASUS Q-Fan 2 technology intelligently adjusts both CPU fan and chassis fan speeds according to system loading to the motherboard. See page 5-24 to 5-32 for details. 1-6 Chapter 1: Product Introduction See page 2-36...
Noise Filter This feature detects repetitive and stationary noises (non-voice signals) like Skype, online game, video conference and recording. Q-Fan 2 ASUS Q-Fan 2 technology intelligently adjusts both CPU fan and chassis fan speeds according to system loading to the motherboard. See page 5-24 to 5-32 for details. 1-6 Chapter 1: Product Introduction See page 2-36...
Motherboard Installation Guide
Page 23
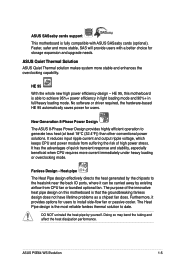
...ASUS O.C. ASUS CrashFree BIOS 3 The ASUS... 1.3.4 ASUS intelligent overclocking features Precision Tweaker 2 Allows the user to adjust the North Bridge Voltage, FSB Termination Voltage, CPU PLL Voltage...BIOS settings can find out if they switch on your screen. ASUS EZ Flash 2 EZ Flash 2 is a user-friendly BIOS...4-5 and 4-39 for details. ASUS AI Slot Detector When PCIE/PCI devices are installed successfully via ASUS's innovatively designed on-board LEDs ... See page 4-23 for details. ASUS O.C. See page 2-22 for details. 1.3.3 ASUS stylish features ASUS MyLogo2™ This feature allows you...
...ASUS O.C. ASUS CrashFree BIOS 3 The ASUS... 1.3.4 ASUS intelligent overclocking features Precision Tweaker 2 Allows the user to adjust the North Bridge Voltage, FSB Termination Voltage, CPU PLL Voltage...BIOS settings can find out if they switch on your screen. ASUS EZ Flash 2 EZ Flash 2 is a user-friendly BIOS...4-5 and 4-39 for details. ASUS AI Slot Detector When PCIE/PCI devices are installed successfully via ASUS's innovatively designed on-board LEDs ... See page 4-23 for details. ASUS O.C. See page 2-22 for details. 1.3.3 ASUS stylish features ASUS MyLogo2™ This feature allows you...

Motherboard Installation Guide
Page 24
function. 1-8 Chapter 1: Product Introduction feature of the motherboard BIOS allows automatic re-setting to the BIOS default settings in case the system hangs due to overclocking, C.P.R. C.P.R. (CPU Parameter Recall) The C.P.R. When the system hangs due to overclocking. eliminates the need to the chipset behavior, AC power off is required before using C.P.R. Due to open the system chassis and clear the RTC data. Simply shut down and reboot the system, and the BIOS automatically restores the CPU default setting for each parameter.
function. 1-8 Chapter 1: Product Introduction feature of the motherboard BIOS allows automatic re-setting to the BIOS default settings in case the system hangs due to overclocking, C.P.R. C.P.R. (CPU Parameter Recall) The C.P.R. When the system hangs due to overclocking. eliminates the need to the chipset behavior, AC power off is required before using C.P.R. Due to open the system chassis and clear the RTC data. Simply shut down and reboot the system, and the BIOS automatically restores the CPU default setting for each parameter.

Motherboard Installation Guide
Page 26
Diagnosis card installation 2-37 ASUS P5E64 WS Evolution Chapter summary 2 2.1 Before you proceed 2-1 2.2 Motherboard overview 2-2 2.3 Central Processing Unit (CPU 2-6 2.4 System memory 2-13 2.5 Expansion slots 2-19 2.6 Jumper 2-23 2.7 Connectors 2-24 2.8 G.P.
Diagnosis card installation 2-37 ASUS P5E64 WS Evolution Chapter summary 2 2.1 Before you proceed 2-1 2.2 Motherboard overview 2-2 2.3 Central Processing Unit (CPU 2-6 2.4 System memory 2-13 2.5 Expansion slots 2-19 2.6 Jumper 2-23 2.7 Connectors 2-24 2.8 G.P.

Motherboard Installation Guide
Page 32
...the PnP cap is shipment/transit-related. • Keep the cap after installing the motherboard. ASUS will shoulder the cost of the PnP cap. 2-6 Chapter 2: Hardware information 2.3 Central Processing Unit (CPU) The motherboard comes with the cap on the socket and the socket contacts are unplugged before installing...the PnP cap is on the LGA775 socket. • The product warranty does not cover damage to the socket contacts resulting from incorrect CPU installation/removal, or misplacement/loss/ incorrect removal of repair only if the damage is missing, or if you see any damage to ...
...the PnP cap is shipment/transit-related. • Keep the cap after installing the motherboard. ASUS will shoulder the cost of the PnP cap. 2-6 Chapter 2: Hardware information 2.3 Central Processing Unit (CPU) The motherboard comes with the cap on the socket and the socket contacts are unplugged before installing...the PnP cap is on the LGA775 socket. • The product warranty does not cover damage to the socket contacts resulting from incorrect CPU installation/removal, or misplacement/loss/ incorrect removal of repair only if the damage is missing, or if you see any damage to ...

Motherboard Installation Guide
Page 33
... in the direction of the socket box should face you. 2.3.1 Installing the CPU To install a CPU: 1. To prevent damage to the left . 2. ASUS P5E64 WS Evolution 2-7 Locate the CPU socket on the motherboard. ® P5E64 WS EVOLUTION P5E64 WS Evolution CPU Socket 775 Before installing the CPU, make sure that the socket box is facing towards you are installing...
... in the direction of the socket box should face you. 2.3.1 Installing the CPU To install a CPU: 1. To prevent damage to the left . 2. ASUS P5E64 WS Evolution 2-7 Locate the CPU socket on the motherboard. ® P5E64 WS EVOLUTION P5E64 WS Evolution CPU Socket 775 Before installing the CPU, make sure that the socket box is facing towards you are installing...

Motherboard Installation Guide
Page 34
... until it snaps into the CPU notch. Refer to prevent bending the connectors on these CPU features. 2-8 Chapter 2: Hardware information If installing a dual-core CPU, connect the chassis fan cable B to the CHA_FAN2 connector to remove (B). CPU notch Gold triangle mark The CPU fits in only one correct ...Intel® Enhanced Memory 64 Technology (EM64T), Enhanced Intel SpeedStep® Technology (EIST), and Hyper-Threading Technology. 4. Position the CPU over the socket, making sure that the gold triangle is on the bottom‑left corner of the socket then fit the socket ...
... until it snaps into the CPU notch. Refer to prevent bending the connectors on these CPU features. 2-8 Chapter 2: Hardware information If installing a dual-core CPU, connect the chassis fan cable B to the CHA_FAN2 connector to remove (B). CPU notch Gold triangle mark The CPU fits in only one correct ...Intel® Enhanced Memory 64 Technology (EM64T), Enhanced Intel SpeedStep® Technology (EIST), and Hyper-Threading Technology. 4. Position the CPU over the socket, making sure that the gold triangle is on the bottom‑left corner of the socket then fit the socket ...

Motherboard Installation Guide
Page 35
...boxed Intel® processor, the package includes the CPU fan and heatsink assembly. Make sure that the four fasteners match the holes on top of the groove pointing outward. (The photo shows the groove shaded for emphasis.) ASUS P5E64 WS Evolution 2-9 Narrow end of the groove Motherboard ...hole Fastener Make sure to orient each fastener with the narrow end of the installed CPU, making sure that you have properly applied Thermal Interface Material to...
...boxed Intel® processor, the package includes the CPU fan and heatsink assembly. Make sure that the four fasteners match the holes on top of the groove pointing outward. (The photo shows the groove shaded for emphasis.) ASUS P5E64 WS Evolution 2-9 Narrow end of the groove Motherboard ...hole Fastener Make sure to orient each fastener with the narrow end of the installed CPU, making sure that you have properly applied Thermal Interface Material to...

Motherboard Installation Guide
Page 36
CPU_FAN CPU FAN PWM CPU FAN IN CPU FAN PWR GND ® P5E64 WS EVOLUTION P5E64 WS Evolution CPU fan connector Do not forget to plug this connector. 2-10 Chapter 2: Hardware information Hardware monitoring errors can occur if you fail to connect the CPU fan connector! B A A A B B B A 3. 2. Push down two fasteners at a time in place. Connect the CPU fan cable to secure the heatsink and fan assembly in a diagonal sequence to the connector on the motherboard labeled CPU_FAN.
CPU_FAN CPU FAN PWM CPU FAN IN CPU FAN PWR GND ® P5E64 WS EVOLUTION P5E64 WS Evolution CPU fan connector Do not forget to plug this connector. 2-10 Chapter 2: Hardware information Hardware monitoring errors can occur if you fail to connect the CPU fan connector! B A A A B B B A 3. 2. Push down two fasteners at a time in place. Connect the CPU fan cable to secure the heatsink and fan assembly in a diagonal sequence to the connector on the motherboard labeled CPU_FAN.

Motherboard Installation Guide
Page 37
Pull up two fasteners at a time in a diagonal sequence to disengage the heatsink and fan assembly B from the connector on the motherboard. 2. ASUS P5E64 WS Evolution 2-11 Disconnect the CPU fan cable from the motherboard. Carefully remove the heatsink and fan assembly from the motherboard. Rotate each fastener counterclockwise. 3. A A B A B B A 4. 2.3.3 Uninstalling the CPU heatsink and fan To uninstall the CPU heatsink and fan: 1.
Pull up two fasteners at a time in a diagonal sequence to disengage the heatsink and fan assembly B from the connector on the motherboard. 2. ASUS P5E64 WS Evolution 2-11 Disconnect the CPU fan cable from the motherboard. Carefully remove the heatsink and fan assembly from the motherboard. Rotate each fastener counterclockwise. 3. A A B A B B A 4. 2.3.3 Uninstalling the CPU heatsink and fan To uninstall the CPU heatsink and fan: 1.

Motherboard Installation Guide
Page 38
Rotate each fastener clockwise to the documentation in the boxed or stand-alone CPU fan package for detailed information on CPU fan installation. 2-12 Chapter 2: Hardware information The narrow end of the groove should point outward after resetting. (The photo shows the groove shaded for emphasis.) Narrow end of the groove Refer to ensure correct orientation when reinstalling. 5.
Rotate each fastener clockwise to the documentation in the boxed or stand-alone CPU fan package for detailed information on CPU fan installation. 2-12 Chapter 2: Hardware information The narrow end of the groove should point outward after resetting. (The photo shows the groove shaded for emphasis.) Narrow end of the groove Refer to ensure correct orientation when reinstalling. 5.


