
Motherboard Installation Guide
Page 62
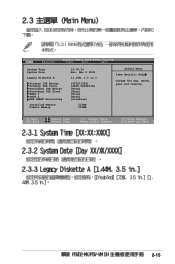
F1:Help ESC:Exit :Select Item :Select Item -/+: Change Value Enter:Select Submenu F5:Setup Default F10:Save and Exit 2-12 Main Advanced Phoenix-Award BIOS Setup Utility Power Boot Exit System Time System Date Legacy Diskette A Primary IDE Master Primary IDE Slave Secondary IDE Master Secondary IDE Slave SATA 1 SATA 2 HDD SMART Monitoring Installed Memory Usable Memory 15:30:36 Mon, Mar 2 2006 [1.44M, 3.5 in.] [ST321122A] [ASUS CDS520/A] [None] [None] [None] [None] [Disabled] 512MB 512MB Select Menu Item Specific Help Change the day, month, year and country.
F1:Help ESC:Exit :Select Item :Select Item -/+: Change Value Enter:Select Submenu F5:Setup Default F10:Save and Exit 2-12 Main Advanced Phoenix-Award BIOS Setup Utility Power Boot Exit System Time System Date Legacy Diskette A Primary IDE Master Primary IDE Slave Secondary IDE Master Secondary IDE Slave SATA 1 SATA 2 HDD SMART Monitoring Installed Memory Usable Memory 15:30:36 Mon, Mar 2 2006 [1.44M, 3.5 in.] [ST321122A] [ASUS CDS520/A] [None] [None] [None] [None] [Disabled] 512MB 512MB Select Menu Item Specific Help Change the day, month, year and country.

Motherboard Installation Guide
Page 64
...System Time System Date 15:30:36 Mon, Mar 2 2006 Legacy Diskette A [1.44M, 3.5 in.] Primary IDE Master Legacy[SDTi3s2k1e1t2t2eA]A: Primary IDE Slave [ASUS CDS520/A] Secondary IDE MasterDisabl[eNdone] .....[ ] Secondary IDE Slave 720K ,[N3o.n5e]in. .....[ ] SATA 1 1.44M,[N3o.n5e]in. .....[ ] ...SATA 2 [None] HDD SMART Monitoring [Disabled] Select Menu Item Specific Help Change the day, month, year and country. Installed Memory Usable Memory 512MB 512MB :Move ENTER:Accept ESC:Abort F1:Help ESC:Exit :Select Item :Select Item -/+: Change Value Enter:Select Submenu F5:Setup ...
...System Time System Date 15:30:36 Mon, Mar 2 2006 Legacy Diskette A [1.44M, 3.5 in.] Primary IDE Master Legacy[SDTi3s2k1e1t2t2eA]A: Primary IDE Slave [ASUS CDS520/A] Secondary IDE MasterDisabl[eNdone] .....[ ] Secondary IDE Slave 720K ,[N3o.n5e]in. .....[ ] SATA 1 1.44M,[N3o.n5e]in. .....[ ] ...SATA 2 [None] HDD SMART Monitoring [Disabled] Select Menu Item Specific Help Change the day, month, year and country. Installed Memory Usable Memory 512MB 512MB :Move ENTER:Accept ESC:Abort F1:Help ESC:Exit :Select Item :Select Item -/+: Change Value Enter:Select Submenu F5:Setup ...
Motherboard Installation Guide
Page 65
Main Advanced Phoenix-Award BIOS Setup Utility Power Boot Exit System Time System Date Legacy Diskette A Primary IDE Master Primary IDE Slave Secondary IDE Master Secondary IDE Slave SATA 1 SATA 2 HDD SMART Monitoring Installed Memory Usable Memory 15:30:36 Mon, Mar 2 2006 [1.44M, 3.5 in.] [ST321122A] [ASUS CDS520/A] [None] [None] [None] [None] [Disabled] 512MB 512MB Select Menu Item Specific Help Change the day, month, year and country. F1:Help ESC:Exit :Select Item :Select Item -/+: Change Value Enter:Select Submenu F5:Setup Default F10:Save and Exit 2-15
Main Advanced Phoenix-Award BIOS Setup Utility Power Boot Exit System Time System Date Legacy Diskette A Primary IDE Master Primary IDE Slave Secondary IDE Master Secondary IDE Slave SATA 1 SATA 2 HDD SMART Monitoring Installed Memory Usable Memory 15:30:36 Mon, Mar 2 2006 [1.44M, 3.5 in.] [ST321122A] [ASUS CDS520/A] [None] [None] [None] [None] [Disabled] 512MB 512MB Select Menu Item Specific Help Change the day, month, year and country. F1:Help ESC:Exit :Select Item :Select Item -/+: Change Value Enter:Select Submenu F5:Setup Default F10:Save and Exit 2-15

Motherboard Installation Guide
Page 71
Advanced Phoenix-Award BIOS Setup Utility Chipset Select Menu DARM Clock/Drive Control Frequency/Voltage control Top Performance Primary Display Adapter VGA Share Memory Size [Disabled] [PCI-E] [64M] Item Specific Help Advanced Phoenix-Award BIOS Setup Utility DRAM Clock/Drive Control Select Menu Current DRAM Frequency DRAM Frequency DRAM ...
Advanced Phoenix-Award BIOS Setup Utility Chipset Select Menu DARM Clock/Drive Control Frequency/Voltage control Top Performance Primary Display Adapter VGA Share Memory Size [Disabled] [PCI-E] [64M] Item Specific Help Advanced Phoenix-Award BIOS Setup Utility DRAM Clock/Drive Control Select Menu Current DRAM Frequency DRAM Frequency DRAM ...
P5VD2-MX/P5V-VM DH English Edition User's Manual
Page 3
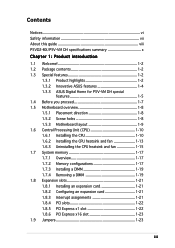
Contents Notices vi Safety information vii About this guide viii P5VD2-MX/P5V-VM DH specifications summary x Chapter 1: Product introduction 1.1 Welcome 1-2 1.2 Package contents 1-2 1.3 Special features 1-2 1.3.1 Product highlights 1-2 1.3.2 Innovative ASUS features 1-4 1.3.3 ASUS Digital Home for P5V-VM DH special features 1-5 1.4 Before you proceed 1-7 1.5 Motherboard overview 1-8 1.5.1 Placement direction 1-8 1.5.2 Screw holes 1-8 1.5.3 Motherboard layout 1-9 1.6 Central Processing Unit (CPU 1-10 1.6.1 Installling the...
Contents Notices vi Safety information vii About this guide viii P5VD2-MX/P5V-VM DH specifications summary x Chapter 1: Product introduction 1.1 Welcome 1-2 1.2 Package contents 1-2 1.3 Special features 1-2 1.3.1 Product highlights 1-2 1.3.2 Innovative ASUS features 1-4 1.3.3 ASUS Digital Home for P5V-VM DH special features 1-5 1.4 Before you proceed 1-7 1.5 Motherboard overview 1-8 1.5.1 Placement direction 1-8 1.5.2 Screw holes 1-8 1.5.3 Motherboard layout 1-9 1.6 Central Processing Unit (CPU 1-10 1.6.1 Installling the...
P5VD2-MX/P5V-VM DH English Edition User's Manual
Page 4
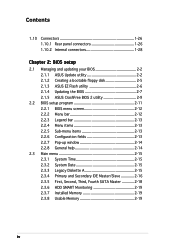
....1 Rear panel connectors 1-26 1.10.2 Internal connectors 1-28 Chapter 2: BIOS setup 2.1 Managing and updating your BIOS 2-2 2.1.1 ASUS Update utility 2-2 2.1.2 Creating a bootable floppy disk 2-5 2.1.3 ASUS EZ Flash utility 2-6 2.1.4 Updating the BIOS 2-7 2.1.5 ASUS CrashFree BIOS 2 utility 2-9 2.2 BIOS setup program 2-11 2.2.1 BIOS menu screen 2-12 2.2.2 Menu bar 2-12 2.2.3 Legend bar...2-15 2.3.4 Primary and Secondary IDE Master/Slave 2-16 2.3.5 First, Second, Third, Fourth SATA Master 2-18 2.3.6 HDD SMART Monitoring 2-19 2.3.7 Installed Memory 2-19 2.3.8 Usable Memory 2-19 iv
....1 Rear panel connectors 1-26 1.10.2 Internal connectors 1-28 Chapter 2: BIOS setup 2.1 Managing and updating your BIOS 2-2 2.1.1 ASUS Update utility 2-2 2.1.2 Creating a bootable floppy disk 2-5 2.1.3 ASUS EZ Flash utility 2-6 2.1.4 Updating the BIOS 2-7 2.1.5 ASUS CrashFree BIOS 2 utility 2-9 2.2 BIOS setup program 2-11 2.2.1 BIOS menu screen 2-12 2.2.2 Menu bar 2-12 2.2.3 Legend bar...2-15 2.3.4 Primary and Secondary IDE Master/Slave 2-16 2.3.5 First, Second, Third, Fourth SATA Master 2-18 2.3.6 HDD SMART Monitoring 2-19 2.3.7 Installed Memory 2-19 2.3.8 Usable Memory 2-19 iv

P5VD2-MX/P5V-VM DH English Edition User's Manual
Page 10
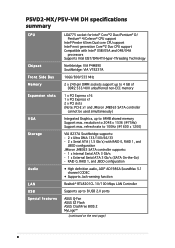
... JMicron JMB363 SATA controller cannot be used simultaneously) Integrated Graphics, up to 8 USB 2.0 ports ASUS Q-Fan ASUS EZ Flash ASUS CrashFree BIOS 2 MyLogo™ (continued on the next page) x P5VD2-MX/P5V-VM DH specifications summary CPU Chipset Front Side Bus Memory Expansion slots VGA Storage Audio LAN USB Special features LGA775 socket for Intel®...
... JMicron JMB363 SATA controller cannot be used simultaneously) Integrated Graphics, up to 8 USB 2.0 ports ASUS Q-Fan ASUS EZ Flash ASUS CrashFree BIOS 2 MyLogo™ (continued on the next page) x P5VD2-MX/P5V-VM DH specifications summary CPU Chipset Front Side Bus Memory Expansion slots VGA Storage Audio LAN USB Special features LGA775 socket for Intel®...
P5VD2-MX/P5V-VM DH English Edition User's Manual
Page 29
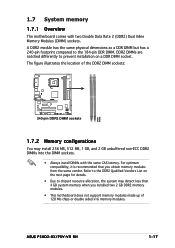
...DDR2 DIMM sockets 1.7.2 Memory configurations You may detect less than 4 GB system memory when you obtain memory modules from the same vendor. Refer to the DDR2 Qualified Vendors List on a DDR DIMM socket. ASUS P5VD2-MX/P5V-VM DH 1-17 1.7 System memory 1.7.1 Overview The motherboard comes with the ...same CAS latency. The figure illustrates the location of 128 Mb chips or double sided x16 memory modules. A DDR2 module has the same physical...
...DDR2 DIMM sockets 1.7.2 Memory configurations You may detect less than 4 GB system memory when you obtain memory modules from the same vendor. Refer to the DDR2 Qualified Vendors List on a DDR DIMM socket. ASUS P5VD2-MX/P5V-VM DH 1-17 1.7 System memory 1.7.1 Overview The motherboard comes with the ...same CAS latency. The figure illustrates the location of 128 Mb chips or double sided x16 memory modules. A DDR2 module has the same physical...

P5VD2-MX/P5V-VM DH English Edition User's Manual
Page 31
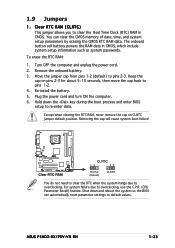
...motherboard and the components. 1. Simultaneously press the retaining clips outward to unplug the power supply before adding or removing DIMMs or other system components. Double-sided DIMM support: A - Single-sided D S - The DIMM might get damaged when it fits in only one pair of Single- ASUS P5VD2-MX.../P5V-VM DH 1-19 Firmly insert the DIMM into the socket until the retaining clips snap back in any slot as Single-channel memory configuration B - channel memory configuration 1.7.3 Installing a DIMM Make sure to unlock ...
...motherboard and the components. 1. Simultaneously press the retaining clips outward to unplug the power supply before adding or removing DIMMs or other system components. Double-sided DIMM support: A - Single-sided D S - The DIMM might get damaged when it fits in only one pair of Single- ASUS P5VD2-MX.../P5V-VM DH 1-19 Firmly insert the DIMM into the socket until the retaining clips snap back in any slot as Single-channel memory configuration B - channel memory configuration 1.7.3 Installing a DIMM Make sure to unlock ...
P5VD2-MX/P5V-VM DH English Edition User's Manual
Page 35
Turn OFF the computer and unplug the power cord. 2. Hold down and reboot the system so the BIOS can clear the CMOS memory of date, time, and system setup parameters by erasing the CMOS RTC RAM data. For system failure due to re-enter data. Plug the power ... RTC RAM: 1. Except when clearing the RTC RAM, never remove the cap on pins 2-3 for about 5~10 seconds, then move the cap back to pins 1-2. 4. ASUS P5VD2-MX/P5V-VM DH 1-23 Re-install the battery. 5. The onboard button cell battery powers the RAM data in CMOS. Keep the cap on CLRTC jumper...
Turn OFF the computer and unplug the power cord. 2. Hold down and reboot the system so the BIOS can clear the CMOS memory of date, time, and system setup parameters by erasing the CMOS RTC RAM data. For system failure due to re-enter data. Plug the power ... RTC RAM: 1. Except when clearing the RTC RAM, never remove the cap on pins 2-3 for about 5~10 seconds, then move the cap back to pins 1-2. 4. ASUS P5VD2-MX/P5V-VM DH 1-23 Re-install the battery. 5. The onboard button cell battery powers the RAM data in CMOS. Keep the cap on CLRTC jumper...

P5VD2-MX/P5V-VM DH English Edition User's Manual
Page 60
... keyboard until the desired item is highlighted. • The BIOS setup screens shown in .] [ST321122A] [ASUS CDS520/A] [None] [None] [None] [None] [Disabled] Select Menu Item Specific Help Change the day, month, year and century. Installed Memory Usable Memory 512MB 512MB F1:Help ESC: Exit ↑↓ : Select Item -/+: Change Value → ←: Select... and loading default settings To select an item on the menu bar, press the right or left arrow key on your screen. • Visit the ASUS website (www.asus.com) to download the latest BIOS information. 2-12 Chapter 2: BIOS setup
... keyboard until the desired item is highlighted. • The BIOS setup screens shown in .] [ST321122A] [ASUS CDS520/A] [None] [None] [None] [None] [Disabled] Select Menu Item Specific Help Change the day, month, year and century. Installed Memory Usable Memory 512MB 512MB F1:Help ESC: Exit ↑↓ : Select Item -/+: Change Value → ←: Select... and loading default settings To select an item on the menu bar, press the right or left arrow key on your screen. • Visit the ASUS website (www.asus.com) to download the latest BIOS information. 2-12 Chapter 2: BIOS setup
P5VD2-MX/P5V-VM DH English Edition User's Manual
Page 62
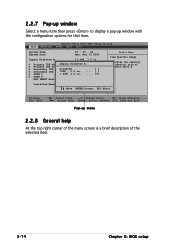
...a pop-up menu 2.2.8 General help At the top right corner of the menu screen is a brief description of diskette drive A. Installed Memory 256MB ↑↓ :Move ENTER:Accept ESC:Abort F1:Help ESC: Exit ↑↓ : Select Item -/+: Change Value F5: ...: Select SubMenu F10: Save and Exit Pop-up window with the configuration options for that item. Primary IDE MasterLegacy Disk[eStTt3e21A1:22A] Primary IDE Slave [ASUS CDS520/A] Secondary IDE MastDeirsabled [None] ..... [ ] Secondary IDE Slav7e20K , 3.5[iNno.ne] ..... [ ] SATA 1 1.44M, 3.5[iNno.ne] ..... [ ] SATA 2 [...
...a pop-up menu 2.2.8 General help At the top right corner of the menu screen is a brief description of diskette drive A. Installed Memory 256MB ↑↓ :Move ENTER:Accept ESC:Abort F1:Help ESC: Exit ↑↓ : Select Item -/+: Change Value F5: ...: Select SubMenu F10: Save and Exit Pop-up window with the configuration options for that item. Primary IDE MasterLegacy Disk[eStTt3e21A1:22A] Primary IDE Slave [ASUS CDS520/A] Secondary IDE MastDeirsabled [None] ..... [ ] Secondary IDE Slav7e20K , 3.5[iNno.ne] ..... [ ] SATA 1 1.44M, 3.5[iNno.ne] ..... [ ] SATA 2 [...

P5VD2-MX/P5V-VM DH English Edition User's Manual
Page 63
... SATA 1 SATA 2 HDD SMART Monitoring 15 : 30 : 36 Mon, Mar 03 2005 [1.44M, 3.5 in .] ASUS P5VD2-MX/P5V-VM DH 2-15 Configuration options: [Disabled] [720K , 3.5 in.] [1.44M, 3.5 in .] [ST321122A] [ASUS CDS520/A] [None] [None] [None] [None] [Disabled] Select Menu Item Specific Help Change the day, month, ... giving you to set the system date. 2.3.3 Legacy Diskette A [1.44M, 3.5 in.] Sets the type of the basic system information. Installed Memory Usable Memory 512MB 512MB F1:Help ESC: Exit ↑↓ : Select Item -/+: Change Value F5: Setup Defaults →←: Select Menu Enter:...
... SATA 1 SATA 2 HDD SMART Monitoring 15 : 30 : 36 Mon, Mar 03 2005 [1.44M, 3.5 in .] ASUS P5VD2-MX/P5V-VM DH 2-15 Configuration options: [Disabled] [720K , 3.5 in.] [1.44M, 3.5 in .] [ST321122A] [ASUS CDS520/A] [None] [None] [None] [None] [Disabled] Select Menu Item Specific Help Change the day, month, ... giving you to set the system date. 2.3.3 Legacy Diskette A [1.44M, 3.5 in.] Sets the type of the basic system information. Installed Memory Usable Memory 512MB 512MB F1:Help ESC: Exit ↑↓ : Select Item -/+: Change Value F5: Setup Defaults →←: Select Menu Enter:...

P5VD2-MX/P5V-VM DH English Edition User's Manual
Page 67
...hard disk drives to active. 2.3.6 HDD SMART Monitoring [Disabled] Allows you can write or read /write heads. This is not configurable. ASUS P5VD2-MX/P5V-VM DH 2-19 This item is necessary so that you to partition and format new IDE hard disk drives. Sector Shows the ... the HDD Self-Monitoring Analysis and Reporting Technology (SMART) feature. Head Shows the number of usable memory. Configuration options: [Disabled] [Enabled] 2.3.7 Installed Memory [xxx MB] Shows the size of installed memory. 2.3.8 Usable Memory [XXX MB] Shows the size of the hard disk read data from the hard disk.
...hard disk drives to active. 2.3.6 HDD SMART Monitoring [Disabled] Allows you can write or read /write heads. This is not configurable. ASUS P5VD2-MX/P5V-VM DH 2-19 This item is necessary so that you to partition and format new IDE hard disk drives. Sector Shows the ... the HDD Self-Monitoring Analysis and Reporting Technology (SMART) feature. Head Shows the number of usable memory. Configuration options: [Disabled] [Enabled] 2.3.7 Installed Memory [xxx MB] Shows the size of installed memory. 2.3.8 Usable Memory [XXX MB] Shows the size of the hard disk read data from the hard disk.

P5VD2-MX/P5V-VM DH English Edition User's Manual
Page 69
...[Disabled] [Enabled] 2.4.2 Chipset Advanced Phoenix-Award BIOS CMOS Setup Utility Chipset DRAM Clock/Drive Control Frequency/Voltage control Top Performance Primary Display Adapter VGA Share Memory Size [Disabled] [PCI-E] [64M] Select Menu Item Specific Help DRAM Clock/Drive Control Advanced Phoenix-Award BIOS CMOS Setup Utility DRAM Clock/Drive Control Current...: [Manual] [By SPD] The following items are user-configurable when the " D R A M T i m i n g S e l e c t a b l e " item is set to Active(Trp) [4T] Configuration options: [2T] [3T] [4T] [5T] ASUS P5VD2-MX/P5V-VM DH 2-21
...[Disabled] [Enabled] 2.4.2 Chipset Advanced Phoenix-Award BIOS CMOS Setup Utility Chipset DRAM Clock/Drive Control Frequency/Voltage control Top Performance Primary Display Adapter VGA Share Memory Size [Disabled] [PCI-E] [64M] Select Menu Item Specific Help DRAM Clock/Drive Control Advanced Phoenix-Award BIOS CMOS Setup Utility DRAM Clock/Drive Control Current...: [Manual] [By SPD] The following items are user-configurable when the " D R A M T i m i n g S e l e c t a b l e " item is set to Active(Trp) [4T] Configuration options: [2T] [3T] [4T] [5T] ASUS P5VD2-MX/P5V-VM DH 2-21

P5VD2-MX/P5V-VM DH English Edition User's Manual
Page 71
... to [Auto], the item IRQ Resources is set to [No], the BIOS configures all the boot and Plug and Play compatible devices. ASUS P5VD2-MX/P5V-VM DH 2-23 Configuration options: [Auto] [Manual] When the item Resources Controlled By is grayed out and not user-configurable....select which graphics controller to enable this item. Refer to the section "IRQ Resources" for boot. Configuration options: [PCI] [AGP] [PCI-E] VGA Share Memory Size [64M] Configuration options: [Disabled] [16M] [32M] [64M] 2.4.3 PCIPnP Advanced Phoenix-Award BIOS CMOS Setup Utility PCIPnP Plug & Play O/S Resources...
... to [Auto], the item IRQ Resources is set to [No], the BIOS configures all the boot and Plug and Play compatible devices. ASUS P5VD2-MX/P5V-VM DH 2-23 Configuration options: [Auto] [Manual] When the item Resources Controlled By is grayed out and not user-configurable....select which graphics controller to enable this item. Refer to the section "IRQ Resources" for boot. Configuration options: [PCI] [AGP] [PCI-E] VGA Share Memory Size [64M] Configuration options: [Disabled] [16M] [32M] [64M] 2.4.3 PCIPnP Advanced Phoenix-Award BIOS CMOS Setup Utility PCIPnP Plug & Play O/S Resources...

P5VD2-MX User's Manual for English Edition
Page 3
Contents Notices vi Safety information vii About this guide viii P5VD2-MX/P5V-VM DH specifications summary x Chapter 1: Product introduction 1.1 Welcome 1-2 1.2 Package contents 1-2 1.3 Special features 1-2 1.3.1 Product highlights 1-2 1.3.2 Innovative ASUS features 1-4 1.3.3 ASUS Digital Home for P5V-VM DH special features 1-5 1.4 Before you proceed 1-7 1.5 Motherboard overview 1-8 1.5.1 Placement direction 1-8 1.5.2 Screw holes 1-8 1.5.3 Motherboard layout 1-9 1.6 Central Processing Unit (CPU 1-10 1.6.1 Installling the...
Contents Notices vi Safety information vii About this guide viii P5VD2-MX/P5V-VM DH specifications summary x Chapter 1: Product introduction 1.1 Welcome 1-2 1.2 Package contents 1-2 1.3 Special features 1-2 1.3.1 Product highlights 1-2 1.3.2 Innovative ASUS features 1-4 1.3.3 ASUS Digital Home for P5V-VM DH special features 1-5 1.4 Before you proceed 1-7 1.5 Motherboard overview 1-8 1.5.1 Placement direction 1-8 1.5.2 Screw holes 1-8 1.5.3 Motherboard layout 1-9 1.6 Central Processing Unit (CPU 1-10 1.6.1 Installling the...

P5VD2-MX User's Manual for English Edition
Page 4
....1 Rear panel connectors 1-26 1.10.2 Internal connectors 1-28 Chapter 2: BIOS setup 2.1 Managing and updating your BIOS 2-2 2.1.1 ASUS Update utility 2-2 2.1.2 Creating a bootable floppy disk 2-5 2.1.3 ASUS EZ Flash utility 2-6 2.1.4 Updating the BIOS 2-7 2.1.5 ASUS CrashFree BIOS 2 utility 2-9 2.2 BIOS setup program 2-11 2.2.1 BIOS menu screen 2-12 2.2.2 Menu bar 2-12 2.2.3 Legend bar...2-15 2.3.4 Primary and Secondary IDE Master/Slave 2-16 2.3.5 First, Second, Third, Fourth SATA Master 2-18 2.3.6 HDD SMART Monitoring 2-19 2.3.7 Installed Memory 2-19 2.3.8 Usable Memory 2-19 iv
....1 Rear panel connectors 1-26 1.10.2 Internal connectors 1-28 Chapter 2: BIOS setup 2.1 Managing and updating your BIOS 2-2 2.1.1 ASUS Update utility 2-2 2.1.2 Creating a bootable floppy disk 2-5 2.1.3 ASUS EZ Flash utility 2-6 2.1.4 Updating the BIOS 2-7 2.1.5 ASUS CrashFree BIOS 2 utility 2-9 2.2 BIOS setup program 2-11 2.2.1 BIOS menu screen 2-12 2.2.2 Menu bar 2-12 2.2.3 Legend bar...2-15 2.3.4 Primary and Secondary IDE Master/Slave 2-16 2.3.5 First, Second, Third, Fourth SATA Master 2-18 2.3.6 HDD SMART Monitoring 2-19 2.3.7 Installed Memory 2-19 2.3.8 Usable Memory 2-19 iv
P5VD2-MX User's Manual for English Edition
Page 10
refresh rate to 8 USB 2.0 ports ASUS Q-Fan ASUS EZ Flash ASUS CrashFree BIOS 2 MyLogo™ (continued on the next page) x RAID 0, RAID 1, and JBOD configuration • High definition audio, ADI® AD1986A SoundMax 5.1 channel CODEC • ...: PCI-E x1 and JMicron JMB363 SATA controller cannot be used simultaneously) Integrated Graphics, up to 2048 x 1536 (@75Hz) Support max. P5VD2-MX/P5V-VM DH specifications summary CPU Chipset Front Side Bus Memory Expansion slots VGA Storage Audio LAN USB Special features LGA775 socket for Intel® Core™2 Duo/Pentium® D/ Pentium...
refresh rate to 8 USB 2.0 ports ASUS Q-Fan ASUS EZ Flash ASUS CrashFree BIOS 2 MyLogo™ (continued on the next page) x RAID 0, RAID 1, and JBOD configuration • High definition audio, ADI® AD1986A SoundMax 5.1 channel CODEC • ...: PCI-E x1 and JMicron JMB363 SATA controller cannot be used simultaneously) Integrated Graphics, up to 2048 x 1536 (@75Hz) Support max. P5VD2-MX/P5V-VM DH specifications summary CPU Chipset Front Side Bus Memory Expansion slots VGA Storage Audio LAN USB Special features LGA775 socket for Intel® Core™2 Duo/Pentium® D/ Pentium...

P5VD2-MX User's Manual for English Edition
Page 29
The figure illustrates the location of 128 Mb chips or double sided x16 memory modules. ASUS P5VD2-MX/P5V-VM DH 1-17 For optimum compatibility, it is recommended that you installed two 2 GB DDR2 memory modules. • This motherboard does not support memory modules made up of the DDR2 DIMM sockets: DIMM1 DIMM2 ® 240-pin DDR2 DIMM...
The figure illustrates the location of 128 Mb chips or double sided x16 memory modules. ASUS P5VD2-MX/P5V-VM DH 1-17 For optimum compatibility, it is recommended that you installed two 2 GB DDR2 memory modules. • This motherboard does not support memory modules made up of the DDR2 DIMM sockets: DIMM1 DIMM2 ® 240-pin DDR2 DIMM...


