
User Manual
Page 1
Motherboard
Motherboard

User Manual
Page 1
P5QL-EM Motherboard
P5QL-EM Motherboard
User Manual
Page 3
Contents Notices...vi Safety information vii About this guide vii P5QL-EM specifications summary ix Chapter 1 Product introduction 1.1 Welcome 1-1 1.2 Package contents 1-1 1.3 Special features 1-1 1.3.1 Product highlights 1-1 1.3.2 ASUS Special features 1-2 1.4 Before you proceed 1-4 1.5 Motherboard overview 1-5 1.5.1 Placement direction 1-5 1.5.2 Screw holes 1-5 1.5.3 Motherboard layout 1-6 1.5.4 Layout contents 1-7 1.6 Central Processing Unit (CPU 1-7 1.6.1 Installing the CPU 1-8 1.6.2 Installing the CPU heatsink and fan 1-10 1.6.3 Uninstalling...
Contents Notices...vi Safety information vii About this guide vii P5QL-EM specifications summary ix Chapter 1 Product introduction 1.1 Welcome 1-1 1.2 Package contents 1-1 1.3 Special features 1-1 1.3.1 Product highlights 1-1 1.3.2 ASUS Special features 1-2 1.4 Before you proceed 1-4 1.5 Motherboard overview 1-5 1.5.1 Placement direction 1-5 1.5.2 Screw holes 1-5 1.5.3 Motherboard layout 1-6 1.5.4 Layout contents 1-7 1.6 Central Processing Unit (CPU 1-7 1.6.1 Installing the CPU 1-8 1.6.2 Installing the CPU heatsink and fan 1-10 1.6.3 Uninstalling...
User Manual
Page 6
... device must accept any interference received including interference that may cause harmful interference to enable proper reuse of the FCC Rules. DO NOT throw the motherboard in municipal waste. This symbol of the monitor to the graphics card is required to radio or television reception, which the receiver is connected. •...
... device must accept any interference received including interference that may cause harmful interference to enable proper reuse of the FCC Rules. DO NOT throw the motherboard in municipal waste. This symbol of the monitor to the graphics card is required to radio or television reception, which the receiver is connected. •...
User Manual
Page 7
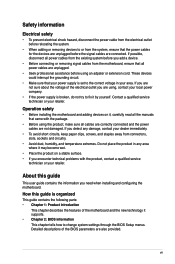
...how to the correct voltage in your retailer. Detailed descriptions of the electrical outlet you need when installing and configuring the motherboard. Safety information Electrical safety • To prevent electrical shock hazard, disconnect the power cable from the electrical outlet before ... read all the manuals that came with the package. • Before using , contact your retailer. Operation safety • Before installing the motherboard and adding devices on a stable surface. • If you add a device. • Before connecting or removing signal cables from connectors,...
...how to the correct voltage in your retailer. Detailed descriptions of the electrical outlet you need when installing and configuring the motherboard. Safety information Electrical safety • To prevent electrical shock hazard, disconnect the power cable from the electrical outlet before ... read all the manuals that came with the package. • Before using , contact your retailer. Operation safety • Before installing the motherboard and adding devices on a stable surface. • If you add a device. • Before connecting or removing signal cables from connectors,...

User Manual
Page 9
resolution 1900 x 1200 (@60Hz) Supports RGB with max. P5QL-EM specifications summary CPU. resolution 2048 x 1536 (@75Hz) Dual VGA output support DVI & RGB ...(O.C.) / 800 / 667 / memory modules Supports up to 8 GB system memory * Due to chipset limitation, this motherboard only supports up to DDR2-1066. resolution 1920 x 1080p (@ 60Hz) Supports DVI-D with HDCP compliant with max. ... Intel SpeedStep® Technology (EIST) Supports Intel® Hyper-Threading Technology *Refer to www.asus.com for yellow DIMMs when overclock to the total of four ranks(four sides in total) of...
resolution 1900 x 1200 (@60Hz) Supports RGB with max. P5QL-EM specifications summary CPU. resolution 2048 x 1536 (@75Hz) Dual VGA output support DVI & RGB ...(O.C.) / 800 / 667 / memory modules Supports up to 8 GB system memory * Due to chipset limitation, this motherboard only supports up to DDR2-1066. resolution 1920 x 1080p (@ 60Hz) Supports DVI-D with HDCP compliant with max. ... Intel SpeedStep® Technology (EIST) Supports Intel® Hyper-Threading Technology *Refer to www.asus.com for yellow DIMMs when overclock to the total of four ranks(four sides in total) of...

User Manual
Page 11
... of new features and latest technologies, making it , check the items in the long line of Hazardous Substances (RoHS). ASUS P5QL-EM 1-1 LGA775 Intel® Core™2 and Quad-core Processor Ready This motherboard supports the latest Intel® Core™2 processors in the world. With new Intel® Core™ microarchitecture technology and...
... of new features and latest technologies, making it , check the items in the long line of Hazardous Substances (RoHS). ASUS P5QL-EM 1-1 LGA775 Intel® Core™2 and Quad-core Processor Ready This motherboard supports the latest Intel® Core™2 processors in the world. With new Intel® Core™ microarchitecture technology and...
User Manual
Page 12
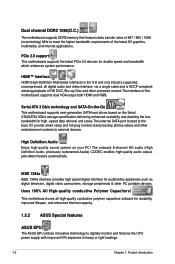
...,delivering enhanced scalability and doubling the bus bandwidth for durability, improved lifespan, and enhanced thermal capacity. 1.3.2 ASUS Special features ASUS EPU The ASUS EPU utilizes innovative technology to digitally monitor and finetune the CPU power supply with improved VR responses in heavy... as digital television, digital video camcorders, storage peripherals & other entertainment contents to meet the higher bandwidth requirements of this motherboard supports dual VGA output both HDMI and RGB. The onboard 8-channel HD audio (High Definition Audio, previously codenamed Azalia)...
...,delivering enhanced scalability and doubling the bus bandwidth for durability, improved lifespan, and enhanced thermal capacity. 1.3.2 ASUS Special features ASUS EPU The ASUS EPU utilizes innovative technology to digitally monitor and finetune the CPU power supply with improved VR responses in heavy... as digital television, digital video camcorders, storage peripherals & other entertainment contents to meet the higher bandwidth requirements of this motherboard supports dual VGA output both HDMI and RGB. The onboard 8-channel HD audio (High Definition Audio, previously codenamed Azalia)...

User Manual
Page 13
...' the cost and hassle of buying a replacement BIOS chip. ASUS Express Gate Taking only 5 seconds to clear CMOS data. ASUS P5QL-EM 1-3 ASUS AI Nap Minimize noise and power consumption when temporarily away! It's a unique motherboard built-in quietest state while you to instant fun! You can... amend the CPU setting again. ASUS EZ Flash 2 EZ Flash 2 is the ...
...' the cost and hassle of buying a replacement BIOS chip. ASUS Express Gate Taking only 5 seconds to clear CMOS data. ASUS P5QL-EM 1-3 ASUS AI Nap Minimize noise and power consumption when temporarily away! It's a unique motherboard built-in quietest state while you to instant fun! You can... amend the CPU setting again. ASUS EZ Flash 2 EZ Flash 2 is the ...
User Manual
Page 14
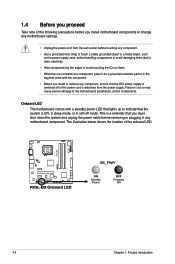
...switched off mode. The illustration below shows the location of the following precautions before you install motherboard components or change any motherboard settings. • Unplug the power cord from the power supply. P5QL-EM P5QL-EM.Onboard.LED R SB_PWR ON Standby Power OFF Powered Off 1-4 Chapter 1: Product introduction This is... 1.4 Before you proceed Take note of the onboard LED. Failure to do so may cause severe damage to indicate that the ATX power supply is detached from the wall socket before touching any component. • Use a grounded wrist strap or touch a ...
...switched off mode. The illustration below shows the location of the following precautions before you install motherboard components or change any motherboard settings. • Unplug the power cord from the power supply. P5QL-EM P5QL-EM.Onboard.LED R SB_PWR ON Standby Power OFF Powered Off 1-4 Chapter 1: Product introduction This is... 1.4 Before you proceed Take note of the onboard LED. Failure to do so may cause severe damage to indicate that the ATX power supply is detached from the wall socket before touching any component. • Use a grounded wrist strap or touch a ...
User Manual
Page 15
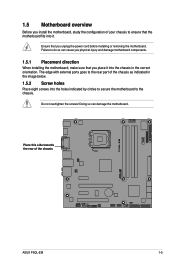
.... 1.5.2 Screw holes Place eight screws into it. Failure to do so can damage the motherboard. 1.5 Motherboard overview Before you install the motherboard, study the configuration of your chassis to ensure that you unplug the power cord before installing or ... the motherboard. Doing so can cause you physical injury and damage motherboard components. 1.5.1 Placement direction When installing the motherboard, make sure that the motherboard fits into the holes indicated by circles to secure the motherboard to the rear part of the chassis P5QL-EM R ASUS P5QL-EM 1-5 ...
.... 1.5.2 Screw holes Place eight screws into it. Failure to do so can damage the motherboard. 1.5 Motherboard overview Before you install the motherboard, study the configuration of your chassis to ensure that you unplug the power cord before installing or ... the motherboard. Doing so can cause you physical injury and damage motherboard components. 1.5.1 Placement direction When installing the motherboard, make sure that the motherboard fits into the holes indicated by circles to secure the motherboard to the rear part of the chassis P5QL-EM R ASUS P5QL-EM 1-5 ...
User Manual
Page 16
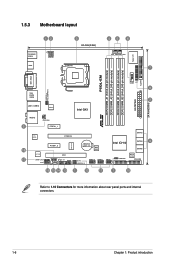
1.5.3 Motherboard layout 123 3 24.4cm(9.6in) 45 6 PS/2KBMS USB56 HDMI ATX12V LGA775 CPU_FAN PWR_FAN 7 Super I/O FLOPPY DDR2 DIMM_B1 (64 bit,240-pin module) DDR2 DIMM_B2 (64 bit,240-pin module) DDR2 DIMM_A1 (64 bit,240-pin module) DDR2 DIMM_A2 (64 bit,240-pin module) P5QL-EM DVI_VGA USBPW1-4 PS2_USBPW5-6 1394 ESATA USB34 LAN1_USB12...
1.5.3 Motherboard layout 123 3 24.4cm(9.6in) 45 6 PS/2KBMS USB56 HDMI ATX12V LGA775 CPU_FAN PWR_FAN 7 Super I/O FLOPPY DDR2 DIMM_B1 (64 bit,240-pin module) DDR2 DIMM_B2 (64 bit,240-pin module) DDR2 DIMM_A1 (64 bit,240-pin module) DDR2 DIMM_A2 (64 bit,240-pin module) P5QL-EM DVI_VGA USBPW1-4 PS2_USBPW5-6 1394 ESATA USB34 LAN1_USB12...

User Manual
Page 17
... (20-8 pin PANEL) 14. Digital audio connector (4-1 pin SPDIF_OUT) 18. IDE connector (40-1 pin PRI_EIDE) 11. 1.5.4 Layout contents Connectors/Jumpers/Slots 1. ATX power connectors (24-pin EATXPWR, 4-pin ATX12V) 3. Contact your retailer immediately if the PnP cap is on the LGA775 socket. • The product warranty does...; processors. • Ensure that the PnP cap is missing, or if you see any damage to the PnP cap/socket contacts/motherboard components. ASUS P5QL-EM 1-7 Front panel audio connector (10-1 pin AAFP) 17. Clear RTC RAM (3-pin CLRTC) 13.
... (20-8 pin PANEL) 14. Digital audio connector (4-1 pin SPDIF_OUT) 18. IDE connector (40-1 pin PRI_EIDE) 11. 1.5.4 Layout contents Connectors/Jumpers/Slots 1. ATX power connectors (24-pin EATXPWR, 4-pin ATX12V) 3. Contact your retailer immediately if the PnP cap is on the LGA775 socket. • The product warranty does...; processors. • Ensure that the PnP cap is missing, or if you see any damage to the PnP cap/socket contacts/motherboard components. ASUS P5QL-EM 1-7 Front panel audio connector (10-1 pin AAFP) 17. Clear RTC RAM (3-pin CLRTC) 13.
User Manual
Page 18
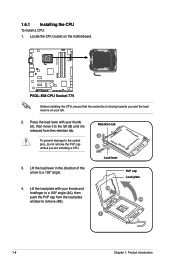
P5QL-EM R P5QL-EM.CPU.Socket.775 Before installing the CPU, ensure that the socket box is facing towards you are installing a CPU. 3. Press the load lever with your ... load plate window to the left . 2. 1.6.1 Installing the CPU To install a CPU: 1. Locate the CPU socket on your thumb (A), then move it is on the motherboard.
P5QL-EM R P5QL-EM.CPU.Socket.775 Before installing the CPU, ensure that the socket box is facing towards you are installing a CPU. 3. Press the load lever with your ... load plate window to the left . 2. 1.6.1 Installing the CPU To install a CPU: 1. Locate the CPU socket on your thumb (A), then move it is on the motherboard.

User Manual
Page 19
..., DO NOT spread the paste with preapplied thermal paste. CPU notch Gold triangle mark Alignment key 6. If so, skip this step. The motherboard supports Intel® LGA775 processors with , ensuring that you wash it gets into the A retention tab. DO NOT eat the Thermal Interface Material...area of the CPU that the gold triangle is spread in an even thin layer. If it off immediately, and seek professional medical help. B ASUS P5QL-EM 1-9 5. Position the CPU over the socket, ensuring that the heatsink will be in contact with the Intel® Enhanced Intel SpeedStep® ...
..., DO NOT spread the paste with preapplied thermal paste. CPU notch Gold triangle mark Alignment key 6. If so, skip this step. The motherboard supports Intel® LGA775 processors with , ensuring that you wash it gets into the A retention tab. DO NOT eat the Thermal Interface Material...area of the CPU that the gold triangle is spread in an even thin layer. If it off immediately, and seek professional medical help. B ASUS P5QL-EM 1-9 5. Position the CPU over the socket, ensuring that the heatsink will be in contact with the Intel® Enhanced Intel SpeedStep® ...

User Manual
Page 20
... Hardware monitoring errors can occur if you install the CPU fan and heatsink assembly. Ensure that the four fasteners B match the holes on the motherboard labeled CPU_FAN. A B A A B 1 B A 1 The type of the installed CPU, making sure that you have properly applied Thermal... CPU FAN IN CPU FAN PWR GND R P5QL-EM.CPU.Fan.Connector 1-10 Chapter 1: Product introduction P5QL-EM CPU_FAN Do not forget to the connector on the motherboard. 2. If you buy a CPU separately, ensure that you have installed the motherboard to the chassis before you buy a boxed Intel...
... Hardware monitoring errors can occur if you install the CPU fan and heatsink assembly. Ensure that the four fasteners B match the holes on the motherboard labeled CPU_FAN. A B A A B 1 B A 1 The type of the installed CPU, making sure that you have properly applied Thermal... CPU FAN IN CPU FAN PWR GND R P5QL-EM.CPU.Fan.Connector 1-10 Chapter 1: Product introduction P5QL-EM CPU_FAN Do not forget to the connector on the motherboard. 2. If you buy a CPU separately, ensure that you have installed the motherboard to the chassis before you buy a boxed Intel...

User Manual
Page 21
... and fan assembly from the motherboard. 1.7 System memory 1.7.1 Overview The motherboard comes with four Double Data Rate 2 (DDR2) Dual Inline Memory Modules (DIMM) sockets. B 3. The figure illustrates the location of the DDR2 DIMM sockets: DIMM_A1 DIMM_A2 DIMM_B1 DIMM_B2 112 Pins P5QL-EM R 128 Pins P5QL-EM.240-pin.DDR2.DIMM.Sockets ASUS P5QL-EM 1-11 Disconnect the CPU fan...
... and fan assembly from the motherboard. 1.7 System memory 1.7.1 Overview The motherboard comes with four Double Data Rate 2 (DDR2) Dual Inline Memory Modules (DIMM) sockets. B 3. The figure illustrates the location of the DDR2 DIMM sockets: DIMM_A1 DIMM_A2 DIMM_B1 DIMM_B2 112 Pins P5QL-EM R 128 Pins P5QL-EM.240-pin.DDR2.DIMM.Sockets ASUS P5QL-EM 1-11 Disconnect the CPU fan...

User Manual
Page 22
... memory address limitation on 32-bit Windows OS, when you install a 64-bit Windows OS when having 4GB or more memory installed on the motherboard, the actual usable memory for the OS can be about 3GB or less. For optimum compatibility, it is then mapped for better overclocking capability....excess memory from the higher-sized channel is recommended that you may install varying memory sizes in total) of RAM at max. • This motherboard does not support DIMMs made up of the lower-sized channel for dual channel mode. install identical DIMM pair in DIMM_A1 and DIMM_B1 (yellow sockets...
... memory address limitation on 32-bit Windows OS, when you install a 64-bit Windows OS when having 4GB or more memory installed on the motherboard, the actual usable memory for the OS can be about 3GB or less. For optimum compatibility, it is then mapped for better overclocking capability....excess memory from the higher-sized channel is recommended that you may install varying memory sizes in total) of RAM at max. • This motherboard does not support DIMMs made up of the lower-sized channel for dual channel mode. install identical DIMM pair in DIMM_A1 and DIMM_B1 (yellow sockets...

User Manual
Page 26
... 1 Unlocked retaining clip A DDR2 DIMM is properly seated. Locked Retaining Clip 1.7.4 Removing a DIMM To remove a DIMM: 1. Simultaneously press the retaining clips outward to both the motherboard and the components. 1. DO NOT force a DIMM into the socket 3 until the retaining clips snap back in only one direction. Remove the DIMM from the...
... 1 Unlocked retaining clip A DDR2 DIMM is properly seated. Locked Retaining Clip 1.7.4 Removing a DIMM To remove a DIMM: 1. Simultaneously press the retaining clips outward to both the motherboard and the components. 1. DO NOT force a DIMM into the socket 3 until the retaining clips snap back in only one direction. Remove the DIMM from the...

User Manual
Page 27
... other cards that comply with the PCI Express specifications. 1.8.6 PCI Express x16 slot This motherboard supports a PCI Express x16 graphics card that came with the slot and press firmly until the card is already installed in a chassis). 3. ASUS P5QL-EM 1-17 Failure to do not need to install expansion cards. Remove the bracket opposite...
... other cards that comply with the PCI Express specifications. 1.8.6 PCI Express x16 slot This motherboard supports a PCI Express x16 graphics card that came with the slot and press firmly until the card is already installed in a chassis). 3. ASUS P5QL-EM 1-17 Failure to do not need to install expansion cards. Remove the bracket opposite...


