User Manual
Page 4
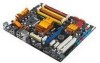
... down function 2-40 2.9.2 Using the dual function power switch 2-40 Chapter 3: BIOS setup 3.1 Managing and updating your BIOS 3-1 3.1.1 ASUS Update utility 3-1 3.1.2 ASUS EZ Flash 2 utility 3-4 3.1.3 AFUDOS utility 3-5 3.2 BIOS setup program 3-7 3.2.1 BIOS menu screen 3-8 3.2.2 Menu bar 3-8 3.2.3 Navigation keys 3-8 3.2.4 Menu items 3-9 3.2.5 Sub-menu items 3-9 3.2.6 Configuration fields 3-9 3.2.7 Pop-up window 3-9 3.2.8 Scroll bar 3-9 3.2.9 General help 3-9 3.3 Main menu 3-10 3.3.1 System Time 3-10...
... down function 2-40 2.9.2 Using the dual function power switch 2-40 Chapter 3: BIOS setup 3.1 Managing and updating your BIOS 3-1 3.1.1 ASUS Update utility 3-1 3.1.2 ASUS EZ Flash 2 utility 3-4 3.1.3 AFUDOS utility 3-5 3.2 BIOS setup program 3-7 3.2.1 BIOS menu screen 3-8 3.2.2 Menu bar 3-8 3.2.3 Navigation keys 3-8 3.2.4 Menu items 3-9 3.2.5 Sub-menu items 3-9 3.2.6 Configuration fields 3-9 3.2.7 Pop-up window 3-9 3.2.8 Scroll bar 3-9 3.2.9 General help 3-9 3.3 Main menu 3-10 3.3.1 System Time 3-10...
User Manual
Page 23
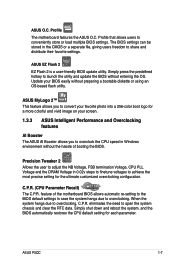
...their favorite settings. When the system hangs due to conveniently store or load multiple BIOS settings. ASUS P5QC 1-7 ASUS EZ Flash 2 EZ Flash 2 is a user-friendly BIOS update utility. Precision Tweaker 2 Allows the user to adjust the NB Voltage, ...motherboard features the ASUS O.C. ASUS MyLogo 2™ This feature allows you to the BIOS default settings in Windows environment without entering the OS. C.P.R. (CPU Parameter Recall) The C.P.R. ASUS O.C. Simply press the predefined hotkey to launch the utility and update the BIOS without the hassle of the motherboard BIOS...
...their favorite settings. When the system hangs due to conveniently store or load multiple BIOS settings. ASUS P5QC 1-7 ASUS EZ Flash 2 EZ Flash 2 is a user-friendly BIOS update utility. Precision Tweaker 2 Allows the user to adjust the NB Voltage, ...motherboard features the ASUS O.C. ASUS MyLogo 2™ This feature allows you to the BIOS default settings in Windows environment without entering the OS. C.P.R. (CPU Parameter Recall) The C.P.R. ASUS O.C. Simply press the predefined hotkey to launch the utility and update the BIOS without the hassle of the motherboard BIOS...
User Manual
Page 54
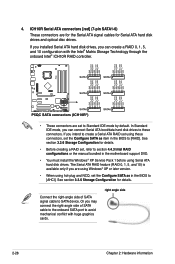
...mode by default. See section 3.3.6 Storage Configuration for details. • Before creating a RAID set the Configure SATA as item in the BIOS to avoid mechanical conflict with the Intel® Matrix Storage Technology through the onboard Intel® ICH10R RAID controller. • These connectors are...can connect Serial ATA boot/data hard disk drives to section 4.4.3 Intel RAID configurations or the manual bundled in the motherboard support DVD. • You must install the Windows® XP Service Pack 1 before using hot-plug and NCQ, set , refer to these connectors, set the ...
...mode by default. See section 3.3.6 Storage Configuration for details. • Before creating a RAID set the Configure SATA as item in the BIOS to avoid mechanical conflict with the Intel® Matrix Storage Technology through the onboard Intel® ICH10R RAID controller. • These connectors are...can connect Serial ATA boot/data hard disk drives to section 4.4.3 Intel RAID configurations or the manual bundled in the motherboard support DVD. • You must install the Windows® XP Service Pack 1 before using hot-plug and NCQ, set , refer to these connectors, set the ...

User Manual
Page 66
...Click the Start button then select ShutDown. 2. Refer to shut down the computer. 3. The power supply should turn off mode, depending on the BIOS setting. Click the Turn Off button to section 3.6 Power Menu in Chapter 3 for less than four seconds lets the system enter the soft-...shut down . Click the Start button then select Turn Off Computer. 2. If you are using Windows® XP: 1. The power supply should turn off after Windows® shuts down function If you are using Windows® Vista: 1. Pressing the power switch for more than four seconds puts the system to ...
...Click the Start button then select ShutDown. 2. Refer to shut down the computer. 3. The power supply should turn off mode, depending on the BIOS setting. Click the Turn Off button to section 3.6 Power Menu in Chapter 3 for less than four seconds lets the system enter the soft-...shut down . Click the Start button then select Turn Off Computer. 2. If you are using Windows® XP: 1. The power supply should turn off after Windows® shuts down function If you are using Windows® Vista: 1. Pressing the power switch for more than four seconds puts the system to ...
User Manual
Page 69
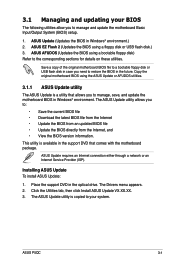
... through a network or an Internet Service Provider (ISP). The ASUS Update utility is a utility that comes with the motherboard package. ASUS P5QC 3-1 Installing ASUS Update To install ASUS Update: 1. The Drivers menu appears. 2. Click the Utilities tab, then click Install ASUS Update VX.XX.XX. 3. ASUS Update (Updates the BIOS in the optical drive. This utility is available in...
... through a network or an Internet Service Provider (ISP). The ASUS Update utility is a utility that comes with the motherboard package. ASUS P5QC 3-1 Installing ASUS Update To install ASUS Update: 1. The Drivers menu appears. 2. Click the Utilities tab, then click Install ASUS Update VX.XX.XX. 3. ASUS Update (Updates the BIOS in the optical drive. This utility is available in...
User Manual
Page 70
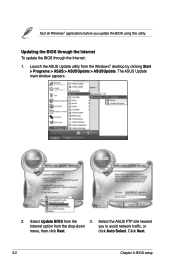
click Auto Select. Click Next. 3-2 Chapter 3: BIOS setup Select the ASUS FTP site nearest Internet option from the 3. Select Update BIOS from the drop‑down you update the BIOS using this utility. Launch the ASUS Update utility from the Windows® desktop by clicking Start > Programs > ASUS > ASUSUpdate > ASUSUpdate. The ASUS Update main window appears. 2. Updating the BIOS through the Internet To update the BIOS through the Internet: 1. Quit all Windows® applications before you to avoid network traffic, or menu, then click Next.
click Auto Select. Click Next. 3-2 Chapter 3: BIOS setup Select the ASUS FTP site nearest Internet option from the 3. Select Update BIOS from the drop‑down you update the BIOS using this utility. Launch the ASUS Update utility from the Windows® desktop by clicking Start > Programs > ASUS > ASUSUpdate > ASUSUpdate. The ASUS Update main window appears. 2. Updating the BIOS through the Internet To update the BIOS through the Internet: 1. Quit all Windows® applications before you to avoid network traffic, or menu, then click Next.
User Manual
Page 71
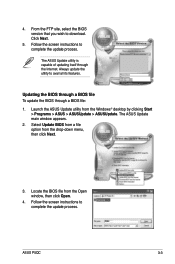
... process. Launch the ASUS Update utility from the Open window, then click Open. 4. Updating the BIOS through a BIOS file To update the BIOS through the Internet. Follow the screen instructions to complete the update process. Locate the BIOS file from the Windows® desktop by clicking Start > Programs > ASUS > ASUSUpdate > ASUSUpdate. P5QC.ROM P5QC ASUS P5QC 3-3 The ASUS Update main window appears. 2. From the...
... process. Launch the ASUS Update utility from the Open window, then click Open. 4. Updating the BIOS through a BIOS file To update the BIOS through the Internet. Follow the screen instructions to complete the update process. Locate the BIOS file from the Windows® desktop by clicking Start > Programs > ASUS > ASUSUpdate > ASUSUpdate. P5QC.ROM P5QC ASUS P5QC 3-3 The ASUS Update main window appears. 2. From the...

User Manual
Page 106
...will be cleared the next time you enter the Express Gate environment after clearing its settings. 3-38 Chapter 3: BIOS setup Choose [Prompt User] to enable or disable the ASUS Express Gate feature. Configuration options: [Prompt User] [1 second] [3 seconds] [5 seconds] [10 seconds] ...[15 seconds] [20 seconds] [30 seconds] Reset User Data [No] Allows you to stay at the Express Gate's first screen before starting Windows or other installed...
...will be cleared the next time you enter the Express Gate environment after clearing its settings. 3-38 Chapter 3: BIOS setup Choose [Prompt User] to enable or disable the ASUS Express Gate feature. Configuration options: [Prompt User] [1 second] [3 seconds] [5 seconds] [10 seconds] ...[15 seconds] [20 seconds] [30 seconds] Reset User Data [No] Allows you to stay at the Express Gate's first screen before starting Windows or other installed...

User Manual
Page 109
... before exiting. Discard Changes This option allows you to discard the selections you press , a confirmation window appears. When you select this option, a confirmation window appears. ASUS P5QC 3-41 Pressing does not immediately exit this menu or from the Exit menu to ensure the values ...Screen Select Item Enter Go to load default values. Exit & Save Changes Once you are finished making your changes to the BIOS items. BIOS SETUP UTILITY Main Ai Tweaker Advanced Power Boot Tools Exit Exit Options Exit & Save Changes Exit & Discard Changes Discard Changes...
... before exiting. Discard Changes This option allows you to discard the selections you press , a confirmation window appears. When you select this option, a confirmation window appears. ASUS P5QC 3-41 Pressing does not immediately exit this menu or from the Exit menu to ensure the values ...Screen Select Item Enter Go to load default values. Exit & Save Changes Once you are finished making your changes to the BIOS items. BIOS SETUP UTILITY Main Ai Tweaker Advanced Power Boot Tools Exit Exit Options Exit & Save Changes Exit & Discard Changes Discard Changes...

User Manual
Page 116
...4-4 Chapter 4: Software support Anti-Virus Utility The anti-virus application detects and protects your computer. ASUS Update The ASUS Update utility allows you to update the motherboard BIOS in Portable Document Format (PDF). Ulead Burn.Now Installs the Ulead Burn.Now application for easy ...Microsoft website (www.microsoft.com) for updates. CyberLink PowerBackup Installs CyberLink PowerBackup to open, view, and print documents in Windows® environment. DirectX® improves the multimedia features of you computer so you to back up and restore your multimedia ...
...4-4 Chapter 4: Software support Anti-Virus Utility The anti-virus application detects and protects your computer. ASUS Update The ASUS Update utility allows you to update the motherboard BIOS in Portable Document Format (PDF). Ulead Burn.Now Installs the Ulead Burn.Now application for easy ...Microsoft website (www.microsoft.com) for updates. CyberLink PowerBackup Installs CyberLink PowerBackup to open, view, and print documents in Windows® environment. DirectX® improves the multimedia features of you computer so you to back up and restore your multimedia ...
User Manual
Page 121
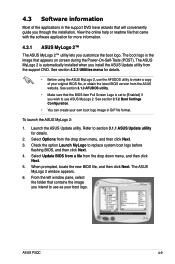
...; You can create your original BIOS file, or obtain the latest BIOS version from the drop down menu, and then click Next. 5. Launch the ASUS Update utility. The ASUS MyLogo 2 window appears. 6. Select Options from the ASUS website. See section 4.2.3 Utilities menu... for details. • Before using the ASUS MyLogo 2, use the AFUDOS utility to make a copy of the applications in GIF file format. To launch the ASUS MyLogo 2: 1. ASUS P5QC...
...; You can create your original BIOS file, or obtain the latest BIOS version from the drop down menu, and then click Next. 5. Launch the ASUS Update utility. The ASUS MyLogo 2 window appears. 6. Select Options from the ASUS website. See section 4.2.3 Utilities menu... for details. • Before using the ASUS MyLogo 2, use the AFUDOS utility to make a copy of the applications in GIF file format. To launch the ASUS MyLogo 2: 1. ASUS P5QC...
User Manual
Page 122
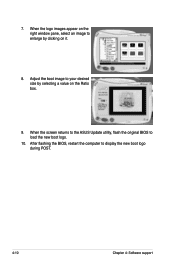
7. Adjust the boot image to enlarge by selecting a value on it. 8. When the logo images appear on the right window pane, select an image to your desired size by clicking on the Ratio box. 9. After flashing the BIOS, restart the computer to load the new boot logo. 10. When the screen returns to the ASUS Update utility, flash the original BIOS to display the new boot logo during POST. 4-10 Chapter 4: Software support
7. Adjust the boot image to enlarge by selecting a value on it. 8. When the logo images appear on the right window pane, select an image to your desired size by clicking on the Ratio box. 9. After flashing the BIOS, restart the computer to load the new boot logo. 10. When the screen returns to the ASUS Update utility, flash the original BIOS to display the new boot logo during POST. 4-10 Chapter 4: Software support
User Manual
Page 123
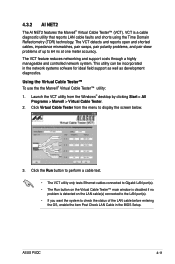
... network system. Launch the VCT utility from the menu to display the screen below. 3. ASUS P5QC 4-11 VCT is detected on the LAN cable(s) connected to the LAN port(s). •...the Marvell® Virtual Cable Tester™ utility: 1. This utility can be incorporated in the BIOS Setup. Click the Run button to perform a cable test. • The VCT utility only ...cable faults and shorts using the Time Domain Reflectometry (TDR) technology. Click Virtual Cable Tester from the Windows® desktop by clicking Start > All Programs > Marvell > Virtual Cable Tester. 2. 4.3.2 AI ...
... network system. Launch the VCT utility from the menu to display the screen below. 3. ASUS P5QC 4-11 VCT is detected on the LAN cable(s) connected to the LAN port(s). •...the Marvell® Virtual Cable Tester™ utility: 1. This utility can be incorporated in the BIOS Setup. Click the Run button to perform a cable test. • The VCT utility only ...cable faults and shorts using the Time Domain Reflectometry (TDR) technology. Click Virtual Cable Tester from the Windows® desktop by clicking Start > All Programs > Marvell > Virtual Cable Tester. 2. 4.3.2 AI ...
User Manual
Page 135
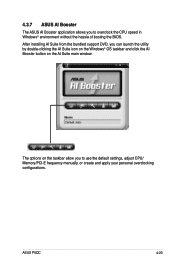
ASUS P5QC 4-23 After installing AI Suite from the bundled support DVD, you can launch the utility by double-clicking the AI Suite icon on the Windows® OS taskbar and click the AI Booster button on the taskbar allow you to use the default settings, adjust CPU/ Memory/PCI-E frequency manually, or create and apply your personal overclocking configurations. The options on the AI Suite main window. 4.3.7 ASUS AI Booster The ASUS AI Booster application allows you to overclock the CPU speed in WIndows® environment without the hassle of booting the BIOS.
ASUS P5QC 4-23 After installing AI Suite from the bundled support DVD, you can launch the utility by double-clicking the AI Suite icon on the Windows® OS taskbar and click the AI Booster button on the taskbar allow you to use the default settings, adjust CPU/ Memory/PCI-E frequency manually, or create and apply your personal overclocking configurations. The options on the AI Suite main window. 4.3.7 ASUS AI Booster The ASUS AI Booster application allows you to overclock the CPU speed in WIndows® environment without the hassle of booting the BIOS.
User Manual
Page 150
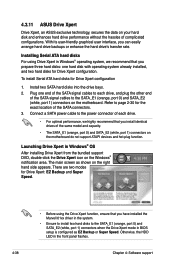
... in BIOS setup is configured as shown on your hard disk and enhances hard drive performance without the hassles of the SATA connectors. 3. Connect a SATA power cable to the SATA_E1 (orange, port 0) and SATA_E2 (white, port 1) connectors on the motherboard. 4.3.11 ASUS Drive Xpert Drive Xpert, an ASUS exclusive ... power connector of the same model and capacity. • The SATA_E1 (orange, port 0) and SATA_E2 (white, port 1) connectors on the Windows® notification area. Refer to the SATA_E1 (orange, port 0) and SATA_E2 (white, port 1) connectors when the Drive Xpert mode in...
... in BIOS setup is configured as shown on your hard disk and enhances hard drive performance without the hassles of the SATA connectors. 3. Connect a SATA power cable to the SATA_E1 (orange, port 0) and SATA_E2 (white, port 1) connectors on the motherboard. 4.3.11 ASUS Drive Xpert Drive Xpert, an ASUS exclusive ... power connector of the same model and capacity. • The SATA_E1 (orange, port 0) and SATA_E2 (white, port 1) connectors on the Windows® notification area. Refer to the SATA_E1 (orange, port 0) and SATA_E2 (white, port 1) connectors when the Drive Xpert mode in...

User Manual
Page 162
... start the web browser or Skype. Click Next to complete installation. Follow the screen instructions to continue. 6. You can take your installed OS such as Windows), enter BIOS setup, or power off. Basic configurations include language, date and time and screen resolution. 4-50 Chapter 4: Software support 5. The First Screen Express Gate's first...
... start the web browser or Skype. Click Next to complete installation. Follow the screen instructions to continue. 6. You can take your installed OS such as Windows), enter BIOS setup, or power off. Basic configurations include language, date and time and screen resolution. 4-50 Chapter 4: Software support 5. The First Screen Express Gate's first...

User Manual
Page 163
... within it or by clicking on the keyboard. Knowing the Express Gate hot-keys Here is already running. You can switch to boot OS Enter BIOS setup Enter Boot selection pop-up In the Express Gate Environment: Key + + + + + Function Switch between softwares by dragging its title bar. The ...an software icon in the LaunchBar denotes that you can re-arrange, re-size and move windows. Move a window by pressing + on its icon to force close it without any of the screen, to file ASUS P5QC 4-51 You can also switch between softwares Bring up a menu of common-used hot-keys...
... within it or by clicking on the keyboard. Knowing the Express Gate hot-keys Here is already running. You can switch to boot OS Enter BIOS setup Enter Boot selection pop-up In the Express Gate Environment: Key + + + + + Function Switch between softwares by dragging its title bar. The ...an software icon in the LaunchBar denotes that you can re-arrange, re-size and move windows. Move a window by pressing + on its icon to force close it without any of the screen, to file ASUS P5QC 4-51 You can also switch between softwares Bring up a menu of common-used hot-keys...
User Manual
Page 180
... Press any key when the system prompts "Press any key to create an Intel® ICH10R RAID driver disk. 4. Place the motherboard support DVD into the optical drive. 5. Follow succeeding screen instructions to avoid computer virus infection. 4-68 Chapter 4: Software support Insert ...drive that is included in Windows®: 1. Start Windows®. 2. Insert a floppy disk into the floppy drive then press . 9. For Windows Vista user, you are using Windows Vista OS. 5. Write-protect the floppy disk to complete the process. Save changes and exit BIOS. 6. Follow succeeding screen ...
... Press any key when the system prompts "Press any key to create an Intel® ICH10R RAID driver disk. 4. Place the motherboard support DVD into the optical drive. 5. Follow succeeding screen instructions to avoid computer virus infection. 4-68 Chapter 4: Software support Insert ...drive that is included in Windows®: 1. Start Windows®. 2. Insert a floppy disk into the floppy drive then press . 9. For Windows Vista user, you are using Windows Vista OS. 5. Write-protect the floppy disk to complete the process. Save changes and exit BIOS. 6. Follow succeeding screen ...
User Manual
Page 185
...; LGA775 processors running on 32-bit operating systems. • The motherboard comes with a BIOS file that supports the Intel® EM64T. 2. A.2 Enhanced Intel SpeedStep® Technology (EIST) • The motherboard comes with EIST support (Windows® Vista, Windows® XP SP2 / Linux 2.6 kernel or later versions) ASUS P5QC A-1 See Chapter 3 for details. • Visit www.intel.com...
...; LGA775 processors running on 32-bit operating systems. • The motherboard comes with a BIOS file that supports the Intel® EM64T. 2. A.2 Enhanced Intel SpeedStep® Technology (EIST) • The motherboard comes with EIST support (Windows® Vista, Windows® XP SP2 / Linux 2.6 kernel or later versions) ASUS P5QC A-1 See Chapter 3 for details. • Visit www.intel.com...

User Manual
Page 186
... the Intel(R) SpeedStep Technology item to save your changes and exit the BIOS setup. 5. When the Display Properties window appears, click the Screen Saver tab. 7. Click the Power button on the computer, then enter the BIOS Setup. 2. Close the Display Properties window. Click Apply, then click OK. 10. A-2 Appendix: CPU features Turn on the.... 6. After the computer restarts, right click on a blank space on the operating system. Press to [Automatic], then press . 4. Go to open the Power Options Properties window. 8. A.2.2 Using the EIST To use the EIST feature: 1.
... the Intel(R) SpeedStep Technology item to save your changes and exit the BIOS setup. 5. When the Display Properties window appears, click the Screen Saver tab. 7. Click the Power button on the computer, then enter the BIOS Setup. 2. Close the Display Properties window. Click Apply, then click OK. 10. A-2 Appendix: CPU features Turn on the.... 6. After the computer restarts, right click on a blank space on the operating system. Press to [Automatic], then press . 4. Go to open the Power Options Properties window. 8. A.2.2 Using the EIST To use the EIST feature: 1.


