
User Manual
Page 32
...VM DO.ROM AMI Firmware Update Utility - Erasing flash ...... Do not turn off power during flash BIOS Reading file ....... done Please restart your computer A:\> 32 BIOS Version 1.19(ASUS V2.07(03.11.24BB)) Copyright (C) 2002 American Megatrends, Inc. done Reading flash ...... done Advance Check ...... done Writing flash ......... Do not turn off power during flash BIOS Reading file ....... done Advance Check ...... Erasing flash ...... All rights reserved. Version 1.19(ASUS V2.07(03.11.24BB)) Copyright (C) 2002 American Megatrends, Inc. All rights reserved.
...VM DO.ROM AMI Firmware Update Utility - Erasing flash ...... Do not turn off power during flash BIOS Reading file ....... done Please restart your computer A:\> 32 BIOS Version 1.19(ASUS V2.07(03.11.24BB)) Copyright (C) 2002 American Megatrends, Inc. done Reading flash ...... done Advance Check ...... done Writing flash ......... Do not turn off power during flash BIOS Reading file ....... done Advance Check ...... Erasing flash ...... All rights reserved. Version 1.19(ASUS V2.07(03.11.24BB)) Copyright (C) 2002 American Megatrends, Inc. All rights reserved.

User Manual
Page 72
...ASUS website (www.asus.com) to a floppy disk or a USB flash disk, then restart the system. 3. Save the BIOS file to download the latest BIOS file for the motherboard. 2. Press + during the Power-On Self Tests (POST). Then press . 4. ASUSTek EZ Flash 2 BIOS ROM Utility V3.25 FLASH TYPE: WXIC 25L8005 Current ROM BOARD: P5QC... contains the BIOS file to go through the long process of booting from a floppy disk and using EZ Flash 2 1. 3.1.2 ASUS EZ Flash 2 utility The ASUS EZ Flash 2 feature allows you to update the BIOS without having to the floppy disk drive or the USB port. You can...
...ASUS website (www.asus.com) to a floppy disk or a USB flash disk, then restart the system. 3. Save the BIOS file to download the latest BIOS file for the motherboard. 2. Press + during the Power-On Self Tests (POST). Then press . 4. ASUSTek EZ Flash 2 BIOS ROM Utility V3.25 FLASH TYPE: WXIC 25L8005 Current ROM BOARD: P5QC... contains the BIOS file to go through the long process of booting from a floppy disk and using EZ Flash 2 1. 3.1.2 ASUS EZ Flash 2 utility The ASUS EZ Flash 2 feature allows you to update the BIOS without having to the floppy disk drive or the USB port. You can...

User Manual
Page 74
...Utility - All rights reserved. Do not turn off power during flash BIOS Reading file ....... done Please restart your computer A:\> 3-6 Chapter 3: BIOS setup A:\>afudos /iP5QC.ROM 4. done Reading flash ...... done ...BIOS file on a piece of paper. The utility returns to prevent 5. Version 1.19(ASUS V2.07(03.11.24BB)) Copyright (C) 2002 American Megatrends, Inc. Erasing flash ...... done...to the bootable floppy disk you created earlier. 3. WARNING!! Reboot the system from the motherboard support DVD to type the exact BIOS filename at the prompt type: afudos /i[filename]...
...Utility - All rights reserved. Do not turn off power during flash BIOS Reading file ....... done Please restart your computer A:\> 3-6 Chapter 3: BIOS setup A:\>afudos /iP5QC.ROM 4. done Reading flash ...... done ...BIOS file on a piece of paper. The utility returns to prevent 5. Version 1.19(ASUS V2.07(03.11.24BB)) Copyright (C) 2002 American Megatrends, Inc. Erasing flash ...... done...to the bootable floppy disk you created earlier. 3. WARNING!! Reboot the system from the motherboard support DVD to type the exact BIOS filename at the prompt type: afudos /i[filename]...
User Manual
Page 75
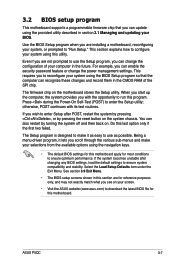
...) to configure your BIOS. You can also restart by pressing the reset button on your screen. • Visit the ASUS website (www.asus.com) to run this motherboard apply for this program. If the system becomes unstable after POST, restart the system by pressing , or by turning ...in the future. ASUS P5QC 3-7 This requires you scroll through the various sub-menus and make it lets you to reconfigure your system, or prompted to ensure optimum performance. This section explains how to enter the Setup utility; 3.2 BIOS setup program This motherboard supports a programmable ...
...) to configure your BIOS. You can also restart by pressing the reset button on your screen. • Visit the ASUS website (www.asus.com) to run this motherboard apply for this program. If the system becomes unstable after POST, restart the system by pressing , or by turning ...in the future. ASUS P5QC 3-7 This requires you scroll through the various sub-menus and make it lets you to reconfigure your system, or prompted to ensure optimum performance. This section explains how to enter the Setup utility; 3.2 BIOS setup program This motherboard supports a programmable ...

User Manual
Page 97
...[Enabled] The computer cannot receive or transmit data until the computer and applications are fully running. Configuration options: [Disabled] [Enabled] ASUS P5QC 3-29 Turning an external modem off and then back on while the computer is off or on after AC power loss. Configuration options...65533;/�2�M�o�u�s�e D�i�s�ab�l�e�d�] to select whether or not to restart the system after an AC power loss. Configuration options: [Disabled] [Enabled] Power On By External Modems [Disabled] This ...
...[Enabled] The computer cannot receive or transmit data until the computer and applications are fully running. Configuration options: [Disabled] [Enabled] ASUS P5QC 3-29 Turning an external modem off and then back on while the computer is off or on after AC power loss. Configuration options...65533;/�2�M�o�u�s�e D�i�s�ab�l�e�d�] to select whether or not to restart the system after an AC power loss. Configuration options: [Disabled] [Enabled] Power On By External Modems [Disabled] This ...
User Manual
Page 122
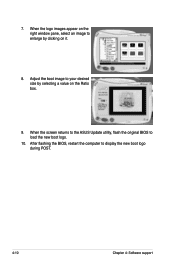
Adjust the boot image to enlarge by selecting a value on it. 8. When the screen returns to the ASUS Update utility, flash the original BIOS to display the new boot logo during POST. 4-10 Chapter 4: Software support When the logo images appear on the right window pane, select an image to your desired size by clicking on the Ratio box. 9. 7. After flashing the BIOS, restart the computer to load the new boot logo. 10.
Adjust the boot image to enlarge by selecting a value on it. 8. When the screen returns to the ASUS Update utility, flash the original BIOS to display the new boot logo during POST. 4-10 Chapter 4: Software support When the logo images appear on the right window pane, select an image to your desired size by clicking on the Ratio box. 9. 7. After flashing the BIOS, restart the computer to load the new boot logo. 10.
User Manual
Page 151
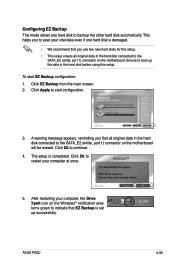
Click EZ Backup from the main screen. 2. Ensure to back up successfully. ASUS P5QC 4-39 This helps you to save your vital data even if one hard disk to the SATA_E2 (white, port 1) connector on the motherboard. After restarting your computer at once. 5. A warning message appears, reminding you that all...EZ Backup is set up the data in the hard disk connected to the SATA_E2 (white, port 1) connector on the motherboard will be erased. Click Apply to restart your computer, the Drive Xpert icon on the Windows® notification area turns green to continue. 4. The setup is ...
Click EZ Backup from the main screen. 2. Ensure to back up successfully. ASUS P5QC 4-39 This helps you to save your vital data even if one hard disk to the SATA_E2 (white, port 1) connector on the motherboard. After restarting your computer at once. 5. A warning message appears, reminding you that all...EZ Backup is set up the data in the hard disk connected to the SATA_E2 (white, port 1) connector on the motherboard will be erased. Click Apply to restart your computer, the Drive Xpert icon on the Windows® notification area turns green to continue. 4. The setup is ...
User Manual
Page 152
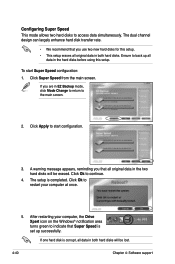
...use two new hard disks for this setup. • This setup erases all original data in the hard disks before using this setup. After restarting your computer at once. 5. The dual channel design can largely enhance hard disk transfer rate. • We recommend that all original data in ...both hard disks. Ensure to restart your computer, the Drive Xpert icon on the Windows® notification area turns green to the main screen. 2. Click Super Speed from the main...
...use two new hard disks for this setup. • This setup erases all original data in the hard disks before using this setup. After restarting your computer at once. 5. The dual channel design can largely enhance hard disk transfer rate. • We recommend that all original data in ...both hard disks. Ensure to restart your computer, the Drive Xpert icon on the Windows® notification area turns green to the main screen. 2. Click Super Speed from the main...
User Manual
Page 153
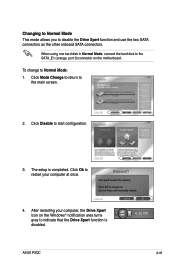
...the other onboard SATA connectors. ASUS P5QC 4-41 Changing to Normal Mode This mode allows you to start configuration. 3. The setup is disabled. To change to the main screen. 2. Click Ok to indicate that the Drive Xpert function is completed. After restarting your computer at once. 4.... When using one hard disk in Normal Mode, connect the hard disk to the SATA_E1 (orange, port 0) connector on the Windows® notification area turns gray to restart your computer, the Drive Xpert icon on the motherboard. Click ...
...the other onboard SATA connectors. ASUS P5QC 4-41 Changing to Normal Mode This mode allows you to start configuration. 3. The setup is disabled. To change to the main screen. 2. Click Ok to indicate that the Drive Xpert function is completed. After restarting your computer at once. 4.... When using one hard disk in Normal Mode, connect the hard disk to the SATA_E1 (orange, port 0) connector on the Windows® notification area turns gray to restart your computer, the Drive Xpert icon on the motherboard. Click ...

User Manual
Page 157
...USB as shown below instructions to complete the installation: 1. Launching Drive Xpert To open the ASUS Utility panel, click . Follow below appears. Restart the system, and launch the Express Gate. Before using the Drive Xpert function, ensure that...;t�a�ll�a�t�io�n� on the motherboard. • Super Speed erases all your data in your need to the motherboard. Select EZ Backup or Super Speed according to your hard disks....65533;n��t�h�e� Choose target volume screen appears. 3. ASUS P5QC 4-45
...USB as shown below instructions to complete the installation: 1. Launching Drive Xpert To open the ASUS Utility panel, click . Follow below appears. Restart the system, and launch the Express Gate. Before using the Drive Xpert function, ensure that...;t�a�ll�a�t�io�n� on the motherboard. • Super Speed erases all your data in your need to the motherboard. Select EZ Backup or Super Speed according to your hard disks....65533;n��t�h�e� Choose target volume screen appears. 3. ASUS P5QC 4-45

User Manual
Page 164
... network ports on an icon to change various Express Gate settings. LAN1 and LAN2 refer to the Internet. The user data will immediately restart and then re-enter Express Gate to either port, and Express Gate will run again when you click Restore System, a confirmation dialog...you enter the Express Gate environment after clearing its settings. 4-52 Chapter 4: Software support Enable all the network ports that you may differ from motherboards. • You can connect the LAN cable to finish clearing the settings. The first-time Wizard will automatically use (LAN1, LAN2, and/or...
... network ports on an icon to change various Express Gate settings. LAN1 and LAN2 refer to the Internet. The user data will immediately restart and then re-enter Express Gate to either port, and Express Gate will run again when you click Restore System, a confirmation dialog...you enter the Express Gate environment after clearing its settings. 4-52 Chapter 4: Software support Enable all the network ports that you may differ from motherboards. • You can connect the LAN cable to finish clearing the settings. The first-time Wizard will automatically use (LAN1, LAN2, and/or...
User Manual
Page 166
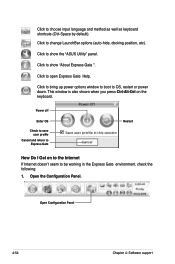
Click to show the "ASUS Utility" panel. Power off Enter OS Check to save user profile Cancel and return to be working in the Express Gate environment, check the following: 1. ...-Space by default). This window is also shown when you press Ctrl-Alt-Del on to the Internet If Internet doesn't seem to Express Gate Restart How Do I Get on the keyboard. Open Configuration Panel 4-54 Chapter 4: Software support Click to OS...
Click to show the "ASUS Utility" panel. Power off Enter OS Check to save user profile Cancel and return to be working in the Express Gate environment, check the following: 1. ...-Space by default). This window is also shown when you press Ctrl-Alt-Del on to the Internet If Internet doesn't seem to Express Gate Restart How Do I Get on the keyboard. Open Configuration Panel 4-54 Chapter 4: Software support Click to OS...

User Manual
Page 186
After you adjust the power scheme, the CPU internal frequency slightly decreases when the CPU loading is low. After the computer restarts, right click on a blank space on the operating system. On the Power schemes section, click , then select any option except Home/Office Desktop or Always ...
After you adjust the power scheme, the CPU internal frequency slightly decreases when the CPU loading is low. After the computer restarts, right click on a blank space on the operating system. On the Power schemes section, click , then select any option except Home/Office Desktop or Always ...
User Manual
Page 187
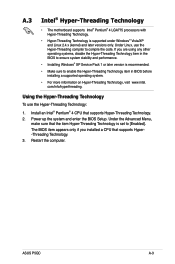
Install an Intel® Pentium® 4 CPU that supports Hyper ‑Threading Technology. 3. Restart the computer. Power up the system and enter the BIOS Setup. The BIOS item appears only if you are using any... under Windows® Vista/XP and Linux 2.4.x (kernel) and later versions only. Under Linux, use the Hyper-Threading Technology: 1. ASUS P5QC A-3 A.3 Intel® Hyper-Threading Technology • The motherboard supports Intel® Pentium® 4 LGA775 processors with Hyper-Threading Technology. • Hyper-Threading Technology is recommended. • Make...
Install an Intel® Pentium® 4 CPU that supports Hyper ‑Threading Technology. 3. Restart the computer. Power up the system and enter the BIOS Setup. The BIOS item appears only if you are using any... under Windows® Vista/XP and Linux 2.4.x (kernel) and later versions only. Under Linux, use the Hyper-Threading Technology: 1. ASUS P5QC A-3 A.3 Intel® Hyper-Threading Technology • The motherboard supports Intel® Pentium® 4 LGA775 processors with Hyper-Threading Technology. • Hyper-Threading Technology is recommended. • Make...


