User Manual
Page 13
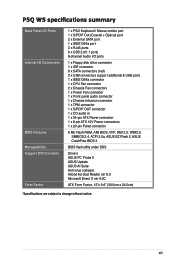
xiii P5Q WS specifications summary Back Panel I/O Ports Internal I/O Connectors BIOS Features Manageability Support DVD Contents Form Factor 1 x PS/2 Keyboard / Mouse combo port 1 x S/PDIF Out (Coaxial + Optical) port 2 x External SATA port 1 x IEEE1394a ...x CD audio in 1 x 24-pin ATX Power connector 1 x 8-pin ATX 12V Power connectors 1 x 20-pin Panel connector 8 Mb Flash ROM, AMI BIOS, PnP, DMI 2.0, WfM2.0, SMBIOS 2.4, ACPI 2.0a, ASUS EZ Flash 2, ASUS CrashFree BIOS 3 BIOS flash utility under DOS Drivers ASUS PC Probe II ASUS Update ASUS AI Suite Anti-virus software Adobe Acrobat Reader ...
xiii P5Q WS specifications summary Back Panel I/O Ports Internal I/O Connectors BIOS Features Manageability Support DVD Contents Form Factor 1 x PS/2 Keyboard / Mouse combo port 1 x S/PDIF Out (Coaxial + Optical) port 2 x External SATA port 1 x IEEE1394a ...x CD audio in 1 x 24-pin ATX Power connector 1 x 8-pin ATX 12V Power connectors 1 x 20-pin Panel connector 8 Mb Flash ROM, AMI BIOS, PnP, DMI 2.0, WfM2.0, SMBIOS 2.4, ACPI 2.0a, ASUS EZ Flash 2, ASUS CrashFree BIOS 3 BIOS flash utility under DOS Drivers ASUS PC Probe II ASUS Update ASUS AI Suite Anti-virus software Adobe Acrobat Reader ...

User Manual
Page 23
...and the DRAM Voltage in case the system hangs due to overclocking. eliminates the need to overclocking, C.P.R. ASUS P5Q WS 1-7 feature of booting the BIOS. �S�e�e��p�a��g�e��4�-�3�0��f�o&#...;il�s�. 1.3.3 ASUS Intelligent Performance & Overclocking features AI Booster The ASUS AI Booster allows you to overclock the CPU speed in Windows environment without the hassle of the motherboard BIOS allows automatic re-setting to the BIOS default settings in 0.02v...
...and the DRAM Voltage in case the system hangs due to overclocking. eliminates the need to overclocking, C.P.R. ASUS P5Q WS 1-7 feature of booting the BIOS. �S�e�e��p�a��g�e��4�-�3�0��f�o&#...;il�s�. 1.3.3 ASUS Intelligent Performance & Overclocking features AI Booster The ASUS AI Booster allows you to overclock the CPU speed in Windows environment without the hassle of the motherboard BIOS allows automatic re-setting to the BIOS default settings in 0.02v...

User Manual
Page 45
...RTC when the system hangs due to clear the CMOS RTC RAM data. function. The onboard button cell battery powers the RAM data in CMOS. ASUS P5Q WS 2-19 Plug the power cord and turn off is required to overclocking, use the C.P.R. (CPU Parameter Recall) feature. After the CMOS clearance, ... jumper cap from pins 1-2 (default) to pins 1-2. 3. For system failure due to enable C.P.R. Shut down the key during the boot process and enter BIOS setup to clear the Real Time Clock (RTC) RAM in CMOS, which include system setup information such as system passwords. You must turn ON the...
...RTC when the system hangs due to clear the CMOS RTC RAM data. function. The onboard button cell battery powers the RAM data in CMOS. ASUS P5Q WS 2-19 Plug the power cord and turn off is required to overclocking, use the C.P.R. (CPU Parameter Recall) feature. After the CMOS clearance, ... jumper cap from pins 1-2 (default) to pins 1-2. 3. For system failure due to enable C.P.R. Shut down the key during the boot process and enter BIOS setup to clear the Real Time Clock (RTC) RAM in CMOS, which include system setup information such as system passwords. You must turn ON the...

User Manual
Page 57
... audio I /O module cable to this connector. • We recommend that you connect a high-definition front panel audio module to this connector to avail of the motherboard's high-definition audio capability. • If you want to connect an AC' 97 front panel audio module to this connector, make sure that supports either... as a CD-ROM, TV tuner, or MPEG card. Connect one end of the front panel audio I /O module that the Front Panel Type item in the BIOS is for details. 10. ASUS P5Q WS 2-31
... audio I /O module cable to this connector. • We recommend that you connect a high-definition front panel audio module to this connector to avail of the motherboard's high-definition audio capability. • If you want to connect an AC' 97 front panel audio module to this connector, make sure that supports either... as a CD-ROM, TV tuner, or MPEG card. Connect one end of the front panel audio I /O module that the Front Panel Type item in the BIOS is for details. 10. ASUS P5Q WS 2-31

User Manual
Page 63
... and wake up system 85 Show post error D3 Prepare system for memory detection 87 and sizing A4 Enter BIOS setup BIOS boot menu D4 Memory test AC OS in PIC mode D5 Copy BIOS from ROM to RAM AA OS in APIC mode C0 Early CPU initiation 01 S1 C5 Wake up... Detect PS2 keyboard 10 Resume from S1 38 USB initiation 30 Resume from S3 52 Display USB devices 40 Resume from S4 2A Initiate VGA BIOS 00 Leave BIOS and pass control to OS ASUS P5Q WS 2-37 2.8.3 G.P.
... and wake up system 85 Show post error D3 Prepare system for memory detection 87 and sizing A4 Enter BIOS setup BIOS boot menu D4 Memory test AC OS in PIC mode D5 Copy BIOS from ROM to RAM AA OS in APIC mode C0 Early CPU initiation 01 S1 C5 Wake up... Detect PS2 keyboard 10 Resume from S1 38 USB initiation 30 Resume from S3 52 Display USB devices 40 Resume from S4 2A Initiate VGA BIOS 00 Leave BIOS and pass control to OS ASUS P5Q WS 2-37 2.8.3 G.P.

User Manual
Page 65
... then select Turn Off Computer. 2. Pressing the power switch for less than four seconds lets the system enter the soft-off mode, depending on the BIOS setting. ASUS P5Q WS 2-39 Click the Turn Off button to section 3.6 Power Menu for details. The power supply should turn off the computer 2.10.1 Using the OS... is ON, pressing the power switch for more than four seconds puts the system to sleep mode or to soft-off mode regardless of the BIOS setting.
... then select Turn Off Computer. 2. Pressing the power switch for less than four seconds lets the system enter the soft-off mode, depending on the BIOS setting. ASUS P5Q WS 2-39 Click the Turn Off button to section 3.6 Power Menu for details. The power supply should turn off the computer 2.10.1 Using the OS... is ON, pressing the power switch for more than four seconds puts the system to sleep mode or to soft-off mode regardless of the BIOS setting.

User Manual
Page 68
Chapter summary 3 3.1 Managing and updating your BIOS 3-1 3.2 BIOS setup program 3-9 3.3 Main menu 3-12 3.4 Ai Tweaker 3-17 3.5 Advanced menu 3-24 3.6 Power menu 3-32 3.7 Boot menu 3-36 3.8 Tools menu 3-40 3.9 Exit menu 3-44 ASUS P5Q WS
Chapter summary 3 3.1 Managing and updating your BIOS 3-1 3.2 BIOS setup program 3-9 3.3 Main menu 3-12 3.4 Ai Tweaker 3-17 3.5 Advanced menu 3-24 3.6 Power menu 3-32 3.7 Boot menu 3-36 3.8 Tools menu 3-40 3.9 Exit menu 3-44 ASUS P5Q WS
User Manual
Page 69
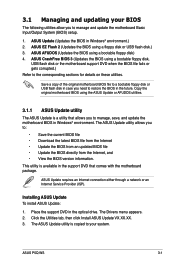
... allows you to manage and update the motherboard Basic Input/Output System (BIOS) setup. 1. The ASUS Update utility is copied to manage, save, and update the motherboard BIOS in the future. Installing ASUS Update To install ASUS Update: 1. The Drivers menu appears. 2. ASUS P5Q WS 3-1 ASUS EZ Flash 2 (Updates the BIOS using a bootable floppy disk) 4. ASUS Update requires an Internet connection either through...
... allows you to manage and update the motherboard Basic Input/Output System (BIOS) setup. 1. The ASUS Update utility is copied to manage, save, and update the motherboard BIOS in the future. Installing ASUS Update To install ASUS Update: 1. The Drivers menu appears. 2. ASUS P5Q WS 3-1 ASUS EZ Flash 2 (Updates the BIOS using a bootable floppy disk) 4. ASUS Update requires an Internet connection either through...

User Manual
Page 71
... process. Always update the utility to complete the update process. P5Q-WS.ROM P5Q-WS ASUS P5Q WS 3-3 The ASUS Update utility is capable of updating itself through a BIOS file: 1. Launch the ASUS Update utility from the drop‑down menu, then click Next. 3. The ASUS Update main window appears. 2. Locate the BIOS file from the Open window, then click Open. 4. Follow...
... process. Always update the utility to complete the update process. P5Q-WS.ROM P5Q-WS ASUS P5Q WS 3-3 The ASUS Update utility is capable of updating itself through a BIOS file: 1. Launch the ASUS Update utility from the drop‑down menu, then click Next. 3. The ASUS Update main window appears. 2. Locate the BIOS file from the Open window, then click Open. 4. Follow...
User Manual
Page 73
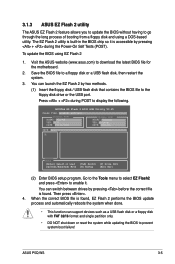
...8209;based utility. Press + during the Power-On Self Tests (POST). ASUS P5Q WS 3-5 Visit the ASUS website (www.asus.com) to display the following. ASUSTek EZ Flash 2 BIOS ROM Utility V3.25 FLASH TYPE: WINBOND W25P/X16 Current ROM BOARD: P5Q-WS VER: 0121 DATE: 05/20/2008 Update ROM BOARD: Unknown VER:... to download the latest BIOS file for the motherboard. 2. You can support devices such as a USB flash disk or a floppy disk with FAT 32/16 format and single partition only. • DO NOT shut down or reset the system while updating the BIOS to prevent system boot failure...
...8209;based utility. Press + during the Power-On Self Tests (POST). ASUS P5Q WS 3-5 Visit the ASUS website (www.asus.com) to display the following. ASUSTek EZ Flash 2 BIOS ROM Utility V3.25 FLASH TYPE: WINBOND W25P/X16 Current ROM BOARD: P5Q-WS VER: 0121 DATE: 05/20/2008 Update ROM BOARD: Unknown VER:... to download the latest BIOS file for the motherboard. 2. You can support devices such as a USB flash disk or a floppy disk with FAT 32/16 format and single partition only. • DO NOT shut down or reset the system while updating the BIOS to prevent system boot failure...

User Manual
Page 75
...motherboard support DVD to prevent system boot failure! 5. done Writing flash ...... The utility verifies the file and starts updating the BIOS. WARNING!! A:\>afudos /iP5Q-WS.ROM 4. A:\>afudos /iP5Q-WS.ROM AMI Firmware Update Utility - done Reading flash ...... All rights reserved. done Verifying flash .... done Please restart your computer A:\> ASUS P5Q WS... 3-7 Do not turn off power during flash BIOS Reading file ....... Write the BIOS filename on the bootable floppy disk. Boot the system ...
...motherboard support DVD to prevent system boot failure! 5. done Writing flash ...... The utility verifies the file and starts updating the BIOS. WARNING!! A:\>afudos /iP5Q-WS.ROM 4. A:\>afudos /iP5Q-WS.ROM AMI Firmware Update Utility - done Reading flash ...... All rights reserved. done Verifying flash .... done Please restart your computer A:\> ASUS P5Q WS... 3-7 Do not turn off power during flash BIOS Reading file ....... Write the BIOS filename on the bootable floppy disk. Boot the system ...

User Manual
Page 76
... BIOS file using this utility. Prepare the motherboard support DVD, the floppy disk or the USB flash disk containing the updated motherboard BIOS before using the motherboard support...BIOS! Bad BIOS checksum. Starting BIOS recovery... Start flashing... 4. Turn on the system. 2. 3.1.5 ASUS CrashFree BIOS 3 utility The ASUS CrashFree BIOS 3 is an auto recovery tool that contains the updated BIOS file. You can cause system boot failure! 3-8 Chapter 3: BIOS setup Recovering the BIOS from the support DVD To recover the BIOS from the USB flash disk: 1. Reading file "P5Q-WS...
... BIOS file using this utility. Prepare the motherboard support DVD, the floppy disk or the USB flash disk containing the updated motherboard BIOS before using the motherboard support...BIOS! Bad BIOS checksum. Starting BIOS recovery... Start flashing... 4. Turn on the system. 2. 3.1.5 ASUS CrashFree BIOS 3 utility The ASUS CrashFree BIOS 3 is an auto recovery tool that contains the updated BIOS file. You can cause system boot failure! 3-8 Chapter 3: BIOS setup Recovering the BIOS from the support DVD To recover the BIOS from the USB flash disk: 1. Reading file "P5Q-WS...

User Manual
Page 77
...security password feature or change the configuration of the SPI chip. See section 3.9 Exit Menu. • The BIOS setup screens shown in this motherboard. If the system becomes unstable after POST, restart the system by pressing , or by turning the system off... not prompted to use as easy to ensure system compatibility and stability. Do this utility. ASUS P5Q WS 3-9 If you are installing a motherboard, reconfiguring your BIOS. 3.2 BIOS setup program This motherboard supports a programmable firmware chip that the computer can recognize these changes and record them in...
...security password feature or change the configuration of the SPI chip. See section 3.9 Exit Menu. • The BIOS setup screens shown in this motherboard. If the system becomes unstable after POST, restart the system by pressing , or by turning the system off... not prompted to use as easy to ensure system compatibility and stability. Do this utility. ASUS P5Q WS 3-9 If you are installing a motherboard, reconfiguring your BIOS. 3.2 BIOS setup program This motherboard supports a programmable firmware chip that the computer can recognize these changes and record them in...

User Manual
Page 81
.... Configuration options: [Disabled] [Auto] PIO Mode [Auto] Allows you are not user-configurable. Configuration options: [Auto] [0] [1] [2] [3] [4] ASUS P5Q WS 3-13 These values are specifically configuring a CD-ROM drive. Configuration options: [Not Installed] [Auto] [CDROM] [ARMD] LBA/Large Mode [Auto... F10 Save and Exit ESC Exit v02.61 (C)Copyright 1985-2008, American Megatrends, Inc. 3.3.5 SATA 1-6 While entering Setup, the BIOS automatically detects the presence of IDE drive. Type [Auto] LBA/Large Mode [Auto] Block(Multi-Sector Transfer)M [Auto] PIO Mode...
.... Configuration options: [Disabled] [Auto] PIO Mode [Auto] Allows you are not user-configurable. Configuration options: [Auto] [0] [1] [2] [3] [4] ASUS P5Q WS 3-13 These values are specifically configuring a CD-ROM drive. Configuration options: [Not Installed] [Auto] [CDROM] [ARMD] LBA/Large Mode [Auto... F10 Save and Exit ESC Exit v02.61 (C)Copyright 1985-2008, American Megatrends, Inc. 3.3.5 SATA 1-6 While entering Setup, the BIOS automatically detects the presence of IDE drive. Type [Auto] LBA/Large Mode [Auto] Block(Multi-Sector Transfer)M [Auto] PIO Mode...

User Manual
Page 83
... [0] [5] [10] [15] [20] [25] [30] [35] 3.3.7 AHCI Configuration This menu is accessed through BIOS. It appears only when you to [AHCI]. Configration options: [Disabled] [Enabled] ASUS P5Q WS 3-15 This will be effective only if the device is the section for AHCI configuration. Main... BIOS SETUP UTILITY AHCI Port1 Device :Not Detected SATA Port1 SMART Monitoring [Auto] [Enabled] Select the ...
... [0] [5] [10] [15] [20] [25] [30] [35] 3.3.7 AHCI Configuration This menu is accessed through BIOS. It appears only when you to [AHCI]. Configration options: [Disabled] [Enabled] ASUS P5Q WS 3-15 This will be effective only if the device is the section for AHCI configuration. Main... BIOS SETUP UTILITY AHCI Port1 Device :Not Detected SATA Port1 SMART Monitoring [Auto] [Enabled] Select the ...
User Manual
Page 85
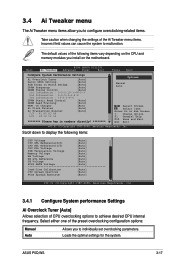
... ESC Exit v02.61 (C)Copyright 1985-2008, American Megatrends, Inc. Scroll down to display the following items vary depending on the motherboard. ASUS P5Q WS 3-17 OC Charger [Auto Ai Clock Twister [Auto] Ai Transaction Booster [Auto] C/P : A1 A2 A3 A4 LVL : ... values can cause the system to malfunction. Select either one of CPU overclocking options to individually set overclocking parameters. BIOS SETUP UTILITY Main Ai Tweaker Advanced Power Boot Tools Exit Configure System Performance Settings Ai Overclock Tuner [Auto] Ratio ...
... ESC Exit v02.61 (C)Copyright 1985-2008, American Megatrends, Inc. Scroll down to display the following items vary depending on the motherboard. ASUS P5Q WS 3-17 OC Charger [Auto Ai Clock Twister [Auto] Ai Transaction Booster [Auto] C/P : A1 A2 A3 A4 LVL : ... values can cause the system to malfunction. Select either one of CPU overclocking options to individually set overclocking parameters. BIOS SETUP UTILITY Main Ai Tweaker Advanced Power Boot Tools Exit Configure System Performance Settings Ai Overclock Tuner [Auto] Ratio ...

User Manual
Page 99
... system configures the Plug and Play devices not required for PCI/PnP devices. Plug And Play O/S [No] NO: lets the BIOS configure all the devices in the system. BIOS SETUP UTILITY Advanced Advanced PCI/PnP Settings WARNING: Setting wrong values in the system. When set to [NO...2008, American Megatrends, Inc. Plug And Play O/S [No] When set to [YES] and if you to malfunction. Configuration options: [No] [Yes] ASUS P5Q WS 3-31 Legacy USB Support [Auto] Allows you to detect the presence of USB devices at startup. Setting to [Auto] allows the system to enable or...
... system configures the Plug and Play devices not required for PCI/PnP devices. Plug And Play O/S [No] NO: lets the BIOS configure all the devices in the system. BIOS SETUP UTILITY Advanced Advanced PCI/PnP Settings WARNING: Setting wrong values in the system. When set to [NO...2008, American Megatrends, Inc. Plug And Play O/S [No] When set to [YES] and if you to malfunction. Configuration options: [No] [Yes] ASUS P5Q WS 3-31 Legacy USB Support [Auto] Allows you to detect the presence of USB devices at startup. Setting to [Auto] allows the system to enable or...

User Manual
Page 101
...[Power On], the system goes on after AC power loss. This feature requires an ATX power supply that provides at least 1A on the PS/2 keyboard to restart the system ...on the +5VSB lead. Configuration options: [Disabled] [Space Bar] [Ctrl-Esc] [Power Key] ASUS P5Q WS 3-33 Change Option F1 General Help F10 Save and Exit ESC Exit v02.61 (C)Copyright 1985-2008,... American Megatrends, Inc. Select Screen Select Item +- 3.6.5 APM Configuration BIOS SETUP UTILITY Power APM Configuration Restore on AC Power Loss [Power Off] Power On By ...
...[Power On], the system goes on after AC power loss. This feature requires an ATX power supply that provides at least 1A on the PS/2 keyboard to restart the system ...on the +5VSB lead. Configuration options: [Disabled] [Space Bar] [Ctrl-Esc] [Power Key] ASUS P5Q WS 3-33 Change Option F1 General Help F10 Save and Exit ESC Exit v02.61 (C)Copyright 1985-2008,... American Megatrends, Inc. Select Screen Select Item +- 3.6.5 APM Configuration BIOS SETUP UTILITY Power APM Configuration Restore on AC Power Loss [Power Off] Power On By ...

User Manual
Page 105
... booting. Select Screen Select Item +- Configuration options: [Disabled] [Enabled] ASUS P5Q WS 3-37 Configuration options: [Off] [On] Wait for 'F1' If Error [Enabled] When set to [Enabled], the system waits for 'F1' if Error [Enabled] Hit 'DEL' Message Display [Enabled] Allows BIOS to use the ASUS MyLogo2™ feature. This will decrease the time needed...
... booting. Select Screen Select Item +- Configuration options: [Disabled] [Enabled] ASUS P5Q WS 3-37 Configuration options: [Off] [On] Wait for 'F1' If Error [Enabled] When set to [Enabled], the system waits for 'F1' if Error [Enabled] Hit 'DEL' Message Display [Enabled] Allows BIOS to use the ASUS MyLogo2™ feature. This will decrease the time needed...

User Manual
Page 107
... press . 3. After you set or change password. Clear User Password Select this item shows Installed. Configuration options: [Setup] [Always] ASUS P5Q WS 3-39 Change User Password Select this item to set a password, this item to clear the user password. Select the Change User Password ...the same steps as Date and Time. [Full Access] allows viewing and changing all the fields in setting a user password. BIOS SETUP UTILITY Boot Security Settings Supervisor Password : Installed User Password : Installed Change Supervisor Password User Access Level Change User Password Clear ...
... press . 3. After you set or change password. Clear User Password Select this item shows Installed. Configuration options: [Setup] [Always] ASUS P5Q WS 3-39 Change User Password Select this item to set a password, this item to clear the user password. Select the Change User Password ...the same steps as Date and Time. [Full Access] allows viewing and changing all the fields in setting a user password. BIOS SETUP UTILITY Boot Security Settings Supervisor Password : Installed User Password : Installed Change Supervisor Password User Access Level Change User Password Clear ...

