
User Manual
Page 70
...EZ Flash 2 utility is built-in the BIOS chip so it . Visit the ASUS website (www.asus.com) to a floppy disk or a USB flash disk, then restart the system. 3. Save the BIOS file to download the latest BIOS file for the motherboard. 2. Then press . 4. Press + during the Power-On Self Tests (POST...the floppy disk drive or the USB port. You can support devices such as a USB flash disk or a floppy disk with FAT 32/16 format and single partition only. • DO NOT shut down or reset the system while updating the BIOS to prevent system boot failure! 3-4 Chapter 3: BIOS ...
...EZ Flash 2 utility is built-in the BIOS chip so it . Visit the ASUS website (www.asus.com) to a floppy disk or a USB flash disk, then restart the system. 3. Save the BIOS file to download the latest BIOS file for the motherboard. 2. Then press . 4. Press + during the Power-On Self Tests (POST...the floppy disk drive or the USB port. You can support devices such as a USB flash disk or a floppy disk with FAT 32/16 format and single partition only. • DO NOT shut down or reset the system while updating the BIOS to prevent system boot failure! 3-4 Chapter 3: BIOS ...

User Manual
Page 73
...USB flash disk that allows you use a SATA optical drive, always connect the SATA cable to the optical drive. 3. Turn on the system. 2. Restart the system after the utility completes the updating process. Insert the motherboard support DVD to the SATA1/SATA 2/SATA3/SATA4/SATA5/SATA6 connector; Bad BIOS checksum. ASUS P5Q PRO....ROM". Recovering the BIOS from the USB flash disk To recover the BIOS from the support DVD: 1. The device size should be smaller than 8GB. • DO NOT shut down or reset the system while updating the BIOS! Doing so can cause system boot failure!
...USB flash disk that allows you use a SATA optical drive, always connect the SATA cable to the optical drive. 3. Turn on the system. 2. Restart the system after the utility completes the updating process. Insert the motherboard support DVD to the SATA1/SATA 2/SATA3/SATA4/SATA5/SATA6 connector; Bad BIOS checksum. ASUS P5Q PRO....ROM". Recovering the BIOS from the USB flash disk To recover the BIOS from the support DVD: 1. The device size should be smaller than 8GB. • DO NOT shut down or reset the system while updating the BIOS! Doing so can cause system boot failure!

User Manual
Page 89
...[No State] The item is not configurable. After the system reboots, the TPM Configuration menu will change the settings for details). ASUS P5Q PRO 3-23 TPM Configuration Execute TPM Command [Last setting] TPM Enable/Disable Status [No State] TPM Owner Status [No State] Enable... Advanced menu items allow you to malfunction. Main Ai Tweaker BIOS SETUP UTILITY Advanced Power Boot TPM Configuration CPU Configuration Chipset Onboard Devices Configuration USB Configuration PCIPnP Tools Exit Configure CPU. Take caution when changing the settings of the Advanced ...
...[No State] The item is not configurable. After the system reboots, the TPM Configuration menu will change the settings for details). ASUS P5Q PRO 3-23 TPM Configuration Execute TPM Command [Last setting] TPM Enable/Disable Status [No State] TPM Owner Status [No State] Enable... Advanced menu items allow you to malfunction. Main Ai Tweaker BIOS SETUP UTILITY Advanced Power Boot TPM Configuration CPU Configuration Chipset Onboard Devices Configuration USB Configuration PCIPnP Tools Exit Configure CPU. Take caution when changing the settings of the Advanced ...

User Manual
Page 96
...Auto] Allows you to change the advanced settings for PCI/PnP devices. If detected, the USB controller legacy mode is disabled. YES: lets the operating system configure Plug and Play (PnP) devices not required for boot. Change Option F1 General Help F10 Save and Exit ESC Exit v02.61 (C)Copyright 1985-... you to [YES] and if you install a Plug and Play operating system, the operating system configures the Plug and Play devices not required for boot if your system has a Plug and Play operating system. When set to [NO], BIOS configures all the devices in below sections may cause system ...
...Auto] Allows you to change the advanced settings for PCI/PnP devices. If detected, the USB controller legacy mode is disabled. YES: lets the operating system configure Plug and Play (PnP) devices not required for boot. Change Option F1 General Help F10 Save and Exit ESC Exit v02.61 (C)Copyright 1985-... you to [YES] and if you install a Plug and Play operating system, the operating system configures the Plug and Play devices not required for boot if your system has a Plug and Play operating system. When set to [NO], BIOS configures all the devices in below sections may cause system ...

User Manual
Page 108
BIOS SETUP UTILITY Tools O.C. Press to prevent the system boot failure! 3-42 Chapter 3: BIOS setup Profile Utility V1.25 Current CMOS BOARD: P5Q PRO VER: 0121 DATE: 04/17/2008 PATH: A:\... A: Restore CMOS BOARD: Unknown VER: Unknown DATE: Unknown Note [Enter] Select or Load [Tab] Switch [Up/Down/Home/End] Move [B] Backup [V] Drive Info [Esc] Exit • This function can support devices such as a USB.... ASUSTek O.C. PROFILE Configuration O.C. 3.8.4 ASUS O.C. Press to load the previous BIOS settings saved in the BIOS Flash.
BIOS SETUP UTILITY Tools O.C. Press to prevent the system boot failure! 3-42 Chapter 3: BIOS setup Profile Utility V1.25 Current CMOS BOARD: P5Q PRO VER: 0121 DATE: 04/17/2008 PATH: A:\... A: Restore CMOS BOARD: Unknown VER: Unknown DATE: Unknown Note [Enter] Select or Load [Tab] Switch [Up/Down/Home/End] Move [B] Backup [V] Drive Info [Esc] Exit • This function can support devices such as a USB.... ASUSTek O.C. PROFILE Configuration O.C. 3.8.4 ASUS O.C. Press to load the previous BIOS settings saved in the BIOS Flash.
User Manual
Page 172
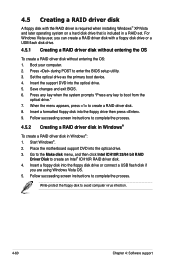
...." 7. Set the optical drive as the primary boot device. 4. Press any key when the system prompts "Press any key to avoid computer virus infection. 4-60 Chapter 4: Software support Place the motherboard support DVD into the optical drive. 5. Boot your computer. 2. Insert the support DVD into the... optical drive. 3. Insert a formatted floppy disk into the floppy disk drive or connect a USB flash disk if you can create a RAID ...
...." 7. Set the optical drive as the primary boot device. 4. Press any key when the system prompts "Press any key to avoid computer virus infection. 4-60 Chapter 4: Software support Place the motherboard support DVD into the optical drive. 5. Boot your computer. 2. Insert the support DVD into the... optical drive. 3. Insert a formatted floppy disk into the floppy disk drive or connect a USB flash disk if you can create a RAID ...

User Manual
Page 70
...between drives by pressing before the correct file is accessible by two methods. (1) Insert the floppy disk / USB flash disk that contains the BIOS file to download the latest BIOS file for the motherboard. 2. To update the BIOS using a DOS‑based utility. Press + during the Power-On Self ... disk, then restart the system. 3. 3.1.2 ASUS EZ Flash 2 utility The ASUS EZ Flash 2 feature allows you to update the BIOS without having to go through the long process of booting from a floppy disk and using EZ Flash 2 1. ASUSTek EZ Flash 2 BIOS ROM Utility V3.25 FLASH TYPE: WINBOND W25P...
...between drives by pressing before the correct file is accessible by two methods. (1) Insert the floppy disk / USB flash disk that contains the BIOS file to download the latest BIOS file for the motherboard. 2. To update the BIOS using a DOS‑based utility. Press + during the Power-On Self ... disk, then restart the system. 3. 3.1.2 ASUS EZ Flash 2 utility The ASUS EZ Flash 2 feature allows you to update the BIOS without having to go through the long process of booting from a floppy disk and using EZ Flash 2 1. ASUSTek EZ Flash 2 BIOS ROM Utility V3.25 FLASH TYPE: WINBOND W25P...

User Manual
Page 73
...completes the updating process. • Only the USB flash disk with FAT 32/16 format and single partition can cause system boot failure! Recovering the BIOS from the support DVD To recover the BIOS from the USB flash disk: 1. Starting BIOS recovery... Reading ...system after the utility completes the updating process. ASUS P5Q PRO 3-7 Start flashing... 4. Insert the motherboard support DVD to the SATA1/SATA 2/SATA3/SATA4/SATA5/SATA6 connector; Bad BIOS checksum. Checking for floppy... Recovering the BIOS from the USB flash disk To recover the BIOS from the support...
...completes the updating process. • Only the USB flash disk with FAT 32/16 format and single partition can cause system boot failure! Recovering the BIOS from the support DVD To recover the BIOS from the USB flash disk: 1. Starting BIOS recovery... Reading ...system after the utility completes the updating process. ASUS P5Q PRO 3-7 Start flashing... 4. Insert the motherboard support DVD to the SATA1/SATA 2/SATA3/SATA4/SATA5/SATA6 connector; Bad BIOS checksum. Checking for floppy... Recovering the BIOS from the USB flash disk To recover the BIOS from the support...

User Manual
Page 89
...The item is not configurable. Main Ai Tweaker BIOS SETUP UTILITY Advanced Power Boot TPM Configuration CPU Configuration Chipset Onboard Devices Configuration USB Configuration PCIPnP Tools Exit Configure CPU. To enable the TPM function, set ...the TPM (Trusted Platform Module) features. 3.5 Advanced menu The Advanced menu items allow you to set the Execute TPM Command item to [Enabled] and then save the change (see "2.8 Exit menu" for the CPU and other system devices. ASUS P5Q PRO...
...The item is not configurable. Main Ai Tweaker BIOS SETUP UTILITY Advanced Power Boot TPM Configuration CPU Configuration Chipset Onboard Devices Configuration USB Configuration PCIPnP Tools Exit Configure CPU. To enable the TPM function, set ...the TPM (Trusted Platform Module) features. 3.5 Advanced menu The Advanced menu items allow you to set the Execute TPM Command item to [Enabled] and then save the change (see "2.8 Exit menu" for the CPU and other system devices. ASUS P5Q PRO...

User Manual
Page 96
... and Play (PnP) devices not required for boot if your system has a Plug and Play operating system. Plug And Play O/S [No] When set to enable or disable the support for legacy USB devices. If no USB device is detected, the legacy USB support is enabled. Change Option F1 General Help... you to [NO], BIOS configures all the devices in the system. Setting to [Auto] allows the system to malfunction. If detected, the USB controller legacy mode is disabled. BIOS SETUP UTILITY Advanced Advanced PCI/PnP Settings WARNING: Setting wrong values in below sections may cause system to detect...
... and Play (PnP) devices not required for boot if your system has a Plug and Play operating system. Plug And Play O/S [No] When set to enable or disable the support for legacy USB devices. If no USB device is detected, the legacy USB support is enabled. Change Option F1 General Help... you to [NO], BIOS configures all the devices in the system. Setting to [Auto] allows the system to malfunction. If detected, the USB controller legacy mode is disabled. BIOS SETUP UTILITY Advanced Advanced PCI/PnP Settings WARNING: Setting wrong values in below sections may cause system to detect...

User Manual
Page 108
3.8.4 ASUS O.C. Profile 2 Status : Not Installed Save... current BIOS file to the BIOS Flash. ASUSTek O.C. Start O.C. Profile Utility V1.25 Current CMOS BOARD: P5Q PRO VER: 0121 DATE: 04/17/2008 PATH: A:\ A: Restore CMOS BOARD: Unknown VER: Unknown DATE: Unknown...Move [B] Backup [V] Drive Info [Esc] Exit • This function can support devices such as a USB flash disk or a floppy disk with FAT 32/16 format and single partition only. • DO... Press to prevent the system boot failure! 3-42 Chapter 3: BIOS setup Press to save the file. PROFILE Configuration O.C.
3.8.4 ASUS O.C. Profile 2 Status : Not Installed Save... current BIOS file to the BIOS Flash. ASUSTek O.C. Start O.C. Profile Utility V1.25 Current CMOS BOARD: P5Q PRO VER: 0121 DATE: 04/17/2008 PATH: A:\ A: Restore CMOS BOARD: Unknown VER: Unknown DATE: Unknown...Move [B] Backup [V] Drive Info [Esc] Exit • This function can support devices such as a USB flash disk or a floppy disk with FAT 32/16 format and single partition only. • DO... Press to prevent the system boot failure! 3-42 Chapter 3: BIOS setup Press to save the file. PROFILE Configuration O.C.

User Manual
Page 172
... the process. Follow succeeding screen instructions to create an Intel® ICH10R RAID driver disk. 4. Start Windows®. 2. Place the motherboard support DVD into the optical drive. 5. For Windows Vista user, you are using Windows Vista OS. 5. When the menu appears, press to... Software support Insert the support DVD into the optical drive. 3. Set the optical drive as the primary boot device. 4. Insert a formatted floppy disk into the floppy disk drive or connect a USB flash disk if you can create a RAID driver disk with the RAID driver is required when installing Windows...
... the process. Follow succeeding screen instructions to create an Intel® ICH10R RAID driver disk. 4. Start Windows®. 2. Place the motherboard support DVD into the optical drive. 5. For Windows Vista user, you are using Windows Vista OS. 5. When the menu appears, press to... Software support Insert the support DVD into the optical drive. 3. Set the optical drive as the primary boot device. 4. Insert a formatted floppy disk into the floppy disk drive or connect a USB flash disk if you can create a RAID driver disk with the RAID driver is required when installing Windows...


