User Manual
Page 11
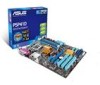
...contents Check your motherboard package for the following items. Motherboard Cables Accessories Application DVD Documentation ASUS P5P41D motherboard 2 x Serial ATA cables 1 x Ultra DMA 100/66/33 cable 1 x I/O shield ASUS motherboard support DVD User Manual 1.3 1.3.1 If any of new features and latest technologies,...Extreme / Core™ 2 Quad/ Core™ 2 Duo processors, which are excellent for buying an ASUS® P5P41D motherboard! The motherboard delivers a host of the above items is damaged or missing, contact your retailer. Chapter 1 Product introduction 1.1 ...
...contents Check your motherboard package for the following items. Motherboard Cables Accessories Application DVD Documentation ASUS P5P41D motherboard 2 x Serial ATA cables 1 x Ultra DMA 100/66/33 cable 1 x I/O shield ASUS motherboard support DVD User Manual 1.3 1.3.1 If any of new features and latest technologies,...Extreme / Core™ 2 Quad/ Core™ 2 Duo processors, which are excellent for buying an ASUS® P5P41D motherboard! The motherboard delivers a host of the above items is damaged or missing, contact your retailer. Chapter 1 Product introduction 1.1 ...

User Manual
Page 13
... restores the CPU default settings when the system hangs due to restore a corrupted BIOS file using an OS-based utility. ASUS P5P41D 1-3 ASUS CrashFree BIOS 3 ASUS CrashFree BIOS 3 is an auto-recovery tool that allows you to overclocking failure. Simply shut down and reboot the system,...creating environment-friendly and recyclable products/packaging to their default settings. Refer to update the BIOS without entering the Windows OS. • ASUS Express Gate supports file uploading from SATA HDDs, ODDs, and USB drives. C.P.R. Five seconds after turning on the system, and any...
... restores the CPU default settings when the system hangs due to restore a corrupted BIOS file using an OS-based utility. ASUS P5P41D 1-3 ASUS CrashFree BIOS 3 ASUS CrashFree BIOS 3 is an auto-recovery tool that allows you to overclocking failure. Simply shut down and reboot the system,...creating environment-friendly and recyclable products/packaging to their default settings. Refer to update the BIOS without entering the Windows OS. • ASUS Express Gate supports file uploading from SATA HDDs, ODDs, and USB drives. C.P.R. Five seconds after turning on the system, and any...
User Manual
Page 15
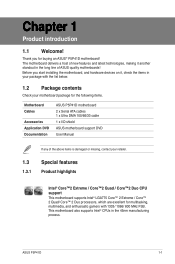
Failure to do so can damage the motherboard. Place this side towards the rear of the chassis ASUS P5P41D 1-5 Do not overtighten the screws! Ensure that you place it . The edge with external ports goes to the rear part of the chassis as indicated ...
Failure to do so can damage the motherboard. Place this side towards the rear of the chassis ASUS P5P41D 1-5 Do not overtighten the screws! Ensure that you place it . The edge with external ports goes to the rear part of the chassis as indicated ...
User Manual
Page 17
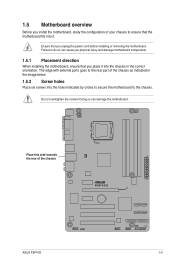
... Intel® Enhanced Intel SpeedStep® Technology (EIST) and Hyper-Threading Technology. 1.6.1 Installing the CPU To install a CPU: 1. Locate the CPU socket on your left. ASUS P5P41D 1-7 ASUS will process Return Merchandise Authorization (RMA) requests only if the motherboard comes with the cap on the socket and the socket contacts are not bent...
... Intel® Enhanced Intel SpeedStep® Technology (EIST) and Hyper-Threading Technology. 1.6.1 Installing the CPU To install a CPU: 1. Locate the CPU socket on your left. ASUS P5P41D 1-7 ASUS will process Return Merchandise Authorization (RMA) requests only if the motherboard comes with the cap on the socket and the socket contacts are not bent...
User Manual
Page 19
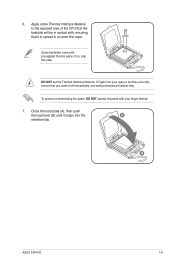
... of the CPU that the heatsink will be in contact with, ensuring that you wash it snaps into your eyes or touches your finger directly. 7. B ASUS P5P41D 1-9
... of the CPU that the heatsink will be in contact with, ensuring that you wash it snaps into your eyes or touches your finger directly. 7. B ASUS P5P41D 1-9
User Manual
Page 21
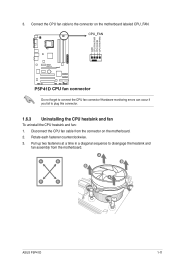
Pull up two fasteners at a time in a diagonal sequence to the connector on the motherboard. 2. Hardware monitoring errors can occur if you fail to connect the CPU fan connector! Do not forget to plug this connector. 1.6.3 Uninstalling the CPU heatsink and fan To uninstall the CPU heatsink and fan: 1. 3. A B A B B A B A ASUS P5P41D 1-11 Connect the CPU fan cable to disengage the heatsink and fan assembly from the connector on the motherboard labeled CPU_FAN. Rotate each fastener counterclockwise. 3. Disconnect the CPU fan cable from the motherboard.
Pull up two fasteners at a time in a diagonal sequence to the connector on the motherboard. 2. Hardware monitoring errors can occur if you fail to connect the CPU fan connector! Do not forget to plug this connector. 1.6.3 Uninstalling the CPU heatsink and fan To uninstall the CPU heatsink and fan: 1. 3. A B A B B A B A ASUS P5P41D 1-11 Connect the CPU fan cable to disengage the heatsink and fan assembly from the connector on the motherboard labeled CPU_FAN. Rotate each fastener counterclockwise. 3. Disconnect the CPU fan cable from the motherboard.
User Manual
Page 23
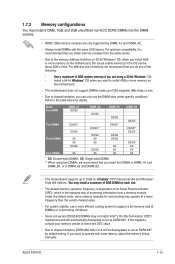
... the OS can only use a more memory on its Serial Presence Detect (SPD), which is dependent on the motherboard, the actual usable memory for details. ASUS P5P41D 1-13 For optimum compatibility, it is recommended that you can be downgraded to run at DDR2-667. If this happens, contact your memory vendor to...
... the OS can only use a more memory on its Serial Presence Detect (SPD), which is dependent on the motherboard, the actual usable memory for details. ASUS P5P41D 1-13 For optimum compatibility, it is recommended that you can be downgraded to run at DDR2-667. If this happens, contact your memory vendor to...
User Manual
Page 25
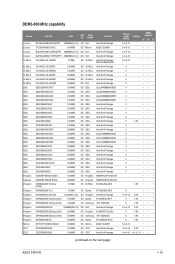
...; • 5 1.8V • • 6 1.8V • • 6 1.8V • • 6-6-6-12 •• 4-5-5-15 2.0V • • 4-4-4-15 1.9 - 2.1 V • • (continued on the next page) ASUS P5P41D 1-15 DDR2-800 MHz capability Vendor Part No.
...; • 5 1.8V • • 6 1.8V • • 6 1.8V • • 6-6-6-12 •• 4-5-5-15 2.0V • • 4-4-4-15 1.9 - 2.1 V • • (continued on the next page) ASUS P5P41D 1-15 DDR2-800 MHz capability Vendor Part No.
User Manual
Page 27
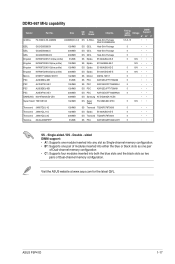
...; • 5 •• 5 •• 5 •• 5 •• • SS - DDR2-667 MHz capability Vendor Part No. Size SS/ Chip DS Brand Chip No. ASUS P5P41D 1-17 Single-sided / DS - Double - Visit the ASUS website at www.asus.com for the latest QVL.
...; • 5 •• 5 •• 5 •• 5 •• • SS - DDR2-667 MHz capability Vendor Part No. Size SS/ Chip DS Brand Chip No. ASUS P5P41D 1-17 Single-sided / DS - Double - Visit the ASUS website at www.asus.com for the latest QVL.
User Manual
Page 29
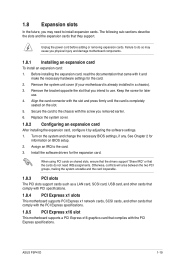
... PCI Express specifications. Install the software drivers for later use . When using PCI cards on the system and change the necessary BIOS settings, if any. ASUS P5P41D 1-19 Keep the screw for the expansion card. Replace the system cover. 1.8.2 Configuring an expansion card After installing the expansion card, configure it and make...
... PCI Express specifications. Install the software drivers for later use . When using PCI cards on the system and change the necessary BIOS settings, if any. ASUS P5P41D 1-19 Keep the screw for the expansion card. Replace the system cover. 1.8.2 Configuring an expansion card After installing the expansion card, configure it and make...
User Manual
Page 31
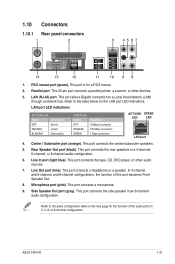
... LAN port 4. This port connects a microphone. 9. This port allows Gigabit connection to the table below for a PS/2 mouse. 2. This port connects the center/subwoofer speakers. 5. ASUS P5P41D 1-21 This port connects the rear speakers in an 8-channel audio configuration. Microphone port (pink). This port connects a headphone or a speaker. This port connects the...
... LAN port 4. This port connects a microphone. 9. This port allows Gigabit connection to the table below for a PS/2 mouse. 2. This port connects the center/subwoofer speakers. 5. ASUS P5P41D 1-21 This port connects the rear speakers in an 8-channel audio configuration. Microphone port (pink). This port connects a headphone or a speaker. This port connects the...
User Manual
Page 33
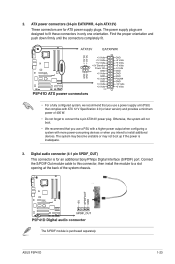
... the S/PDIF Out module cable to this connector, then install the module to fit these connectors in only one orientation. The S/PDIF module is inadequate. 3. ASUS P5P41D 1-23 2. Otherwise, the system will not boot. • We recommend that complies with more power-consuming devices or when you use a power supply unit (PSU...
... the S/PDIF Out module cable to this connector, then install the module to fit these connectors in only one orientation. The S/PDIF module is inadequate. 3. ASUS P5P41D 1-23 2. Otherwise, the system will not boot. • We recommend that complies with more power-consuming devices or when you use a power supply unit (PSU...
User Manual
Page 35
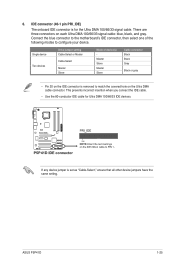
... Master Slave Mode of the following modes to match the covered hole on each Ultra DMA 100/66/33 signal cable: blue, black, and gray. ASUS P5P41D 1-25 There are three connectors on the Ultra DMA cable connector. If any device jumper is removed to configure your device. This prevents incorrect insertion...
... Master Slave Mode of the following modes to match the covered hole on each Ultra DMA 100/66/33 signal cable: blue, black, and gray. ASUS P5P41D 1-25 There are three connectors on the Ultra DMA cable connector. If any device jumper is removed to configure your device. This prevents incorrect insertion...
User Manual
Page 37
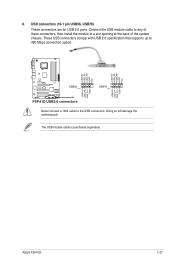
Connect the USB module cable to any of the system chassis. These USB connectors comply with USB 2.0 specification that supports up to a slot opening at the back of these connectors, then install the module to 480 Mbps connection speed. Never connect a 1394 cable to the USB connectors. USB connectors (10-1 pin USB56, USB78) These connectors are for USB 2.0 ports. The USB module cable is purchased separately. 8. ASUS P5P41D 1-27 Doing so will damage the motherboard!
Connect the USB module cable to any of the system chassis. These USB connectors comply with USB 2.0 specification that supports up to a slot opening at the back of these connectors, then install the module to 480 Mbps connection speed. Never connect a 1394 cable to the USB connectors. USB connectors (10-1 pin USB56, USB78) These connectors are for USB 2.0 ports. The USB module cable is purchased separately. 8. ASUS P5P41D 1-27 Doing so will damage the motherboard!
User Manual
Page 39
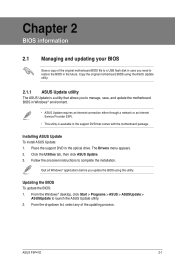
.... 3. Chapter 2 BIOS information 2.1 Managing and updating your BIOS Save a copy of the updating process: ASUS P5P41D 2-1 From the Windows® desktop, click Start > Programs > ASUS > ASUSUpdate > ASUSUpdate to complete the installation. From the dropdown list, select any of the original motherboard ...the BIOS To update the BIOS: 1. Quit all Windows® applications before you update the BIOS using the ASUS Update utility. 2.1.1 ASUS Update utility The ASUS Update is available in the support DVD that allows you need to manage, save, and update the motherboard BIOS...
.... 3. Chapter 2 BIOS information 2.1 Managing and updating your BIOS Save a copy of the updating process: ASUS P5P41D 2-1 From the Windows® desktop, click Start > Programs > ASUS > ASUSUpdate > ASUSUpdate to complete the installation. From the dropdown list, select any of the original motherboard ...the BIOS To update the BIOS: 1. Quit all Windows® applications before you update the BIOS using the ASUS Update utility. 2.1.1 ASUS Update utility The ASUS Update is available in the support DVD that allows you need to manage, save, and update the motherboard BIOS...
User Manual
Page 41
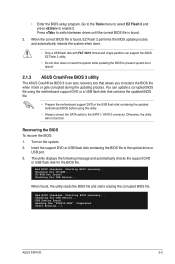
... Flash 2 utility. • Do not shut down or reset the system while updating the BIOS to prevent system boot failure! 2.1.3 ASUS CrashFree BIOS 3 utility The ASUS CrashFree BIOS 3 is found . Recovering the BIOS To recover the BIOS: 1. Bad BIOS checksum. Checking for CD-ROM... Starting BIOS recovery......when it . Insert the support DVD or USB flash disk containing the BIOS file to the optical drive or USB port. 3. Start Erasing...\ ASUS P5P41D 2-3 Turn on the system. 2. When found ! The utility displays the following message and automatically checks the support DVD or USB flash disk...
... Flash 2 utility. • Do not shut down or reset the system while updating the BIOS to prevent system boot failure! 2.1.3 ASUS CrashFree BIOS 3 utility The ASUS CrashFree BIOS 3 is found . Recovering the BIOS To recover the BIOS: 1. Bad BIOS checksum. Checking for CD-ROM... Starting BIOS recovery......when it . Insert the support DVD or USB flash disk containing the BIOS file to the optical drive or USB port. 3. Start Erasing...\ ASUS P5P41D 2-3 Turn on the system. 2. When found ! The utility displays the following message and automatically checks the support DVD or USB flash disk...
User Manual
Page 43
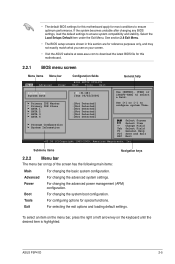
Submenu items Navigation keys 2.2.2 Menu bar The menu bar on your screen. • Visit the ASUS website at www.asus.com to download the latest BIOS file for reference purposes only, and may not exactly match what you see ...Detected] SATA 2 :[Not Detected] SATA 3 :[Not Detected] SATA 4 :[Not Detected] Storage Configuration System Information Use [+] or [-] to ensure system compatibility and stability. ASUS P5P41D 2-5 If the system becomes unstable after changing any BIOS settings, load the default settings to configure system Time. Change Field Tab Select Field F1 General...
Submenu items Navigation keys 2.2.2 Menu bar The menu bar on your screen. • Visit the ASUS website at www.asus.com to download the latest BIOS file for reference purposes only, and may not exactly match what you see ...Detected] SATA 2 :[Not Detected] SATA 3 :[Not Detected] SATA 4 :[Not Detected] Storage Configuration System Information Use [+] or [-] to ensure system compatibility and stability. ASUS P5P41D 2-5 If the system becomes unstable after changing any BIOS settings, load the default settings to configure system Time. Change Field Tab Select Field F1 General...
User Manual
Page 45
... on the menu screen items and how to configure system time. Select [ARMD] (ATAPI Removable Media Device) if your device is installed in the system. ASUS P5P41D 2-7
... on the menu screen items and how to configure system time. Select [ARMD] (ATAPI Removable Media Device) if your device is installed in the system. ASUS P5P41D 2-7
User Manual
Page 47
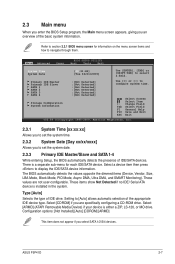
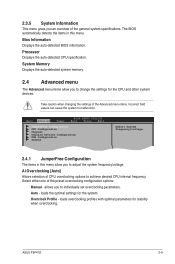
.... Processor Displays the auto-detected CPU specification. Select either one of CPU overclocking options to change the settings for the CPU and other system devices. ASUS P5P41D 2-9 Auto - System Memory Displays the auto-detected system memory. 2.4 Advanced menu The Advanced menu items allow you to individually set overclocking parameters. loads the optimal...
.... Processor Displays the auto-detected CPU specification. Select either one of CPU overclocking options to change the settings for the CPU and other system devices. ASUS P5P41D 2-9 Auto - System Memory Displays the auto-detected system memory. 2.4 Advanced menu The Advanced menu items allow you to individually set overclocking parameters. loads the optimal...
User Manual
Page 49
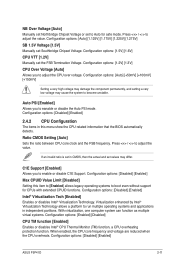
... [Enabled] Enables or disables Intel® Virtualization Technology. Virtualization enhanced by Intel® Virtualization Technology allows a platform to adjust the value. Configuration options: [Disabled] [Enabled] ASUS P5P41D 2-11 Press / to run multiple operating systems and applications in independent partitons. With virtualization, one computer system can function as multiple virtual systems. Configuration options...
... [Enabled] Enables or disables Intel® Virtualization Technology. Virtualization enhanced by Intel® Virtualization Technology allows a platform to adjust the value. Configuration options: [Disabled] [Enabled] ASUS P5P41D 2-11 Press / to run multiple operating systems and applications in independent partitons. With virtualization, one computer system can function as multiple virtual systems. Configuration options...


