
User Manual
Page 19
... talk, QQ, and Yahoo! You can easily monitor the condition of the motherboard BIOS allows automatic re-setting to the BIOS default settings in case the system... and clear the RTC data. ASUS P5N7A-VM 1-7 Express Gate Taking only 5 seconds to go online from SATA HDDs, ODDs and USB drive and downloading to 100 meters...boot logo for details. • The actual boot time depends on the weather and e-mails just before leaving your pictures without entering Windows at 1 meter accuracy. feature of the Ethernet cable(s) connected to keep in OS. 1.3.3 ASUS Stylish Features ASUS...
... talk, QQ, and Yahoo! You can easily monitor the condition of the motherboard BIOS allows automatic re-setting to the BIOS default settings in case the system... and clear the RTC data. ASUS P5N7A-VM 1-7 Express Gate Taking only 5 seconds to go online from SATA HDDs, ODDs and USB drive and downloading to 100 meters...boot logo for details. • The actual boot time depends on the weather and e-mails just before leaving your pictures without entering Windows at 1 meter accuracy. feature of the Ethernet cable(s) connected to keep in OS. 1.3.3 ASUS Stylish Features ASUS...
User Manual
Page 58
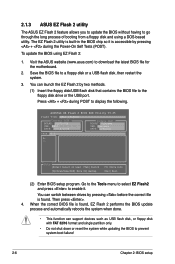
... You can support devices such as USB flash disk, or floppy disk with FAT 32/16 format and single partition only. • Do not shut down or reset the system while updating the BIOS to download the latest BIOS file for the motherboard. 2. To update the BIOS using... P5N7A-VM VER: 0210 (H:00 B:14) DATE: 07/18/2008 Update ROM BOARD: Unknown VER: Unknown DATE: Unknown PATH: C:\ A: C: Note [Enter] Select or Load [Tab] Switch [Up/Down/Home/End] Move [B] Backup [V] Drive Info [Esc] Exit (2) Enter BIOS setup program. Visit the ASUS website (www.asus.com) to prevent system boot ...
... You can support devices such as USB flash disk, or floppy disk with FAT 32/16 format and single partition only. • Do not shut down or reset the system while updating the BIOS to download the latest BIOS file for the motherboard. 2. To update the BIOS using... P5N7A-VM VER: 0210 (H:00 B:14) DATE: 07/18/2008 Update ROM BOARD: Unknown VER: Unknown DATE: Unknown PATH: C:\ A: C: Note [Enter] Select or Load [Tab] Switch [Up/Down/Home/End] Move [B] Backup [V] Drive Info [Esc] Exit (2) Enter BIOS setup program. Visit the ASUS website (www.asus.com) to prevent system boot ...
User Manual
Page 61
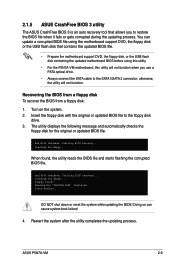
... using this utility. • For the P5N7A-VM motherboard, this utility will not function. Bad BIOS checksum. Restart the system after the utility completes the updating process. Turn on the system. 2. You can cause system boot failure! 4. Reading file "P5N7AVM.ROM". .... ASUS P5N7A-VM 2-9 2.1.5 ASUS CrashFree BIOS 3 utility The ASUS CrashFree BIOS 3 is an auto recovery tool that contains the updated BIOS file. • Prepare the motherboard support DVD, the floppy disk, or the USB flash disk containing the updated motherboard BIOS before using the motherboard support...
... using this utility. • For the P5N7A-VM motherboard, this utility will not function. Bad BIOS checksum. Restart the system after the utility completes the updating process. Turn on the system. 2. You can cause system boot failure! 4. Reading file "P5N7AVM.ROM". .... ASUS P5N7A-VM 2-9 2.1.5 ASUS CrashFree BIOS 3 utility The ASUS CrashFree BIOS 3 is an auto recovery tool that contains the updated BIOS file. • Prepare the motherboard support DVD, the floppy disk, or the USB flash disk containing the updated motherboard BIOS before using the motherboard support...

User Manual
Page 62
...motherboard support DVD to the USB port. 2. DVD-ROM found , the utility automatically checks the optical drive for the original or updated BIOS file. Restart the system after the utility completes the updating process. • Only the USB flash disk with FAT 32/16 format and single partition can cause system boot... the latest BIOS version for the BIOS file When found ! Doing so can support ASUS CrashFree BIOS 3. Recovering the BIOS from the support DVD To recover the BIOS from the USB flash disk: 1. Starting BIOS recovery... Start flashing... 4. Remove any floppy disk from...
...motherboard support DVD to the USB port. 2. DVD-ROM found , the utility automatically checks the optical drive for the original or updated BIOS file. Restart the system after the utility completes the updating process. • Only the USB flash disk with FAT 32/16 format and single partition can cause system boot... the latest BIOS version for the BIOS file When found ! Doing so can support ASUS CrashFree BIOS 3. Recovering the BIOS from the support DVD To recover the BIOS from the USB flash disk: 1. Starting BIOS recovery... Start flashing... 4. Remove any floppy disk from...

User Manual
Page 70
... Help F10 Save and Exit ESC Exit v02.61 (C)Copyright 1985-2007, American Megatrends, Inc. 2-18 Chapter 2: BIOS setup Main Advanced Power BIOS SETUP UTILITY Boot Tools Exit CPU Configuration JumperFree Configuration Chipset Onboard Devices Configuration...
... Help F10 Save and Exit ESC Exit v02.61 (C)Copyright 1985-2007, American Megatrends, Inc. 2-18 Chapter 2: BIOS setup Main Advanced Power BIOS SETUP UTILITY Boot Tools Exit CPU Configuration JumperFree Configuration Chipset Onboard Devices Configuration...
User Manual
Page 111
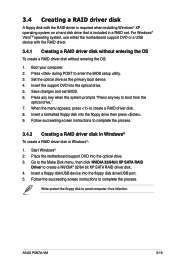
... a RAID driver disk in Windows® To create a RAID driver disk in a RAID set. Follow the succeeding screen instructions to boot from the optical drive." 7. ASUS P5N7A-VM 3-19 3.4 Creating a RAID driver disk A floppy disk with the RAID driver. 3.4.1 Creating a RAID driver disk without entering the OS... DVD into the floppy drive then press . 9. Place the motherboard support DVD into the floppy disk drive/USB port. 5. Insert a floppy disk/USB device into the optical drive. 3. Set the optical drive as the primary boot device. 4. Press any key when the system prompts "Press any...
... a RAID driver disk in Windows® To create a RAID driver disk in a RAID set. Follow the succeeding screen instructions to boot from the optical drive." 7. ASUS P5N7A-VM 3-19 3.4 Creating a RAID driver disk A floppy disk with the RAID driver. 3.4.1 Creating a RAID driver disk without entering the OS... DVD into the floppy drive then press . 9. Place the motherboard support DVD into the floppy disk drive/USB port. 5. Insert a floppy disk/USB device into the optical drive. 3. Set the optical drive as the primary boot device. 4. Press any key when the system prompts "Press any...


