
P5N32-SLI SE DELUXE English Edition User's Manual
Page 4
...the dual function power switch 3-2 Chapter 4: BIOS setup 4.1 Managing and updating your BIOS 4-1 4.1.1 ASUS Update utility 4-1 4.1.2 Creating a bootable floppy disk 4-4 4.1.3 AFUDOS utility 4-5 4.1.4 ASUS EZ Flash utility 4-8 4.2 BIOS setup program 4-9 4.2.1 BIOS menu screen 4-10 4.2.2 Menu bar... 4-10 4.2.3 Navigation keys 4-10 4.2.4 Menu items 4-11 4.2.5 Sub-menu items 4-11 4.2.6 Configuration fields 4-11 4.2.7 Pop-up window 4-11 4.2.8 Scroll bar 4-11...
...the dual function power switch 3-2 Chapter 4: BIOS setup 4.1 Managing and updating your BIOS 4-1 4.1.1 ASUS Update utility 4-1 4.1.2 Creating a bootable floppy disk 4-4 4.1.3 AFUDOS utility 4-5 4.1.4 ASUS EZ Flash utility 4-8 4.2 BIOS setup program 4-9 4.2.1 BIOS menu screen 4-10 4.2.2 Menu bar... 4-10 4.2.3 Navigation keys 4-10 4.2.4 Menu items 4-11 4.2.5 Sub-menu items 4-11 4.2.6 Configuration fields 4-11 4.2.7 Pop-up window 4-11 4.2.8 Scroll bar 4-11...

P5N32-SLI SE DELUXE English Edition User's Manual
Page 6
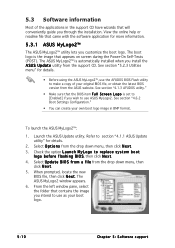
5.3 Software information 5-10 5.3.1 ASUS MyLogo2 5-10 5.3.2 AI NET 2 5-12 5.3.3 Audio configurations 5-13 5.3.4 Using the NVIDIA® Firewall 5-19 5.4 RAID configurations 5-22 5.4.1 Installing hard ...the OS 5-38 5.5.2 Creating a RAID/SATA driver disk in Windows® ...... 5-38 Chapter 6: NVIDIA® SLI™ technology support 6.1 Overview 6-1 6.2 Dual graphics card setup 6-2 6.2.1 Installing SLI-ready graphics cards 6-2 6.2.2 Installing the device drivers 6-5 6.2.3 Enabling the multi-GPU feature in Windows 6-5 Appendix: CPU features A.1 Intel® EM64T A-1 A.2 Enhanced...
5.3 Software information 5-10 5.3.1 ASUS MyLogo2 5-10 5.3.2 AI NET 2 5-12 5.3.3 Audio configurations 5-13 5.3.4 Using the NVIDIA® Firewall 5-19 5.4 RAID configurations 5-22 5.4.1 Installing hard ...the OS 5-38 5.5.2 Creating a RAID/SATA driver disk in Windows® ...... 5-38 Chapter 6: NVIDIA® SLI™ technology support 6.1 Overview 6-1 6.2 Dual graphics card setup 6-2 6.2.1 Installing SLI-ready graphics cards 6-2 6.2.2 Installing the device drivers 6-5 6.2.3 Enabling the multi-GPU feature in Windows 6-5 Appendix: CPU features A.1 Intel® EM64T A-1 A.2 Enhanced...
P5N32-SLI SE DELUXE English Edition User's Manual
Page 33
...; 4 and Intel® Celeron® processors in the 775-land package. Refer to ensure system stability. ASUS P5N32-SLI SE Deluxe 2-7 Contact your retailer immediately if the PnP cap is missing, or if you see any damage to the socket... d i n g T e c h n o l o g y s u pp o r t Windows® 2000 Professional Windows® 2000 Advanced Server Windows® 2000 Advanced Server Windows® XP Home Windows® XP Home Windows® XP Professional Windows® XP Professional Windows® Server 2003 - Overheating can permanently damage the system and/or CPU. • Install...
...; 4 and Intel® Celeron® processors in the 775-land package. Refer to ensure system stability. ASUS P5N32-SLI SE Deluxe 2-7 Contact your retailer immediately if the PnP cap is missing, or if you see any damage to the socket... d i n g T e c h n o l o g y s u pp o r t Windows® 2000 Professional Windows® 2000 Advanced Server Windows® 2000 Advanced Server Windows® XP Home Windows® XP Home Windows® XP Professional Windows® XP Professional Windows® Server 2003 - Overheating can permanently damage the system and/or CPU. • Install...
P5N32-SLI SE DELUXE English Edition User's Manual
Page 35
...º angle (A), then push the PnP cap from the load plate window to the Appendix for more information on the socket and damaging the CPU! 6. Close the load plate (A), then A push the load lever (B) until it snaps into the CPU notch. ASUS P5N32-SLI SE Deluxe 2-9 4. Gold triangle mark The CPU fits in only one correct...
...º angle (A), then push the PnP cap from the load plate window to the Appendix for more information on the socket and damaging the CPU! 6. Close the load plate (A), then A push the load lever (B) until it snaps into the CPU notch. ASUS P5N32-SLI SE Deluxe 2-9 4. Gold triangle mark The CPU fits in only one correct...
P5N32-SLI SE DELUXE English Edition User's Manual
Page 42
... install a maximum of address space allocation for details. • This motherboard does not support memory modules made up to Windows® XP 32-bit version operating system since it does not support Physical Address Extension (PAE). • If you installed...functions. This limitation applies to 8 GB on each slot. 32-bit Windows® 2000 Advanced Server Windows® Server 2003 Enterprise Edition 64-bit Windows® Server 2003 Standard x64 Edition Windows® XP Professional x64 Edition Windows® Server 2003 Enterprise x64 Edition 2-16 Chapter 2: Hardware information ...
... install a maximum of address space allocation for details. • This motherboard does not support memory modules made up to Windows® XP 32-bit version operating system since it does not support Physical Address Extension (PAE). • If you installed...functions. This limitation applies to 8 GB on each slot. 32-bit Windows® 2000 Advanced Server Windows® Server 2003 Enterprise Edition 64-bit Windows® Server 2003 Standard x64 Edition Windows® XP Professional x64 Edition Windows® Server 2003 Enterprise x64 Edition 2-16 Chapter 2: Hardware information ...

P5N32-SLI SE DELUXE English Edition User's Manual
Page 72
...off mode, depending on the BIOS setting. Click the S t a r t button then click S h u t D o w n . . . 2. If you are using Windows® 2000: 1. Click the T u r n O f f button to shut down the computer. 3. 3.2 Powering off the computer 3.2.1 Using the OS shut down function If you... are using Windows® XP: 1. The power supply should turn off after Windows® shuts down . 3.2.2 Using the dual function power switch While the system is selected, then click the O K button...
...off mode, depending on the BIOS setting. Click the S t a r t button then click S h u t D o w n . . . 2. If you are using Windows® 2000: 1. Click the T u r n O f f button to shut down the computer. 3. 3.2 Powering off the computer 3.2.1 Using the OS shut down function If you... are using Windows® XP: 1. The power supply should turn off after Windows® shuts down . 3.2.2 Using the dual function power switch While the system is selected, then click the O K button...
P5N32-SLI SE DELUXE English Edition User's Manual
Page 75
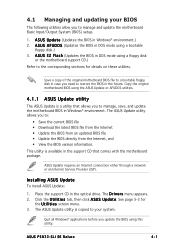
... BIOS in DOS mode using this utility. A S U S E Z F l a s h (Updates the BIOS in Windows® environment. The ASUS Update utility is a utility that comes with the motherboard package. ASUS P5N32-SLI SE Deluxe 4-1 Copy the original motherboard BIOS using the ASUS Update or AFUDOS utilities. 4.1.1 ASUS Update utility The ASUS Update is copied to your BIOS The following utilities allow you update...
... BIOS in DOS mode using this utility. A S U S E Z F l a s h (Updates the BIOS in Windows® environment. The ASUS Update utility is a utility that comes with the motherboard package. ASUS P5N32-SLI SE Deluxe 4-1 Copy the original motherboard BIOS using the ASUS Update or AFUDOS utilities. 4.1.1 ASUS Update utility The ASUS Update is copied to your BIOS The following utilities allow you update...

P5N32-SLI SE DELUXE English Edition User's Manual
Page 76
Select the ASUS FTP site t h e I O S f r o m 3. Click N e x t. 4-2 Chapter 4: BIOS setup Select U p d a t e B I n t e r n e t option from the Windows® desktop by clicking S t a r t > P r o g r a m s > A S U S > A S U S U p d a t e > A S U S U p d a t e. Updating the BIOS through the Internet To update the BIOS through the Internet: 1. The ASUS Update main window appears. 2. Launch the ASUS Update utility from the nearest you to avoid network drop-down menu, then click traffic, or click A u t o S e l e c t. N e x t.
Select the ASUS FTP site t h e I O S f r o m 3. Click N e x t. 4-2 Chapter 4: BIOS setup Select U p d a t e B I n t e r n e t option from the Windows® desktop by clicking S t a r t > P r o g r a m s > A S U S > A S U S U p d a t e > A S U S U p d a t e. Updating the BIOS through the Internet To update the BIOS through the Internet: 1. The ASUS Update main window appears. 2. Launch the ASUS Update utility from the nearest you to avoid network drop-down menu, then click traffic, or click A u t o S e l e c t. N e x t.

P5N32-SLI SE DELUXE English Edition User's Manual
Page 77
... update process. Select U p d a t e B I O S f r o m a f i l e option from the Windows® desktop by clicking S t a r t > P r o g r a m s > A S U S > A S U S U p d a t e > A S U S U p d a t e. The ASUS Update utility is capable of updating itself through a BIOS file: 1. Updating the BIOS through a BIOS file To update the BIOS through the Internet. Locate the BIOS file from the O p e n window, then click S a v e. 4. Click Next. 5. ASUS P5N32-SLI SE Deluxe 4-3 4. Follow the screen instructions to avail...
... update process. Select U p d a t e B I O S f r o m a f i l e option from the Windows® desktop by clicking S t a r t > P r o g r a m s > A S U S > A S U S U p d a t e > A S U S U p d a t e. The ASUS Update utility is capable of updating itself through a BIOS file: 1. Updating the BIOS through a BIOS file To update the BIOS through the Internet. Locate the BIOS file from the O p e n window, then click S a v e. 4. Click Next. 5. ASUS P5N32-SLI SE Deluxe 4-3 4. Follow the screen instructions to avail...

P5N32-SLI SE DELUXE English Edition User's Manual
Page 78
...field, type D:\bootdisk\makeboot a: assuming that D is your optical drive letter. D O S s t a r t u p d i s k from the Windows® desktop, then select M y C o m p u t e r. Click S t a r t, then select R u n. Insert a 1.44MB ...3 1 / 2 F l o p p y D i s k window appears. 4.1.2 Creating a bootable floppy disk 1. DOS environment a. At the DOS prompt, type format A:/S then press . Windows® XP environment a. c. W i n d o w s® X P u s e r s : Select C r e a t e a n M S - Windows® 2000 environment To create a set of the following to the floppy ...
...field, type D:\bootdisk\makeboot a: assuming that D is your optical drive letter. D O S s t a r t u p d i s k from the Windows® desktop, then select M y C o m p u t e r. Click S t a r t, then select R u n. Insert a 1.44MB ...3 1 / 2 F l o p p y D i s k window appears. 4.1.2 Creating a bootable floppy disk 1. DOS environment a. At the DOS prompt, type format A:/S then press . Windows® XP environment a. c. W i n d o w s® X P u s e r s : Select C r e a t e a n M S - Windows® 2000 environment To create a set of the following to the floppy ...

P5N32-SLI SE DELUXE English Edition User's Manual
Page 85
.... If an item is a brief description of a menu screen when there are items that do not fit on the screen. Scroll bar ASUS P5N32-SLI SE Deluxe 4-11 Press the WARNING: Setting wrong values in brackets, and is not user-configurable. Primary IDE Master [ST320410A] Primary IDE Slave... IDE Configuration [Not Detected] System Information Use [+] or [-] to display a list of the field opposite the item. Select Screen Select Item +- Pop-up window with the configuration options for that menu. Change Field Tab Select Field F1 General Help F10 Save and Exit ESC Exit v02.58 (C)Copyright 1985...
.... If an item is a brief description of a menu screen when there are items that do not fit on the screen. Scroll bar ASUS P5N32-SLI SE Deluxe 4-11 Press the WARNING: Setting wrong values in brackets, and is not user-configurable. Primary IDE Master [ST320410A] Primary IDE Slave... IDE Configuration [Not Detected] System Information Use [+] or [-] to display a list of the field opposite the item. Select Screen Select Item +- Pop-up window with the configuration options for that menu. Change Field Tab Select Field F1 General Help F10 Save and Exit ESC Exit v02.58 (C)Copyright 1985...

P5N32-SLI SE DELUXE English Edition User's Manual
Page 116
... the Setup program without saving your changes, the program prompts you with a message asking if you want to save your selections, choose this option, a confirmation window appears. When you select this option or if you select this option from the Exit menu to ensure the values you selected are finished making... non-volatile RAM. 4-42 Chapter 4: BIOS setup Load Setup Defaults This option allows you made to save the changes while exiting. When you press , a confirmation window appears. Press to load default values. Select [ O k ] to save changes and exit.
... the Setup program without saving your changes, the program prompts you with a message asking if you want to save your selections, choose this option, a confirmation window appears. When you select this option or if you select this option from the Exit menu to ensure the values you selected are finished making... non-volatile RAM. 4-42 Chapter 4: BIOS setup Load Setup Defaults This option allows you made to save the changes while exiting. When you press , a confirmation window appears. Press to load default values. Select [ O k ] to save changes and exit.

P5N32-SLI SE DELUXE English Edition User's Manual
Page 119
...documentation for detailed information. • Make sure that you install Windows® 2000 Service Pack 4 or the Windows® XP Service Pack2 or later versions before installing the drivers...ASUS website(www.asus.com) for reference only. Double-click the A S S E T U P . ASUS P5N32-SLI SE Deluxe 5-1 Click an icon to display support CD/motherboard information Click an item to install If A u t o r u n is enabled in this chapter for updates. 5.2.1 Running the support CD Place the support CD to run the CD. 5.1 Installing an operating system This motherboard supports Windows...
...documentation for detailed information. • Make sure that you install Windows® 2000 Service Pack 4 or the Windows® XP Service Pack2 or later versions before installing the drivers...ASUS website(www.asus.com) for reference only. Double-click the A S S E T U P . ASUS P5N32-SLI SE Deluxe 5-1 Click an icon to display support CD/motherboard information Click an item to install If A u t o r u n is enabled in this chapter for updates. 5.2.1 Running the support CD Place the support CD to run the CD. 5.1 Installing an operating system This motherboard supports Windows...

P5N32-SLI SE DELUXE English Edition User's Manual
Page 121
... ASUS Update The ASUS Update utility allows you keep your computer in Windows® environment. Installation Wizard for utilities Launches the ASUS ...InstAll utilities installation wizard. This utility requires an Internet connection either through a network or an Internet Service Provider (ISP). Marvell Yukon VCT Application Installs the Marvell® Yukon Virtual Cable Tester™, a cable diagnostic utility that the motherboard supports. ASUS P5N32-SLI SE Deluxe 5-3 ASUS Ai Booster The ASUS...
... ASUS Update The ASUS Update utility allows you keep your computer in Windows® environment. Installation Wizard for utilities Launches the ASUS ...InstAll utilities installation wizard. This utility requires an Internet connection either through a network or an Internet Service Provider (ISP). Marvell Yukon VCT Application Installs the Marvell® Yukon Virtual Cable Tester™, a cable diagnostic utility that the motherboard supports. ASUS P5N32-SLI SE Deluxe 5-3 ASUS Ai Booster The ASUS...
P5N32-SLI SE DELUXE English Edition User's Manual
Page 128
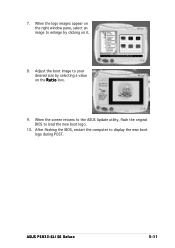
...;: 1. Check the option L a u n c h M y L o g o t o r e p l a c e s y s t e m b o o t l o g o b e f o r e f l a s h i n g B I O S f r o m a f i l e from the support CD. View the online help or readme file that came with the software application for details. 2. Refer to use ASUS MyLogo2. The ASUS MyLogo2 window appears. 6. Select U p d a t e B I O S, then click N e x t. 4. From the left window pane, select the folder that contains the image you through the installation. Select O p t i o n s from the...
...;: 1. Check the option L a u n c h M y L o g o t o r e p l a c e s y s t e m b o o t l o g o b e f o r e f l a s h i n g B I O S f r o m a f i l e from the support CD. View the online help or readme file that came with the software application for details. 2. Refer to use ASUS MyLogo2. The ASUS MyLogo2 window appears. 6. Select U p d a t e B I O S, then click N e x t. 4. From the left window pane, select the folder that contains the image you through the installation. Select O p t i o n s from the...
P5N32-SLI SE DELUXE English Edition User's Manual
Page 129
After flashing the BIOS, restart the computer to load the new boot logo. 10. When the screen returns to the ASUS Update utility, flash the original BIOS to display the new boot logo during POST. ASUS P5N32-SLI SE Deluxe 5-11 7. Adjust the boot image to enlarge by selecting a value on it. 8. When the logo images appear on the right window pane, select an image to your desired size by clicking on the R a t i o box. 9.
After flashing the BIOS, restart the computer to load the new boot logo. 10. When the screen returns to the ASUS Update utility, flash the original BIOS to display the new boot logo during POST. ASUS P5N32-SLI SE Deluxe 5-11 7. Adjust the boot image to enlarge by selecting a value on it. 8. When the logo images appear on the right window pane, select an image to your desired size by clicking on the R a t i o box. 9.

P5N32-SLI SE DELUXE English Edition User's Manual
Page 130
... to perform a cable test. • The VCT only runs on systems with Windows® XP or Windows® 2000 operating systems. • The R u n button on the Virtual Cable Tester™ main window is disabled if no problem is a cable diagnostic utility that reports LAN cable faults...pair polarity problems, and pair skew problems of up to display the screen below. 3. Click V i r t u a l C a b l e T e s t e r from the Windows® desktop by clicking Start > All Programs > Marvell > Virtual Cable Tester. 2. Launch the VCT utility from the menu to 100 meters at one meter accuracy.
... to perform a cable test. • The VCT only runs on systems with Windows® XP or Windows® 2000 operating systems. • The R u n button on the Virtual Cable Tester™ main window is disabled if no problem is a cable diagnostic utility that reports LAN cable faults...pair polarity problems, and pair skew problems of up to display the screen below. 3. Click V i r t u a l C a b l e T e s t e r from the Windows® desktop by clicking Start > All Programs > Marvell > Virtual Cable Tester. 2. Launch the VCT utility from the menu to 100 meters at one meter accuracy.

P5N32-SLI SE DELUXE English Edition User's Manual
Page 132
... effect options: 1. S/PDIF option The Sony/Philips Digital Interface (S/PDIF) options allows you click on the upper-right hand corner of the window to your desired settings. 3. Click the option buttons to change your S/PDIF out settings. 3. Click the Exit ( ) button on the... upper-right hand corner of the window to exit. 5-14 Chapter 5: Software support Click the Exit ( ) button on the buttons. 4. From the Realtek Audio Control Panel, click the S P D ...
... effect options: 1. S/PDIF option The Sony/Philips Digital Interface (S/PDIF) options allows you click on the upper-right hand corner of the window to your desired settings. 3. Click the option buttons to change your S/PDIF out settings. 3. Click the Exit ( ) button on the... upper-right hand corner of the window to exit. 5-14 Chapter 5: Software support Click the Exit ( ) button on the buttons. 4. From the Realtek Audio Control Panel, click the S P D ...

P5N32-SLI SE DELUXE English Edition User's Manual
Page 133
Click the U A J A u t o m a t i c button to exit. Click the Exit ( ) button on the upper-right hand corner of the window to enable or disable the Universal Audio Jack(UAJ®) technology feature. 4. From the Realtek Audio Control Panel, click the S p e a k e r C o n f i g u r a t i o n button. 2. To set your settings. 3. Select from the combo list box your current speaker setup, then click A u t o T e s t to set the speaker configuration: 1. ASUS P5N32-SLI SE Deluxe 5-15 Speaker Configuration This option allows you to test your speaker configuration.
Click the U A J A u t o m a t i c button to exit. Click the Exit ( ) button on the upper-right hand corner of the window to enable or disable the Universal Audio Jack(UAJ®) technology feature. 4. From the Realtek Audio Control Panel, click the S p e a k e r C o n f i g u r a t i o n button. 2. To set your settings. 3. Select from the combo list box your current speaker setup, then click A u t o T e s t to set the speaker configuration: 1. ASUS P5N32-SLI SE Deluxe 5-15 Speaker Configuration This option allows you to test your speaker configuration.

P5N32-SLI SE DELUXE English Edition User's Manual
Page 135
Click the Exit ( ) button on the upper-right hand corner of the window to exit. 3D Audio Demo This option shows a demo of the window to start the 3D audio demo: 1. Click the P l a y button to exit. If there are detected problems, make sure that your audio cables are connected ... Audio Control Panel, click the 3 D A u d i o D e m o button. 2. Click the button to the proper audio jack and repeat connector sensing. 7. Click the option buttons to stop. 4. ASUS P5N32-SLI SE Deluxe 5-17 Click the Exit ( ) button on the upper-right hand corner of the 3D audio feature. 6.
Click the Exit ( ) button on the upper-right hand corner of the window to exit. 3D Audio Demo This option shows a demo of the window to start the 3D audio demo: 1. Click the P l a y button to exit. If there are detected problems, make sure that your audio cables are connected ... Audio Control Panel, click the 3 D A u d i o D e m o button. 2. Click the button to the proper audio jack and repeat connector sensing. 7. Click the option buttons to stop. 4. ASUS P5N32-SLI SE Deluxe 5-17 Click the Exit ( ) button on the upper-right hand corner of the 3D audio feature. 6.


