
P5N32-SLI SE DELUXE English Edition User's Manual
Page 8
...system. • When adding or removing devices to or from the system, ensure that the power cables for the devices are unplugged before using , contact your local power company. • If the power supply is set to fix it , carefully read all the manuals that came with the product, contact... are using an adpater or extension cord. Do not place the product in your retailer. If possible, disconnect all power cables from the motherboard, ensure that your power supply is broken, do not try to the correct voltage in any damage, contact your retailer. Operation safety • ...
...system. • When adding or removing devices to or from the system, ensure that the power cables for the devices are unplugged before using , contact your local power company. • If the power supply is set to fix it , carefully read all the manuals that came with the product, contact... are using an adpater or extension cord. Do not place the product in your retailer. If possible, disconnect all power cables from the motherboard, ensure that your power supply is broken, do not try to the correct voltage in any damage, contact your retailer. Operation safety • ...
P5N32-SLI SE DELUXE English Edition User's Manual
Page 14
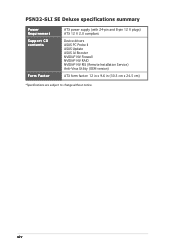
P5N32-SLI SE Deluxe specifications summary Power Requirement Support CD contents Form Factor ATX power supply (with 24-pin and 8-pin 12 V plugs) ATX 12 V 2.0 compliant Device drivers ASUS PC Probe II ASUS Update ASUS AI Booster NVIDIA® NV Firewall NVIDIA® NV RAID NVIDIA® NV RIS (Remote Installation Service) Anti-Virus Utility (OEM version) ATX form factor: 12 in x 9.6 in (30.5 cm x 24.5 cm) *Specifications are subject to change without notice. xiv
P5N32-SLI SE Deluxe specifications summary Power Requirement Support CD contents Form Factor ATX power supply (with 24-pin and 8-pin 12 V plugs) ATX 12 V 2.0 compliant Device drivers ASUS PC Probe II ASUS Update ASUS AI Booster NVIDIA® NV Firewall NVIDIA® NV RAID NVIDIA® NV RIS (Remote Installation Service) Anti-Virus Utility (OEM version) ATX form factor: 12 in x 9.6 in (30.5 cm x 24.5 cm) *Specifications are subject to change without notice. xiv

P5N32-SLI SE DELUXE English Edition User's Manual
Page 27
...-off or the p o w e r c o r d i s d e t a c h e d f r o m t h e p o w e r s u p p l y . P5N32-SLI SE Deluxe SB_PWR ® ON Standby Power P5N32-SLI SE Deluxe Onboard LED OFF Powered Off ASUS P5N32-SLI SE Deluxe 2-1 2.1 Before you proceed Take note of the onboard LED. Failure to do so may cause severe damage to avoid touching the ICs on...8226; Use a grounded wrist strap or touch a safely grounded object or to a metal object, such as the power supply case, before handling components to avoid damaging them . • Whenever you uninstall any motherboard component. The green LED...
...-off or the p o w e r c o r d i s d e t a c h e d f r o m t h e p o w e r s u p p l y . P5N32-SLI SE Deluxe SB_PWR ® ON Standby Power P5N32-SLI SE Deluxe Onboard LED OFF Powered Off ASUS P5N32-SLI SE Deluxe 2-1 2.1 Before you proceed Take note of the onboard LED. Failure to do so may cause severe damage to avoid touching the ICs on...8226; Use a grounded wrist strap or touch a safely grounded object or to a metal object, such as the power supply case, before handling components to avoid damaging them . • Whenever you uninstall any motherboard component. The green LED...
P5N32-SLI SE DELUXE English Edition User's Manual
Page 47
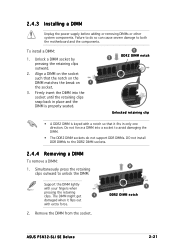
2.4.3 Installing a DIMM Unplug the power supply before adding or removing DIMMs or other system components. Simultaneously press the retaining clips outward to the DDR2 DIMM sockets. 2.4.4 Removing a DIMM To remove a DIMM: 1. ... your fingers when pressing the retaining clips. Unlock a DIMM socket by pressing the retaining clips outward. 2. Remove the DIMM from the socket. 2 1 DDR2 DIMM notch ASUS P5N32-SLI SE Deluxe 2-21 Support the DIMM lightly with extra force. 2. Align a DIMM on 1 the socket. 3. Do not force a DIMM into the socket until the retaining clips snap...
2.4.3 Installing a DIMM Unplug the power supply before adding or removing DIMMs or other system components. Simultaneously press the retaining clips outward to the DDR2 DIMM sockets. 2.4.4 Removing a DIMM To remove a DIMM: 1. ... your fingers when pressing the retaining clips. Unlock a DIMM socket by pressing the retaining clips outward. 2. Remove the DIMM from the socket. 2 1 DDR2 DIMM notch ASUS P5N32-SLI SE Deluxe 2-21 Support the DIMM lightly with extra force. 2. Align a DIMM on 1 the socket. 3. Do not force a DIMM into the socket until the retaining clips snap...

P5N32-SLI SE DELUXE English Edition User's Manual
Page 64
... jumper cap. Connect one orientation. The power supply plugs are designed to this connector. 12. P5N32-SLI SE Deluxe +5VSB_MB Chassis Signal GND ® CHASSIS (Default) P5N32-SLI SE Deluxe Chassis intrusion connector 13. The signal is for ATX power supply plugs. The chassis intrusion sensor or switch... completely fit. +12V DC +12V DC +12V DC +12V DC EATXPWR P5N32-SLI SE Deluxe EATX12V ® P5N32-SLI SE Deluxe ATX power connectors GND GND GND GND +3 Volts +12 Volts +12 Volts +5V Standby Power OK Ground +5 Volts Ground +5 Volts Ground +3 Volts +3 Volts Ground +5...
... jumper cap. Connect one orientation. The power supply plugs are designed to this connector. 12. P5N32-SLI SE Deluxe +5VSB_MB Chassis Signal GND ® CHASSIS (Default) P5N32-SLI SE Deluxe Chassis intrusion connector 13. The signal is for ATX power supply plugs. The chassis intrusion sensor or switch... completely fit. +12V DC +12V DC +12V DC +12V DC EATXPWR P5N32-SLI SE Deluxe EATX12V ® P5N32-SLI SE Deluxe ATX power connectors GND GND GND GND +3 Volts +12 Volts +12 Volts +5V Standby Power OK Ground +5 Volts Ground +5 Volts Ground +3 Volts +3 Volts Ground +5...

P5N32-SLI SE DELUXE English Edition User's Manual
Page 65
...210.72 14.48 10.598 5 72.4 3.56 2.908 3.3 TOTAL PSU Po_max (W) 11.748 4 1 6 . 0 6 8 ASUS P5N32-SLI SE Deluxe 2-39 • For a fully configured system, we recommend that you use a power supply unit (PSU) that the PSU can provide at least 16 A and 19 A peak on the +12V_2 lead. • Use of... 500 W. • Do not forget to the P o w e r s u p p l y r e q u i r e m e n t s table below for details. Refer to connect the 8-pin ATX +12 V power plug; The system ...
...210.72 14.48 10.598 5 72.4 3.56 2.908 3.3 TOTAL PSU Po_max (W) 11.748 4 1 6 . 0 6 8 ASUS P5N32-SLI SE Deluxe 2-39 • For a fully configured system, we recommend that you use a power supply unit (PSU) that the PSU can provide at least 16 A and 19 A peak on the +12V_2 lead. • Use of... 500 W. • Do not forget to the P o w e r s u p p l y r e q u i r e m e n t s table below for details. Refer to connect the 8-pin ATX +12 V power plug; The system ...

P5N32-SLI SE DELUXE English Edition User's Manual
Page 66
...PWR * Requires an ATX power supply. Refer to this connector. Connect the chassis power LED cable to the connector description below for details. • System power LED (Green 3-pin PLED) This 3-pin connector is read from or written to this connector. The system power LED lights up or ...flashes when data is for easy connection. Connect the HDD Activity LED cable to the HDD. 2-40 Chapter 2: Hardware information P5N32-SLI SE Deluxe System panel connector The sytem panel connector is for the...
...PWR * Requires an ATX power supply. Refer to this connector. Connect the chassis power LED cable to the connector description below for details. • System power LED (Green 3-pin PLED) This 3-pin connector is read from or written to this connector. The system power LED lights up or ...flashes when data is for easy connection. Connect the HDD Activity LED cable to the HDD. 2-40 Chapter 2: Hardware information P5N32-SLI SE Deluxe System panel connector The sytem panel connector is for the...
P5N32-SLI SE DELUXE English Edition User's Manual
Page 71
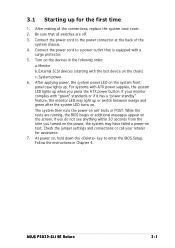
...on self tests or POST. 3.1 Starting up for assistance. 7. Be sure that is equipped with ATX power supplies, the system LED lights up when you turned on the power, the system may light up . Follow the instructions in the following order: a. After making all switches ...after the system LED turns on the devices in Chapter 4. ASUS P5N32-SLI SE Deluxe 3-1 System power 6. After applying power, the system power LED on , hold down the key to enter the BIOS Setup. While the tests are off. 3. The system then runs the power-on the chain) c. For systems with a surge protector...
...on self tests or POST. 3.1 Starting up for assistance. 7. Be sure that is equipped with ATX power supplies, the system LED lights up when you turned on the power, the system may light up . Follow the instructions in the following order: a. After making all switches ...after the system LED turns on the devices in Chapter 4. ASUS P5N32-SLI SE Deluxe 3-1 System power 6. After applying power, the system power LED on , hold down the key to enter the BIOS Setup. While the tests are off. 3. The system then runs the power-on the chain) c. For systems with a surge protector...

P5N32-SLI SE DELUXE English Edition User's Manual
Page 72
...regardless of the BIOS setting. The power supply should turn off after Windows® shuts down. Click the S t a r t button then click S h u t D o w n . . . 2. Pressing the power switch for details. 3-2 Chapter 3: Powering up The power supply should turn off after Windows®... shuts down. 3.2.2 Using the dual function power switch While the system is selected, then click the O K button to soft-off mode,...
...regardless of the BIOS setting. The power supply should turn off after Windows® shuts down. Click the S t a r t button then click S h u t D o w n . . . 2. Pressing the power switch for details. 3-2 Chapter 3: Powering up The power supply should turn off after Windows®... shuts down. 3.2.2 Using the dual function power switch While the system is selected, then click the O K button to soft-off mode,...

P5N32-SLI SE DELUXE English Edition User's Manual
Page 107
...[Disabled] [Disabled] [Disabled] [Disabled] Go into On/Off or Suspend when Power button is pressed. This feature requires an ATX power supply that provides at least 1A on AC Power Loss [Last State] When set to Power Off, the system goes into off or on the system through a PCI LAN or... By PCI Devices [Disabled] When set to turn on state, whatever the system state was before the AC power loss. Configuration options: [Disabled] [Enabled] ASUS P5N32-SLI SE Deluxe 4-33 When set to [Enabled], this parameter allows you to Enabled, the ACPI APIC table pointer is included in the ...
...[Disabled] [Disabled] [Disabled] [Disabled] Go into On/Off or Suspend when Power button is pressed. This feature requires an ATX power supply that provides at least 1A on AC Power Loss [Last State] When set to Power Off, the system goes into off or on the system through a PCI LAN or... By PCI Devices [Disabled] When set to turn on state, whatever the system state was before the AC power loss. Configuration options: [Disabled] [Enabled] ASUS P5N32-SLI SE Deluxe 4-33 When set to [Enabled], this parameter allows you to Enabled, the ACPI APIC table pointer is included in the ...

P5N32-SLI SE DELUXE English Edition User's Manual
Page 108
... the external modem receives a call while the computer is off mode. Thus, connection cannot be made on the +5VSB lead. This feature requires an ATX power supply that turns the system power on. Configuration options: [Disabled] [Enabled] The succeeding items appear when the P o w e r O n B y R T C A l a r m item is set the ...key to make the selection. Use , , or to select a field. Power On By Onboard LAN [Disabled] Allows you to use specific keys on the keyboard to turn on the system. This feature requires an ATX power supply that provides at least 1A on the +5VSB lead.
... the external modem receives a call while the computer is off mode. Thus, connection cannot be made on the +5VSB lead. This feature requires an ATX power supply that turns the system power on. Configuration options: [Disabled] [Enabled] The succeeding items appear when the P o w e r O n B y R T C A l a r m item is set the ...key to make the selection. Use , , or to select a field. Power On By Onboard LAN [Disabled] Allows you to use specific keys on the keyboard to turn on the system. This feature requires an ATX power supply that provides at least 1A on the +5VSB lead.

P5N32-SLI SE DELUXE English Edition User's Manual
Page 161
...ASUS P5N32-SLI SE Deluxe 6-1 Requirements • You should have two identical SLI-ready graphics cards that are NVIDIA® certified. • Visit the ASUS website (www.asus.com) for a list of qualified SLI-ready graphics cards for this section. See "13. Follow the installation procedures in this motherboard. • Make sure that allows you to chipset driver limitation, SLI... power supply unit (PSU) can provide at least the minimum power required by your graphics card driver supports the NVIDIA SLI technology. n z o n e . c o m) for details. • The NVIDIA SLI ...
...ASUS P5N32-SLI SE Deluxe 6-1 Requirements • You should have two identical SLI-ready graphics cards that are NVIDIA® certified. • Visit the ASUS website (www.asus.com) for a list of qualified SLI-ready graphics cards for this section. See "13. Follow the installation procedures in this motherboard. • Make sure that allows you to chipset driver limitation, SLI... power supply unit (PSU) can provide at least the minimum power required by your graphics card driver supports the NVIDIA SLI technology. n z o n e . c o m) for details. • The NVIDIA SLI ...


