
P5N32-SLI Deluxe User's Manual for English Edition
Page 4
...setup 4.1 Managing and updating your BIOS 4-1 4.1.1 Creating a bootable floppy disk 4-1 4.1.2 AFUDOS utility 4-2 4.1.3 ASUS CrashFree BIOS 2 utility 4-5 4.1.4 ASUS EZ Flash utility 4-7 4.1.5 ASUS Update utility 4-8 4.2 BIOS setup program 4-11 4.2.1 BIOS menu screen 4-12 4.2.2 Menu bar 4-12 4.2.3... Navigation keys 4-12 4.2.4 Menu items 4-13 4.2.5 Sub-menu items 4-13 4.2.6 Configuration fields 4-13 4.2.7 Pop-up window 4-13 4.2.8...
...setup 4.1 Managing and updating your BIOS 4-1 4.1.1 Creating a bootable floppy disk 4-1 4.1.2 AFUDOS utility 4-2 4.1.3 ASUS CrashFree BIOS 2 utility 4-5 4.1.4 ASUS EZ Flash utility 4-7 4.1.5 ASUS Update utility 4-8 4.2 BIOS setup program 4-11 4.2.1 BIOS menu screen 4-12 4.2.2 Menu bar 4-12 4.2.3... Navigation keys 4-12 4.2.4 Menu items 4-13 4.2.5 Sub-menu items 4-13 4.2.6 Configuration fields 4-13 4.2.7 Pop-up window 4-13 4.2.8...

P5N32-SLI Deluxe User's Manual for English Edition
Page 6
...ASUS MyLogo2 5-10 5.3.2 AI NET 2 5-12 5.3.3 Audio configurations 5-13 5.3.4 Using the NVIDIA® Firewall 5-19 5.3.5 Using the Wireless LAN module 5-22 5.4 RAID configurations 5-26 5.4.1 Installing hard disks 5-27 5.4.2 NVIDIA® RAID configurations 5-28 5.4.3 Silicon Image RAID configurations 5-35 5.5 Creating a RAID driver disk 5-42 Chapter 6: NVIDIA® SLI...™ technology support 6.1 Overview 6-1 6.2 Dual graphics card setup 6-2 6.2.1 Installing SLI-ready graphics cards 6-2 6.2.2 Installing the device drivers 6-5 6.2.3 Enabling the multi-GPU feature in Windows ...
...ASUS MyLogo2 5-10 5.3.2 AI NET 2 5-12 5.3.3 Audio configurations 5-13 5.3.4 Using the NVIDIA® Firewall 5-19 5.3.5 Using the Wireless LAN module 5-22 5.4 RAID configurations 5-26 5.4.1 Installing hard disks 5-27 5.4.2 NVIDIA® RAID configurations 5-28 5.4.3 Silicon Image RAID configurations 5-35 5.5 Creating a RAID driver disk 5-42 Chapter 6: NVIDIA® SLI...™ technology support 6.1 Overview 6-1 6.2 Dual graphics card setup 6-2 6.2.1 Installing SLI-ready graphics cards 6-2 6.2.2 Installing the device drivers 6-5 6.2.3 Enabling the multi-GPU feature in Windows ...

P5N32-SLI Deluxe User's Manual for English Edition
Page 33
...; Celeron® processors in the 775-land package. ASUS P5N32-SLI Deluxe 2-7 Refer to ensure better air flow when overclocking. • Upon purchase of 2400 rpm and 8 CFM turnrate when using a dual-core CPU to the PnP cap/socket contacts/motherboard components. Standard, Windows® Server 2003 - ASUS will process Return Merchandise Authorization (RMA) requests only...
...; Celeron® processors in the 775-land package. ASUS P5N32-SLI Deluxe 2-7 Refer to ensure better air flow when overclocking. • Upon purchase of 2400 rpm and 8 CFM turnrate when using a dual-core CPU to the PnP cap/socket contacts/motherboard components. Standard, Windows® Server 2003 - ASUS will process Return Merchandise Authorization (RMA) requests only...

P5N32-SLI Deluxe User's Manual for English Edition
Page 35
... the connectors on the socket and damaging the CPU! 6. Close the load plate (A), then A push the load lever (B) until it snaps into the retention tab. ASUS P5N32-SLI Deluxe 2-9 Refer to remove (B). 4. Lift the load plate with the Intel® Enhanced Memory 64 Technology (EM64T), Enhanced Intel SpeedStep® Technology (EIST), and Hyper... Intel® Pentium® 4 LGA775 processors with your thumb and forefinger to a 100º angle (A), then push the PnP cap from the load plate window to the Appendix for more information on the bottom-left corner of the socket.
... the connectors on the socket and damaging the CPU! 6. Close the load plate (A), then A push the load lever (B) until it snaps into the retention tab. ASUS P5N32-SLI Deluxe 2-9 Refer to remove (B). 4. Lift the load plate with the Intel® Enhanced Memory 64 Technology (EM64T), Enhanced Intel SpeedStep® Technology (EIST), and Hyper... Intel® Pentium® 4 LGA775 processors with your thumb and forefinger to a 100º angle (A), then push the PnP cap from the load plate window to the Appendix for more information on the bottom-left corner of the socket.

P5N32-SLI Deluxe User's Manual for English Edition
Page 42
...; If you installed four 1 GB memory modules, the system may install a maximum of 4 GB DIMMs on the operating systems listed below. This limitation applies to Windows® XP 32-bit version operating system since it does not support Physical Address Extension (PAE). • If you installed... Windows® XP 32-bit version operating system, we recommend that you install less than 3 GB of total memory because of memory module(s) installed per channel ...
...; If you installed four 1 GB memory modules, the system may install a maximum of 4 GB DIMMs on the operating systems listed below. This limitation applies to Windows® XP 32-bit version operating system since it does not support Physical Address Extension (PAE). • If you installed... Windows® XP 32-bit version operating system, we recommend that you install less than 3 GB of total memory because of memory module(s) installed per channel ...

P5N32-SLI Deluxe User's Manual for English Edition
Page 72
...regardless of the BIOS setting. The power supply should turn off after Windows® shuts down. If you are using Windows® 2000: 1. Refer to shut down the computer. 3. The power supply should turn off after Windows® shuts down. 3.2.2 Using the dual function power switch While the...the O K button to soft-off mode, depending on the BIOS setting. 3.2 Powering off the computer 3.2.1 Using the OS shut down function If you are using Windows® XP: 1. Make sure that the S h u t D o w n option button is ON, pressing the power switch for more than four seconds puts...
...regardless of the BIOS setting. The power supply should turn off after Windows® shuts down. If you are using Windows® 2000: 1. Refer to shut down the computer. 3. The power supply should turn off after Windows® shuts down. 3.2.2 Using the dual function power switch While the...the O K button to soft-off mode, depending on the BIOS setting. 3.2 Powering off the computer 3.2.1 Using the OS shut down function If you are using Windows® XP: 1. Make sure that the S h u t D o w n option button is ON, pressing the power switch for more than four seconds puts...

P5N32-SLI Deluxe User's Manual for English Edition
Page 75
...a s h (Updates the BIOS in the future. A S U S U p d a t e (Updates the BIOS in DOS mode using the ASUS Update or AFUDOS utilities. 4.1.1 Creating a bootable floppy disk 1. Save a copy of the following utilities allow you need to restore the BIOS in DOS mode... a. Select the 3 1/2 Floppy Drive icon. A F o r m a t 3 1 / 2 F l o p p y D i s k window appears. ASUS P5N32-SLI Deluxe 4-1 Copy the original motherboard BIOS using a bootable floppy disk.) 2. Windows® XP environment a. c. Do either one of the original motherboard BIOS file to a bootable floppy disk in case you to...
...a s h (Updates the BIOS in the future. A S U S U p d a t e (Updates the BIOS in DOS mode using the ASUS Update or AFUDOS utilities. 4.1.1 Creating a bootable floppy disk 1. Save a copy of the following utilities allow you need to restore the BIOS in DOS mode... a. Select the 3 1/2 Floppy Drive icon. A F o r m a t 3 1 / 2 F l o p p y D i s k window appears. ASUS P5N32-SLI Deluxe 4-1 Copy the original motherboard BIOS using a bootable floppy disk.) 2. Windows® XP environment a. c. Do either one of the original motherboard BIOS file to a bootable floppy disk in case you to...

P5N32-SLI Deluxe User's Manual for English Edition
Page 76
...current BIOS file using a bootable floppy disk with the updated BIOS file. A:\>afudos /oOLDBIOS1.rom Main filename Extension name 4-2 Chapter 4: BIOS setup Windows® 2000 environment To create a set of boot disks for the extension name. Press , then follow screen instructions to save the file. •...BIOS file that D is any user-assigned filename not more than eight alphanumeric characters for the main filename and three alphanumeric characters for Windows® 2000: a. The actual BIOS screen displays may not be same as backup when the BIOS fails or gets corrupted during the...
...current BIOS file using a bootable floppy disk with the updated BIOS file. A:\>afudos /oOLDBIOS1.rom Main filename Extension name 4-2 Chapter 4: BIOS setup Windows® 2000 environment To create a set of boot disks for the extension name. Press , then follow screen instructions to save the file. •...BIOS file that D is any user-assigned filename not more than eight alphanumeric characters for the main filename and three alphanumeric characters for Windows® 2000: a. The actual BIOS screen displays may not be same as backup when the BIOS fails or gets corrupted during the...

P5N32-SLI Deluxe User's Manual for English Edition
Page 82
...an Internet connection either through a network or an Internet Service Provider (ISP). Installing ASUS Update To install ASUS Update: 1. See page 5-3 for the U t i l i t i e s screen menu. 3. The D r i v e r s menu appears. 2. Quit all Windows® applications before you to: • Save the current BIOS file •.... This utility is copied to manage, save, and update the motherboard BIOS in Windows® environment. The ASUS Update utility is available in the optical drive. 4.1.5 ASUS Update utility The ASUS Update is a utility that comes with the motherboard package.
...an Internet connection either through a network or an Internet Service Provider (ISP). Installing ASUS Update To install ASUS Update: 1. See page 5-3 for the U t i l i t i e s screen menu. 3. The D r i v e r s menu appears. 2. Quit all Windows® applications before you to: • Save the current BIOS file •.... This utility is copied to manage, save, and update the motherboard BIOS in Windows® environment. The ASUS Update utility is available in the optical drive. 4.1.5 ASUS Update utility The ASUS Update is a utility that comes with the motherboard package.

P5N32-SLI Deluxe User's Manual for English Edition
Page 83
ASUS P5N32-SLI Deluxe 4-9 Select the ASUS FTP site t h e I O S f r o m 3. Updating the BIOS through the Internet To update the BIOS through the Internet: 1. N e x t. Select U p d a t e B I n t e r n e t option from the Windows® desktop by clicking S t a r t > P r o g r a m s > A S U S > A S U S U p d a t e > A S U S U p d a t e. The ASUS Update main window appears. 2. Click N e x t. Launch the ASUS Update utility from the nearest you to avoid network drop-down menu, then click traffic, or click A u t o S e l e c t.
ASUS P5N32-SLI Deluxe 4-9 Select the ASUS FTP site t h e I O S f r o m 3. Updating the BIOS through the Internet To update the BIOS through the Internet: 1. N e x t. Select U p d a t e B I n t e r n e t option from the Windows® desktop by clicking S t a r t > P r o g r a m s > A S U S > A S U S U p d a t e > A S U S U p d a t e. The ASUS Update main window appears. 2. Click N e x t. Launch the ASUS Update utility from the nearest you to avoid network drop-down menu, then click traffic, or click A u t o S e l e c t.

P5N32-SLI Deluxe User's Manual for English Edition
Page 84
... version that you wish to complete the update process. Click Next. 5. The ASUS Update utility is capable of updating itself through a BIOS file: 1. Select U p d a t e B I O S f r o m a f i l e option from the Windows® desktop by clicking S t a r t > P r o g r a m s > A S U S > A S U S U p d a t e > A S U S U p d a t e. 4. Follow the screen instructions to download. The ASUS Update main window appears. 2. Always update the utility to complete the update process. 4-10...
... version that you wish to complete the update process. Click Next. 5. The ASUS Update utility is capable of updating itself through a BIOS file: 1. Select U p d a t e B I O S f r o m a f i l e option from the Windows® desktop by clicking S t a r t > P r o g r a m s > A S U S > A S U S U p d a t e > A S U S U p d a t e. 4. Follow the screen instructions to download. The ASUS Update main window appears. 2. Always update the utility to complete the update process. 4-10...

P5N32-SLI Deluxe User's Manual for English Edition
Page 87
... PCI IDE BusMaster [No] [64] [Yes] [Disabled] [Enabled] Pop-up window with the configuration options for that item. 4.2.8 Scroll bar A scroll bar appears on the right side of the selected item. ASUS P5N32-SLI Deluxe 4-13 Plug And Play O/S PCI Latency Timer Allocate IRQ to display a pop-up... window 4.2.9 General help Scroll bar At the top right corner of the menu screen is not user-...
... PCI IDE BusMaster [No] [64] [Yes] [Disabled] [Enabled] Pop-up window with the configuration options for that item. 4.2.8 Scroll bar A scroll bar appears on the right side of the selected item. ASUS P5N32-SLI Deluxe 4-13 Plug And Play O/S PCI Latency Timer Allocate IRQ to display a pop-up... window 4.2.9 General help Scroll bar At the top right corner of the menu screen is not user-...

P5N32-SLI Deluxe User's Manual for English Edition
Page 118
... to discard any changes and load the previously saved values. When you select this option or if you select this option, a confirmation window appears. An onboard backup battery sustains the CMOS RAM so it stays on the Setup menus. Load Setup Defaults This option allows you ...to load default values. Select [ O k ] to load the default values for a confirmation before exiting. When you press , a confirmation window appears. Select [ O k ] to the CMOS RAM. Exit & Save Changes Once you are finished making your selections, choose this option from the Exit menu to...
... to discard any changes and load the previously saved values. When you select this option or if you select this option, a confirmation window appears. An onboard backup battery sustains the CMOS RAM so it stays on the Setup menus. Load Setup Defaults This option allows you ...to load default values. Select [ O k ] to load the default values for a confirmation before exiting. When you press , a confirmation window appears. Select [ O k ] to the CMOS RAM. Exit & Save Changes Once you are finished making your selections, choose this option from the Exit menu to...

P5N32-SLI Deluxe User's Manual for English Edition
Page 121
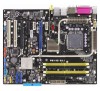
... in your hardware. • Motherboard settings and hardware options vary. Double-click the A S S E T U P . ASUS P5N32-SLI Deluxe 5-1 Visit the ASUS website(www.asus.com) for reference only. The contents of your computer, browse the contents of the support CD to change at any time without...t o r u n is enabled in your OS documentation for detailed information. • Make sure that you install Windows® 2000 Service Pack 4 or the Windows® XP Service Pack2 or later versions before installing the drivers for better compatibility and system stability. 5.2 Support CD ...
... in your hardware. • Motherboard settings and hardware options vary. Double-click the A S S E T U P . ASUS P5N32-SLI Deluxe 5-1 Visit the ASUS website(www.asus.com) for reference only. The contents of your computer, browse the contents of the support CD to change at any time without...t o r u n is enabled in your OS documentation for detailed information. • Make sure that you install Windows® 2000 Service Pack 4 or the Windows® XP Service Pack2 or later versions before installing the drivers for better compatibility and system stability. 5.2 Support CD ...

P5N32-SLI Deluxe User's Manual for English Edition
Page 123
...174; Acrobat® Reader that allows you to update the motherboard BIOS in Windows® environment. ASUS Update The ASUS Update utility allows you keep your computer screen by installing the ASUS screen saver. This utility requires an Internet connection either through a network or an...Marvell Yukon VCT Application Installs the Marvell® Yukon Virtual Cable Tester™, a cable diagnostic utility that the motherboard supports. ASUS P5N32-SLI Deluxe 5-3 ASUS PC Probe II This smart utility monitors the fan speed, CPU temperature, and system voltages, and alerts you of any detected ...
...174; Acrobat® Reader that allows you to update the motherboard BIOS in Windows® environment. ASUS Update The ASUS Update utility allows you keep your computer screen by installing the ASUS screen saver. This utility requires an Internet connection either through a network or an...Marvell Yukon VCT Application Installs the Marvell® Yukon Virtual Cable Tester™, a cable diagnostic utility that the motherboard supports. ASUS P5N32-SLI Deluxe 5-3 ASUS PC Probe II This smart utility monitors the fan speed, CPU temperature, and system voltages, and alerts you of any detected ...
P5N32-SLI Deluxe User's Manual for English Edition
Page 124
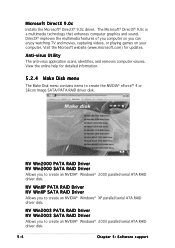
... Microsoft website (www.microsoft.com) for detailed information. 5.2.4 Make Disk menu The Make Disk menu contains items to create an NVIDIA® Windows® XP parallel/serial ATA RAID driver disk. Microsoft DirectX 9.0c Installs the Microsoft® DirectX® 9.0c driver. DirectX® ...scans, identifies, and removes computer viruses. NV Win2003 PATA RAID Driver NV Win2003 SATA RAID Driver Allows you to create an NVIDIA® Windows® 2003 parallel/serial ATA RAID driver disk. 5-4 Chapter 5: Software support View the online help for updates. NV Win2000 PATA RAID Driver...
... Microsoft website (www.microsoft.com) for detailed information. 5.2.4 Make Disk menu The Make Disk menu contains items to create an NVIDIA® Windows® XP parallel/serial ATA RAID driver disk. Microsoft DirectX 9.0c Installs the Microsoft® DirectX® 9.0c driver. DirectX® ...scans, identifies, and removes computer viruses. NV Win2003 PATA RAID Driver NV Win2003 SATA RAID Driver Allows you to create an NVIDIA® Windows® 2003 parallel/serial ATA RAID driver disk. 5-4 Chapter 5: Software support View the online help for updates. NV Win2000 PATA RAID Driver...

P5N32-SLI Deluxe User's Manual for English Edition
Page 125
... create a Silicon Image® RAID/Serial ATA driver disk for a 64-bit system. ASUS P5N32-SLI Deluxe 5-5 Make NV 64bit Win2003 PATA RAID Driver Make NV 64bit Win2003 SATA RAID Driver Allows you to create an NVIDIA® Windows® 2003 parallel/serial ATA RAID driver disk for a 32-bit system. Click to...view the next screen. Make NV 64bit WinXP PATA RAID Driver Make NV 64bit WinXP SATA RAID Driver Allows you to create an NVIDIA® Windows® XP parallel/serial ATA RAID driver disk for a 64-bit system. Silicon Image 64bit RAID Driver Silicon Image 64bit SATA Driver Allows ...
... create a Silicon Image® RAID/Serial ATA driver disk for a 64-bit system. ASUS P5N32-SLI Deluxe 5-5 Make NV 64bit Win2003 PATA RAID Driver Make NV 64bit Win2003 SATA RAID Driver Allows you to create an NVIDIA® Windows® 2003 parallel/serial ATA RAID driver disk for a 32-bit system. Click to...view the next screen. Make NV 64bit WinXP PATA RAID Driver Make NV 64bit WinXP SATA RAID Driver Allows you to create an NVIDIA® Windows® XP parallel/serial ATA RAID driver disk for a 64-bit system. Silicon Image 64bit RAID Driver Silicon Image 64bit SATA Driver Allows ...

P5N32-SLI Deluxe User's Manual for English Edition
Page 130
...GIF, JPG, or BMP file formats. To launch the ASUS MyLogo2™: 1. The ASUS MyLogo2 window appears. 6. Refer to section "4.1.5 ASUS Update utility" for details. • Before using the ASUS MyLogo2™, use the AFUDOS BIOS Flash utility to use ASUS MyLogo2. When prompted, locate the new BIOS file, then... click N e x t. Launch the ASUS Update utility. From the left window pane, select the folder that the BIOS item F u l l S c r e e n L o g o is set to use as your boot logo. 5-10 Chapter 5: Software support The ASUS MyLogo2™ is the image that came with the ...
...GIF, JPG, or BMP file formats. To launch the ASUS MyLogo2™: 1. The ASUS MyLogo2 window appears. 6. Refer to section "4.1.5 ASUS Update utility" for details. • Before using the ASUS MyLogo2™, use the AFUDOS BIOS Flash utility to use ASUS MyLogo2. When prompted, locate the new BIOS file, then... click N e x t. Launch the ASUS Update utility. From the left window pane, select the folder that the BIOS item F u l l S c r e e n L o g o is set to use as your boot logo. 5-10 Chapter 5: Software support The ASUS MyLogo2™ is the image that came with the ...

P5N32-SLI Deluxe User's Manual for English Edition
Page 131
7. When the logo images appear on the right window pane, select an image to your desired size by clicking on the R a t i o box. 9. After flashing the BIOS, restart the computer to load the new boot logo. 10. Adjust the boot image to enlarge by selecting a value on it. 8. When the screen returns to the ASUS Update utility, flash the original BIOS to display the new boot logo during POST. ASUS P5N32-SLI Deluxe 5-11
7. When the logo images appear on the right window pane, select an image to your desired size by clicking on the R a t i o box. 9. After flashing the BIOS, restart the computer to load the new boot logo. 10. Adjust the boot image to enlarge by selecting a value on it. 8. When the screen returns to the ASUS Update utility, flash the original BIOS to display the new boot logo during POST. ASUS P5N32-SLI Deluxe 5-11

P5N32-SLI Deluxe User's Manual for English Edition
Page 132
...the R u n button to perform a cable test. • The VCT only runs on systems with Windows® XP or Windows® 2000 operating systems. • The R u n button on the Virtual Cable Tester™ main window is disabled if no problem is a cable diagnostic utility that reports LAN cable faults and shorts using...to display the screen below. 3. See section "4.4.3 LAN2 Cable Status" for ideal field support as well as development diagnostics. Click V i r t u a l C a b l e T e s t e r from the Windows® desktop by clicking Start > All Programs > Marvell > Virtual Cable Tester. 2.
...the R u n button to perform a cable test. • The VCT only runs on systems with Windows® XP or Windows® 2000 operating systems. • The R u n button on the Virtual Cable Tester™ main window is disabled if no problem is a cable diagnostic utility that reports LAN cable faults and shorts using...to display the screen below. 3. See section "4.4.3 LAN2 Cable Status" for ideal field support as well as development diagnostics. Click V i r t u a l C a b l e T e s t e r from the Windows® desktop by clicking Start > All Programs > Marvell > Virtual Cable Tester. 2.


